August 11, 2014

Knitting: Myrtle Cardigan pt. 6

I previously wrote:
I'm not sure if it is an error in the pattern or my interpretation. I just joined the sleeves by knitting across the row and following the lace pattern. At this point I think the pattern is telling me I should be on row 2 of the lace repeat where I start the armhole decreases. I'm on row 3. I did not know how to join the sleeves into the work without knitting across. This means I will work row 3 and begin sleeve decreases on row 4 (decreases are supposed to occur on the pattern rows). I don't think it will make much difference but the instructions left me a bit perplexed. I read through everything twice more and I followed everything right up until the join sleeves instruction.
And then I had a head slapping moment. You CAN do decreases on the same row as joining sleeves to the body. So I ripped back - thank goodness for that lifeline that I put in just prior to adding the sleeves - and followed the instructions in the pattern on joining the sleeves. And then because it had been so long since I had worked on this, I worked the lace charts in the wrong order. I had to rip back again and start over.

I can safely say that I am on my way. I can also confirm that working only one repeat of the lace up the middle of the sleeves was also the right move. It makes doing the sleeve decreases so much easier. I have worked far enough that I have one extra repeat of the lace in the body. Now to do one more before decreasing for the neck. Fingers-crossed that I have enough yarn.

After working on this for over a year, I think I can see myself actually finishing this.

July 29, 2014

Experts and craftsmanship : who do you trust in the era of slick packaging and presentation?

Vintage sleeve pattern drafts

The age of the Internet has fundamentally changed how we access information. It has changed the way we learn and share. In the sewing community we share projects, ideas, techniques. Some have even found ways to make money doing what they love.

There is a phrase I learned from someone, "You don't know what you don't know."

If you don't know what you don't know, how do you learn what you need to know? How do you even ask the right questions?

Perhaps I'm a bit thoughtful as I struggle to write my book on grading. How do I present a technical skill in an easy to understand, accessible way? The writing process is dragging on because I want to get the instructional information just right. In addition, I recently ran across a mommy blogger who is now teaching others how to grade patterns using patched together measurement charts* cribbed from various sources. I won't link to this particular person, but it gave me pause. Her past experience does not support her current endeavors, but she is perceived as an expert because of slick packaging and presentation. It's not that she can't gain skills and teach others, but where is the dividing line between what you don't know and where you know enough?

An expert is someone who has gained mastery, skills and experience of a particular subject. At what point does someone migrate from a beginner to an intermediate and then expert sewist or master pattern maker? I believe it is a journey of a lifetime. And for many, you only become an expert at one aspect because the overarching subject is too vast. In the industry you specialize, influenced by the first employment opportunity that guides your future.

More thoughts on this topic in the future....

*I've studied these charts and compared them to ASTM charts. Her charts contain proportion problems which may create fit issues.

June 16, 2014

Sleeve cap ease to fit around your shoulder is a myth

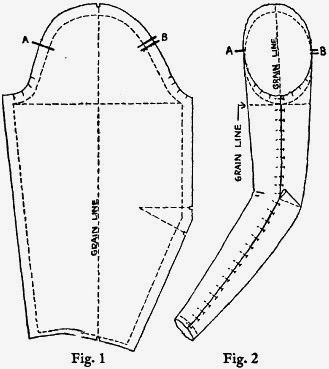
Vintage sleeve pattern draft

My most popular blog entry is Tutorial: Reduce/Remove Sleeve Cap Ease. Excessive ease in set-in sleeves continues to be a source of frustration for many. Still, there are those that continue to insist that sleeve cap ease is necessary in order for a sleeve to fit over the curve of your shoulder. Another well meaning sewist claimed my tutorial only worked for children's clothing (my specialty) because children are smaller, but adults definitely need ease.

Kathleen has written a now classic blog entry, Sleeve Cap Ease is Bogus (including a sequel). She even did a series on how to draft an armhole and sleeve correctly so that no ease is needed (partially gated). It would be worth your time to go back and reread those blog entries.

This idea that ease is needed for proper fit is interesting. Unfortunately, it is a false concept. A sleeve should not fit over the curve of a shoulder. Instead, the sleeve should hang straight down from the shoulder. The shoulder seam needs to extend long enough that it reaches to the widest part or tip of the shoulder. In the picture below you can see the shape of both the shoulder and armhole. This draft will allow the sleeve to hang from the shoulder.

Vintage pattern draft of a suit jacket
Kathleen goes into greater detail about this in her blog entries. If you draft a sleeve as instructed by many pattern making manuals with the recommended 1-2 inches of ease, you will not be able to get beautiful looking sleeves like the ones found being worn by the actors of His Girl Friday. Notice the placement of the armhole seams.

His Girl Friday - notice the nice fitting sleeves

Instead, you will get a sleeve that looks something like this:

A sleeve cap with too much ease
Photo courtesy of Kelly Hogaboom and is licensed under the Creative Commons Attribution-Share Alike 2.0 Generic license.

Sleeve caps with ease amount to lazy pattern making, or at the very least pattern making without knowing better.

Children are really not much different when it comes to fit and pattern design. They do have fewer overall curves, so in many ways pattern making and fit are simpler. What curves they do have though, are smaller. Sewing a set-in sleeve in an infant sized bodice is in many ways more difficult. There is less length to work with and tighter curves. If ease is included it is just enough to allow the operator to get around that smaller circumference easier. The amount of ease is very small (1/4 to 1/2 inch) and is entirely dependent on the fabric. In many cases, it is not needed at all because the differential of a machine can be adjusted.

I can understand if this seems unbelievable. It certainly goes against the grain of conventional sewist wisdom. The best way to know, is to try it for yourself. Try using a pattern with sleeve cap ease and one without. Which sleeve is easier to sew in? Which looks better? At the end of the day, you choose which sleeve you prefer to work with.

June 02, 2014

Knitting: Myrtle Cardigan pt. 5 - joining the sleeves

I have officially surpassed the 1 year mark on knitting this sweater. I've learned a lot about knitting and my personal knitting preferences.

I do like knitting lace. I like the challenge. I enjoy the effort of figuring it out. I like the results. I will knit lace again in the future (probably something simpler!).

This project has been dragging because I don't have the mental or physical energy to work on it in the evenings. Evenings are my knitting time that I use to relax in front of the tv.

You can't watch much television and work on this at the same time. At least I can't. I'm knitting each repeat faster, but each row is taking longer now that the sleeves are attached.

I am now at the most difficult part of the sweater. I am raising the neckline by two repeats. This is the part where I will be doing the decreases for the neck and armholes at the same time. I definitely made the right call to knit the underarms in plain stockinette - a little bit less lace.

I'm not sure if it is an error in the pattern or my interpretation. I just joined the sleeves by knitting across the row and following the lace pattern. At this point I think the pattern is telling me I should be on row 2 of the lace repeat where I start the armhole decreases. I'm on row 3. I did not know how to join the sleeves into the work without knitting across. This means I will work row 3 and begin sleeve decreases on row 4 (decreases are supposed to occur on the pattern rows). I don't think it will make much difference but the instructions left me a bit perplexed. I read through everything twice more and I followed everything right up until the join sleeves instruction.

April 29, 2014

Grading vocabulary - Nest and stack point

As I have attempted to learn how to code (computer programming), I have been stymied by one simple problem. Vocabulary. Most programming manuals or tutorials assume the learner has some basic knowledge about programming and skip explaining essential skills or words. This is even true of the manuals designed for complete idiots and absolute beginners. One good example in the programming world is the word compiler. I understand it on a basic level as a set of instructions that tells the computer how to link various files to create the executable software program.* There are various ways to deal with compilers depending on the programming language and platform used.  I didn't know what compilers there were, which to use, how to write the instructions, etc. All I could find was some pretty lousy examples that I could copy and paste and they magically (or not) worked. I could present dozens of examples of this disconnect as I've stumbled my way through working on SodaCAD.

Grading manuals are similar, at least the ones I have used. They lack sufficient or clear explanations of the most basic of terms. Often times the manual writers skip sizing theory and jump to demonstrating their preferred grading method. This includes the much revered Jack Handford grading manual, the manual I still use and recommend today. Handford's book was the first that helped me understand grading but I recently reviewed the book and noticed the notations I made where I was confused.

One of my goals in writing my grading manual is to include a Grading 101 section. The above drawing is the illustration for two terms.

Nest - pattern pieces within a size range that are stacked along a common point or line. Indicated here by the horizontal line and star.

Stack point - the point at which pattern pieces are aligned, generally located in the middle of the piece but may be located elsewhere (indicated by the star). In CAD grading, the stack point may also be called the point of origin and can be easily moved as needed.

I'm still working on my vocabulary list and guide. If there is a term you have heard and would like explained, please leave a comment below

*I realize I probably just used some vocabulary that the readers of this blog might not know. In any event, it illustrates the problem.