Showing posts with label Dress Forms. Show all posts

June 18, 2006

Making a dressform pt. 6 : More dressform pictures!

I realized I should have posted picts of what my form looks like under the dress. So here they are. At this stage I was still trying to figure out the top cap piece. All that is left is adding the tape to indicate the waistline and ankle. These pictures aren't great. In the top one, it looks like the shoulders are uneven. I think the form was still swinging when I snapped the shot. In the second, it looks like the form's legs are angled toward it's support. I think I was holding the camera at a funny angle. It does hang straight and even....

June 16, 2006

Making a dress form pt. 5 : Finished!


When I started this project, I assumed it would be rather simple. Draft a pattern with no ease and stuff it. Instead, I had to adjust my pattern many times. Plus I had to solve problem of creating an inner structure and stand. Wow, it was a lot of work!

I am generally pleased with how my form turned out. As in all experiments there are many lessons learned. The first, the form companies are charging a fair price. I saved money in materials, but it took me a lot of time and two attempts to get my form right. Second, my form may have a short life. Not all of the materials are the most durable. I imagine I will have to do repairs in the future. Just in case I decide to do this again, I am keeping my patterns!

Earlier I had posted about Aldrich's neck-base measurement being too big. I ended up not altering my form pattern - forgetfulness on my part. I still think her measurement is still a little too big, but as you can see my dress does fit. My earlier problems were from over-stuffing. I kept tight control of the stuffing of my final form.

Someday, I will purchase a real form. For now this one works well. It matches my measurement requirements fairly close. And it does fit my dress!

June 06, 2006

Making a dress form pt. 4 : padding the form with batting

From the picture below, you can see I have made some progress. I have started to pad the papier mache form with batting. I used my original draft from my first form and modified a few seams. In this picture I am trying on the leg - it needed further adjustment, along with the front torso. I also took note on what areas needed a bit more padding. The form is suspended from the stand by a cotton yarn. I will be putting weights into the bottom of the legs to help give it more stability. Already, this version is much better than my previous one, but still not as good as the professionally made forms.

May 27, 2006

Making a dress form pt. 3 : Starting with a good base

I hit upon a bit of inspiration while searching the net for info on how to make a dress form. I kept running into the terms papier mache. The professional forms have a papier mache center. At Vintage Sewing (link no longer works) there is a demonstration on how to pad your own form.

Papier mache is a simple medium to work in, just messy. I bought an all vinyl doll to use as a base. It has smaller measurements than I need - which is perfect to later pad it out. I pulled the doll apart, sprayed it with oil and wrapped plastic wrap around the body. Next, layers of paper and glue. I then cut it off the body and slashed and spread it apart to get better proportions. More layers of glue and paper....

I have the body, done and I am now working on the legs. No pictures yet, but soon. Hopefully, I can start doing the padding next week!

May 10, 2006

Making a dress form pt. 1 : Start by drafting a pattern

Dress forms are expensive - at least the ones used in the industry. You can purchase retail display forms but they will not hold up in the work room. The average professional form averages $1,000. Not many of us have that much cash laying around and I certainly do not. I began to think about making my own dress form. This is an idea that I have seen floated around in vintage sewing books. One of my previous employers also did the same thing and it made me wonder if  I could really do it.

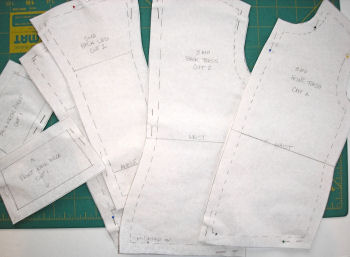
Well I plunged in and drafted Aldrich's classic bodice using metric measurements without ease (size 3mo). I then drafted her sleep-suit block without ease. I had fairly good pictures of a child's full body dress form, so I used that picture to create a more anatomical form. I added shaping for a tummy and rear end. I added 1/2" seam allowances. Here are some of my pieces:


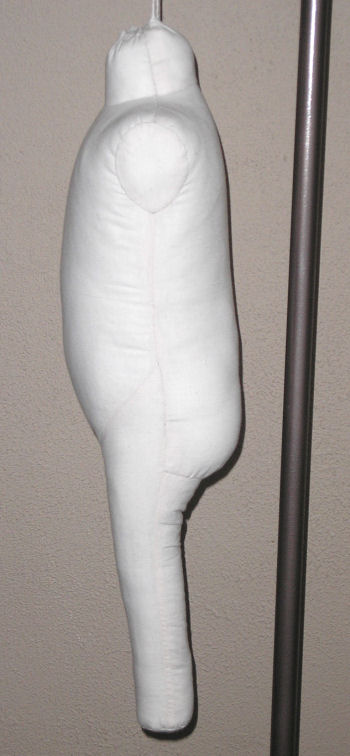
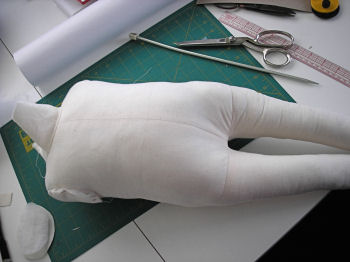
I have already sewn most of it together and stuffed it. I have already discovered some further pattern adjustments for the future. Especially the seam between the front leg and front torso. You can see the wrinkles in the picture below. I think I will angle this line more. The second thing I learned is that to get a truly smooth, surface, you need to create a cardboard body to put inside. I managed to find a piece of lightweight cardboard to put into the torso. I wrapped the cardboard in some pieces of batting and it made a huge difference. Next time, I will add some cardboard tubes to the legs and use a heavier weight of linen, like the professional forms. In this test form, I used muslin. So far, I am fairly pleased.


I have to finish sewing on the armhole pieces and finish up the neck. And then I have to figure out how to suspend this form. I will likely have to create my own stand...