Showing posts with label Pants. Show all posts

July 21, 2008

Product Review: Jacket and Pants set for a child pt. 2

Up next are the pants. I didn't take a picture of the whole pants. Oh well. Here is a closeup of the waistband. The pants have a set-on waist band with elastic only going partway around the waist. The front has a faux fly - typical of this size range. The elastic appears not to be centered correctly - I'll have to look at it again. In any event, this would be a difficult application. The elastic ends are topstitched through the front waistband. I am sure the waist was done this way so that the faux fly would lay flat.

Detail of pant waistband
An inside view of the faux fly. The center front seam is sewn in one operation. No separate pieces here.

Detail of a faux fly on child's pant front
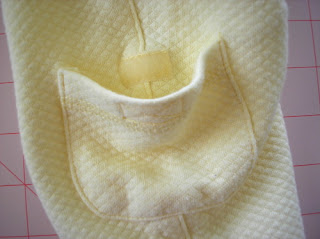
Each pant leg has a patch pocket with velcro closures. Notice that each outseam is also topstitched.
Detail of patch pocket on pant leg
Another close-up of the waist. The elastic is encased in the waist band and not stitched to the top pant edge like the corduroy pants. Because of the fly front, this is probably how the elastic waist has to be done. Still, I don't like the loose edge on the inside.
Detail of construction of elastic waist in child's pant
Guesses about the size can be left in comments here too. Any guesses on the retail price point?

July 10, 2008

Product Review: Corduroy Pants for a toddler


I haven't done a product review in a long time. This is an item randomly pulled from my stash, a pair of elastic waist corduroy pants in size 18 months.

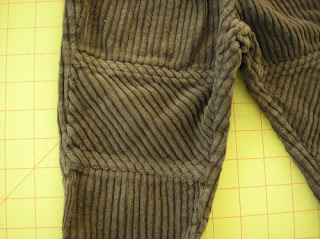
There was a time when this heavy-weight corduroy was popular. Is it still popular for boys? Even though this is a heavy weight corduroy, I don't know that this would be very durable. 18 month old kids spend a lot of time on their knees and bums crawling and scooting around. Most are probably walking, but not all the time. Anyway, you can see it has a pieced front leg with a bias piece over the knee. The waist has tunneled elastic.

Corduroy pants for a toddler
Here is a close-up of the knee. Stitching this fabric can pose challenges because it is a thick fabric. BTW, the fabric is cut nap up (smooth toward the waist). Doing this gives a richer, more luxurious look, but also turns the clothing into a giant lint trap.

Extra padding on a pair of toddler corduroy pants
Here is the inside view of the front leg. One thing you could do to add extra value is to line, possibly interface, the knee piece. It would add some extra durability. But maybe people don't care about that when the pants are $5.


This last picture shows the elastic. I imagine the pattern maker and sample sewer spent a lot of time figuring out the correct cut elastic measurement. The fabric weight and tunnel stitching can cause the elastic to stretch out and not recover properly unless you compensate. The elastic is attached to the waist with an overlock stitch, turned to the inside and topstitched. I don't think there is any other way to do an elastic waist in this fabric. Too bulky otherwise.

January 21, 2008

Grading Pants Notes pt. 3

The following is my final entry on grading infant-toddler pants. Having a copy of the Jack Handford grading manual will be helpful in understanding what these notes mean, especially for this last entry. Hopefully you have at least read the introduction and the instructions for grading a bodice. If you don't have a copy of the book, save these notes anyway - they may come in handy. Part 1 contains an explanation of direction arrows, Part 2 explains notation.

My infant-toddler pants are between knee and mid-calf length. I designed them to peek out just below the skirts of my dresses without distracting from the overall look of the dress. I wanted the trim of the pants barely visible below the skirt hem. So what should be the length grade of my pants?

At the top of the page for the pant grade (i.e., pg 218), Handford states that the grade for various lengths can be determined by studying the grading chart and diagram. The grading chart contains instructions for grading ankle length pants. I don't know why, but it wasn't obvious to me what grade steps to alter. I ended up doing the ankle length grade and decided it was grading to much. Did I mention that I ended up grading my toddler pants three times? Anyway, if you want to grade shorts, or any other length, these are the steps to alter:

Move #5 and #9 (up) is the knee length grade.

Move #6 and #8 is the ankle length grade.

If you want knee length shorts, skip moves #6 & #8. If you want mid-calf length, you could try splitting the difference between the knee length and ankle length grade. Any other lengths will be some variation on the above mentioned moves. If the length is closer to the ankle, follow the ankle grade and vice versa for shorter styles. In other words, these moves are flexible and depend on the style you are grading. It also depends on the personal preference of the individual grader. I graded my pants using the knee-length grade.

One reason I had a little bit of difficulty with determining the length grade has to do with my computerized grading experience. Moves 5 & 6, for example, can be combined in one grading point. The grading of children's patterns can be simplified because the shapes and growth is simpler in some ways. Since you can select an individual grading point and put in relative changes, the moves are interpreted a little bit differently. I am a self-taught grader and it takes me a bit more effort to determine my approach.

Any other question on grading pants? I hope these notes are helpful.