This video gives some sneak peaks about what is in the book! Available for purchase at Amazon and MelanderDesigns.com.

Showing posts with label Pattern making. Show all posts
Showing posts with label Pattern making. Show all posts
July 20, 2022
The Essential Guide to Children's Clothing Sizes and How to Grade Them
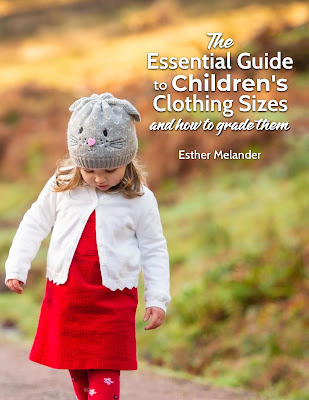
I am excited to announce my new book, The Essential Guide to Children's Clothing Sizes and How to Grade Them. This book explains children's clothing sizes in the United States, how they came about, and what sizes are used today. This book includes many things that have never been included in books on children's clothing design in the past.
- A break down and explanation of children's clothing sizes from Preemie to size 16, including boys sizes.
- A brief overview of difficulties in the industry, including obesity, and sleepwear
- An explanation of how create your own grade rules.
- Step-by-step instructions on how to grade basic styles, including grade rule charts.
- Body measurement charts for infants to size 14, including slim and plus sizes for older children.
- The infant measurement chart includes head circumference, neck circumference, hand length and width, foot length and width -- measurements that are hard to find.
- Extra grade rule charts that include Newborn and size 9 months.
- CAD grade rule charts
- Complete measurement studies with additional body measurements, grade rules and references for infants, toddlers, 4-6x, girls (7-14), boys, and young men.
May 26, 2015
Grading from body measurements pt. 3
This is part three of an ongoing discussion about N. A. Schofield's
article Pattern Grading found in the Sizing in Clothing book. Part one
is here, part two here. I recommend reading the previous parts of this series before reading this one.
So what were the results of Schofield's experiment? I can't reproduce the actual results here, but it was something like this.
 Imagine the square is a bodice pattern piece in one size. The star is supposed to be the same pattern piece but graded to the next size. Clearly, the two shapes have no proportional relationship to each other. The problem is further compounded by a different grade for corresponding pieces.
 Imagine these are front and back bodice pattern pieces. Each corresponding pattern piece was graded separately based on the measurement data for that body location. Now imagine trying to sew the front and back together. It can't be done. Schofield freely admits the difficulty in the results. Though she also believes we need to learn how to deal with new shapes in pattern pieces in order to achieve superior fit.
Schofield's experiment left me with a lot of questions. I did not understand completely why she rejected the ASTM measurement data, nor why she went back to essentially raw data. Her grading methodology left me a bit confused. The results were clearly not suitable for industry application. Superior fit is the holy grail of fashion, but I'm not convinced that grading is the entire source of the problem. Superior fit, for each individual might only be achieved on an individual basis. In this case, 3D body scanning and customized clothing is the answer, but is it practical?
I would like to see this experiment repeated. The factors that will impact additional experiments are the measurement data and grading methodology. Why not use ASTM measurement data? Why not use traditional grading methods? I always support those who are willing to test ideas and theories. This was a worthy attempt by Schofield to ask important why and how questions.
So what were the results of Schofield's experiment? I can't reproduce the actual results here, but it was something like this.


Schofield's experiment left me with a lot of questions. I did not understand completely why she rejected the ASTM measurement data, nor why she went back to essentially raw data. Her grading methodology left me a bit confused. The results were clearly not suitable for industry application. Superior fit is the holy grail of fashion, but I'm not convinced that grading is the entire source of the problem. Superior fit, for each individual might only be achieved on an individual basis. In this case, 3D body scanning and customized clothing is the answer, but is it practical?
I would like to see this experiment repeated. The factors that will impact additional experiments are the measurement data and grading methodology. Why not use ASTM measurement data? Why not use traditional grading methods? I always support those who are willing to test ideas and theories. This was a worthy attempt by Schofield to ask important why and how questions.
April 16, 2015
Grading from body measurements pt. 2
This is part two of an ongoing discussion about N. A. Schofield's article Pattern Grading found in the Sizing in Clothing book. Part one is here.
My initial reaction to the idea of grading from body measurements was, "Well, of course we should." And in fact, we do for children's clothing. It seemed rather obvious to me to look at children's clothing as a model. Children's sizing is based on the idea of growth, meaning that the measurement intervals between sizes are not always consistent.
Let's look at an example for a 4-6x size range.*
For sizes 4, 5, 6, 6x
Chest: 23, 24, 25, 25.5
Waist: 21.5, 22, 22.5, 23
Hip: 23.5, 24.5, 25.5, 26.5
The grade works out to be, choosing size 5 as the base size:
Chest: 1, 0, 1, 1.5
Waist: 0.5, 0, 0.5, 0.5
Hip: 1, 0, 1, 1
In this example, we have a 1" chest grade, except for size 6x which is 1.5". The waist is a 0.5" inch grade and the hip returns to a 1" grade for all sizes. Each body measurement area has it's own grade.
In women's clothing a 2" grade means that the interval change between the sizes will be 2" for chest, waist, and hips. Though even this isn't true across all brands, and you will find variations. (IMO, this is a good thing)
I don't know the history of women's sizing well enough to explain how this mode of practice came to be nor exactly why. It is clear that it does make grading, especially hand grading, much easier in practice. It is also unclear to me that grading is the source of our fitting woes. Nevertheless, it does make sense to me to go back and look at body measurements and devise a more precise grade rule.
The question then becomes, which body measurements do we use? In my children's example above, the numbers are still nice and easy to work with. The body measurements have been intentionally manipulated to be easy to work with. Raw measurement data was averaged, sorted, and studied to arrive at some numbers. Those numbers were not easy to work with, so a group of industry professionals sat down and made them that way. They modified certain measurements by about 1/8" to achieve consistency. Their modifications were rather minor and easily fall within a statistical margin of error. If you read their reasoning, it makes sense. This manipulation of measurement data for ease of use continues today in more modern measurement studies. It seems deceitful, but at the end of the day is infinitely practical. ASTM D4910 inherits this method of data handling from the measurement studies done in the 1940s, but does provide some updated measurements.
Looking at the Misses body measurement chart, ASTM D5585, it seems to be arranged and handled in the same way as the children's body measurement chart. IOW, the chart does not show a 1, 1.5, or 2 inch grade in the body measurements. It is a lot like the children's example above. There does seem to be a disconnect between measurement data and grading, at least on the surface. Individual companies will decide how to interpret and implement measurement data, and therefore their grade rules. (IMO, I think this is a good thing). And some will use a 2 inch grade, and some will not.
So what measurement data did Schofield use? She rejected the ASTM charts and created her own version of measurements derived from body measurement studies. This presented a problem because measurement studies do not always include the measurements needed for pattern making and grading. Schofield did not normalize the data, in other words make it easy to work with. Also she had to figure out how to deal with missing measurement data. I no longer have a copy of the article and can't look back, but Schofield selected certain measurements over others. How and why she handled those measurements puzzled me.
I believe Schofield's goal was to remove the idea of maintaining an ideal proportion or predictable pattern shape. She wanted to see what the body measurements really did between sizes.
Her results were almost predictable. More on that later.
*These measurements come from the withdrawn child measurement standard CS151-50. Measurements are in inches.
April 09, 2015
Grading from body measurements pt. 1
Pattern grading is the process by which new sizes are developed from an existing pattern. There are various methods or processes used to grade a pattern. These methods include slash-and-spread, shifting, and CAD. At the end of the day, each method accomplishes the same thing, a new size.
The apparel industry has received a lot of criticism for their sizing, especially of women's clothing. At it's core, sizing goes hand-in-hand with pattern grading. You have to define your sizes in order to grade a pattern. In order to grade a pattern you have to know body measurements for each size. The common grade rules for women's apparel is the 1", 1.5" and 2" grade rules used in the United States. Similar grade rules are found in Europe and the UK. The primary criticism is that these grade rules are not based on anthropometric data, or actual body measurements. Instead these grade rules are just pulled out of a hat without regard to women or their fitting needs. These arbitrary grade rules are merely for the convenience of industry.
This is the point of view taken by N. A. Schofield in her article Pattern Grading found in the Sizing in Clothing book. The goal of her research was to test the idea of creating grade rules based on actual body measurements rather than an arbitrary grade rule. There has been a lot of criticism of the industry over sizing and it is a worthy goal to research alternatives. Asking the why questions. Why does the apparel industry do things the way they do? Why do we grade women's clothing this way? Can we do it differently? I've asked a lot of these same questions as I've looked at children's clothing. When I started out, I didn't understand the why and sometimes the answer was not satisfying. I can totally get behind Schofield's motivation to try and find an answer.
And yet, I feel like I am setting up to be very critical of Schofield's research and I don't want to give the impression, as an industry professional, that even asking the questions were wrong. She was right to ask the question and to test an alternative. The results of her research are interesting and ironically (and indirectly) add support to current practices.
So here are some of Schofield's main arguments:
1. 1", 1.5", and 2" grade rules are not based on anthropometric data. Meaning it is not based on body measurements or the proportional relationships between body parts/areas. These grade rules were intended for the convenience and ease of hand grading.
2. Grade rules should be derived from body measurements. This means that grade breaks between bust, waist, and hips should not be consistent. Instead of a 34-36-38 chest measurement, we should be seeing a 34-35.5-38 (just as an example), chest measurement.
3. Size prediction and also body measurement prediction needs refinement. This idea is rather complex. Body measurement studies create a lot of raw data. In order to make sense of it, statisticians will test size prediction by using one or two body measurements. So can you predict the overall body size by using just the height or chest measurement? And if you do that, what influence does that have on other body measurements? If a person gets taller, do they also get wider? It is a complex question and not easily answered because there are so many variables. Statisticians bring order to raw measurement data so that we can organize the body measurements into sizes. They do this by averaging and, in some cases, normalizing the data so we can work with it easily. Schofield implies that we should just rely on the raw measurement data.
The ultimate goal of this study was to improve overall fit of women's apparel by basing grade rules on actual body measurements. I'll have to break up my review of this study into multiple blog entries because I have a lot to say about it. So stay tuned.
March 10, 2015
A t-shirt refashion maybe

So I pulled out my TNT t-shirt pattern that I made a few years ago. My initial thought was to just cut down the shirt to match the fit of my pattern. Essentially using the t-shirt as a fabric rather than a shirt.
There are a few problems that stopped me. First is the casing. I debated on cutting out the casing and just having a band on the bottom hem but I was concerned the seam would be in a weird place. The next problem was the sleeve. There really isn't enough fabric to recut the sleeve.
Looking now at the picture, I wonder if I should take in the sides and call it good? What do you think?
March 05, 2015
Communicating size and fit through size labels and charts
The primary way most clothing brands communicate size information is through a size label. This works in most retail settings. Online (and print catalog) clothes shopping adds the benefit of including an easy to use, sometimes interactive size chart. Additional instructions on how to measure yourself is also helpful.
None of these solutions are completely fool proof. First, the manufacturer interprets and adapts measurement data to meet the needs of their identified customer. This means they have created and implemented a size system in anticipation of what their customer wants. But a customer may want something to be closer/looser fitting, and shorter/longer lengths than the manufacturer. How does one balance size and fit for a diverse population with ever shifting expectations?
The current trend among new fashion companies is to design for a very narrow customer profile. By targeting a very specific customer, the manufacturers can optimize the fit of their brand to their customer. Larger big box brands have to fit a wide range of body shapes and sizes and their clothes will never fit as well as a more exclusive brand. In some cases a manufacturer will modify their sizes for an existing size system, so that they change what a size means for their target market. In other words, a size 8 for one brand will mean something entirely different for another. This is why there is so much variation in the marketplace between brands.
On the surface this sounds like vanity sizing run amok. If manufacturers change the underlying sizes to fit their version of a size, then surely they are deceiving us into believing we are a smaller size than we truly are. Truth in advertising and all that, right?
The problem with only one size standard across brands is that it does not allow for variation. Women in particular have a large variety of body shapes and sizes. Because manufacturers are free to adapt to meet the needs of their customers having multiple versions of a size will allow people to find the version that fits them best. Once they do, and if the styling is right, they will become loyal customers.
The problem comes back to how to communicate that to the customer. As I said at top, providing more information helps the customer to make a more informed choice. And that is the true challenge.
*This blog entry is part of my on going review of Sizing in Clothing, and is a discussion inspired by the article, Communication of sizing and fit by J. Chun. This article goes into a little more depth about how sizes have evolved and what they might mean.
 | ||
| A pictogram showing body dimensions for a specific size. |
The current trend among new fashion companies is to design for a very narrow customer profile. By targeting a very specific customer, the manufacturers can optimize the fit of their brand to their customer. Larger big box brands have to fit a wide range of body shapes and sizes and their clothes will never fit as well as a more exclusive brand. In some cases a manufacturer will modify their sizes for an existing size system, so that they change what a size means for their target market. In other words, a size 8 for one brand will mean something entirely different for another. This is why there is so much variation in the marketplace between brands.
On the surface this sounds like vanity sizing run amok. If manufacturers change the underlying sizes to fit their version of a size, then surely they are deceiving us into believing we are a smaller size than we truly are. Truth in advertising and all that, right?
The problem with only one size standard across brands is that it does not allow for variation. Women in particular have a large variety of body shapes and sizes. Because manufacturers are free to adapt to meet the needs of their customers having multiple versions of a size will allow people to find the version that fits them best. Once they do, and if the styling is right, they will become loyal customers.
The problem comes back to how to communicate that to the customer. As I said at top, providing more information helps the customer to make a more informed choice. And that is the true challenge.
*This blog entry is part of my on going review of Sizing in Clothing, and is a discussion inspired by the article, Communication of sizing and fit by J. Chun. This article goes into a little more depth about how sizes have evolved and what they might mean.
February 10, 2015
Size standardization for clothing
In academic circles there is the idea that we need one measurement and sizing standard to solve all our fitting problems. A top down approach with no allowance for variation. Customers often complain that manufacturers have no idea what they are doing because nothing ever fits. Manufacturers face an enormous challenge in trying to interpret size specifications while at the same time meeting the needs of their customers. The more I read about sizing the more chaotic it seems. At the end of the day there is more than one way to look at size standardization, and I think only one battle to fight.
One standard to rule them all
Yes, the idea that one standard can be established for everyone. By forcing compliance we will have peace on earth, and yes, our clothes will fit! Considering the variety of shapes and sizes in the United States alone, the idea is really a fantasy.
Loosely conforming to a standard while yet adapting to meet a customer's need.
Even if one standard to rule them all is unrealistic, we still need a standard. ASTM and the latest Sizing USA study have provided us with a standard that any manufacturer can use (for a price, of course). These measurement and sizing specs can act as a guide, a place to start. As a manufacturer develops their customer profile, they can adapt these standards to meet the needs of their customer.
Over the years, it's important to compare your product against these standards. I've seen patterns and sizing drift from these standards naturally through errors. These errors are not intentional, they just happen and can easily pass from one style to the next. So a careful study and comparison can bring things back. This includes measuring fit models and comparing them against the standard and analyzing customer returns due to fit issues.
In-house size standardization
Once a sizing standard is established for a brand, it is important to adhere to that standard during product development. As an example, all new pants styles have the same finished length and waist sizes as specified. Variations in fit can come from multiple sources due to fabric variations (or problems), construction issues (taking too big/small a seam allowance, cutting errors), or variations in a pattern. You have to be careful not to draft a pattern from scratch every time. Pattern makers in the industry will use the patterns from an already proven style to develop the new style. This practice ensures consistent fit across styles. A quality control process through each step of development and production is necessary to find problems before they become big ones.
A few words on vanity sizing
Vanity sizing implies that a manufacturer wilfully chooses to ignore a size standard and relabel a size smaller than it actually is. I do not believe there is a vast conspiracy to do this intentionally. Instead I think manufacturers are trying to meet the needs of their customers while trying to conform to a standard.
*This blog entry was inspired from my reading in the book Sizing in Clothing and more specifically the article Sizing Standardization by K. L. LaBat. I made very few notes on this article and don't remember much of what I read. I did make a note that LaBat tried to prove the existence of vanity sizing by studying children's age-based sizing. I thought the argument was rather weak.
One standard to rule them all
Yes, the idea that one standard can be established for everyone. By forcing compliance we will have peace on earth, and yes, our clothes will fit! Considering the variety of shapes and sizes in the United States alone, the idea is really a fantasy.
- One standard guarantees that some of the population will not have any clothes that fit. One could argue this situation exists today, so why not try one standard. With no allowance to adapt to fit the wide range of shapes and sizes, then outliers will never have clothes that fit.
- Our population is constantly changing. The most recent sizing study revealed that we are taller and weigh more than we did in the past. One standard would quickly become outdated.
- Sizing studies are very expensive and labor intensive. Studies are not done frequently, so manufacturers will always be behind what is happening in the real world.
Loosely conforming to a standard while yet adapting to meet a customer's need.
Even if one standard to rule them all is unrealistic, we still need a standard. ASTM and the latest Sizing USA study have provided us with a standard that any manufacturer can use (for a price, of course). These measurement and sizing specs can act as a guide, a place to start. As a manufacturer develops their customer profile, they can adapt these standards to meet the needs of their customer.
Over the years, it's important to compare your product against these standards. I've seen patterns and sizing drift from these standards naturally through errors. These errors are not intentional, they just happen and can easily pass from one style to the next. So a careful study and comparison can bring things back. This includes measuring fit models and comparing them against the standard and analyzing customer returns due to fit issues.
In-house size standardization
Once a sizing standard is established for a brand, it is important to adhere to that standard during product development. As an example, all new pants styles have the same finished length and waist sizes as specified. Variations in fit can come from multiple sources due to fabric variations (or problems), construction issues (taking too big/small a seam allowance, cutting errors), or variations in a pattern. You have to be careful not to draft a pattern from scratch every time. Pattern makers in the industry will use the patterns from an already proven style to develop the new style. This practice ensures consistent fit across styles. A quality control process through each step of development and production is necessary to find problems before they become big ones.
A few words on vanity sizing
Vanity sizing implies that a manufacturer wilfully chooses to ignore a size standard and relabel a size smaller than it actually is. I do not believe there is a vast conspiracy to do this intentionally. Instead I think manufacturers are trying to meet the needs of their customers while trying to conform to a standard.
*This blog entry was inspired from my reading in the book Sizing in Clothing and more specifically the article Sizing Standardization by K. L. LaBat. I made very few notes on this article and don't remember much of what I read. I did make a note that LaBat tried to prove the existence of vanity sizing by studying children's age-based sizing. I thought the argument was rather weak.
January 27, 2015
Creating sizing systems for clothing
This is a continuation of my review of Sizing in Clothing. The previous blog entries are History of Sizing, and the Book Review.
What does it take to create a sizing system? We often taken for granted a size chart on a retail website or print catalog. And when something doesn't fit, it's easy to blame the size system used by the manufacturer. And we've all been there. Shopping for blue jeans or a swimsuit causes a lot of anxiety and stress as we go through more than one size to find something that fits. A. Petrova discussed all of the variables that go into making those size charts that help you select the right size in the article Creating Sizing Systems found in the Sizing in Clothing book.
So what does it take? The first big step is to measure a population and then to divide that population into various body shapes such as Misses, Petites, Tall, Plus, etc. Each category is defined by certain control dimensions such as height, weight, waist, chest, hips, or whatever is considered the key dimensions. Usually there are 3-4 key body measurements. These kind of measurement studies are expensive and are usually undertaken by government, universities, and trade organizations.
Next, each category is subdivided into sizes contained within a size range. Each category is labelled a size designation. It could be Small-Medium-Large, or numbers such as 2, 4, 6, 8, 10. These size labels are meaningless until associated with a set of body measurements. (We could get into a discussion of vanity sizing here but it really doesn't matter what you call a size. It's the underlying body measurements that are key). In the US, we are accustomed to knowing what size to start with when shopping without knowing our body measurements. In the EU, there are similar difficulties though there has been some push to adopt the centilong system. This system identifies a size by height with some corresponding girth measurements. Not all European manufacturers have done this and some are as inconsistent in application as their American counterparts.
A. Petrova continues the article with some ideas on how to develop size systems or charts based on garment styles versus just body measurements. The biggest disadvantage to this idea is that the customer would need to know several size scales when shopping, making shopping a complicated experience. The advantage is that fit could be fine tuned, maybe.
So who is to blame when clothes don't fit? Is it the size chart? Maybe, maybe not. There are so many variables that it is hard to select just one reason. The fit model used in pattern development may match the size chart, but not be representative of the consumer. In other words there could be a mismatch between expectations and reality between the manufacturer and the customer. Grade rules may not match or equal actual body grades - which is a discussion for another article. Perhaps the size chart information was incomplete, lacked sufficient instruction, or had a typo. Poor construction or poor fabric quality play a factor. When analyzing sales information and returns, all of these things have to be considered.
 |
| By Downtowngal (Own work) [CC BY-SA 3.0], via Wikimedia Commons |
So what does it take? The first big step is to measure a population and then to divide that population into various body shapes such as Misses, Petites, Tall, Plus, etc. Each category is defined by certain control dimensions such as height, weight, waist, chest, hips, or whatever is considered the key dimensions. Usually there are 3-4 key body measurements. These kind of measurement studies are expensive and are usually undertaken by government, universities, and trade organizations.
Next, each category is subdivided into sizes contained within a size range. Each category is labelled a size designation. It could be Small-Medium-Large, or numbers such as 2, 4, 6, 8, 10. These size labels are meaningless until associated with a set of body measurements. (We could get into a discussion of vanity sizing here but it really doesn't matter what you call a size. It's the underlying body measurements that are key). In the US, we are accustomed to knowing what size to start with when shopping without knowing our body measurements. In the EU, there are similar difficulties though there has been some push to adopt the centilong system. This system identifies a size by height with some corresponding girth measurements. Not all European manufacturers have done this and some are as inconsistent in application as their American counterparts.
A. Petrova continues the article with some ideas on how to develop size systems or charts based on garment styles versus just body measurements. The biggest disadvantage to this idea is that the customer would need to know several size scales when shopping, making shopping a complicated experience. The advantage is that fit could be fine tuned, maybe.
So who is to blame when clothes don't fit? Is it the size chart? Maybe, maybe not. There are so many variables that it is hard to select just one reason. The fit model used in pattern development may match the size chart, but not be representative of the consumer. In other words there could be a mismatch between expectations and reality between the manufacturer and the customer. Grade rules may not match or equal actual body grades - which is a discussion for another article. Perhaps the size chart information was incomplete, lacked sufficient instruction, or had a typo. Poor construction or poor fabric quality play a factor. When analyzing sales information and returns, all of these things have to be considered.
January 20, 2015
Relying on old body measurements and pattern drafting instructions

There is a certain bit of nostalgia when looking back in time. We often say, "They don't build things like they used to," implying that we paid closer attention to quality and details. This same kind of thinking is also found in pattern making and sewing. There is a general assumption that the way things were done in the past are better then they are now. Some pull out old measurement charts and drafting instructions to recreate the past for a better present. We don't even have to go very far. There is the hope of a stylish outfit made of a 1950's sewing pattern and thinking that it will fit.

Before I go any further, let me say there is nothing wrong with looking backward and trying to understand how things were done. It is a fun exercise to draft a pattern using old instructions or sewing up that vintage pattern. This is about using old body measurement data and pattern drafting instructions to create modern clothing.
There are some key factors that make up a size - height, weight, girth, and shape. I suppose in the 1890s pattern makers and tailors were just beginning to understand the relationships between each of those factors. At least for men's clothing. Women's clothing was still a guessing game requiring customized fit. It wasn't until the 1940s that we began to see the connection to height, weight, and girth. Statistical analysis could finally show that when one factor changes, the others do as well. The studies done by Ruth O'Brien and her committee allowed us to see and understand body proportions and shapes and use that information to predict overall size. This information was not truly implemented until the 1950s and 1960s. Other studies have come along to add to our knowledge. A study in the early 1970s expanded our knowledge of children's body measurements. Another study, SizeUSA, was released in 2004 and greatly enhanced our knowledge of the US population using 3D body scanners.*
If you draft a pattern using older drafting instructions and body measurement charts, you will create something that is based on that time's understanding of body proportions and measurements. If that is your goal, then all is well and good. But if you find a free measurement chart dating back even 50 years, then you are placing your product in the 1950s.
We know this because not only has our understanding of anthropometry increased, but we know that the body measurements of a population change over time. If you are interested in creating your own line, it is in your best interest to obtain the most recent (and reliable) measurement data you can.
*Unfortunately the SizeUSA data is held behind a very expensive lock and key. Access is only available to those willing to pay a pretty hefty sum despite the study receiving tax dollars. Some ASTM body measurement charts have been updated to incorporate the study data. The ASTM children's body measurement chart is a mash-up of data that incorporates multiple studies dating back to Ruth O'Brien's 1941 study and some more modern data.
January 13, 2015
What size is your pixel? Precision drawing in Inkscape and Adobe Illustrator
Last September I began to follow a discussion on pixels in the Inkscape Developer's mailing list. The concern was centered around units and how they are used in Inkscape. In the early days of graphical drawing it was assumed the user would want to see their drawing full scale. In other words if you drew a box that was 1 inch square, you would want to see that displayed on the screen. In order for that to happen, a definition had to be created to tell the computer how many pixels were equivalent to one inch.
Inkscape and Adobe Illustrator are vector drawing programs. This means that drawing lines and objects are stored on the computer as mathematical equations. Vector drawing programs are known for their precision, accuracy, and scalability. Programs like Gimp and Photoshop are raster-based drawing programs, programs that allow you to manipulate individual pixels. You cannot scale images up, only down, because the computer cannot fill in the holes. Lines are fuzzy because they are built of individual pixels. Both pieces of software have their advantages for different uses. The differences have begun to blur in the last few years. Inkscape and AI can now do things that were exclusively in the domain of Photoshop, and yet store the drawing as a vector drawing. Of course, Inkscape and AI are used in an environment in which the vector drawing is displayed via Pixels.
There is one reason to bring this topic up, as complex and boring as it may be. There is an increasing trend among indie pattern makers in the use of Inkscape and Adobe Illustrator for pattern making. In fact, you can take classes on the subject from various sources. These software programs do work - to a point. I've noticed with Inkscape a tendency for a certain fuzziness. I've created precise drawings where I've entered the dimensions and printed them. The measurements of the printed drawing were always a little off. Inkscape is not entirely at fault, though the developers have worked on improving this in the up coming release. There are a lot of variables that we have to contend with. Your display, drawing, and printer all play a factor in the accuracy of the measurements used.
The best way to test your current setup is to draw a square in your program, such as 1 inch x 1 inch. Print it out and measure it. Be sure to look at the print quality and width of your lines. Are the lines cleanly and clearly defined? Does your square measure as expected? Do you have to measure to the outside or inside of the line to achieve the desired measurement?
I took some time to test Inkscape with my current display and printer. First, I'll show you the printed results.
 The print out is pretty good. I drew a 2 inch square and it printed out as a 2 inch square. BTW, this was a square with a 1px stroke and no fill. You would think with these results, there would be no problem.
 But next, I measured what I saw on the screen. The 2 inch square actually measures 1.875" x 1.875". If this were an actual pattern piece, an 1/8" can make a difference, especially in grading. This kind of error would become magnified with each grade step. Also, the placement of critical components such as pockets, drill holes, buttonholes, seam allowances, darts, and notches could all be off by just a little bit. This is part of the problem that the Inkscape developers were concerned about.
And here is where the fuzzy math comes in.

I drew a square and entered in the exact dimensions for width and height of 2.000. Clicking off the square and then reselecting it shows that the square now measures 2.011 x 2.011 inches. Not a big deal if creating a drawing for the web or a poster. But it is a big deal when creating a precise drawing. As a user, until I print something out, I have no idea if the drawing will measure as expected. If I make adjustments, I have to take into account what I see on the screen and what Inkscape reports back to me. Fuzzy, much?
I don't know if this is a bug specific to Inkscape (0.48) or my hardware. I also don't know if this will be true in the next release (0.91). I don't know how Adobe Illustrator tests out. I do know that Inkscape and AI are not the greatest tools for pattern making and grading.
Perhaps you are thinking this is much to do about nothing. If it mostly works, then why worry about it? Specialized apparel CAD systems are optimized to not only create high precision drawings, but to do it efficiently. Sure Inkscape and AI have their place, maybe they will work for you. But if you really want to get to the next level, you need the right tools.
In digital imaging, a pixel, pel,[1] or picture element[2] is a physical point in a raster image, or the smallest addressable element in an all points addressable display device; so it is the smallest controllable element of a picture represented on the screen. The address of a pixel corresponds to its physical coordinates. LCD pixels are manufactured in a two-dimensional grid, and are often represented using dots or squares, but CRT pixels correspond to their timing mechanisms and sweep rates. (Wikipedia)Over the years pixel sizes, and screen resolutions, have changed. We have far superior displays on our desktops then those early developers did. We can fit more pixels into that one inch than was ever thought possible. The whole discussion about pixel sizes and resolutions, gets rather complicated. Generally speaking, what a user sees on screen is what they want to get in print. How to achieve that is rather difficult.
Inkscape and Adobe Illustrator are vector drawing programs. This means that drawing lines and objects are stored on the computer as mathematical equations. Vector drawing programs are known for their precision, accuracy, and scalability. Programs like Gimp and Photoshop are raster-based drawing programs, programs that allow you to manipulate individual pixels. You cannot scale images up, only down, because the computer cannot fill in the holes. Lines are fuzzy because they are built of individual pixels. Both pieces of software have their advantages for different uses. The differences have begun to blur in the last few years. Inkscape and AI can now do things that were exclusively in the domain of Photoshop, and yet store the drawing as a vector drawing. Of course, Inkscape and AI are used in an environment in which the vector drawing is displayed via Pixels.
There is one reason to bring this topic up, as complex and boring as it may be. There is an increasing trend among indie pattern makers in the use of Inkscape and Adobe Illustrator for pattern making. In fact, you can take classes on the subject from various sources. These software programs do work - to a point. I've noticed with Inkscape a tendency for a certain fuzziness. I've created precise drawings where I've entered the dimensions and printed them. The measurements of the printed drawing were always a little off. Inkscape is not entirely at fault, though the developers have worked on improving this in the up coming release. There are a lot of variables that we have to contend with. Your display, drawing, and printer all play a factor in the accuracy of the measurements used.
The best way to test your current setup is to draw a square in your program, such as 1 inch x 1 inch. Print it out and measure it. Be sure to look at the print quality and width of your lines. Are the lines cleanly and clearly defined? Does your square measure as expected? Do you have to measure to the outside or inside of the line to achieve the desired measurement?
I took some time to test Inkscape with my current display and printer. First, I'll show you the printed results.


And here is where the fuzzy math comes in.

I drew a square and entered in the exact dimensions for width and height of 2.000. Clicking off the square and then reselecting it shows that the square now measures 2.011 x 2.011 inches. Not a big deal if creating a drawing for the web or a poster. But it is a big deal when creating a precise drawing. As a user, until I print something out, I have no idea if the drawing will measure as expected. If I make adjustments, I have to take into account what I see on the screen and what Inkscape reports back to me. Fuzzy, much?
I don't know if this is a bug specific to Inkscape (0.48) or my hardware. I also don't know if this will be true in the next release (0.91). I don't know how Adobe Illustrator tests out. I do know that Inkscape and AI are not the greatest tools for pattern making and grading.
Perhaps you are thinking this is much to do about nothing. If it mostly works, then why worry about it? Specialized apparel CAD systems are optimized to not only create high precision drawings, but to do it efficiently. Sure Inkscape and AI have their place, maybe they will work for you. But if you really want to get to the next level, you need the right tools.
January 08, 2015
The history of standardized sizes for clothing
Do you ever wonder how people came up with the idea of sizing clothes? The creation of sizes allowed for the mass production of ready-to-wear garments. It was not created at a meeting of industry professionals, but evolved over time. Great leaps in sizing occurred because of war - somebody had to quickly and efficiently outfit an army.
Winifred Aldrich traces the development of sizes and ready to wear in her article History of Sizing and Ready-to-Wear Garments found in the Sizing in Clothing book*. Aldrich is a British pattern maker, designer, and researcher. I own two of her pattern drafting manuals and consider them among the best drafting manuals available (link in the sidebar to the left for the children's drafting manual). She knows her stuff, and she presents it well.
The understanding of body proportions began slowly with tailors producing clothing for men. They used strips of paper to measure the body and transfer the measurements to cloth. In time tailors devised tape measures and drafting systems. A size was not the beginning of the drafting job, rather the completed garment represented the size of the customer. As the industrial revolution progressed, tailors began to teach and sell their drafting systems. This included some already drafted patterns, sometimes in more than one size.


The concept was revolutionary and men began to be able to purchase their clothing ready made. Women, on the other hand, still had most of their clothing custom made into the early 20th century. There were attempts at creating patterns for women with named sizes, but it still required customization. There was a lack of knowledge of women's body measurements most likely because of the Victorian ideals of the time.

It is important to understand that our understanding of body measurements and proportions were not formalized until the 1940's. Ruth O'Brien, an employee of the U.S. Department of Home Economics and the Department of Agriculture, was commissioned to conduct a body measurement study of the American population. The purpose was to create a set of size standards based on reliable data that the apparel industry could use. The work involved in this study was enormous and revolutionary. O'Brien and her department created a measurement procedure that is still in existence today (only to be superseded by 3D body scanning). The data from these studies have been study and analyzed around the world.
To put this in perspective, it wasn't until the 1940s that we could finally see and understand human proportions with any clarity. It's easy to pan this early work as outdated and wrong but the 1940's was not that long ago. We still have so much to learn and understand.
A fun little factoid. Grading using the shifting or slide method, a common method still used today, can be traced back to 1908.
Aldrich's article goes into much more depth about the history of sizing. She includes pictures of early patterns and sizing systems. It is well worth a read if you can get a copy of it. This article is a combination and expansion of two previously written articles found in the journal Textile History.
*As I review individual articles from the Sizing in clothing book, I will not give a detailed discussion of each article. Rather, I will summarize and highlight a few key points along with my own thoughts on the subject.
Winifred Aldrich traces the development of sizes and ready to wear in her article History of Sizing and Ready-to-Wear Garments found in the Sizing in Clothing
The understanding of body proportions began slowly with tailors producing clothing for men. They used strips of paper to measure the body and transfer the measurements to cloth. In time tailors devised tape measures and drafting systems. A size was not the beginning of the drafting job, rather the completed garment represented the size of the customer. As the industrial revolution progressed, tailors began to teach and sell their drafting systems. This included some already drafted patterns, sometimes in more than one size.


The concept was revolutionary and men began to be able to purchase their clothing ready made. Women, on the other hand, still had most of their clothing custom made into the early 20th century. There were attempts at creating patterns for women with named sizes, but it still required customization. There was a lack of knowledge of women's body measurements most likely because of the Victorian ideals of the time.

It is important to understand that our understanding of body measurements and proportions were not formalized until the 1940's. Ruth O'Brien, an employee of the U.S. Department of Home Economics and the Department of Agriculture, was commissioned to conduct a body measurement study of the American population. The purpose was to create a set of size standards based on reliable data that the apparel industry could use. The work involved in this study was enormous and revolutionary. O'Brien and her department created a measurement procedure that is still in existence today (only to be superseded by 3D body scanning). The data from these studies have been study and analyzed around the world.
To put this in perspective, it wasn't until the 1940s that we could finally see and understand human proportions with any clarity. It's easy to pan this early work as outdated and wrong but the 1940's was not that long ago. We still have so much to learn and understand.
A fun little factoid. Grading using the shifting or slide method, a common method still used today, can be traced back to 1908.
Aldrich's article goes into much more depth about the history of sizing. She includes pictures of early patterns and sizing systems. It is well worth a read if you can get a copy of it. This article is a combination and expansion of two previously written articles found in the journal Textile History.
*As I review individual articles from the Sizing in clothing book, I will not give a detailed discussion of each article. Rather, I will summarize and highlight a few key points along with my own thoughts on the subject.
November 03, 2014
Grading rulers and how-to drawings

Photographs would be great but I didn't think I could pull off photographs that were good enough for print. There are some practical matters too. An eBook filled with as many photographs as I need would be enormous. Too big of a file size to process for print (fingers-crossed they turn out ok) and too big to download easily. There are photos in the book, but just a few. So yes, I am planning on an eBook version, though probably not for Kindle.
So the how-to section will be step-by-step drawings. The drawing above is the set-up for hand grading. It shows the guidelines and grading ruler placement. The shaded area represents tag board. The pattern piece is cut in tag board too, but is white for clarity.
The gridded area represents the grading ruler. My grading ruler is the rectangular gridded ruler in the middle below. I was lucky enough to find it at a thrift store stuck in the book below.

This style of hinged grading ruler is no longer available. Never fear, there are options. You can grade with any clear ruler that has 1/16" gradations like the 18 inch ruler in the picture above. You can also buy a grading ruler from Connie Crawford. The price can't be beat! I've been looking at special quilting rulers and those are tremendously over-priced in comparison.
The grading how-to section will cover hand grading in depth and a general overview of grading for CAD. CAD grading depends on the CAD software, so in depth instructions would be difficult to cover for each major system.
Because things can be lost in translation - meaning my drawings and photographs may not convey the best for everyone - there will be at least one how-to video. I'm not sure what I'm setting myself up for, but I'll give it a try.
July 29, 2014
Experts and craftsmanship : who do you trust in the era of slick packaging and presentation?

The age of the Internet has fundamentally changed how we access information. It has changed the way we learn and share. In the sewing community we share projects, ideas, techniques. Some have even found ways to make money doing what they love.
There is a phrase I learned from someone, "You don't know what you don't know."
If you don't know what you don't know, how do you learn what you need to know? How do you even ask the right questions?
Perhaps I'm a bit thoughtful as I struggle to write my book on grading. How do I present a technical skill in an easy to understand, accessible way? The writing process is dragging on because I want to get the instructional information just right. In addition, I recently ran across a mommy blogger who is now teaching others how to grade patterns using patched together measurement charts* cribbed from various sources. I won't link to this particular person, but it gave me pause. Her past experience does not support her current endeavors, but she is perceived as an expert because of slick packaging and presentation. It's not that she can't gain skills and teach others, but where is the dividing line between what you don't know and where you know enough?
An expert is someone who has gained mastery, skills and experience of a particular subject. At what point does someone migrate from a beginner to an intermediate and then expert sewist or master pattern maker? I believe it is a journey of a lifetime. And for many, you only become an expert at one aspect because the overarching subject is too vast. In the industry you specialize, influenced by the first employment opportunity that guides your future.
More thoughts on this topic in the future....
*I've studied these charts and compared them to ASTM charts. Her charts contain proportion problems which may create fit issues.
June 16, 2014
Sleeve cap ease to fit around your shoulder is a myth

My most popular blog entry is Tutorial: Reduce/Remove Sleeve Cap Ease. Excessive ease in set-in sleeves continues to be a source of frustration for many. Still, there are those that continue to insist that sleeve cap ease is necessary in order for a sleeve to fit over the curve of your shoulder. Another well meaning sewist claimed my tutorial only worked for children's clothing (my specialty) because children are smaller, but adults definitely need ease.
Kathleen has written a now classic blog entry, Sleeve Cap Ease is Bogus (including a sequel). She even did a series on how to draft an armhole and sleeve correctly so that no ease is needed (partially gated). It would be worth your time to go back and reread those blog entries.
This idea that ease is needed for proper fit is interesting. Unfortunately, it is a false concept. A sleeve should not fit over the curve of a shoulder. Instead, the sleeve should hang straight down from the shoulder. The shoulder seam needs to extend long enough that it reaches to the widest part or tip of the shoulder. In the picture below you can see the shape of both the shoulder and armhole. This draft will allow the sleeve to hang from the shoulder.


Instead, you will get a sleeve that looks something like this:
 |
| Photo courtesy of Kelly Hogaboom and is licensed under the Creative Commons Attribution-Share Alike 2.0 Generic license. |
Sleeve caps with ease amount to lazy pattern making, or at the very least pattern making without knowing better.
Children are really not much different when it comes to fit and pattern design. They do have fewer overall curves, so in many ways pattern making and fit are simpler. What curves they do have though, are smaller. Sewing a set-in sleeve in an infant sized bodice is in many ways more difficult. There is less length to work with and tighter curves. If ease is included it is just enough to allow the operator to get around that smaller circumference easier. The amount of ease is very small (1/4 to 1/2 inch) and is entirely dependent on the fabric. In many cases, it is not needed at all because the differential of a machine can be adjusted.
I can understand if this seems unbelievable. It certainly goes against the grain of conventional sewist wisdom. The best way to know, is to try it for yourself. Try using a pattern with sleeve cap ease and one without. Which sleeve is easier to sew in? Which looks better? At the end of the day, you choose which sleeve you prefer to work with.
April 29, 2014
Grading vocabulary - Nest and stack point

Grading manuals are similar, at least the ones I have used. They lack sufficient or clear explanations of the most basic of terms. Often times the manual writers skip sizing theory and jump to demonstrating their preferred grading method. This includes the much revered Jack Handford grading manual, the manual I still use and recommend today. Handford's book was the first that helped me understand grading but I recently reviewed the book and noticed the notations I made where I was confused.
One of my goals in writing my grading manual is to include a Grading 101 section. The above drawing is the illustration for two terms.
Nest - pattern pieces within a size range that are stacked along a common point or line. Indicated here by the horizontal line and star.
Stack point - the point at which pattern pieces are aligned, generally located in the middle of the piece but may be located elsewhere (indicated by the star). In CAD grading, the stack point may also be called the point of origin and can be easily moved as needed.
I'm still working on my vocabulary list and guide. If there is a term you have heard and would like explained, please leave a comment below
*I realize I probably just used some vocabulary that the readers of this blog might not know. In any event, it illustrates the problem.
March 27, 2014
A bolero sewing pattern search
 |
| A mink bolero |
An anonymous commenter left this inquiry:
Do you know of a good pattern for making bolero (sp)? I want to make some pretty but basic ones to go over shirts, etc. I can't seem to find a pattern for a basic one.I have a personal preference for boleros or shrugs made of knitted fabric or actually crocheted or knitted. I haven't sewn any for myself, so I can't really recommend any patterns. Though after looking at Pinterest, there are several I might actually look at trying. I pinned several possible sewing patterns to a pinterest board titled Boleros, but as I haven't actually sewn them I can't recommend any of them.
The simplest bolero/shrug is merely a rectangle, folded in half with short seams sewn along the long edge to form an underarm or sleeve seam. There are of course many variations that can be created from this by modifying the shape from a rectangle.

Style is always subjective and I'm not sure what would be helpful. Boleros come in all kinds of shapes, from fitted to structured, and many fabrics. There are tailored, modern, and vintage styles. It is difficult to offer a suggestion without knowing more. If you have a suggestion, please leave a comment.
February 03, 2014
Pattern drafting in LibreCAD
At the start of the new year I commented about trying to figure out what to do next. I described my feelings as reaching the end of one road and trying to decide which road to take next. You might assume there were only a few options, but in reality there are many. One option was to look at languishing projects to pick back up. I have two rather large projects. One will take me many years, the other is about half done.
The really large project is sodaCAD. I started a software project back in 2010, but let it drop because I lacked the skills to work on it. SodaCAD is my attempt at an open source pattern making software. Most commercial or enterprise level pattern making software packages are very expensive and have onerous maintenance fees and licensing. I've always wanted to provide an alternative.

After much research and a few different attempts, I stumbled upon LibreCAD. LibreCAD is a free alternative to AutoCAD. Commercial pattern making packages have AutoCAD at its core. LibreCAD contains many essential CAD drawing functions already, so it is a perfect foundation to build on. I actually learned how to draft patterns using AutoCAD in college. What I lack is programming skills, but that is slowly coming.
Before I can work on optimizing LibreCAD, I had to test it out and actually try drafting a pattern to test its capabilities. It took a bit of time, but I managed to draft a bodice front.*
 LibreCAD is by no means the ideal solution (not yet!) for this kind of work. It is, in many ways better than Adobe Illustrator or Inkscape. Illustrator and Inkscape lack precision and efficiency. Inkscape in particular, tends to be fuzzy when it comes to numbers. Say you draw a square that is 25 x 25, but you move one side out 1 inch. Now you have a rectangle that is 25 x 25.95. LibreCAD has no issues with precision. It does lack efficiency for pattern making, so I made many mental notes for improvement.
LibreCAD is available for use now on Windows, Mac, and Linux. If you do decide to try it out, I would recommend watching some video tutorials on YouTube. The interface and drawing functions take some learning. I have no idea how long it will take to get SodaCAD ready for use.
*This pattern piece is available in sodaCAD source files for demonstration and testing purposes.
The really large project is sodaCAD. I started a software project back in 2010, but let it drop because I lacked the skills to work on it. SodaCAD is my attempt at an open source pattern making software. Most commercial or enterprise level pattern making software packages are very expensive and have onerous maintenance fees and licensing. I've always wanted to provide an alternative.
After much research and a few different attempts, I stumbled upon LibreCAD. LibreCAD is a free alternative to AutoCAD. Commercial pattern making packages have AutoCAD at its core. LibreCAD contains many essential CAD drawing functions already, so it is a perfect foundation to build on. I actually learned how to draft patterns using AutoCAD in college. What I lack is programming skills, but that is slowly coming.
Before I can work on optimizing LibreCAD, I had to test it out and actually try drafting a pattern to test its capabilities. It took a bit of time, but I managed to draft a bodice front.*
LibreCAD is available for use now on Windows, Mac, and Linux. If you do decide to try it out, I would recommend watching some video tutorials on YouTube. The interface and drawing functions take some learning. I have no idea how long it will take to get SodaCAD ready for use.
*This pattern piece is available in sodaCAD source files for demonstration and testing purposes.
January 23, 2014
Shoulder slope pattern correction
LisaB asked me to explain:

Not everyone will need to make this adjustment. This was a problem inherent in my own patterns to fit me. The drawing below, I hope more clearly shows how the shoulder seam was laying.

Raise the shoulder at the neckpoint 3/8" on front bodice to correct shoulder slope problem. I need to apply this correction to my t-shirt pattern too.I tried my first cardigan sample on several times and noticed the shoulder seam was not pointing in the right direction. The seam at the neck point was pointing toward the front rather than laying right on top of my shoulder. I also looked at my t-shirt pattern and observed the same problem. This indicates a possible shoulder slope problem or shoulder to hem length problem on either the front or the back bodice or both. To figure this out, I ran a basting thread in my cardigan shoulder seam area and looked in the mirror to see where I needed to make the adjustment (no fitting buddy or dressform at my house, unfortunately). I also pulled out my blouse pattern and compared the shoulder seam. In the end, I needed to move the shoulder up at the neckpoint 3/8" on the front bodice. This increased the shoulder to hem length on the front just enough to allow the back bodice to relax backward and position the shoulder seam right on top of the shoulder.
Not everyone will need to make this adjustment. This was a problem inherent in my own patterns to fit me. The drawing below, I hope more clearly shows how the shoulder seam was laying.
January 21, 2014
Adapting a block pattern into something else pt. 8 : the final pattern alterations and a finished design

It took me quite a while to finish up the pattern modifications for this style. I would try on the first sample and look in the mirror, then go back to the pattern many times. There were a few things that were not right. Each time I would try it on, I would pull the jacket forward so the back neck rested higher. This would throw off the shoulder line. Finally, I realized I needed to raise the back neck and raise the shoulder at the neck point on the front bodice. This situated everything nicely. The first jacket is definitely a wearable first muslin, but the second sample turned out great.
Final pattern alterations:
- Remove extra wearing ease. I noticed that many similar cardigans are not really that much bigger than the average t-shirt, so keep this in mind when adapting your t-shirt pattern.
- Raise the back neck 3/4". I had left the original neckline of the t-shirt, which ended up being lower than I wanted for the cardigan.
- Raise the shoulder at the neckpoint 3/8" on front bodice to correct shoulder slope problem. I need to apply this correction to my t-shirt pattern too.
- Shorten sleeve length.

All that's left is to double check the seams to make sure they match and cut the pattern out of tagboard. This jacket is now ready for further iterations. Maybe a shorter or slimmer version. A waist line with darts. It's all possible.
If I wanted to take this cardigan into production, I already have some of the information needed and recorded in my blank forms:
- Style and cutting sheet lists all the pattern pieces with spec drawing.
- Sewing spec lists each step of construction.
- Fabric swatch cards with content information.
- Recorded the pieces in the pattern catalog.
- Finished pattern measurements for quality control
- Grading spec
- Cost analysis
Subscribe to:
Posts (Atom)