Showing posts with label T-shirts. Show all posts
Showing posts with label T-shirts. Show all posts
April 09, 2012
T-shirt pattern quest pt. 5 : Evaluating the fit of the armhole
I sewed up two more samples of my t-shirt pattern. I was still not satisfied with the fit. There were wrinkles around the armhole and elsewhere. I spent a bit of time studying the pictures below to try understand the fitting problem and how to solve it.
It finally occurred to me why the armhole was giving me so many problems. The back armhole was too short. You can actually see in the picture that the front of the t-shirt is being pulled toward the back at the shoulder seam and underarm. The fix was rather simple - make the back armhole longer.
What a difference, don't you think? There are some other fit problems. I'm still debating the amount that I scooped out on the front armhole. I think I may need some extra width across the front. And then there is the sleeve that wants to twist. But overall, this is pretty good and those complaints are minor. Will there be a version 5.0? Probably.
January 09, 2012
T-shirt pattern quest pt. 4 : Analysis of fit and construction
Here are the results of my first and second pattern test. I had enough fabric to make two shirts. Each shirt revealed problems with my construction and fit. I had added about 1" of extra wearing ease to shirt 1 and that was reduced to 1/2" of extra ease in shirt 2. The pattern was designed with 3/8" seam allowances. This allowed for an 1/8" cut off on the seam edges so that the seams finish at 1/4". I had difficulty in shirt 1 maintaining that cut off allowance, improving on the second.
One thing I did not notice is that this fabric is directional. With napped fabrics, the fabric can look darker or lighter depending on which direction the fabric lays. This interlock is not napped but it definitely looks different in different directions. I had switched the direction of the sleeves on shirt 2 and so there is a color variation. It is subtle and hardly noticeable except in certain light.
Finally, there is an issue with the fit of the armhole, which is just a bit too tight. This creates unsightly wrinkles in the underarm area. I guess I never noticed on the original shirt, but the problem exists there too. So, a bit of adjustment has to happen. I need to lower the armhole a bit and scoop out the front. This means the sleeve will need a bit of adjustment as well. The armholes will no longer be symmetrical front to back, which is how it should be. Anyway, more on that as progress is made.
The shirts are fine and comfortable enough to wear, but a modeled shot may or may not appear on the blog
January 03, 2012
T-shirt pattern quest pt. 3 : Sewing up the first sample
The next step in recreating my favorite t-shirt pattern is to test out some different construction options by sewing up a sample. This sample will also be used to double check fit. I began by testing some binding options on some scraps. I eventually discovered the best method for my machines that gave the best looking results.
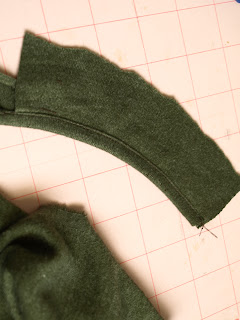
Before stitching the neckbinding to the t-shirt, I stitched one shoulder and overedged one edge of the neck binding.
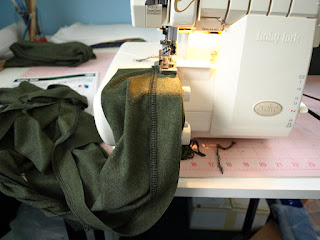
In the picture below I am stitching the binding strip to the neck. The binding strip is on top so that I can stretch it as it goes through the machine. The shirt is supported by the table. Don't let it hang down in front of the machine or gravity will do more stretching of the shirt than you intend. I did edge finish one edge of the binding strip by serging. I didn't have enough green thread, so some of it is in black.
Next, I followed the same steps in stitching the binding to the sleeve hem edge. These sleeves show about how much I stretch the binding as it went through the machine.
I then stitched the remaining shoulder seam closed through the neckbinding. This means there is a visible seam at the shoulder. This type of shoulder - neckline construction is also visible on the original t-shirt.
A few last words on the binding. The original shirt had a double fold binding, which is difficult to reproduce at home without the proper folders and adjustments to your machines. The binding I did is less bulky and easier to execute with home sewing equipment and it turned out just fine.
August 23, 2007
Who puts whom in a corner?
You have probably seen them. Those cute infant-toddler shirts with quotes, phrases, and images inspired by popular culture. You can buy those shirts everywhere from CafePress, on-line retailers, shopping malls, and even street corners. I am sure no one ever thought some of those phrases would be trademarked. If you follow the link, you will find that Lions Gate is going after people who print a quote from their movie on t-shirts. The defendants are producers of baby t-shirts and products.
The case will be difficult to prove. The phrase that can't be said has been "borrowed" by various companies since the movie came out 20 years ago. Lions Gate sells approved merchandise with the phrase that can't be said. But until now, they have failed to adequately defend their own trademark. After 20 years, is the trademark valid? I did a quick search for it at the USPTO and couldn't find it. Was it ever registered?
If Lions Gate wins this case, can you imagine other movie studios going after people for similar things? If you can't say the phrase that can't be said, how many other phrases can't be uttered? Maybe CafePress should be nervous - so many of their baby products are inspired by movie utterances.
Ethics aside, this case illustrates a danger to the freedom of speech. Who knew a common phrase could be trademarked? Should we be concerned when we use the word Apple or ask where the beef is?
Let's take another tack. The movie studios are benefiting from essentially free advertising. Think about all of those babies wearing shirts with the phrase that can't be said. Their parents will remember that movie and perhaps want to see it again through video purchases or rentals. Perhaps movie studios have a right to protect their intellectual property, but at what cost? Are they willing to risk losing free advertising and potential customers? Apparently they are.
Subscribe to:
Comments (Atom)


