Showing posts with label Size Charts. Show all posts

August 31, 2022

Can children's clothing sizes be improved?

Little girl in a field

This blog is part of a series about The Essential Guide To Children's Clothing.

Any person that shops for children's clothing often becomes frustrated in their shopping experience. There appears to be a disconnect between what the retailer or brand are stating is one size and what the child actually fits. Why does this happen? Is there a better way?

It is true that age based size labels are sometimes inaccurate, or at least appear inaccurate. A child's body size and shape is influenced by a lot of different factors. Those factors include genetics, ethnicity, income demographic, diet, and nutrition. Children's clothing sizes vary because of this and other factors.

Manufacturers specialize on product type and a customer profile. This is true even in children's clothing. There is a size standard which exists for children's clothing, but manufacturers and designers will adapt or modify their product to fit their customer profile. This is not a bad thing. Children are individuals with their own unique characteristics. 

Many people complain that there needs to be a clear standard and by conforming to that standard we will solve sizing problems. Is it realistic to compel the industry to conform to a single size standard for children? By doing this, you will be guaranteed to never find clothing that fits all children at all times. There would always be a child that will not find clothing that fits if there is only one standard. Flexibility is needed in such a diverse marketplace. So while there is a general size standard that can be purchased, it may or may not be followed all that closely.

There are ways to make things easier for customers. Providing clear size charts and how to measure guides in the retail store and online can help customers select the right size. While it may be frustrating, customers have the ability to shop the market for alternate brands or sizes that fit their child. Variation is actually a good thing.

For this and more, see The Essential Guide to Children's Clothing Sizes.

July 20, 2022

The Essential Guide to Children's Clothing Sizes and How to Grade Them

I am excited to announce my new book, The Essential Guide to Children's Clothing Sizes and How to Grade Them. This book explains children's clothing sizes in the United States, how they came about, and what sizes are used today. This book includes many things that have never been included in books on children's clothing design in the past.

  • A break down and explanation of children's clothing sizes from Preemie to size 16, including boys sizes.
  • A brief overview of difficulties in the industry, including obesity, and sleepwear
  • An explanation of how create your own grade rules.
  • Step-by-step instructions on how to grade basic styles, including grade rule charts.
  • Body measurement charts for infants to size 14, including slim and plus sizes for older children.
  • The infant measurement chart includes head circumference, neck circumference, hand length and width, foot length and width -- measurements that are hard to find.
  • Extra grade rule charts that include Newborn and size 9 months.
  • CAD grade rule charts
  • Complete measurement studies with additional body measurements, grade rules and references for infants, toddlers, 4-6x, girls (7-14), boys, and young men.
I will be doing a series over the coming weeks highlighting the above list with sneak peaks at what is in the book. This book is essential for anyone that designs and manufactures children's clothing. The book is currently available for purchase on Amazon or as an ebook on Payhip.

February 17, 2020

Who manufactures a size 9 months for baby clothes?


Infant clothing on a clothesline

I have been intensely working on a project that requires me to study measurement charts and grading charts for children's clothing. It is not the most exciting thing to analyze, I must admit. There has been one size that has been the most difficult to understand and that is the size 9 months for babies.

Traditionally, there never was a size 9 months. The infant size range was arranged:

3M - 6M - 12M - 18M - 24M - 36M

Over time that arrangement dropped the 36M, making the 12M the middle size for sampling and grading. At some point a NB (newborn) and 9M was added. I have not found the reasoning for the additional sizes or exactly when they were added. At least with the NB, it makes some common sense as it is clothing for newly born children. Babies very quickly move through these early infant sizes, so many times the clothes are simple t-shirts and bodysuits. Size 9M, from a measurement standpoint, appears to be a half-size. Something between the 6M and 12M. You could say the 9M should fit a 9 month old baby and perhaps that is the intent.

The problem comes with how to incorporate the size 9M into a normal infant size range offering. It throws off the middle size 12M in sampling and grading. With the addition of the 9M, the 9M becomes the middle size.

NB - 3M - 6M - 9M - 12M - 18M - 24M

No one samples in a size 9M. No one. In fact, it would make grading difficult to do so - just look at the traditional grading charts by Jack Handford.

And that left me wondering. How many brands actually produce a size 9M? While my quick survey is not scientific, it revealed some interesting points.

Manufacturers of sleepwear, t-shirts, bodysuits, or lounge wear, tend to produce only certain sizes and they tend to arrange them:

0-3M, 3-6M, 6-9M

Of course there are variations. Manufacturers of special occasion dresses tend to produce only a few sizes too.

12M - 18M - 24M

There are variations there too. When I worked for a brand that produced christening apparel, we produced all the sizes from NB - 24M. Size 9M was not one of our top selling sizes.

BabyGap does not produce size 9M for any of their styles. They stick to the traditional size range:

3M - 6M - 12M - 18M - 24M

But they arrange their sizes so it looks like they have their bases covered.

Up to 7lb (NB),  0-3M, 3-6M, 6M-12M, 12M-18M, 18M-24M

So what is the point of all this? When you are developing your children's clothing line, you do not need to produce every size. There is a great temptation to offer every style in every size. The reality is that if the big brands aren't doing it, neither do you. A lot depends on the style and your customer. Who do you hang with? Who is your competition? What sizes do they produce? Once you know the answers to those questions, you can focus your efforts.

What about the size 9M? Unless your customer requires that size, it is probably best to skip it or at least make it appear that it is included within a size label like 6M-12M. Some private label programs may require a size 9M. If that is the case, it is a simple matter to split the grade rule between a 6M and a 12M to add the size.

May 26, 2015

Grading from body measurements pt. 3

This is part three of an ongoing discussion about N. A. Schofield's article Pattern Grading found in the Sizing in Clothing book. Part one is here, part two here. I recommend reading the previous parts of this series before reading this one.

So what were the results of Schofield's experiment? I can't reproduce the actual results here, but it was something like this.

Grading from raw body measurements results in pattern pieces with different shapes
Imagine the square is a bodice pattern piece in one size. The star is supposed to be the same pattern piece but graded to the next size. Clearly, the two shapes have no proportional relationship to each other. The problem is further compounded by a different grade for corresponding pieces.

Corresponding pieces do not match
Imagine these are front and back bodice pattern pieces. Each corresponding pattern piece was graded separately based on the measurement data for that body location. Now imagine trying to sew the front and back together. It can't be done. Schofield freely admits the difficulty in the results. Though she also believes we need to learn how to deal with new shapes in pattern pieces in order to achieve superior fit.

Schofield's experiment left me with a lot of questions. I did not understand completely why she rejected the ASTM measurement data, nor why she went back to essentially raw data. Her grading methodology left me a bit confused. The results were clearly not suitable for industry application. Superior fit is the holy grail of fashion, but I'm not convinced that grading is the entire source of the problem. Superior fit, for each individual might only be achieved on an individual basis. In this case, 3D body scanning and customized clothing is the answer, but is it practical?

I would like to see this experiment repeated. The factors that will impact additional experiments are the measurement data and grading methodology. Why not use ASTM measurement data? Why not use traditional grading methods? I always support those who are willing to test ideas and theories. This was a worthy attempt by Schofield to ask important why and how questions.

April 09, 2015

Grading from body measurements pt. 1

Pattern grading is the process by which new sizes are developed from an existing pattern. There are various methods or processes used to grade a pattern. These methods include slash-and-spread, shifting, and CAD. At the end of the day, each method accomplishes the same thing, a new size.

The apparel industry has received a lot of criticism for their sizing, especially of women's clothing. At it's core, sizing goes hand-in-hand with pattern grading. You have to define your sizes in order to grade a pattern. In order to grade a pattern you have to know body measurements for each size. The common grade rules for women's apparel is the 1", 1.5" and 2" grade rules used in the United States. Similar grade rules are found in Europe and the UK. The primary criticism is that these grade rules are not based on anthropometric data, or actual body measurements. Instead these grade rules are just pulled out of a hat without regard to women or their fitting needs. These arbitrary grade rules are merely for the convenience of industry.

This is the point of view taken by N. A. Schofield in her article Pattern Grading found in the Sizing in Clothing book. The goal of her research was to test the idea of creating grade rules based on actual body measurements rather than an arbitrary grade rule. There has been a lot of criticism of the industry over sizing and it is a worthy goal to research alternatives. Asking the why questions. Why does the apparel industry do things the way they do? Why do we grade women's clothing this way? Can we do it differently? I've asked a lot of these same questions as I've looked at children's clothing. When I started out, I didn't understand the why and sometimes the answer was not satisfying. I can totally get behind Schofield's motivation to try and find an answer.

And yet, I feel like I am setting up to be very critical of Schofield's research and I don't want to give the impression, as an industry professional, that even asking the questions were wrong. She was right to ask the question and to test an alternative. The results of her research are interesting and ironically (and indirectly) add support to current practices.

So here are some of Schofield's main arguments:

1. 1", 1.5", and 2" grade rules are not based on anthropometric data. Meaning it is not based on body measurements or the proportional relationships between body parts/areas. These grade rules were intended for the convenience and ease of hand grading.

2. Grade rules should be derived from body measurements. This means that grade breaks between bust, waist, and hips should not be consistent. Instead of a 34-36-38 chest measurement, we should be seeing a 34-35.5-38 (just as an example), chest measurement.

3. Size prediction and also body measurement prediction needs refinement. This idea is rather complex. Body measurement studies create a lot of raw data. In order to make sense of it, statisticians will test size prediction by using one or two body measurements. So can you predict the overall body size by using just the height or chest measurement? And if you do that, what influence does that have on other body measurements? If a person gets taller, do they also get wider? It is a complex question and not easily answered because there are so many variables. Statisticians bring order to raw measurement data so that we can organize the body measurements into sizes. They do this by averaging and, in some cases, normalizing the data so we can work with it easily. Schofield implies that we should just rely on the raw measurement data.

The ultimate goal of this study was to improve overall fit of women's apparel by basing grade rules on actual body measurements. I'll have to break up my review of this study into multiple blog entries because I have a lot to say about it. So stay tuned.

March 05, 2015

Communicating size and fit through size labels and charts

The primary way most clothing brands communicate size information is through a size label. This works in most retail settings. Online (and print catalog) clothes shopping adds the benefit of including an easy to use, sometimes interactive size chart. Additional instructions on how to measure yourself is also helpful.

Pictogram showing body dimensions for a specific size
A pictogram showing body
dimensions for a specific size.
None of these solutions are completely fool proof. First, the manufacturer interprets and adapts measurement data to meet the needs of their identified customer. This means they have created and implemented a size system in anticipation of what their customer wants. But a customer may want something to be closer/looser fitting, and shorter/longer lengths than the manufacturer. How does one balance size and fit for a diverse population with ever shifting expectations?

The current trend among new fashion companies is to design for a very narrow customer profile. By targeting a very specific customer, the manufacturers can optimize the fit of their brand to their customer. Larger big box brands have to fit a wide range of body shapes and sizes and their clothes will never fit as well as a more exclusive brand. In some cases a manufacturer will modify their sizes for an existing size system, so that they change what a size means for their target market. In other words, a size 8 for one brand will mean something entirely different for another. This is why there is so much variation in the marketplace between brands.

On the surface this sounds like vanity sizing run amok. If manufacturers change the underlying sizes to fit their version of a size, then surely they are deceiving us into believing we are a smaller size than we truly are. Truth in advertising and all that, right?

The problem with only one size standard across brands is that it does not allow for variation. Women in particular have a large variety of body shapes and sizes. Because manufacturers are free to adapt to meet the needs of their customers having multiple versions of a size will allow people to find the version that fits them best. Once they do, and if the styling is right, they will become loyal customers.

The problem comes back to how to communicate that to the customer. As I said at top, providing more information helps the customer to make a more informed choice. And that is the true challenge.

*This blog entry is part of my on going review of Sizing in Clothing, and is a discussion inspired by the article, Communication of sizing and fit by J. Chun. This article goes into a little more depth about how sizes have evolved and what they might mean.

February 10, 2015

Size standardization for clothing

In academic circles there is the idea that we need one measurement and sizing standard to solve all our fitting problems. A top down approach with no allowance for variation. Customers often complain that manufacturers have no idea what they are doing because nothing ever fits. Manufacturers face an enormous challenge in trying to interpret size specifications while at the same time meeting the needs of their customers. The more I read about sizing the more chaotic it seems. At the end of the day there is more than one way to look at size standardization, and I think only one battle to fight.

One standard to rule them all

Yes, the idea that one standard can be established for everyone. By forcing compliance we will have peace on earth, and yes, our clothes will fit! Considering the variety of shapes and sizes in the United States alone, the idea is really a fantasy.

  • One standard guarantees that some of the population will not have any clothes that fit. One could argue this situation exists today, so why not try one standard. With no allowance to adapt to fit the wide range of shapes and sizes, then outliers will never have clothes that fit.
  • Our population is constantly changing. The most recent sizing study revealed that we are taller and weigh more than we did in the past. One standard would quickly become outdated.
  • Sizing studies are very expensive and labor intensive. Studies are not done frequently, so manufacturers will always be behind what is happening in the real world.

Loosely conforming to a standard while yet adapting to meet a customer's need.

Even if one standard to rule them all is unrealistic, we still need a standard. ASTM and the latest Sizing USA study have provided us with a standard that any manufacturer can use (for a price, of course). These measurement and sizing specs can act as a guide, a place to start. As a manufacturer develops their customer profile, they can adapt these standards to meet the needs of their customer.

Over the years, it's important to compare your product against these standards. I've seen patterns and sizing drift from these standards naturally through errors. These errors are not intentional, they just happen and can easily pass from one style to the next. So a careful study and comparison can bring things back. This includes measuring fit models and comparing them against the standard and analyzing customer returns due to fit issues. 

In-house size standardization

Once a sizing standard is established for a brand, it is important to adhere to that standard during product development. As an example, all new pants styles have the same finished length and waist sizes as specified. Variations in fit can come from multiple sources due to fabric variations (or problems), construction issues (taking too big/small a seam allowance, cutting errors), or variations in a pattern. You have to be careful not to draft a pattern from scratch every time. Pattern makers in the industry will use the patterns from an already proven style to develop the new style. This practice ensures consistent fit across styles. A quality control process through each step of development and production is necessary to find problems before they become big ones.

A few words on vanity sizing

Vanity sizing implies that a manufacturer wilfully chooses to ignore a size standard and relabel a size smaller than it actually is. I do not believe there is a vast conspiracy to do this intentionally. Instead I think manufacturers are trying to meet the needs of their customers while trying to conform to a standard.

*This blog entry was inspired from my reading in the book Sizing in Clothing and more specifically the article Sizing Standardization by K. L. LaBat. I made very few notes on this article and don't remember much of what I read. I did make a note that LaBat tried to prove the existence of vanity sizing by studying children's age-based sizing. I thought the argument was rather weak.

January 27, 2015

Creating sizing systems for clothing

This is a continuation of my review of Sizing in Clothing. The previous blog entries are History of Sizing, and the Book Review.

Vintage tape measure
By Downtowngal (Own work)
[CC BY-SA 3.0], via Wikimedia Commons
What does it take to create a sizing system? We often taken for granted a size chart on a retail website or print catalog. And when something doesn't fit, it's easy to blame the size system used by the manufacturer. And we've all been there. Shopping for blue jeans or a swimsuit causes a lot of anxiety and stress as we go through more than one size to find something that fits. A. Petrova discussed all of the variables that go into making those size charts that help you select the right size in the article Creating Sizing Systems found in the Sizing in Clothing book.

So what does it take? The first big step is to measure a population and then to divide that population into various body shapes such as Misses, Petites, Tall, Plus, etc. Each category is defined by certain control dimensions such as height, weight, waist, chest, hips, or whatever is considered the key dimensions. Usually there are 3-4 key body measurements. These kind of measurement studies are expensive and are usually undertaken by government, universities, and trade organizations.

Next, each category is subdivided into sizes contained within a size range. Each category is labelled a size designation. It could be Small-Medium-Large, or numbers such as 2, 4, 6, 8, 10. These size labels are meaningless until associated with a set of body measurements. (We could get into a discussion of vanity sizing here but it really doesn't matter what you call a size. It's the underlying body measurements that are key). In the US, we are accustomed to knowing what size to start with when shopping without knowing our body measurements. In the EU, there are similar difficulties though there has been some push to adopt the centilong system. This system identifies a size by height with some corresponding girth measurements. Not all European manufacturers have done this and some are as inconsistent in application as their American counterparts.

A. Petrova continues the article with some ideas on how to develop size systems or charts based on garment styles versus just body measurements. The biggest disadvantage to this idea is that the customer would need to know several size scales when shopping, making shopping a complicated experience. The advantage is that fit could be fine tuned, maybe.

So who is to blame when clothes don't fit? Is it the size chart? Maybe, maybe not. There are so many variables that it is hard to select just one reason. The fit model used in pattern development may match the size chart, but not be representative of the consumer. In other words there could be a mismatch between expectations and reality between the manufacturer and the customer. Grade rules may not match or equal actual body grades - which is a discussion for another article. Perhaps the size chart information was incomplete, lacked sufficient instruction, or had a typo. Poor construction or poor fabric quality play a factor. When analyzing sales information and returns, all of these things have to be considered.

July 08, 2012

Designing and grading for a large size range

I get the following question from time to time:

I am a self taught pattern drafter, drafting patterns for myself and my 
kids for years.  I decided to turn this into a business recently and am 
creating a line of children's patterns for the home sewer.  My size range 
is 6m-10 and this is where my question is... Can you help me understand the process of redrafting the SAME style/pattern in my different base sizes?  I  get that I can't just take a size 5 and grade all the other sizes from 
there.  I own several popular pattern drafting books as well as 2 different 
grading books and I can't seem to find this information anywhere.  Any 
information you can provide me would be SO HELPFUL.  I am guessing there is some precise way to redraft my base sizes so the design doesn't change much.  Can you shed some light on how they do this in the business?  THANK YOU!
There are several things. First, it is not unusual when designing children's clothing to cover a large size range. The reality is it is much more work than you would think. I would recommend reviewing my previous blog entries on grading, especially Creating a Grading Standard (also read the other grading tutorials, they'll be helpful).

Unfortunately, there is no other precise way to redraft your sample or base sizes except good old-fashioned pattern drafting. If you have some basic pattern blocks for each size range, then it is no big deal. Just starting out, though, it is a lot of work. It will take less time and become easier over time, so no worries. One thing to pay attention to are proportions. You may need to alter the design to accommodate the size while still giving the impression of the same overall design idea.

August 31, 2009

Comparing pattern shaping and children's sizes follow-up

Kathleen suggested that I post an update on a previous grading post I did about a year ago. You can read what I wrote previously at When Patterns Collide. In that post I suggested that it would be possible to combine the 24M and 2T and the 4T and the 4. My reasoning being that the 24M and the 2T are essentially the same sizes - why differentiate them? The subject is a little complex and perhaps controversial - at least to pattern making geeks. My goal was to reduce the work load. I was drafting and grading all of my patterns by hand. I am incredibly slow grading by hand. In addition, I was trying to solve one particular sizing problem that shows up in childrenswear, that is hard to illustrate. Since I shut down my Prairie Roses line, I am not knee deep in pattern making as I was a year ago. But perhaps it may be helpful to explain what I ended up doing.

Originally, I broke up my sizes into these ranges:

3M, 6M, 9M, 12M, 18M, 24M - sample size 12M

2T, 3T, 4T - sample size 3T

4, 5, 6, 6x - sample size 5

These ranges are rather typical of what you will find in retail stores. When developing my patterns, I have to make and grade the patterns for each size range separately. You cannot make one set of patterns in one size and grade them up and down all the way. It won't work because that many sizes will cause minute grading errors and strange fit, especially on the smallest and largest sizes. As you define your grading and size measurements, you will find that the 24M and 2T and the 4T and 4 overlap. I followed the Jack Handford grading rules, which are pretty darn good, but end up with a result like this:

Bodice pattern pieces in a size 4T and 4 and how they compare

In the picture above, the size 4 is laying on top of the size 4T. The size 4T is actually too long in length and too wide. I double checked all of my grading and there was no mistake. The size 4T was graded off my 3T and the size 4 off of the 5. The shaping of the sample size pattern pieces varied a little. The toddler was a little boxier because toddlers don't have any waist shaping, whereas a 5 year old does. If I were to leave my patterns this way, someone will eventually hang the two sizes next to each other and think there was some kind of manufacturing mistake. I needed to fix my patterns so that each size is incrementally bigger.

To do this, I rearranged my size ranges, combining some sizes:

3M, 6M, 9M, 12M, 18M - sample size 12M

24M/2T, 3T, 4T/4 - sample size 3T

5, 6, 6x - sample size 5

The next thing I did was reworked the shaping of my toddler sizes to look more like the 4-6x range. I pulled the waist in some and made the armhole smaller. I made these shaping changes because I found that my toddler patterns were just a little too big. Now, I can lay all of my bodice pattern pieces in order and they get incrementally larger from the 3M to the 6x. Your patterns may look different, but it is worth comparing the sizes on the outside edges of your ranges to make sure you don't have something weird show up like I did.

Even though I combined some sizes, I kept this behind the scenes. My customers still saw all of the sizes separated out. If someone ordered a size 24M and another ordered a 2T, the dress would be exactly the same except for the size tag. I offered all of the sizes on my website so that customers would see something familiar. Perhaps it seems a little dishonest? I don't think so because in the real world a 24M child is the same size as a 2T and I was willing to take the chance. For what its worth, no one ever complained or returned those sizes for fit issues.

Now, I don't know that what I did is "the way it should be done". In the past though, I have had people question why the 24M was larger than the 2T and I had no explanation. Once I worked through grading all of my patterns by hand, it started to click in my head. The relationship of the shape of the pattern pieces, the grade, and body measurements are all connected.

February 04, 2009

Who creates grade rules?

Tape measure

Some one asked me a grading question the other day. She wanted to know who creates grade rules?

A pattern maker, grader, or you could make the grade rules. If you choose to make the grade rules yourself, I have some guides available in The Organized Fashion Designer and The Simple Tech Pack. It's harder with children's clothing because there isn't as much standardization. An experienced grader should have some standard charts or be able to develop rules off of your measurement charts. I would personally start developing grade rules by referencing the Jack Handford book and make modifications as needed. I would only let a pattern maker or grader do it who has experience with it.

You can buy measurement charts from ASTM as a place to start. The ASTM measurement charts for children are probably the best resource for children's body measurements. Be cautious of using free charts found on the Internet. I have seen free measurement charts on the Internet riddled with inconsistencies that could lead to serious errors.

If you have time, you may want to sew up the smallest and largest sizes just to double check the grade and sizing. It doesn't have to be in your production fabric or anything. A fitting is the only way to know if your grade is correct. You won't need to do this on every style or very often. Kind of important when starting out though.

October 27, 2008

A toddler sizing rant from a frustrated mom

This mom's blog about twins Hannah and Sophie gives another perspective on the children's sizing problem. I feel her frustration, and I can understand because as a pattern maker and designer I have difficulty getting the sizing right too. The comments on that particular entry suggest she start her own business selling clothes that fit.

If she were to start a business selling toddler slim clothes, she would discover the same difficulties as other children's fashion designers. Sizing is a big problem that falls all over the anthropometric map. Adult sizing is rather stable in the sense that adults reach a size and tend to stay there - disregarding weight gain or loss. You can categorize adults into sub-groups with similar body proportions and sizing. You can do that with children too but the sub-groups are transitional. Children grow as they age, changing from one group to the next in progression. Ideally, children's clothing allows for that transition in a smooth fashion. In reality, children will occasionally have clothes that are too short, too long, too wide, etc. It is impossible to accommodate them all because they don't all start from the same place. Genetics and individual circumstances play a big part.

Simplified growth chart for children

This not offered as an excuse for the industry. Surely some creative DE could provide clothing for Hannah and Sophie that is comfortable and fits well. I suspect that the twins were premature because of TTTS. The girls appear to be thriving and doing well. Children born prematurely are a unique sub-group that falls outside the norms. They tend to be smaller and grow differently than other children. It would be an interesting challenge for someone to come up with a product line to help them. Any one up for it?

September 02, 2008

Comparing pattern shaping and children's sizes

As many children's wear designers know, children's clothing has a lot of sizes. It can become quite the dilemma when trying to decide which sizes to offer. Some DE's offer their styles in as many as 21 sizes. Way back in 2006 I suggested a theory to reduce the number of sizes by combining or eliminating some of them. You may want to go back and review the entry Too Many Sizes and other related entries to see how I have arrived at today.

Anyway, I have tried to put the theory into practice and I have made some progress. I only offer my styles in sizes 3M to 6x. I am still working on the grades for the 4-6x styles, so I am nearly there. My sizes break down like this:

3M, 6M, 9M*, 12M, 18M

24M/2T, 3T, 4T/4

5, 6, 6x

I don't really consider the 9M as a true size. It is a half size between the 6M and 12M and is graded by splitting the grade between the 6M and 12M. The 24M and 2T are essentially the same as are the 4T and 4 - those sizes have been combined for grading purposes. My website still delineates the combined sizes as separate sizes.

This blog entry is not a discussion on the why and wherefores of children's sizing - a surprisingly complex and controversial topic. Instead, I wanted to show a possible grading/pattern problem that shows up now and then. I have been grading and comparing my basic bodice blocks. You should do this too because someone will eventually see the problem and it will be more difficult to fix.

I have drafted my basic bodice block three times, in each of my sample sizes for each of my size ranges - 12M, 3T, 5. (BTW, you can't use the same pattern piece and grade it in all the sizes. Believe me, that is one large headache). The next step is to grade each range separately. Keep in mind that each sample size will have slightly different shaping, but the general shape and proportion should be related.

Before getting too far, the outer fringes of each size range should be compared. For example, the size 18M should be smaller than the 24M/2T and the size 4T/4 should be smaller than the 5. Originally, I had graded the size 4T and 4 separately. In other words the 4T was based off the 3T sample and the 4 was based off the 5. The reason I combined the 4T and 4 was because the shape and overall size was so similar it was a duplication in effort, and I also ran into the problem where the 4T was actually larger than the 4. If you do separate out the sizes than the 4T must be smaller than the 4. If you don't check your grades, someone will bring two dresses to you and say the patterns are wrong, size labels are switched or some other problem.

In the photos below you can see the problem more clearly. In the top picture, the size 4 is laying on top of the 4T. You can see the 4 is smaller than the 4T. In the bottom picture the 4T is on top of the 4 and it is clearly longer with a larger armhole.
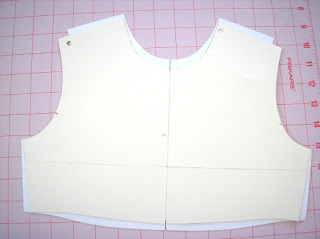
Comparing pattern shaping and sizing of a bodice frontComparing pattern shaping and sizing of a bodice back
To solve this problem, I have been reworking my toddler patterns. I started by combining sizes 4T and 4 so I have one less size to grade. Next my toddler bodices were redrafted to have a shape similar to the 5 (less boxy, smaller armhole). Finally, I regraded the toddler patterns. This is still a work in progress, but the results are much better - each size is progressively larger.

I had the same problem with my size 18M and 24M/2T. In this case it wasn't a grading problem. Instead my infant patterns were proportionally too long compared to the toddler. I fixed this by shortening the bodice slightly.

Anyway, the point is that you should make sure and check the sizes on the outer fringes of each size range and make adjustments so that each size is progressively larger. You can adjust the grade rules (much easier in CAD, btw) or change the shape of the patterns.

(I am ignoring the idea that in the real world an 18M child could be larger than a 24M child. If that is the case, a parent would buy a larger size than 18M and just complain about the craziness of US sizing standards. When I did private label programs for the big box retailers their grade/POM charts progressively got larger with each size. Logically it makes sense even if reality is very different. Anyway, you can allow your sizes to overlap if you want, you'll just need to have an explanation as to why when a sewing contractor becomes confused.).

April 18, 2008

Grading Complex Styles pt. 2

Part 2 of this series continues the discussion of how to grade complex styles. It is not necessary to have the Handford book to understand the concept, but some experience with grading would be helpful.

This part of the series was going to contain a lot of explanation with lots of examples. There are two reasons that I held off on that. The first is I am considering writing a book on the subject. I am sure it will be a best seller and I will be able to retire early [eye-roll]. The second is that it would be impossible to discuss every possible scenario. It would be best to explain the principle and let you work out your specific grading problem on your own. You will benefit with having to struggle with the material and learn lots in the process.

Just a side note, these pieces have been simplified, no darts or extra gathers. I am also ignoring the seam allowances. The grading is done the same way regardless. This demonstration only shows how to figure out a length grade. The same principle works for widths.

Anyway, let's move on to the examples....

Graded nest of a bodice pattern piece

Bodice pattern split for a midriff

In order to grade a complex style, you need to have basic blocks that are already graded. On top I have a basic block that is already graded. Below that is my ungraded pattern pieces for a bodice with a mid-riff.

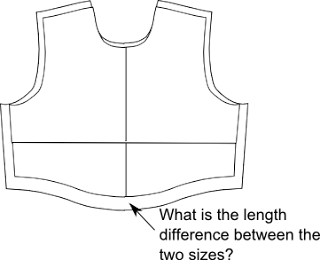
Measuring the difference in length between sizes

There are many ways to determine the total length grade. In this case, I just want to know what the length difference is between the graded basic block and the ungraded pieces. I want to grade my pieces up to the next larger size. To do this, I just lay the ungraded pattern pieces on top of the next size and align the pieces along the horizontal and vertical axis. My drawings are missing the horizontal, but you can pretend there is a line that runs from the side-seam/armscye points across the pieces. BTW if you would rather, you can figure all this out mathematically....

Once you know the length grade difference, you can then decide where you want that length growth to occur on your ungraded pattern pieces. In the examples below, you can have that length split between the two pieces or all of it in one piece or the other (shown in red).

Growth split between the top and bottom pieces

Growth occurring only with the top pattern piece

Growth occurring only with the bottom pattern piece

The question you have to ask is:

How much should a seam move to maintain proportions?


This is where the beauty of computerized grading happens. I can play with the grade as much as I want - plugging in different numbers until the proportions look the way I want for each size. Hand grading would be a little more complex. The more complex the style, the more difficult the grade can become when doing it by hand. Handford's suggestion to tape the pieces together with long strips of tagboard can work in hand grading. The grader will have to determine if additional grade points should be added and how much movement should occur. This can be done by using Handford's red lines of distribution. Sophisticated manipulation at each grade point can only occur in CAD.

Still the principle works the same regardless of how complex the style or method.

1. Determine your total length/width grades.
2. Calculate the length/width difference between sizes at the grade points.
3. Decide where the growth should occur by comparing the total grade and the difference between each size at the needed grade points. What proportionally looks correct? How is my fit affected?

January 03, 2008

Grading Pants Notes pt. 1

The following are my notes on grading infant-toddler pants. Having a copy of the Jack Handford grading manual will be helpful in understanding what these notes mean. Hopefully you have at least read the introduction and the instructions for grading a bodice. If you don't have a copy of the book, save these notes anyway - they may come in handy.

These are the first of my notes on grading pants using the Jack Handford book. Part one of these notes is an explanation about directions and movements of the pattern pieces. Later I will talk specifically about grading pants, shorts, and what I think is a mistake in the children's chapter. Handford's book is a textbook and like most design text books he starts with grading women's styles. The book progresses from woman's bodices, pants, and skirts, to men's styles, and finally to children. When design/pattern making/grading book authors finally get to the children's info, the information becomes abbreviated and incomplete (if they include it at all). Handford's book is different because he does include infant and toddler information and it is more complete than any other grading manual out there. Still, he falls into the same trap. He assumes the student has worked through all of the previous chapters before arriving at the children's chapter. He assumes you have a strong grading background and understand his method completely. But what about those who have no interest in grading woman's clothing and skip ahead to the chapters with the most relevant information? This is what I did.

Now I do have a strong grading background - computer grading. Hand and computer grading are similar and Handford's method is how it is done in the industry. The direction of the grading is done in a similar fashion. The grade rules are similar. The grade steps are the same. But physically moving a hard, paper pattern around versus selecting points and entering relative coordinates is different. Despite that, I have a general sense of how a pattern should grow or shrink between sizes - and that helped me finally understand Handford's method better.

Directional movement in grading in and outTo start out, you will need to compare the grade instructions for women's pants to children. If you turn to page 79 (grading of women's back pant), you will notice arrows with words around each pattern piece. The arrows look like this drawing. If you flip over to the toddler pant grade (page 225), you will see arrows, but no words. It is at this point that Handford assumes you will know what direction is In, Out, Up, or Down. Now study the drawings of the women's pant and the children's pant. Do you see any other differences? There is one major difference that threw me off - I'll explain later...

Directions in pattern grading, in, out, up, downThe next thing to understand are directions. All patterns will move IN, OUT, UP, or DOWN. Handford shows how this works on page 6 in relation to a bodice. The children's chapter doesn't have these extra helps. So I drew arrows like on the right and below to help remind me of grading direction. I added the words to body center or to body side to remind me of how to move the pattern IN or OUT. As you can see, IN or OUT can change depending on whether you are grading a left or right piece (applies to front or back too). Directions may change again when grading darts. Be sure to study styles with darts to see the changes. Infant-Toddler styles do not have darts, so movements will occur like these drawings. Movements UP move toward the body head and DOWN toward the feet. UP and DOWN movements are always the same.

I hope I haven't thoroughly confused anyone yet. I felt like this brief explanation of the notation and movements was necessary before getting into more detail.

If you have questions, please leave them in comments.

August 31, 2007

Too Many Sizes pt. 2

In my previous blog entry on this subject I discussed combining sizes to reduce the overall number of sizes produced. As I have been developing patterns for my new line of dresses, Prairie Roses, I have attempted to practice what I preach.

I have been doing all of the pattern making and grading for my new dress line entirely by hand. I do use CAD, but only for my employer who actually owns the system. I try to keep everything separate so there are no ethical questions (My patterns have different shaping and grading anyway). Also, I want to experience what most new designers experience since so few DE's can afford a CAD system. It takes soooo much time to do it all by hand, especially the grading. I am getting faster on the grading, but it is very time consuming. I have been using Jack Handford's book on grading and my graded patterns have turned out really well. The grade rules are beautiful - there is no other way to describe it. They are nice and consistent and all of the pattern measurements fall into an acceptable range.

My patterns fall into the infant-toddler size range and I have chosen to combine the 24M and 2T. I also added a 9 mo size, which is considered a half size and not usually included. I decided to let customers tell me whether they want a 9 mo or not with sales. It isn't that big of a deal to split the grade between the 6 mo and 12 mo. If it doesn't sell, it is easy enough to drop it. Anyway, my sizes break down like this.

3 - 6 - 9 - 12 - 18
24M/2T - 3T - 4T

You will notice I combined the 24M with the toddler group. This means my 24M/2T patterns will be based on grading from the 3T. I decided a 24M child has shaping more closely related to toddlers than infants.

In my infant grouping, the sample/base size turns into the 9M. Since the 9M is something I may not keep around, it doesn't make sense to sample in that size. I prefer to use a 12M as a sample size. If you move the 24M back up to the infant grouping and drop the 9M, then the 12M is the right sample size. Also, it is easier to find a more willing 12M child model than younger.

Now here is a dirty little secret in the childrenswear industry. Many childrenswear companies actually sample in the smallest size, 3M. This is because they end up making A LOT of samples and the samples are made from actual production fabric, not muslin. Sampling in the smallest size saves fabric. The dress form I made is actually a 3M, so that is my sample size too. It causes problems with drafting first patterns and grading. As soon as I can afford it, I will be buying a 12M form and sampling in that size.

May 17, 2007

A Word on Handford and Children's Sizes


I have previously blogged about Jack Handford's book Professional Pattern Grading (I like this grading book!). I just graded my basic infant bodices using Handford's grading charts and I just wanted to pass on a few insights.

If you read my blog on children's sizing (Too Many Sizes!), then you will know that there is a lot of variety in how manufacturer's lay out their size ranges. Handford is not really any different. His sizing breaks down like this:

3M, 6M, 12M, 18M, 24M, 36M

You will notice that the 9M size is missing. A 9M is considered a half size between 6M and 12M. Some manufacturers include it and others skip it. After studying dozens of measurement charts, I tend to favor skipping it. Children grow really fast in the first few months of life, so there is no need to include lots of possible sizes.

Another thing to consider is his 24m and 36M sizes. His toddler sizes break down like this:

1, 2, 3, 4

Except for boutique/specialty shop stores, you don't really see toddler sizes denoted like this. Normally, the toddler range is 2T, 3T, and 4T (some throw in a 5T). Anyway, there may be some overlap between the infant and toddler sizes with your patterns. This doesn't mean you can grade all of the infant and toddler sizes together. You will still need an infant block and a toddler block. You may have some shaping differences between the two.

It took me some time to wrap my brain around his grading instructions. I could look at the diagrams and see that this was the type of grading done in the industry. Even computer grading takes it's cues from this method. The actual grading process, however, varies from computerized grading.

I am accustomed to working with all of the pieces nested together. I can select a grading point and enter in the X,Y changes. It really is pretty simple. Handford has you grade one size at a time. After grading one size, you cut it out and use it to grade the next size. Precision is absolutely key because mistakes gradually increase with each size. I eventually got the hang of it and found it to be pretty easy. Once I had all of the sizes, I nested them on top of each other and I could see how well it worked. And it did work well.

So now I have two sets of infant bodice patterns using the Handford method and an adaptation of Aldrich's measurement charts. I am going to compare the two to see which I like better. So far, there doesn't seem to be too much disagreement between them. I am also trying to decide if I should add in a 9M. Right now, I am leaning toward Handford.

April 25, 2007

Neck Opening Circumference

Please note: Body measurement charts for infants which include the neck circumference measurement are now available in my book The Essential Guide to Children's Clothing Sizes, available on Amazon.

Libetty left a comment on a recent blog entry and I think the answer deserves its own blog.

So I have a sizing question that you may be able to answer... What is the minimum neck opening circumference that a child needs to get a garment on over their head? I've always thought that it was 18". Is this correct???
Babies are very interesting. Most babies have the head circumference that they will have as adults. There is some growth that occurs between newborns and older babies as the bones in the skull begin to fuse and the head takes shape. Other factors that contribute to head size are genetics and weight. A newborn baby's head circumference may start as small as 14 inches but grow to about 20 inches by age 2. Proportionally, babies appear top heavy because the head looks too big in comparison to the rest of the body.

When designing clothing and patterns for babies, there are some other considerations. Babies do not dress themselves. This means someone else must be able to reach into a shirt, for example, and comfortably pull it over the head. With a dress, you have to reach down through the neck and pull a dress over the hips and ultimately over the shoulders. Some degree of space must be included to allow for ease in dressing (as quickly as possibly too!).

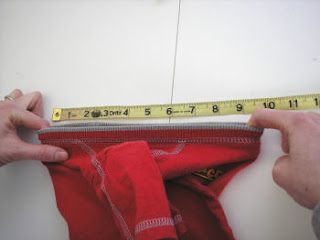
The recommended head opening for children's clothes is 20 inches for all infants and 21-22 inches for toddlers and up. This is a minimum measurement. Additional ease may be required depending on the fabric and/or style. This recommendation comes from my experience working with big box retailers - and they all seem to agree on this point. Over the years, I have seen that this is the measurement that is actually needed. BTW, this measurement refers to the extended neck measurement (see pictures below). There is no US government regulation that I know of - this is an industry standard. You can measure lots of product yourself to see most things follow this guideline.

Incorporating 20 inches into a neck circumference can be very difficult. The assumption is made that the neck circumference of the pattern must meet 20 inches. A neck circumference on a baby is 12-14 inches (measurement taken at the base of the neck). If your pattern has a neck circumference of 20", then your garment will probably fall off. The extra girth needed to meet the extended neck circumference can be added by the addition of a front or back placket, zipper, button placket, lapped shoulders, elastic, or stretchy neck ribbing. In other words, make the neck of the pattern where it should be and add extra length/girth somewhere else.

Here are few pictures of me measuring the extended neck circumference of a few different styles. Please note, I used a tape measure because it shows up better in the pictures. You should probably use a flat ruler instead. Plus, DH was taking the pictures off to the side, so it appears that I am not lining things up right, but I am. To measure the extended neck circumference, place one finger in the center front neck and another in the center back and stretch. Double the measurment from the ruler and you will have the extended neck circumference. If drafting a pattern, you can measure the pattern neck circumference plus any additional opening. It is best to double check a measurement after a garment is sewn up because things change.

Measuring a neck opening for a child's blouseThis shirt has an elastic neck. Stretch the elastic as far as it will go without damaging it. You can see this neck measures about 22" extended.


Measuring a neck opening for a child's polo shirtThis infant polo shirt has a front button placket. You can see this shirt stretches to 20".


Measuring a neck opening for a child's t-shirtThis infant t-shirt only stretches to about 18". It is a bit tight IMO. Part of the problem is the stretch of the ribbing and also how it is stitched to the neckline. The topstitching prevents stretching beyond this point and could actually break if I take it any further.


Measuring a neck opening for a girls dressTo measure the neck opening of a dress, measure from the center front neck to the bottom of the skirt placket opening. The extended neck measurement needs to be larger because the waistline needs to either slip over the head or the hips easily. This measures about 26 inches.

January 11, 2007

Sizing Studies for Children

A few weeks ago, a new mother complained about the variation in infant clothing sizes. She explained that her 12 month daughter wore clothes ranging in size from 6m to 18m. Some marked for 12 months were either too big or too small. Finding clothes that fit was a matter of trying things on a fussy baby.

She stated, "You can't trust what the size tag says."

Kathleen at Fashion-Incubator wrote an article about problems with sizing studies, especially for women. Children's sizing studies present some of the same difficulties. Children's sizing is complicated by the fact that children grow and at different rates. Ethnicity plays a part in proportions, weight, and growth rates. As a technical designer, I feel that I am only taking my best guess when drafting patterns. I have to synthesize about a dozen different size charts and methods to come up with something that works and fits! I firmly believe that even infant children deserve clothing that fits.

My concern with most measurement charts and sizing studies are that they are minimally useful for patternmaking for infants. Many measurement size charts either completely ignore or present limited info for infant sizing. The Armstrong book starts her charts at size 2/2T (some of her measurements are a bit funky too). The Gloria Mortimer-Dunn book is the same way. Childrenswear Design, has some basic information for infant patternmaking although the information is not complete. The best presentation of measurement info is from Winifred Aldrich in her book Metric Pattern Cutting for Children's Wear and Babywear: From Birth to 14 Years .

I have drafted basic blocks using Aldrich's charts and instructions. They turned out ok, but definitely needed refinement for style and fit. I thought the basic, fitted blocks need a little more ease and a lower neck. The flat blocks needed a better armhole shaping. Despite that, with some tweaking, you could have a nice set of infant blocks to work with. Part of my difficulty could be that the British are accustomed to a closer fitting block and the metric system. I had to wrap my head around metric conversions, which probably introduced some inaccuracies.

I haven't talked much about measurement charts available from ASTM. This is because I have not purchased a set of charts from them. I don't have the need at this point. Other government studies are interesting, but don't contain enough of the measurements needed to draft basic blocks. Growth charts and retail size charts (and a few in patternmaking books), list infant sizes by pounds and lengths. Those are interesting for comparison and not useful for drafting patterns.

I am not sure what new childrenswear designers are to do. Most companies develop their own measurement charts and some are better than others. Getting those first, good bodice block patterns are critical because every future design is based off of them. It may be easier to drape your first blocks off of dress forms rather than drafting from measurements. Or maybe a combination of both. This sizing study problem could explain why infant sizing is all over the place.

Over the years, I have settled with basic patterns that have proven to work. They continue to be modified for improvement and someday they will be what I hope is a great pattern.

January 08, 2007

Points of Measure and Grading

In a previous grading blog, I showed the first step in developing grade rules. I usually break my measurement and grading charts into two charts. Here is an example:

An example of developing a grade rule

I usually stop at the middle chart and work the rest of the math out in my head as I grade. Some of you may want to break your measurements down even further. If a pattern piece is symmetrical, you can grade half of the pattern at a time. The third chart shows the grades for half of the pattern width.

My charts have a column on the left titled POM, or point of measure. Those points of measure should correspond to a drawing like this:

Points of measure on a pattern piece

The measurements in the top chart above are based off pattern measurements (which are made up for this example), rather than body measurement charts. The grades are developed from body measurements. To grade successfully, you will need to take a lot of measurements off your base size patterns. For a bodice pattern, you will need armhole circumference, across the shoulder neck circumference, neck width, neck depth, and possibly more. Work between your body measurements, pattern measurements, grade, and ease requirements to develop appropriate grade rules for each point of measure. BTW, if your pattern measurements are finished measurements (minus seam allowances), you can use these charts to measure finished garments while doing quality assessments.

There are standard reference grading charts available from various sources. You can refer to them to develop your grade rules, if you like, and it may save you some time. Standard grading charts are usually available for adult, most often, women's clothing. Children's grading charts are available, but I have found them less useful. There are too many variations in children's body measurements, and every company has their own set. I usually have to develop grading charts that are unique for each company. When a designer asks me to grade a pattern, I have to work off of their measurement charts and basic pattern pieces for the grade to make sense. I will compare their measurement charts with my own to make sure their measurement and grades fall within an acceptable range.

If you do use a standard reference grading chart, you will need to double check your pattern/body measurements across the range. Standard grade charts do not accommodate variations in body type that your company may try to fit.

In the next grading blog, I will begin to explain the actual process of grading.