Showing posts sorted by relevance for query too many sizes. Sort by date Show all posts

September 02, 2008

Comparing pattern shaping and children's sizes

As many children's wear designers know, children's clothing has a lot of sizes. It can become quite the dilemma when trying to decide which sizes to offer. Some DE's offer their styles in as many as 21 sizes. Way back in 2006 I suggested a theory to reduce the number of sizes by combining or eliminating some of them. You may want to go back and review the entry Too Many Sizes and other related entries to see how I have arrived at today.

Anyway, I have tried to put the theory into practice and I have made some progress. I only offer my styles in sizes 3M to 6x. I am still working on the grades for the 4-6x styles, so I am nearly there. My sizes break down like this:

3M, 6M, 9M*, 12M, 18M

24M/2T, 3T, 4T/4

5, 6, 6x

I don't really consider the 9M as a true size. It is a half size between the 6M and 12M and is graded by splitting the grade between the 6M and 12M. The 24M and 2T are essentially the same as are the 4T and 4 - those sizes have been combined for grading purposes. My website still delineates the combined sizes as separate sizes.

This blog entry is not a discussion on the why and wherefores of children's sizing - a surprisingly complex and controversial topic. Instead, I wanted to show a possible grading/pattern problem that shows up now and then. I have been grading and comparing my basic bodice blocks. You should do this too because someone will eventually see the problem and it will be more difficult to fix.

I have drafted my basic bodice block three times, in each of my sample sizes for each of my size ranges - 12M, 3T, 5. (BTW, you can't use the same pattern piece and grade it in all the sizes. Believe me, that is one large headache). The next step is to grade each range separately. Keep in mind that each sample size will have slightly different shaping, but the general shape and proportion should be related.

Before getting too far, the outer fringes of each size range should be compared. For example, the size 18M should be smaller than the 24M/2T and the size 4T/4 should be smaller than the 5. Originally, I had graded the size 4T and 4 separately. In other words the 4T was based off the 3T sample and the 4 was based off the 5. The reason I combined the 4T and 4 was because the shape and overall size was so similar it was a duplication in effort, and I also ran into the problem where the 4T was actually larger than the 4. If you do separate out the sizes than the 4T must be smaller than the 4. If you don't check your grades, someone will bring two dresses to you and say the patterns are wrong, size labels are switched or some other problem.

In the photos below you can see the problem more clearly. In the top picture, the size 4 is laying on top of the 4T. You can see the 4 is smaller than the 4T. In the bottom picture the 4T is on top of the 4 and it is clearly longer with a larger armhole.
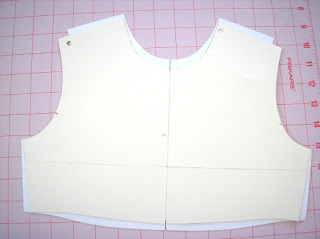
Comparing pattern shaping and sizing of a bodice frontComparing pattern shaping and sizing of a bodice back
To solve this problem, I have been reworking my toddler patterns. I started by combining sizes 4T and 4 so I have one less size to grade. Next my toddler bodices were redrafted to have a shape similar to the 5 (less boxy, smaller armhole). Finally, I regraded the toddler patterns. This is still a work in progress, but the results are much better - each size is progressively larger.

I had the same problem with my size 18M and 24M/2T. In this case it wasn't a grading problem. Instead my infant patterns were proportionally too long compared to the toddler. I fixed this by shortening the bodice slightly.

Anyway, the point is that you should make sure and check the sizes on the outer fringes of each size range and make adjustments so that each size is progressively larger. You can adjust the grade rules (much easier in CAD, btw) or change the shape of the patterns.

(I am ignoring the idea that in the real world an 18M child could be larger than a 24M child. If that is the case, a parent would buy a larger size than 18M and just complain about the craziness of US sizing standards. When I did private label programs for the big box retailers their grade/POM charts progressively got larger with each size. Logically it makes sense even if reality is very different. Anyway, you can allow your sizes to overlap if you want, you'll just need to have an explanation as to why when a sewing contractor becomes confused.).

June 26, 2006

Too many sizes!

I am currently in the process of rewriting this article for another project. A lot of what I wrote in 2006 is a reflection of my thinking back then. I have since refined my thoughts which will be published later. So please consider this article a bit out-of-date.

One designer asked me two fundamental questions. At the time I wasn't sure how to answer them. The first is really a grading question and the second a sizing standard. Both are related. To keep things simple, I will start with the sizing standard question.

"Why are there so many sizes for children's clothing?"

Because children grow. Ok. That is the easy way out. The truth is that children grow and manufacturers try to have a range of sizes to choose from.

The other half of the question was, "Can we have fewer sizes?"

This is a much more complicated answer. Because children's clothing can cover such a wide range, it is possible to have a lot of sizes. One company I worked for produced clothing from Preemie to a size 16 - not including the plus sizes. When you break this down it looks like this:

Preemie, NB, 3M, 6M, 9M, 12M, 18M, 24M, 2T, 3T, 4T, 4, 5, 6, 6x, 7, 8, 10, 12, 14, 16.

This is a whopping 21 sizes! This complicates bookkeeping and sales information incredibly. If you create a style in one colorway, then each size will have its own SKU (stock keeping unit). If you add a colorway, then each size in this style can have two SKU's - one for each color. The company wanted to try and reduce the number of SKU's each season. This particular company produced a new line every 4 months which consisted of dozens of new styles. Thinking about it can give anyone a headache.

To reduce the number of sizes, you have to either combine some of the sizes into ranges and eliminate some duplication. The duplication is the easiest to see first. There is very little difference between a 24M and a 2T. A 24 month old child is essentially a 2 year old. The T simply means that ease is added to the pant area for a diaper.* Most 24 month old children and 2T children are still wearing diapers, so there should little to no difference in the patterns there.

*I'm not sure where the idea that the T in the size 2T implied the size included diaper ease. I repeated this idea because it was all I knew at the time. After a lot of research, I now believe this idea is a myth that has been perpetuated around the internet. I have found no size study information that supports this idea. Rather it has become a standard custom to refer to toddler sizing in this way. As a pattern maker I always included ease for a diaper in the toddler sizes because they wear diapers! The ease is not much more than what is needed for wearing pants anyway. Diapers do not add much bulk these days. Perhaps in years gone past in the age of cloth diapering, it was more of a concern.

The other likely duplication is the 4T and 4. Again these sizes overlap with only a slight difference in the pant area for a diaper. Most four year olds are potty-trained, although it is possible that some are not. In any event, if you manufacturer girl's dresses, this is another area where sizes could be combined. Some companies have started putting out a 5T, but it would be unusual to find a five year old wearing a diaper.

The next size duplication looks like the 6 and 6x. In this case, there is a fitting difference introduced. There should be little girth difference in the patterns, but there will be a length difference. A 6x is a taller size for a 6 year old. Some retailers combine the 6x with a 7. This is where it would be important to know your customers before eliminating or combining sizes.*

 *(Please note that this paragraph has been modified. I made a big assumption that was just wrong stating that the size 6x is a plus size version of the size 6. This isn't true. It is a taller version of the size 6. In any event, the paragraph above has been edited with the correct information).

So now our sizing looks like this:

Preemie, NB, 3M, 6M, 9M, 12M, 18M, 24M/2T, 3T, 4T/4, 5, 6, 7, 8, 10, 12, 14, 16.

And this is where I have to interject. Retailers, and especially big box retailers, do differentiate the sizing of the patterns on the sizes we just combined. A 2T is just a little bit bigger than a 24M, even though it really shouldn't be. Consumers have become accustomed to this type of sizing system and so have the technical designers in the business. In other words, don't expect any big changes anytime soon. This proposal is a way to simplify things. You are more likely to find a simplified sizing standard in boutique or specialty stores.

Ok, back on track now. The next step is to create a range of sizes. This is simplest in the infant sizes and another grey area. Every major manufacturer has come up with their own size range break-down, and it really is all over the place.
I really like how JcPenney has broken down their infant size range:

Newborn, 0-3M, 6-9M, 12M, 18M, 24M/2T

The nice thing about this sizing standard is that there are no overlapping of sizes.
Some companies will create a range like this:

Newborn, 0-3M, 3-6M, 6-9M, 9-12M, 12-18M, 18-24M

As you can see, there is a lot of overlapping. This could cause confusion for a customer because it is difficult to pick just the right size range. Also, this doesn't reduce the number of sizes carried.

If we eliminate the newborn and preemie sizes and use the size range from JcPenney, we would get this:

0-3M, 6-9M, 12M, 18M, 2, 3, 4, 5, 6, 7, 8, 10, 12, 14, 16.

If you look carefully, you will see that I eliminated the 24M size and the T's on the 2, 3, and 4. This is where you have to decide how the size will appear on the care/content tag or hang tag. It would be best not to confuse customers - keep things simple and logical here.

You will also notice that there seems to be a size missing in the infant sizes. The size 6-9M is often combined because either the 6M or the 9M is considered a half size between the 3M and the 12M. This is obvious when you study measurement charts, so just take my word on it for now.

The other thing to consider when generating a size standard is the patternmaker/grader. The size 0-3M, for example can be created in one of two ways. The measurements of the Newborn and 3M could be averaged out or the patternmaker could just make the patterns a true 3M. In order to fit the most children, it is best to make the patterns fit the high-end of the range. In our example, the patterns would be made in a 3M. The clothing will fit loose on the small end of the range, but kids grow fast. The only exception might be sleepwear which needs to fit snug to the body in all of the size ranges. This is another place where you need to know your product and customer well.

By following this example, we have gone from a whopping 21 sizes to 15! While this still creates a lot of sizes, it is so much simpler and easier to understand.

0-3M, 6-9M, 12M, 18M, 2, 3, 4, 5, 6, 7, 8, 10, 12, 14, 16.

The next question to address is the grading question. And that will have to wait for tomorrow.

May 17, 2007

A Word on Handford and Children's Sizes


I have previously blogged about Jack Handford's book Professional Pattern Grading (I like this grading book!). I just graded my basic infant bodices using Handford's grading charts and I just wanted to pass on a few insights.

If you read my blog on children's sizing (Too Many Sizes!), then you will know that there is a lot of variety in how manufacturer's lay out their size ranges. Handford is not really any different. His sizing breaks down like this:

3M, 6M, 12M, 18M, 24M, 36M

You will notice that the 9M size is missing. A 9M is considered a half size between 6M and 12M. Some manufacturers include it and others skip it. After studying dozens of measurement charts, I tend to favor skipping it. Children grow really fast in the first few months of life, so there is no need to include lots of possible sizes.

Another thing to consider is his 24m and 36M sizes. His toddler sizes break down like this:

1, 2, 3, 4

Except for boutique/specialty shop stores, you don't really see toddler sizes denoted like this. Normally, the toddler range is 2T, 3T, and 4T (some throw in a 5T). Anyway, there may be some overlap between the infant and toddler sizes with your patterns. This doesn't mean you can grade all of the infant and toddler sizes together. You will still need an infant block and a toddler block. You may have some shaping differences between the two.

It took me some time to wrap my brain around his grading instructions. I could look at the diagrams and see that this was the type of grading done in the industry. Even computer grading takes it's cues from this method. The actual grading process, however, varies from computerized grading.

I am accustomed to working with all of the pieces nested together. I can select a grading point and enter in the X,Y changes. It really is pretty simple. Handford has you grade one size at a time. After grading one size, you cut it out and use it to grade the next size. Precision is absolutely key because mistakes gradually increase with each size. I eventually got the hang of it and found it to be pretty easy. Once I had all of the sizes, I nested them on top of each other and I could see how well it worked. And it did work well.

So now I have two sets of infant bodice patterns using the Handford method and an adaptation of Aldrich's measurement charts. I am going to compare the two to see which I like better. So far, there doesn't seem to be too much disagreement between them. I am also trying to decide if I should add in a 9M. Right now, I am leaning toward Handford.

August 31, 2009

Comparing pattern shaping and children's sizes follow-up

Kathleen suggested that I post an update on a previous grading post I did about a year ago. You can read what I wrote previously at When Patterns Collide. In that post I suggested that it would be possible to combine the 24M and 2T and the 4T and the 4. My reasoning being that the 24M and the 2T are essentially the same sizes - why differentiate them? The subject is a little complex and perhaps controversial - at least to pattern making geeks. My goal was to reduce the work load. I was drafting and grading all of my patterns by hand. I am incredibly slow grading by hand. In addition, I was trying to solve one particular sizing problem that shows up in childrenswear, that is hard to illustrate. Since I shut down my Prairie Roses line, I am not knee deep in pattern making as I was a year ago. But perhaps it may be helpful to explain what I ended up doing.

Originally, I broke up my sizes into these ranges:

3M, 6M, 9M, 12M, 18M, 24M - sample size 12M

2T, 3T, 4T - sample size 3T

4, 5, 6, 6x - sample size 5

These ranges are rather typical of what you will find in retail stores. When developing my patterns, I have to make and grade the patterns for each size range separately. You cannot make one set of patterns in one size and grade them up and down all the way. It won't work because that many sizes will cause minute grading errors and strange fit, especially on the smallest and largest sizes. As you define your grading and size measurements, you will find that the 24M and 2T and the 4T and 4 overlap. I followed the Jack Handford grading rules, which are pretty darn good, but end up with a result like this:

Bodice pattern pieces in a size 4T and 4 and how they compare

In the picture above, the size 4 is laying on top of the size 4T. The size 4T is actually too long in length and too wide. I double checked all of my grading and there was no mistake. The size 4T was graded off my 3T and the size 4 off of the 5. The shaping of the sample size pattern pieces varied a little. The toddler was a little boxier because toddlers don't have any waist shaping, whereas a 5 year old does. If I were to leave my patterns this way, someone will eventually hang the two sizes next to each other and think there was some kind of manufacturing mistake. I needed to fix my patterns so that each size is incrementally bigger.

To do this, I rearranged my size ranges, combining some sizes:

3M, 6M, 9M, 12M, 18M - sample size 12M

24M/2T, 3T, 4T/4 - sample size 3T

5, 6, 6x - sample size 5

The next thing I did was reworked the shaping of my toddler sizes to look more like the 4-6x range. I pulled the waist in some and made the armhole smaller. I made these shaping changes because I found that my toddler patterns were just a little too big. Now, I can lay all of my bodice pattern pieces in order and they get incrementally larger from the 3M to the 6x. Your patterns may look different, but it is worth comparing the sizes on the outside edges of your ranges to make sure you don't have something weird show up like I did.

Even though I combined some sizes, I kept this behind the scenes. My customers still saw all of the sizes separated out. If someone ordered a size 24M and another ordered a 2T, the dress would be exactly the same except for the size tag. I offered all of the sizes on my website so that customers would see something familiar. Perhaps it seems a little dishonest? I don't think so because in the real world a 24M child is the same size as a 2T and I was willing to take the chance. For what its worth, no one ever complained or returned those sizes for fit issues.

Now, I don't know that what I did is "the way it should be done". In the past though, I have had people question why the 24M was larger than the 2T and I had no explanation. Once I worked through grading all of my patterns by hand, it started to click in my head. The relationship of the shape of the pattern pieces, the grade, and body measurements are all connected.

October 27, 2006

Creating a grading standard pt. 2

In a previous blog, I wrote about the first steps in creating a grading standard, but failed to discuss the details. It would be helpful to also review my blog entry titled Too Many Sizes! In this blog, I will try to explain grading terms and the rules by which grading can occur. In the future, I will show how to develop your actual grade rules and how I grade a pattern (which is different from any other method I have seen).

There seems to be a lot of confusion about grading. Some people view grading as a magical process that can turn your beautiful pattern in one size into any other size you desire. Before anyone can grade your pattern, you should have already done some homework. You should have chosen a category, size range, and measurement chart. Your category and size standard should be fairly simple. You should only be working in one category and your size range should not have more than 6 sizes. You may want to work in men and womens plus and regular sizes all at once, but it is just not possible.

Now, I have to stop here for a moment and explain the concept of categories. I don't know if this is the appropriate term or not. I work in a children's category, but you may work in Misses, Juniors, Mens, or whatever. Within those broad categories, there are sub-categories or classifications based on your sizing system. A classification is based on a specific figure type such as Misses, Petites, Plus, or Talls. Each of these designations have a separate and distinct sizing system. You can't magically start with a Misses size and turn it into a Plus size by grading it. That is not how grading works, so don't even attempt it. There is no magic formula.

Grading is a simple, yet difficult concept for people to grasp. Grading is a process by which a base pattern is proportionally changed to create smaller or larger sizes. Grading is always based on a set of measurements specific to a size range and classification. Successful grading does not change the overall proportions of the intended design as the size changes. This is why a size range should be limited to about 6 sizes. Any more than that and the largest or smallest size will be proportionally wrong.

Successful grading is all about having a good starting point. A base pattern is a pattern created and perfected to fit a sample size. From that base pattern, you will create the other sizes in your size range. Now some of you want to offer Plus sizes in addition to your Misses Sizes. It should be as simple as grading your base Misses patterns up to the appropriate plus size, right? After all, it would save a great deal of work. You already have a perfect pattern and why would you want to go to the work of creating a whole new set of patterns.

The reality is, you will have to create a whole new set of patterns in a new base size contained in a new size range and classification. I know this sounds like a lot of work. The truth is that it is, at least initially. You will have to develop a set of base patterns for your Misses sizes and a separate set for your Plus sizes. You may sample a new style in a Misses size initially. Once a style is approved, your patternmaker will then create patterns in any other size ranges you want to offer. The process required to create the plus size patterns will be very similar, if not identical, to the process required to draft the Misses size patterns. There may be a little tweaking for fit during sampling, but the process will be faster than the original style development. Your patternmaker will already know what should be done.

For example, one company I work for will create a new style in a size 5 (in a children's size range of 4-6x). They then decide they want to offer that style in the entire range 2T-16 and plus sizes. I have already broken up the sizes into ranges of 2T-4T, 4-6x, 7-16, and 8+ to 20+. I then make patterns in the sample sizes of 3T, 5 (which is already done), 10, and 10+. The patterns for each sample size are then graded within their range. It may sound like a lot of work, especially if done entirely by hand. Since I work in a CAD environment, I can accomplish this task in less than a day. By hand, it may take 2-3 days.

Going back to our previous example......Once your set of Misses patterns and Plus size patterns are finished, you will then send those off to be graded. And this is where you have to create your grade rules. To create grade rules, you will need your measurement charts. So here is your homework assignment. Read your measurement chart. If you are offering more than one classification, compare the two. How does a Plus size differ from a Misses? Do your measurements make sense? Do the measurements decrease for the smaller sizes and increase for the bigger? In the next blog, I will show how to create your grade rules from your measurement charts. Once you see the grade rules, you will then understand why you can't grade a Misses size into a Plus size.

August 31, 2007

Too Many Sizes pt. 2

In my previous blog entry on this subject I discussed combining sizes to reduce the overall number of sizes produced. As I have been developing patterns for my new line of dresses, Prairie Roses, I have attempted to practice what I preach.

I have been doing all of the pattern making and grading for my new dress line entirely by hand. I do use CAD, but only for my employer who actually owns the system. I try to keep everything separate so there are no ethical questions (My patterns have different shaping and grading anyway). Also, I want to experience what most new designers experience since so few DE's can afford a CAD system. It takes soooo much time to do it all by hand, especially the grading. I am getting faster on the grading, but it is very time consuming. I have been using Jack Handford's book on grading and my graded patterns have turned out really well. The grade rules are beautiful - there is no other way to describe it. They are nice and consistent and all of the pattern measurements fall into an acceptable range.

My patterns fall into the infant-toddler size range and I have chosen to combine the 24M and 2T. I also added a 9 mo size, which is considered a half size and not usually included. I decided to let customers tell me whether they want a 9 mo or not with sales. It isn't that big of a deal to split the grade between the 6 mo and 12 mo. If it doesn't sell, it is easy enough to drop it. Anyway, my sizes break down like this.

3 - 6 - 9 - 12 - 18
24M/2T - 3T - 4T

You will notice I combined the 24M with the toddler group. This means my 24M/2T patterns will be based on grading from the 3T. I decided a 24M child has shaping more closely related to toddlers than infants.

In my infant grouping, the sample/base size turns into the 9M. Since the 9M is something I may not keep around, it doesn't make sense to sample in that size. I prefer to use a 12M as a sample size. If you move the 24M back up to the infant grouping and drop the 9M, then the 12M is the right sample size. Also, it is easier to find a more willing 12M child model than younger.

Now here is a dirty little secret in the childrenswear industry. Many childrenswear companies actually sample in the smallest size, 3M. This is because they end up making A LOT of samples and the samples are made from actual production fabric, not muslin. Sampling in the smallest size saves fabric. The dress form I made is actually a 3M, so that is my sample size too. It causes problems with drafting first patterns and grading. As soon as I can afford it, I will be buying a 12M form and sampling in that size.

October 29, 2018

Understanding pattern grading for children's clothing

I'm catching up with some questions and comments. It's been a while since I've answered a grading question.
My brain is spinning with all the reading I've been doing on this subject. Can you please explain to me why I couldn't grade within my separate size ranges by grading, for example, 3-6 with one particular grade rule and then taking then changing my grade rule for the next section? Would this not be taking the difference growth rates and such into account? I feel like there's probably a reason that I haven't quite grasped yet. Thanks so much.
Grading women's clothing is different from grading children's clothing. Women's clothing is graded with either a 1 1/2" or 2" grade between the sizes. This grade rule refers to the change in circumference measurements between the sizes. There is a lot of criticism for this grade rule because it appears to not have a connection to actual body measurements. That assumption is not strictly true, but it is true this practice is a convenience for the industry. It is too difficult to mass produce clothing and create a custom fit for an individual woman. This grading convention has historically proven to fit the most women in the most efficient way.

Men's clothing has many more sizes. These sizes are given size names that correspond to actual body measurements such as waist, pant leg inseam, or neck and sleeve. The circumference difference is usually 1 inch but it may be 2 inches for larger sizes.

Children's clothing is different. Children grow exponentially from birth. Their growth makes it difficult to group children into size groups, but over 70 years ago a measurement study managed to give us enough measurement data to do just that. That measurement data shows that the change between children's sizes is not even. This is true regardless of how sizes are arranged or named. The circumference measurement difference may range between 1/2" to 1" or more. There are similar irregularities in length grades. Children's clothing brands interpret measurements in their own way, so you will see variation in the marketplace.


Speaking to this particular question. If you group your children's sizes so they are called 0-3M, 3-6M, 6-9M, etc., your grade rule will still vary between the sizes. But there will be no grade change between a 3M and a 6M in the size called 3-6M. When developing a grade rule for this kind of size system, I interpret the sizes like this:

0-3M = 3M
3-6M = 6M
6-9M = 9M

You can call your sizes whatever you choose, but for pattern making and grading you have to assign a meaning to that size. Interpreting sizes with a size label of 0-3M as a single size 3M is the easiest way to develop grade rules and it seems to work.

September 02, 2022

How to find body measurement charts for children

Tape measure


This blog entry is part of a series on The Essential Guide to Children's Clothing Sizes.

There are a lot of children's body measurement charts floating around the Internet. But are they reliable? The answer to that question is difficult to determine. I have looked at some of the free charts out there and some are pretty good and others definitely have some anomalies. While I won't single out any particular chart, I would urge some caution on relying on whatever you can find freely on the Internet.

Some of the anomalies include inconsistent body measurements and differences between sizes. This may sound odd because you would expect that a size should measure what it measures. Having read a few measurement studies, the raw data that backs up body measurements are inconsistent between the sizes. But that raw data is difficult to work with, especially when it comes to grading. So statisticians and data analysts take the raw data and average it out. Then they take the average body measurements and adjust the numbers up or down small amounts to obtain numbers that are easy to work with as a convenience for pattern making and grading. This type of data manipulation does not result in fit anomalies as might be expected despite cries of vanity sizing and inaccuracies.

It's hard to say how these free charts available on the Internet came about. I suspect many of them are based off of cribbed data from various retailers. Some may be based on measuring some children. Some may be straight from official measurement studies. Regardless, caution is warranted.

You can use the free charts on the Internet, if you choose. It may be a place to start. It may also be a source of frustration if things aren't working quite right in your product development.

However, there are places to acquire body measurement charts. Some free, some not.

ASTM is an organization that develops standards, including body measurement standards. However, there standards are not free and contain restrictions on their use. This is the place for the most up-to-date measurement standards with sizing studies to back most of it up. Search for these standards on the Internet to find them.

D4910 - Size standard for infants, sizes preemie -24M

D6860 - Size standard for Boys, sizes 6-24, Husky

D6192 - Size standard for Girls, sizes 2-20, (Regular and Slim), plus sizes

D6829 - Size standard for Juniors, size 0-19

The U.S. government created a series of body measurement standards, which were in use into the 1980's. They were later withdrawn in favor of the ASTM standards. However, these charts are in the public domain and can still be found with some difficulty. In recent years the government has even pulled these from the Internet. They may still be found at government document repositories located within various libraries around the country or requested through standards.gov. I include complete copies of these standards in my book The Essential Guide to Children's Clothing Sizes. I created cleaned up versions of these standards that are easier to read in the appendix. I also include missing measurements from the original standard, which are the neck circumference, hand, and foot lengths and widths.

CS151-50 - Children

PS45-71 - Young Men

PS36-70 - Boys

PS54-72 - Girls

It is true that the withdrawn standards are a bit out of date. However, even the purchased, most up-to-date measurement charts from ASTM are based on this earlier standard. ASTM has added some sizes and refined some of the body measurements, but the similarities are still there. In other words, you can use the withdrawn standards as a good starting point in your product development and not be too far off. You will at least have a better foundation than using body measurement charts from unknown sources with questionable measurement data.

For this and more, see The Essential Guide to Children's Clothing Sizes.

February 17, 2020

Who manufactures a size 9 months for baby clothes?


Infant clothing on a clothesline

I have been intensely working on a project that requires me to study measurement charts and grading charts for children's clothing. It is not the most exciting thing to analyze, I must admit. There has been one size that has been the most difficult to understand and that is the size 9 months for babies.

Traditionally, there never was a size 9 months. The infant size range was arranged:

3M - 6M - 12M - 18M - 24M - 36M

Over time that arrangement dropped the 36M, making the 12M the middle size for sampling and grading. At some point a NB (newborn) and 9M was added. I have not found the reasoning for the additional sizes or exactly when they were added. At least with the NB, it makes some common sense as it is clothing for newly born children. Babies very quickly move through these early infant sizes, so many times the clothes are simple t-shirts and bodysuits. Size 9M, from a measurement standpoint, appears to be a half-size. Something between the 6M and 12M. You could say the 9M should fit a 9 month old baby and perhaps that is the intent.

The problem comes with how to incorporate the size 9M into a normal infant size range offering. It throws off the middle size 12M in sampling and grading. With the addition of the 9M, the 9M becomes the middle size.

NB - 3M - 6M - 9M - 12M - 18M - 24M

No one samples in a size 9M. No one. In fact, it would make grading difficult to do so - just look at the traditional grading charts by Jack Handford.

And that left me wondering. How many brands actually produce a size 9M? While my quick survey is not scientific, it revealed some interesting points.

Manufacturers of sleepwear, t-shirts, bodysuits, or lounge wear, tend to produce only certain sizes and they tend to arrange them:

0-3M, 3-6M, 6-9M

Of course there are variations. Manufacturers of special occasion dresses tend to produce only a few sizes too.

12M - 18M - 24M

There are variations there too. When I worked for a brand that produced christening apparel, we produced all the sizes from NB - 24M. Size 9M was not one of our top selling sizes.

BabyGap does not produce size 9M for any of their styles. They stick to the traditional size range:

3M - 6M - 12M - 18M - 24M

But they arrange their sizes so it looks like they have their bases covered.

Up to 7lb (NB),  0-3M, 3-6M, 6M-12M, 12M-18M, 18M-24M

So what is the point of all this? When you are developing your children's clothing line, you do not need to produce every size. There is a great temptation to offer every style in every size. The reality is that if the big brands aren't doing it, neither do you. A lot depends on the style and your customer. Who do you hang with? Who is your competition? What sizes do they produce? Once you know the answers to those questions, you can focus your efforts.

What about the size 9M? Unless your customer requires that size, it is probably best to skip it or at least make it appear that it is included within a size label like 6M-12M. Some private label programs may require a size 9M. If that is the case, it is a simple matter to split the grade rule between a 6M and a 12M to add the size.

January 24, 2013

Review of Simple Modern Sewing pt. 2 : Sewing up a sample

I have to admit that I put off the rest of this review. It's hard to be so down on a book that I had so enjoyed perusing. You can read the gushing in part 1 of my review. First the positive:

The photography and layout of Simple Modern Sewing is great. The instructions are adequate for experienced sewists. The patterns are printed on sturdy white paper.

And then when you pull out the pattern sheet, this is what you get:

Pattern sheet from Simple Modern Sewing


As you can see, nearly all the pattern pieces and sizes use the same exact black line. It would have helped to at least denote the different sizes with different line types and colors for different styles in the same way that Burda does. You have to really look carefully for notches, because they are easy to miss despite extra notations on the pieces. And in just this one snapshot of one part of the pattern sheet, there are 5 pattern pieces that overlap.

The issues with the pattern sheet are relatively minor though, especially if you are comfortable with Burda patterns. I did manage to trace everything off for the wrap blouse and dress. I had to select the large size since that matched up with my measurements best. There did seem to be some discrepancy between the measurement chart, printed finish measurements in the pattern instructions, and the actual pattern pieces. I didn't take the time the track it down and it could be just differences in how one measures. For me, it resulted in a bit more room (which was actually needed) than I expected. One good thing is that the shape of the armhole and sleeve was along the lines of what Kathleen recommends.

A bigger issue did present itself once I started checking the pattern. There is a grading error on the shoulder seam of the bodice pieces of the wrap blouse for the medium and large sizes. In order to fix the large size, you will need to pull the shoulder point of the back shoulder seam in about 3/8 inch. The other smaller sizes match up just fine. I debated whether this was indeed a grading problem because sometimes the back shoulder is eased instead of having a dart. On boxy, loose fitting styles there is no easing or dart, which is what this style is supposed to be. Since the smaller sizes matched, there could be no other explanation. No other bloggers have mentioned the same problem, so I'm not sure if it is just an anomaly on my copy.

After correcting the pattern and adding seam allowances, I proceeded to cut and sew and got this:

DH said it looked like a medical scrub, except it didn't even fit that well. The dart points in the wrong direction, which means I probably should have done a FBA or something else. The skirt part of the blouse has an extremely small gather ratio, less than 1:1.25, which makes the gathers look like a mistake. The result of all of this is that it looked terrible on.


I probably could spend the time to fix the pattern and try again.


But it would take too many iterations.


This project caused me to loose my sewing mojo. Who else hates spending time on something with such disappointing results? I think I can now understand beginning sewists frustrations.


Having said all that, I can recommend this book only for its design and styling inspiration. Go elsewhere for patterns which are similar.


I cannot recommend this book to beginning sewists at all. If you have more experience altering patterns and don't mind endless fiddling, then maybe this book is for you.

June 27, 2006

Creating a grading standard for children's clothing

Before I can move on to the grading question, I must make a couple of comments on my previous post. The best time to determine a sizing standard is at the very begining of your company. If you have been in business for 30 years, for example, it will be very difficult to change things around. So please, please do your homework.

Another thing, you can make your sizing standard anyway you want. Even though I am suggesting a simplified sizing standard, it may not be appropriate for you. If your intended customer is a big box retailer, it may be too simple. In fact, they may not like it. They are accustomed to choosing from a lot of different sizes. If you become part of a private label program, they will tell you what the sizing standard should be anyway. If you have something similar already set-up, there will be less stress for your patternmaker. Again, the sizing standard suggested in the previous post would be more appropriate for a company targeting specialty boutiques and small retailers.

Ok. Now the grading questiong...

"Can't we use the 3mo size for our base size and grade everything up from there?"

The motivation for this question is to save some work. In essence you make your pattern only one time and let the grading take care of all of the other sizes. While the idea is good, it presents some problems.

First, it is important to know how a child grows. A very good description and diagrams are shown in the book Patternmaking for Fashion Design by Armstrong. In my second edition of the book, it is on page 674. Up to about age 3 children are cylindrical in shape. There is little differentiation between chest, waist, and hips. At about age 4-5, girls start to develop a waist. At age 8, there is more definition and curves. Boys and girls are similar in shape up to about age 8.

Because there is a change in body shape at regular intervals, a patternmaker will break-up the sizes like this:

0-3M to 24M, 2T-4T, 4-6x, 7-16

By breaking up the patterns into these size ranges, a patternmaker would then make base size patterns in a 12M, 3T, 5, and an 8 (or whatever sizes are chosen). You could sample your initial style in any size you prefer - hopefully a middle size. When the design is approved and read to go into pre-production, the patternmaker will then make patterns for your style in each of the other base sizes. Those patterns are then graded for each range.

Some manufacturers will go to the trouble of sampling their style in each range. Retailers like to look at more than one size range because they have to "see" how to merchandise their floor areas. It is possible you will end up making a lot of sales rep's samples if you plan on selling the whole range. These extra samples are called sisters or brothers.

Even with our simplified sizing standard, you would still break up your sizes like this:

0-3M to 3, 4-6, and 7-16

Now some design entrepeneur's may still insist on having only one base size and grading everything off of that. What will happen is you will introduce errors into your patterns in the extreme ends of the range. The grading will be more complicated. The fit will be off in the transitional sizes between infant to toddler, young child to older child. For organization sake, your patternmaker/grader will greatly appreciate having things broken down into simpler groups.

Also, you will be bucking industry standards and not playing by the rules. Walk into any department store and look at how the children's clothes are arranged. You will notice that the clothes are arranged together in the size ranges we talked about above - infant, toddler, young child (4-6x), and older child (7-16). Your order form should have your styles broken down similarly.

By this point you are probably thinking that it is still a lot of work to make that many patterns for each base size. If you have a CAD system with nifty pattern drafting and grading capabilities, it isn't really that big of a deal. Even if you had to do it by hand, it should only take a day or so. Your patternmaker will be just repeating the same drafting process over and over again. If you make dozens of styles every season, you may seriously consider investing in a CAD system.

April 18, 2006

Sizing Up Children and shopping difficulties

In the March 2006 issue of Redbook magazine, Melissa Schweiger attempts to explain the difficulty of creating women’s fashion. The disparity in body shapes, weights, and sizing is an evolving and complex task. Fashion companies each create their ideal customer and manufacture clothing based on specific sizing. But all too often women fall in between sizing or have different proportions. Many women have to try on a mountain of clothes to find something that finally fits.

Schweiger makes some interesting points about the changing shape of American women. Many of these ideas also apply to children’s fashion and sizing. Below, I highlight some key points:

Arbitrary Sizing

Each manufacturer develops their own sizing system. In women’s fashion the sizing numbers are relatively standard. For example, the sizes run 2, 4, 6, 8, 10, 12, and so on. In infant clothing, the sizing varies from label to label. One place will size 0-3, 3-6. 6-9, 9-12, 12-18, 18-24. Another will size 0-9, 9-12, 18-24. Some simply place a label with corresponding weight such as 19-26lbs. Stores like the Gap hand out info cards to help the consumer determine the right size.

After determining one size for one label, you will be out of luck at the next store. A 6-month-old baby can easily wear any size labeled 6-18mo. The added difficulty of fitting a baby is that they get fussy. If you can’t stand trying on 10 pairs of pants, imagine an infant after one pair.

Changing Shapes

According to this article, American women have changed. They are a bit taller and heavier. American women are more ethnically diverse. The challenge for manufacturers and designers is to design a product that fits a more diverse range of people. Some are making attempts, some refuse.

The general consensus among children’s fashion professionals is that children are changing along with their parents. They are taller and heavier, and more ethnically diverse. Childhood obesity and inactivity play a part in changing shapes.

The problem is children’s clothing manufacturers cling to their 30+ year old size charts. They protect their sizing information like a trade secret (not uncommon in every segment of the fashion biz). And while major studies are being done on men and women, they are not being done on children. (If I am wrong, please let me know).

Shopping for children who fall outside of the norm has tremendous difficulty. Plus sizes for children are not stocked in many stores, despite the apparent increasing demand. And if there is truly a demand for children’s plus sizes, it is hard to gauge. Children in this category move to adult sizes much more quickly.

Overall, this magazine article was an interesting review of the difficulty faced by clothing manufacturers. Well worth the read if you have wondered why you can’t find anything that fits.
Additional ideas and fitting information can be found at http://www.fashion-incubator.com.

October 25, 2007

Stewart Girl's Dress pt. 3

I have made some progress with the pattern. I still believe the greater challenge is coming up with a mass construction technique. No matter how I twist my brain around the style, it still requires hand manipulation of the gathers. So per Kathleen's suggestion, here is what the pattern would look like. I realized after I took the pictures that I had left off the seam allowances for the dart - must add that before sewing up the samples. This is a quick and dirty pattern, and I know it is not production ready. The style is going to work for girl sizes 8-16 and older. Younger sizes do not have (or need) darts in the skirt, although they can be added for a style detail.

Skirt sewing pattern with dart detailsThis is a basic skirt block for a girl's size 10. A style line is drawn on the pattern where the gather detail is to be placed.


Adding fullness to a dart on a skirt patternLines are drawn from the dart point and the style line until they intersect. The skirt is slashed along those lines to the point of intersection. The dart is partially rotated closed. The original style had some fullness in the waist. The dart equivalent fullness only adds about a 1/2" to the waist front. I suspect the original style had more. The original style was probably for an older teenager rather than a young girl. Anyway, slash lines are drawn from the lower dart leg to the hip line (On a full length skirt, the slash lines would go to the hem. For ease, I am only working to the hip line).

Added fullness to a side dart on a skirtSlash the skirt along the new slash lines to the hip and spread to the desired fullness. In this case, I spread for a 2:1 gather ratio. The finished pattern would look something like the one to the left. Like I said, I forget to add seam allowances to the dart opening. If you try this yourself, don't forget to add them.

Fabric samples will have to wait until later - too many pressing projects.

January 11, 2007

Sizing Studies for Children

A few weeks ago, a new mother complained about the variation in infant clothing sizes. She explained that her 12 month daughter wore clothes ranging in size from 6m to 18m. Some marked for 12 months were either too big or too small. Finding clothes that fit was a matter of trying things on a fussy baby.

She stated, "You can't trust what the size tag says."

Kathleen at Fashion-Incubator wrote an article about problems with sizing studies, especially for women. Children's sizing studies present some of the same difficulties. Children's sizing is complicated by the fact that children grow and at different rates. Ethnicity plays a part in proportions, weight, and growth rates. As a technical designer, I feel that I am only taking my best guess when drafting patterns. I have to synthesize about a dozen different size charts and methods to come up with something that works and fits! I firmly believe that even infant children deserve clothing that fits.

My concern with most measurement charts and sizing studies are that they are minimally useful for patternmaking for infants. Many measurement size charts either completely ignore or present limited info for infant sizing. The Armstrong book starts her charts at size 2/2T (some of her measurements are a bit funky too). The Gloria Mortimer-Dunn book is the same way. Childrenswear Design, has some basic information for infant patternmaking although the information is not complete. The best presentation of measurement info is from Winifred Aldrich in her book Metric Pattern Cutting for Children's Wear and Babywear: From Birth to 14 Years .

I have drafted basic blocks using Aldrich's charts and instructions. They turned out ok, but definitely needed refinement for style and fit. I thought the basic, fitted blocks need a little more ease and a lower neck. The flat blocks needed a better armhole shaping. Despite that, with some tweaking, you could have a nice set of infant blocks to work with. Part of my difficulty could be that the British are accustomed to a closer fitting block and the metric system. I had to wrap my head around metric conversions, which probably introduced some inaccuracies.

I haven't talked much about measurement charts available from ASTM. This is because I have not purchased a set of charts from them. I don't have the need at this point. Other government studies are interesting, but don't contain enough of the measurements needed to draft basic blocks. Growth charts and retail size charts (and a few in patternmaking books), list infant sizes by pounds and lengths. Those are interesting for comparison and not useful for drafting patterns.

I am not sure what new childrenswear designers are to do. Most companies develop their own measurement charts and some are better than others. Getting those first, good bodice block patterns are critical because every future design is based off of them. It may be easier to drape your first blocks off of dress forms rather than drafting from measurements. Or maybe a combination of both. This sizing study problem could explain why infant sizing is all over the place.

Over the years, I have settled with basic patterns that have proven to work. They continue to be modified for improvement and someday they will be what I hope is a great pattern.