Showing posts with label Sample. Show all posts

December 11, 2013

Adapting a block pattern into something else pt. 7 : Pattern modifications

Testing a neckband construction

Have you ever had a project bug you? I had my first sample hanging in the Design Loft almost taunting me. Originally I wanted a neckband on my cardigan. Then during construction, I changed to a rolled fabric edge along the neckline. The longer I stared at it, the less I liked it. Still unsure how a folded neckband would look, I whipped up a small sample, and what do you know? It worked just fine. It could be improved with a bit of interfacing, but not too bad.

So I pulled out the seam ripper and set to work. In addition, I removed some of the extra ease I had previously added for a closer fit.
Testing the fitting sample
You'll notice there are still a few minor adjustments that need to be made. The sleeves are too long. Yep, I over compensated there. The shoulder needs to be brought back up. And the back neckline needs to be raised. Despite all that, I am fairly pleased with the results. This is the style of cardigan that I really like. It looks sloppy in the photo because I used a rayon/poly jersey knit that is just too lightweight and drapey for the style. The next version will be even better. And yes I do plan to wear this, even in public. It is very, very comfortable.


November 21, 2013

Adapting a block pattern into something else pt. 6 : Sewing a fitting sample

Test fitting sample for a new cardigan design
You can easily spend a lot of time creating a pattern on paper but at some point, it needs to be sewn up. It is while sewing that you'll see your design take shape and lead you to make modifications as needed. I changed the design a bit by eliminating the folded neckband. The neckband is instead a single layer that is allowed to roll. I made this change because the fabric is pretty light and it would need some kind of stabilizer, which I didn't have. The cardigan is very comfortable and fits pretty well. Even so, I added just a bit too much wearing ease. So I need to reduce some of the body width. The upper back is a tad long and the sleeves need shortened.

It's pretty hard to get everything just right on the first attempt. I've done enough girls dress patterns that I don't usually have to do many iterations. Adult clothing takes a bit more tries because I lack experience with it. Industry pattern makers and sample makers will sometimes make many iterations of a design before they get it just right. This is a slightly different approach than home sewists might take. But once the pattern is nailed down, I won't have to worry about it anymore. It will be much easier to create variations on this style too.

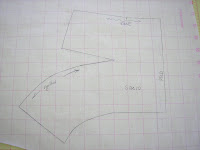
Paper sewing pattern
Before I could tackle the pattern adjustments, I needed to stop and get organized. I assigned a style number, created a style and cutting spec sheet, and assigned pattern numbers. I explain how to do this along with providing printable blank forms to fill out in my book. If you prefer keeping a digital record, you can use the examples in the book to create your own spreadsheets. In many ways I still prefer paper and pencil. It forces your brain to think differently - perhaps more analytically. I have used both paper and pencil and spreadsheets. There are advantages to both.

January 24, 2013

Review of Simple Modern Sewing pt. 2 : Sewing up a sample

I have to admit that I put off the rest of this review. It's hard to be so down on a book that I had so enjoyed perusing. You can read the gushing in part 1 of my review. First the positive:

The photography and layout of Simple Modern Sewing is great. The instructions are adequate for experienced sewists. The patterns are printed on sturdy white paper.

And then when you pull out the pattern sheet, this is what you get:

Pattern sheet from Simple Modern Sewing


As you can see, nearly all the pattern pieces and sizes use the same exact black line. It would have helped to at least denote the different sizes with different line types and colors for different styles in the same way that Burda does. You have to really look carefully for notches, because they are easy to miss despite extra notations on the pieces. And in just this one snapshot of one part of the pattern sheet, there are 5 pattern pieces that overlap.

The issues with the pattern sheet are relatively minor though, especially if you are comfortable with Burda patterns. I did manage to trace everything off for the wrap blouse and dress. I had to select the large size since that matched up with my measurements best. There did seem to be some discrepancy between the measurement chart, printed finish measurements in the pattern instructions, and the actual pattern pieces. I didn't take the time the track it down and it could be just differences in how one measures. For me, it resulted in a bit more room (which was actually needed) than I expected. One good thing is that the shape of the armhole and sleeve was along the lines of what Kathleen recommends.

A bigger issue did present itself once I started checking the pattern. There is a grading error on the shoulder seam of the bodice pieces of the wrap blouse for the medium and large sizes. In order to fix the large size, you will need to pull the shoulder point of the back shoulder seam in about 3/8 inch. The other smaller sizes match up just fine. I debated whether this was indeed a grading problem because sometimes the back shoulder is eased instead of having a dart. On boxy, loose fitting styles there is no easing or dart, which is what this style is supposed to be. Since the smaller sizes matched, there could be no other explanation. No other bloggers have mentioned the same problem, so I'm not sure if it is just an anomaly on my copy.

After correcting the pattern and adding seam allowances, I proceeded to cut and sew and got this:

DH said it looked like a medical scrub, except it didn't even fit that well. The dart points in the wrong direction, which means I probably should have done a FBA or something else. The skirt part of the blouse has an extremely small gather ratio, less than 1:1.25, which makes the gathers look like a mistake. The result of all of this is that it looked terrible on.


I probably could spend the time to fix the pattern and try again.


But it would take too many iterations.


This project caused me to loose my sewing mojo. Who else hates spending time on something with such disappointing results? I think I can now understand beginning sewists frustrations.


Having said all that, I can recommend this book only for its design and styling inspiration. Go elsewhere for patterns which are similar.


I cannot recommend this book to beginning sewists at all. If you have more experience altering patterns and don't mind endless fiddling, then maybe this book is for you.

January 03, 2012

T-shirt pattern quest pt. 3 : Sewing up the first sample


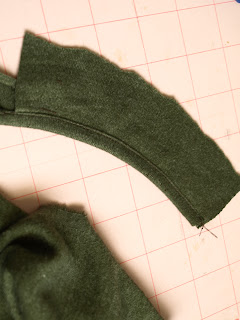
The next step in recreating my favorite t-shirt pattern is to test out some different construction options by sewing up a sample. This sample will also be used to double check fit. I began by testing some binding options on some scraps. I eventually discovered the best method for my machines that gave the best looking results.

Testing binding options for knits

Before stitching the neckbinding to the t-shirt, I stitched one shoulder and overedged one edge of the neck binding.
Sewing a should seam on a t-shirt
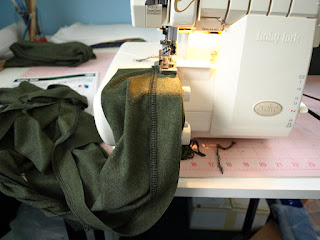
In the picture below I am stitching the binding strip to the neck. The binding strip is on top so that I can stretch it as it goes through the machine. The shirt is supported by the table. Don't let it hang down in front of the machine or gravity will do more stretching of the shirt than you intend. I did edge finish one edge of the binding strip by serging. I didn't have enough green thread, so some of it is in black.
Stitching a neck binding to a t-shirt
Next, I followed the same steps in stitching the binding to the sleeve hem edge. These sleeves show about how much I stretch the binding as it went through the machine.

Attaching the sleeve binding

I then stitched the remaining shoulder seam closed through the neckbinding. This means there is a visible seam at the shoulder. This type of shoulder - neckline construction is also visible on the original t-shirt.
Neck and shoulder seam construction
After closing up the second shoulder, attach the sleeves and sew up the side seams. This is the shirt just prior to topstitching. Just fold the binding strip to the inside and topstitch carefully from the right. You can see an example in the first picture of how it turned out, but I'll post a picture of the finished shirt later. I used a regular straight stitch for topstitching. I don't need the neck to stretch to pull it over my head, so it actually turned out fine. My Babylock Evolve does have a chain stitch option, and that is how it should be done. BUT, it takes a good amount of time to switch it over and because of the overly large presser foot, you can't easily see where you are stitching - too much bother. Industrial chain stitch machines look a lot like regular machines. I believe some vintage domestic Singers also have the ability to do a chain stitch, so if you have that option, than use that.

A few last words on the binding. The original shirt had a double fold binding, which is difficult to reproduce at home without the proper folders and adjustments to your machines. The binding I did is less bulky and easier to execute with home sewing equipment and it turned out just fine.

November 05, 2007

Sewing Tutorial - Set-in sleeves

This is my first sewing tutorial for sewing set-in sleeves flat - please forgive the photo intensive entry and anything that is not too clear. Here, I am testing some refinements to my cap sleeve pattern. I am doing the sewing with my domestic Singer 503 (a fabulous machine, btw). The technique is essentially the same on a 4-5 spool serger or industrial straight stitch machine. Some of this is my personal opinion, some fairly standard fabric handling techniques. Please note, my sleeve pattern has no ease.

Start sewing a sleeve with a sleeve cap against the feed dogsPlace the sleeve against the feed dogs, the body on top. Notice that I am using no pins, no basting, and no ease stitching. There is a single notch at the center of the sleeve cap. My sleeve is symmetrical front to back so there are no extra notches to indicate the back or front of the sleeve. Adult clothing would have extra notches, so make sure to match up fronts or backs or you will have a funny looking sleeve.


Hand position for sewing a sleeve without pins Do you see the placement of my hands? My left hand is holding the body and my right hand is controlling the sleeve. This is one of the major differences of industrial vs. home sewing. Home sewists like to pin the two layers together and have everything move together in lock step. With this method I can control the two layers as they move under the foot by ever so subtly pulling or pushing. It takes time, practice, and confidence in your pattern to develop this skill but it is absolutely essential.

Matching notches when sewing a sleeveThis picture just shows that the shoulder seam and the sleeve notch meet up. Another industrial technique is that the operators will tap the foot pedal. Home sewers press down on the foot pedal like they are at the races. But during certain operations, the operator can gain more control by tapping the foot pedal. This can help while going around a curve.


A set-in sleeve sewn flatThis picture tries to illustrate why the sleeve should be next to the feed dogs. If there is any ease (and it should be minimal) the feed dogs will do the work of easing for you. My sleeve has no ease so this picture isn't accurate. If there were ease, it would look something like this on the inside.


View of the sleeve capThis is a view of the top of the sleeve cap. There seems to be a few puckers, but that is a combination of poor lighting and the fabric - a poly-cotton broadcloth. The sleeve cap is actually nice and smooth.


Sew a side seam from waist to sleeve hemStitch the side seam from the waist to the sleeve hem making sure the armscye/sleeve cap seam allowances are turned toward the sleeve. The seam allowances, when turned in the right direction, will fill the sleeve cap and help give it a nice rounded shape from the outside. Some operators will allow the seams to lay in opposite directions (for bulk, they may go in opposite directions, but otherwise they shouldn't).


Finished sewn sleeveThe finished sleeve.

October 25, 2007

Stewart Girl's Dress pt. 3

I have made some progress with the pattern. I still believe the greater challenge is coming up with a mass construction technique. No matter how I twist my brain around the style, it still requires hand manipulation of the gathers. So per Kathleen's suggestion, here is what the pattern would look like. I realized after I took the pictures that I had left off the seam allowances for the dart - must add that before sewing up the samples. This is a quick and dirty pattern, and I know it is not production ready. The style is going to work for girl sizes 8-16 and older. Younger sizes do not have (or need) darts in the skirt, although they can be added for a style detail.

Skirt sewing pattern with dart detailsThis is a basic skirt block for a girl's size 10. A style line is drawn on the pattern where the gather detail is to be placed.


Adding fullness to a dart on a skirt patternLines are drawn from the dart point and the style line until they intersect. The skirt is slashed along those lines to the point of intersection. The dart is partially rotated closed. The original style had some fullness in the waist. The dart equivalent fullness only adds about a 1/2" to the waist front. I suspect the original style had more. The original style was probably for an older teenager rather than a young girl. Anyway, slash lines are drawn from the lower dart leg to the hip line (On a full length skirt, the slash lines would go to the hem. For ease, I am only working to the hip line).

Added fullness to a side dart on a skirtSlash the skirt along the new slash lines to the hip and spread to the desired fullness. In this case, I spread for a 2:1 gather ratio. The finished pattern would look something like the one to the left. Like I said, I forget to add seam allowances to the dart opening. If you try this yourself, don't forget to add them.

Fabric samples will have to wait until later - too many pressing projects.