Competing in the childrenswear fashion industry is all about finding a niche and doing it well. Jody Williams is one such individual who has a great niche, but is struggling with the execution. Jody was recently highlighted in Forbes magazine, (March 26, 2007 issue). (You have to register at Forbes online to read the article, so I am not providing the link to the article. Head to the library instead).
Jody creates clothing for children with special needs. Specifically children who need feeding tubes and ostomy bags. Her business idea developed after a rather difficult night with a special needs foster child. She sat down in front of her sewing machine to solve a problem and created a one-piece swaddling outfit with only one opening for diaper changes.
The article was not all that positive towards Jody. It reveals some interesting facts about her costs versus her retail prices. DE's need to pay attention to this kind of stuff, or it could sink a start-up. And please don't get me wrong. I WANT her to succeed. Her idea is very much needed. This is one DE that would benefit from reading Kathleen's book.
She has spent $35,000 and four years to sell only 100 units. Her wholesale cost for retailers is $22 and she retails them for about $40. She spends $10/each to manufacture. One very revealing detail is that she spends 26 cents for each label! But to be fair, many people will pay $40 for a bodysuit/onesie at a specialty boutique. I think she can overcome the sticker shock if she finds the right distribution and marketing.
She certainly needs to lower her manufacturing costs, but she has also chosen a difficult customer profile. Cash-strapped parents of special needs children have to be convinced to part with $40 for one outfit. Plus, hospitals are very difficult to work with because of fierce competition for high dollar contracts.
I hope she does well. Special needs children need her.

Showing posts with label Design. Show all posts
Showing posts with label Design. Show all posts
March 15, 2007
January 02, 2007
Knits-Wovens - How to tame the stretch

Remember my previous blog on flower buttons? I promised to blog further on how this manufacturer worked with combining knits and wovens. Combining knits and wovens opens up wonderful design opportunities, that is until you try to sew the two together. The knits invariably stretch out of shape and the wovens will stubbornly refuse to stretch.
The most frustrating thing is trying to gather a skirt (with a high gather ratio) to a knit bodice. Imagine a pretty gathered taffeta skirt sewn to a stretch velvet top. While I am not going to explain every tip and trick out there, this well-loved jacket has some excellent examples of how to do this.
The most important thing to remember when combining the two is that knits will have to be stabilized in some way. This jacket has a facing which has been interfaced with a light-weight interfacing appropriate for a stretch fabric.
 In other words, after the interfacing is applied, the knit fabric retains some of its knit characteristics - it doesn't feel stiff as a board. The interfacing prevents the buttonholes from stretching out and the topstitching is straight and even.
As a design inspiration, you can see how the facing is an entirely different fabric. The neckline and center front seams would have been too bulky if faced with the french terry knit. Instead, they used a flower print jersey. I am sure this jacket was part of a two piece set that had a matching pair of flower print pants.
The gathered eyelet trim was pre-gathered onto a twill tape and then applied to the hem. The manufacturer could have applied a twill tape to the jacket and then gathered the trim directly to the hem. In either case, the knit fabric has to be stabilized to prevent stretching. The jacket, sleeve and pocket hems all have this gathered eyelet trim. Wow!
The manufacturer gets bonus points for their patch pocket application.
 The rounded pocket would have been very difficult to maintain the round shape and topstitch it without stretching. They used a 1/2" strip of interfacing around the edge of the pocket. This picture is a close-up of the inside of the pocket.
The final tip is not easily observable. In a factory, the sewing machines can be adjusted to help prevent stretching. How the fabric is fed through the machine is part of the reason store-bought knits look so good. This adjustment is often called the differential and it refers to the movement of the feed dogs. Industrial machines with differential feed have two sets of feed dogs. These feed dogs can be adjusted in how far they move back and forth and up and down, in relation to each other. The front feed dogs can either pull extra fabric or pull less in relation to the back feed. This is not to be confused with the stitch length, also controlled by the feed dogs. Few home machines, with the exception of some overlock sergers, have this ability, requiring knits to be stabilized even more when sewn. A walking-foot attachment, or machine, may help with seam distortion too. American and Efird has some good suggestions on sewing knits.
December 17, 2006
Button style can add interest to a design
 Sometimes design inspiration comes from the most utilitarian part of a garment. And yet, if one pays attention to such small details, you can take an ordinary piece of clothing and turn it into something special.
This tiny little flower button jazzed up an otherwise boring knit jacket. The jacket is made from a french terry knit with a ruffle trim on the hems. If this had a regular two-hole button, the jacket would have been plain boring.
A regular two-hole button costs less than one cent each. They are generally one of the least expensive items found on an item of clothing. That changes when you start to add novelty buttons. There are tons of special and extra special buttons available. Most manufacturers can't afford wholesale button costs of 20 cents a piece or more. This flower button would be less than 5 cents because it is still rather basic. Special buttons are saved for the front of the garment where they can be seen.
If you truly want to set your garment apart, pay attention to details like buttons on the back of a dress, for example. Special occasion girl's dresses sometimes have interesting and fun button details. Buttons on the back may match a colored sash, skirt band, or trim. Maybe use some of the buttons as part of an embellishment. Can you imagine using a different thread color to sew the buttons on this jacket? How about a soft yellow center to correspond with a flower embroidery on a pocket? Boutique children's designers can certainly play with this seemingly small detail.
While the jacket is not cutting edge fashion, this manufacturer did some interesting things that I may blog about in the future. Knits can be difficult to work with, especially when topstitching or adding a woven fabric trim. Knits and wovens do not like to work together happily. One or the other ends up stretched or distorted. You can see how nicely this trim lays with no stretching of the knit jacket.
This jacket was obviously well loved. It is worn and stained. Even so, the previous owner did not clip the threads left by the manufacturer. You can see one of five errant threads in the picture above. This is a big pet peeve of mine. Any finishing and inspection should include clipping threads.
October 25, 2006
Where do you get your inspiration?"

Over the last few years, I have given a few speeches to high school classes. The inevitable question you hear is, "Where do you get your inspiration?" I wish I could nail down a specific thing that inspires me, but it is not as simple as one thing. Many designers have a specific thing that motivated or inspired them to start. The more difficult thing is maintaining that inspiration.
My first job, right out of college, was with a children's design company. I will never know why they hired me - I was so green to the business. I had assumed that I would work with this company for a few years and then move onto a category that I truly wanted to design. I knew nothing about children's clothing and really didn't like it. Little did I know how important that first job would be. None of the advisors in college advise you to look for a job in the category you want right from the start. My advisors were more concerned with making sure their graduates had ANY job in the fashion industry - a topic for another blog.
Over time, I grew to like children's clothing and then to be inspired. Now, I can say I love designing children's clothing. I can't even imagine working in any other category. (In fact, it would be difficult for me to move to another category based on my skill set and experience - again another blog entry). Inspiration came to me through exposure to the category and hard work.
I have been surrounded by children's clothing and products for years now. If a new idea comes to me, I can immediately apply it to various children's products. Part of the exposure to the category came simply because of my physical work environment. Past clothing lines hung on the walls, fabric swatches hung in the design library, and more. One of my job requirements was to shop the market. Meaning, I was literally paid to shop. I went to the mall and boutiques every two weeks. I got to learn how frequently stores changed their displays, what things were selling, what was discounted, when sales occurred. I not only shopped the children's departments, but others too. Sometimes, categories that were completely unrelated. I would come home with sketches in my notebook of things I had seen or ideas to try.
Another important job requirement was to walk trade shows. It is difficult as a designer to attend retail trade shows because salesmen know why you are there (your tag usually says designer). This is probably the best way to check out the competition before their products hit the retail floors. You can spot which booths are busy and which are not. You can identify trends that are hot. Fabric trade shows is another way to pick up on color and print trends.
Eventually, you get to the point as a designer where you can predict what is coming next. It is in your blood. I can remember when a co-worker/designer and I both showed up at work wearing the exact same shade of lilac top. We had both sensed that color would be important next season and had made personal purchases accordingly.
So, my original inspiration was the need for a job - and to succeed in it. Today, it is so much a part of me, that I can't imagine doing anything else.
August 08, 2006
An analysis of a girls spring time dress
I found some time to analyze a dress from another manufacturer. I do this from time to time to see some of the innovative engineering that others have built into their infant clothing. (Infant clothing requires a lot of engineering, btw). This is the best way to learn how to put things together. This dress is a department store dress from Baby Togs. It would retail for about $20. There are some things that make this a department-store quality dress, with some interesting observations. The dress is a three piece set, made from a cotton/poly gingham. The dress is very cute and a good value. BTW, this dress was made in China.

Good Quality Points
1. The fabric is not a regular gingham. It is more like a dobby fabric. It is a better quality check fabric than I usually see. The content is 55% cotton 45% poly.
2. Embroidery. Anytime embroidery is added to a dress, the cost goes up, especially if made in the USA. This style has embroidered daisies only on the front bodice and embroidered flowers on the pockets. There is a minimum charge to run both pieces. They get bonus points for the amount on the dress.
3. The flower on the dress is not tacked on with a tacker. Instead the flower center is actually embroidered through to the hat band. This ensures the flower does not fall off!

4. The diaper cover is rather ordinary, but it has wider elastic at the waist - 1/2". Normally, budget clothing will have 1/4". The elastic is fully encased for a smooth finish and is not stitched through. They also probably saved money by doing a 4-piece diaper. This allows the cutter to move the pieces around to save money on fabric. Of course, it adds additional labor - but so far that is not an issue in China. In China, fabric is more expensive then labor.
Some interesting observations
1. The first thing I noticed about this dress was the skirt gather ratio - it is rather skimpy. Looking closer, you can tell the skirt is actually A-line. Even more amazing, they were able to put a straight grain band on the skirt. This kind of application would frustrate most people. The skirt hem could easily stretch out of shape, and yet I could only find minor stretching on one side seam. I did find evidence of basting, perhaps that helped. Personally, I would have cut the skirt straight and use the width of the fabric. The a-line skirt sweep is about 45". If you are using a 45" fabric, then there would be no difference in making the skirt straight. Plus it would have been easier to sew.
2. I have only seen one way of gathering skirts in China. This is because most Chinese manufacturers do not have shirring arms on their overlock machines. As incredible as this may seem, it is true. (And believe me, I have tried to show them this labor saving device, but labor is very cheap in China and they are not motivated to change). Instead of gathering and attaching the skirt in one operation, it is done in 3-4 steps. They will use a straight stitch machine with a gathering foot to create the gathers. Then they will baste the skirt to the bodice, and finally overedge the seam. This dress also has topstitching along the waist seam (a fourth step). It is hard to see in this picture, but here it is. You can see two rows of straight stitching. Another problem with this method is the gathers do not look neat and even. From the face side, it looks fine, but the inside is another story.
3. The final interesting point is where the manufacturer attempted to save fabric. The front bodice is fully lined, but the back is only partial. I am not sure this would have saved any fabric. Chances are the fabric saved was actually tossed out.
This was a fun dress to inspect. I don't quite understand some of the things they did, but despite that, it still turned out cute. It is right on for a department store dress and hits the right price point.
2019 notes - I lost some of the original pictures of this blog post, but the notes are still interesting!

Good Quality Points
1. The fabric is not a regular gingham. It is more like a dobby fabric. It is a better quality check fabric than I usually see. The content is 55% cotton 45% poly.
2. Embroidery. Anytime embroidery is added to a dress, the cost goes up, especially if made in the USA. This style has embroidered daisies only on the front bodice and embroidered flowers on the pockets. There is a minimum charge to run both pieces. They get bonus points for the amount on the dress.
3. The flower on the dress is not tacked on with a tacker. Instead the flower center is actually embroidered through to the hat band. This ensures the flower does not fall off!
4. The diaper cover is rather ordinary, but it has wider elastic at the waist - 1/2". Normally, budget clothing will have 1/4". The elastic is fully encased for a smooth finish and is not stitched through. They also probably saved money by doing a 4-piece diaper. This allows the cutter to move the pieces around to save money on fabric. Of course, it adds additional labor - but so far that is not an issue in China. In China, fabric is more expensive then labor.
Some interesting observations
1. The first thing I noticed about this dress was the skirt gather ratio - it is rather skimpy. Looking closer, you can tell the skirt is actually A-line. Even more amazing, they were able to put a straight grain band on the skirt. This kind of application would frustrate most people. The skirt hem could easily stretch out of shape, and yet I could only find minor stretching on one side seam. I did find evidence of basting, perhaps that helped. Personally, I would have cut the skirt straight and use the width of the fabric. The a-line skirt sweep is about 45". If you are using a 45" fabric, then there would be no difference in making the skirt straight. Plus it would have been easier to sew.
2. I have only seen one way of gathering skirts in China. This is because most Chinese manufacturers do not have shirring arms on their overlock machines. As incredible as this may seem, it is true. (And believe me, I have tried to show them this labor saving device, but labor is very cheap in China and they are not motivated to change). Instead of gathering and attaching the skirt in one operation, it is done in 3-4 steps. They will use a straight stitch machine with a gathering foot to create the gathers. Then they will baste the skirt to the bodice, and finally overedge the seam. This dress also has topstitching along the waist seam (a fourth step). It is hard to see in this picture, but here it is. You can see two rows of straight stitching. Another problem with this method is the gathers do not look neat and even. From the face side, it looks fine, but the inside is another story.
3. The final interesting point is where the manufacturer attempted to save fabric. The front bodice is fully lined, but the back is only partial. I am not sure this would have saved any fabric. Chances are the fabric saved was actually tossed out.
This was a fun dress to inspect. I don't quite understand some of the things they did, but despite that, it still turned out cute. It is right on for a department store dress and hits the right price point.
2019 notes - I lost some of the original pictures of this blog post, but the notes are still interesting!
August 03, 2006
Sew What? Sewing a VW Convertible Bug Top Cover
 |
| This VW Convertible Bug looks better than the one I made! |
I am sure many of you who sew have had this exact reaction to a sewing request. In this case, one woman named her company Sew What? Inc. Megan Duckett started a business sewing draperies. Her employment sewing for a theater company is how she decided on a company name. The complete story can be found at U.S. News and World Report, July 31, 2006 edition.
I am always impressed by women who start sewing related businesses. Megan even ran her company out of her garage for a time. What an inspiration! For more info about Megan, check out her website Sew What Inc.
My blog entry is not really about Megan's company, but about those Sew What?! moments. For Megan, she was asked to sew a lining into a coffin for a theatrical production. I have had many Sew What?! moments, but one stands out. I was asked to sew a vinyl car top cover for a convertible VW Bug.
Yes, I took this job. I knew I wouldn't make any money from the project, but it was the challenge that grabbed me. This was during college and I thought I could sew anything (I still think that, provided I have the right equipment). During college, a friend of mine bought a convertible bug. It had no cover. He welded a frame together and then asked me to sew a top together. I had an average home sewing machine and a lot of ambition.
With a budget of $60, I purchased some black vinyl, extra large snaps, and some clear vinyl (for a rear window). The only equipment purchase I made was some teflon coated needles in size 18 and a snap kit. This fabric was very thick. I have to say my initial pattern actually looked very good. The execution is where I had trouble.
This is one of those instances where a walking-foot machine would have come in handy. Instead, I sewed this thing together with my Singer 503A. For all of those Ebay sellers out there that claim this machine can sew through 4 layers of vinyl, well they are half right. It will do it, but it may not look very good. This is a tuff little machine and I really pushed it to the max sewing this together. The seams were overlapped on top of each other like a lapped seam, but the material slid and stretched as it went along. In any event, I finally finished it.
The top was attached to the car with the snaps. The snap kits available in the fabric stores are not really designed to go through heavy-weight vinyl or to be glued onto a car surface, but somehow we got them attached. Despite our efforts, this car was not really safe to drive with a home-made car top. I could just see it fly off at 25MPH. My friend ended up using the car top for rainy days while it was parked. He also bought a real vehicle that was safe to drive.
July 26, 2006
Fashion Challenged Wal-Mart
Evidently Wal-mart's sales of it's women's clothes is down. This according to a recent Business Week article. It's no surprise really. I almost never buy clothing at Wal-Mart. There are a couple of reasons. One, the fitting rooms are too close to the registers. They are small, dirty, and cramped. If I feel I should try something on before buying it, I won't buy it. The last few pieces I bought I should have tried on - the mediums were really sized as a large. Oh well, at least it was only $5 wasted and a lesson learned.
In the book Nickled and Dimed on Not Getting by in America, author Barbara Ehrenreich worked covertly for Wal-mart. As a sales associate in the women's department, she spent most of her time putting away returns from the fitting rooms, store returns, and cleaning. She never spent any time assisting customers or pushing sales. According to her anecdotal evidence, 80-90% of the clothing taken to the fitting room is rejected. This points to fitting issues.
The next reason I don't buy clothing at Wal-mart is the clothing looks cheap. Some of the styles were cute, but the finishing details were lacking or the colors were too garish. One outfit had simple, exposed serged hems instead of a rolled or blind hem. This screams cheap. I also know this won't hold up in the wash.
Girls dresses also scream cheap. Their isn't enough fabric in the gathered skirts to look like a skirt. Ribbon and flower trims are wrinkled. Same issue with the garish colors. To be fair, the basic children's clothing is fine. You can get a great value on Carter's brand clothing. But skip the Rose Cottage label.
At one company, I helped create private label merchandise for the Rose Cottage Brand. It is true that Wal-Mart has greatly improved its quality program. But they are still missing the boat. In order to get the product to hit their price point, you have to reduce gather ratio's, remove linings, reduce trimmings. When you are done with the dress, it looks incredibly cheap. For a couple dollars more, you could get a dress that looks like a real dress at another store.
So the secret for Wal-Mart's success is to take a cue from Target. Create affordable merchandise with improved quality, the right colors, the right fit, and be mistaken for a more expensive piece. Oh, and move the clothing department away from the main drag of the store. Do I really want my neighbors to know I buy my underwear at Wal-mart?
July 24, 2006
Project Runway - A fantasy design world

Season 3 has started and I have to admit that I like to watch the show. It reminds me so much of my design school experience. In design school you are frequently given similar challenges to design something to fit a certain customer or target market. The work rooms feel familiar too, even some of the personalities.
There are a few things that continue to bug me about the show. The designer this show tries to discover is what I call a fantasy designer. There is a certain segment of the fashion business where a designer works with wealthy customers to create an evening dress or expensive sportswear. Their clientele consists of actors or other celebrities. That particular segment is so small that the continual portrayal as an ideal is an insult to the rest of us in the fashion business. Project Runway completely ignores many product categories, including children.
I am talking about designers that work in the trenches - mass market apparel. Creating something as cheaply as possible while maintaining a certain quality level. Worrying about profit margins and overseas manufacturing. This is the real world. This is the world where most designers work. Working for a large apparel business is gritty, real work. The hours are just as long and as stressful.
Another type of designer is an enterepeneur who has started their own business and sells to ordinary people. This kind of designer is more grounded and realistic about their customer and their product. They have a look that is interesting and sells. They are smart and understand business and fashion. It takes a lot of strength and will power to start a business from the ground-up.
I have to give credit to Jay (Season 1 winner) and Chloe (Season 2). Neither of them went the celebrity designer route you would expect. Jay took his time to figure the business end out before launching his line. Chloe expanded her own existing business. This is so smart.
I wish the show would give challenges to the competitors that are more realistic. One real-world challenge I faced was to design a children's fluffy dress - labor and materials - for under $5. Such a dress would retail for about $15.99 at a big box retailer. Now that is a challenge!
So yes, I would love to see them attempt other product categories. The fashion industry is so diverse. What about an outfit for a 50+ year old woman? Baby boomers are becoming one of the larger customer profiles. How about a maternity outfit? A new print for a scarf, tie, or umbrella? A children's look? I really, really want to see these designers try something other than a silk charmeuse evening gown.
I will probably keep watching this season. I am hooked, I admit it. I just hope the show doesn't spin out of control and become more ridiculous with time.
May 04, 2006
The golden mean and pattern making for children's clothing
After studying measurement charts until my eyes about popped out of my head, I finally took the plunge and drafted my first bodice using Aldrich's method. After working for many years in the childrenswear business, I have never actually drafted my own blocks. There was never a need - I just used whatever the company had. I drafted the flat infant blocks and immediately it didn't look right. I have been a bit confused by her use of flat, jersey, and woven bodices. Later in the book, she has a classic bodice. I picked the flat bodice block because it was in the front of the book.
The problem I encountered with the flat block is it looked too long in the length, especially the scye depth. This is partly where art meets technical design. Most infant bodices are drafted intentionally above the waist. Proportionally it just looks better. Until about age 3 a child's waist falls half-way on the body. Interior designers, architects, fashion, etc., use the golden mean or 1 to 3 proportion. This is something that is almost never mentioned in any pattern drafting instructions for childrenswear. The instructions always have you draft the back neck to the true waist I am sure they neglect to mention this because every designer decides where exactly their waist line will fall. Generally speaking this waistline can fall anywhere from 1-2" above the natural waist. This practice is used on nearly all childrenswear up to age 16, especially on any infant casual clothing and girl's dresses. Casual boys wear mimics the proportions of adults as they get older. Confusing, huh!
When drafting the basic blocks it is important to decide on what kind of product you are going to make. Who knew so many decisions have to made so far ahead in product development?!
I don't really like Aldrich's flat blocks. Even with adjusting the waist line, the scye depth is too long, IMO. Instead, I flipped ahead and drafted her classic block. The classic block is drafted to fit closer to the body and is used in formal wear. To me this is a better place to start. The armhole and neck shapes look better. The flat block can later be extrapolated from the classic. If I understand Aldrich correctly, the flat block is a method used in the children's business where the front and back bodice pieces are essentially the same shape, except for the necklines. By starting with the classic block, you can then add your own additional ease and modify the neck and armhole shaping that makes sense to you.
My next project is to draft the classic block without ease and make my own children's dress form. I read about a similiar proceedure at Vintage Sewing. With the cost of dress forms, I thought this might be a more economical solution and I would have a form with my measurements. I'll let you know how it turns out.
April 21, 2006
A brief review of Metric Pattern Cutting for Children's Wear and Babywear

I finally received a copy of Winifred Aldrich's book on pattern cutting for children. I have never created my own blocks for children as I relied on my employer's existing pattern blocks. In college and in my first employment, I used Helen Armstrong's patternmaking book. The Armstrong book completely skips over infant sizes - at least in my edition of the book. Just about any patternmaking manual will give basic instructions on how to draft a pattern. The problem is the drafting instructions do not give you the correct measurements or proportions for an infant. Aldrich's book is an exception and starts off with basic drafts for infants. So now that I have this book, I finally feel like I can make progress on developing my own pattern blocks for children.
I am accustomed to American sizing and Imperial measurements. Aldrich is from Great Britain and she uses British fashion terms and metric measurements. I have to read things very closely and study the charts carefully to understand the things she is talking about. Despite that, the book is excellent. I can sit at the feet of a master pattern cutter and learn from her years of experience and wisdom.
I have yet to decide on making my blocks using the metric system or not. I may use her drafting methods and substitute my own imperial measurements. I have one measurement chart based off the US measurement study done in 1975 and I keep going back to it. Plus, I like the way she has broken down infant/toddler sizing to reduce redundant sizing. I will blog more about this topic later.
The book includes data from Aldrich's own measurement study on children's sizes. And surprisingly, her measurements are not dissimilar from a British government study released in 1988-1989. The British (and really the EU) designate children's sizes based on height with age being a reference. There are many advantages to such a system. Again, more about that later.
2019 note: Links are Amazon affiliate links. When I wrote this, I referred to an earlier edition of both Winifred Aldrich and Armstrong's books. Links are to newer editions for the reader's convenience.
April 03, 2006
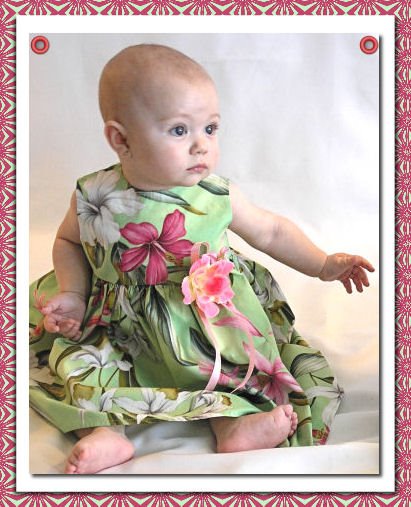
Hawaiian Paradise Line pt 4 : Photoshoot
We finally had our photo shoot for our Hawaiian Sundress Line. It was so fun to see our dresses on live babies. And the girls were so adorable. Here are a few pictures:


March 27, 2006
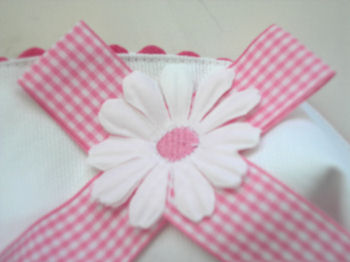
Hawaiian Paradise Line pt. 3 : Adding flowers
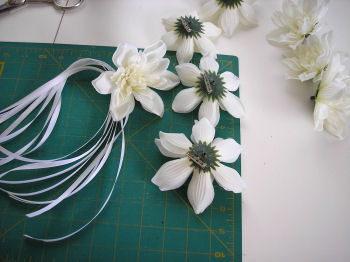
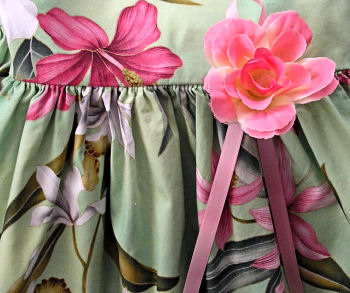
This is my favorite part of the production process. Decoration time! The dresses really come alive. Here are some sneak peaks at some of the silk flowers and ribbons I used on these dresses:

The flowers have a pin back for easy removal during cleaning. The pins have a safety latch to prevent poking by a sharp point.
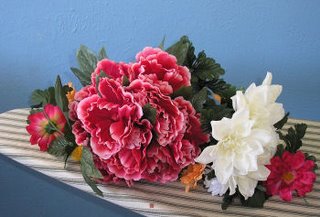
I had many flowers to choose from!

I love the combination of pink and light green! Very pretty.
The flowers have a pin back for easy removal during cleaning. The pins have a safety latch to prevent poking by a sharp point.

I had many flowers to choose from!
I love the combination of pink and light green! Very pretty.
March 15, 2006
Hawaiian Paradise Line pt. 2 : The Singer Ruffler Attachment.
As a part of this project, I have utilized a new attachment for my sewing machine. It is not really new - I acquired a couple of these for about 50 cents from a thrift store years ago. But I have never really needed it. I just thought it might be useful one day. Finally, I DID need it and it IS useful.
Let me introduce the Singer Ruffler. This attachment makes pretty ruffles, tucks or pleats. I am primarily using it for gathering the skirts of my Hawaiian sundresses and it has saved me loads of time.
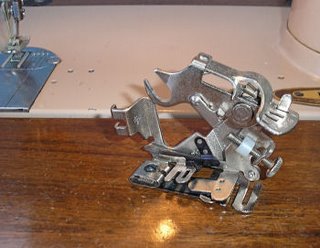
Since I am a newbie to this attachment, I did break several needles. There is not a lot of clearance under the attachment for fabric. Because of this, it is difficult to tell if the foot is actually all the way down against the feed dogs. My needles were breaking because I had not lowered the lift lever and my needle was hitting the gathering blade. With it properly lowered, there is plenty of clearance for the needle and less needle breakage. It was one of those Duh! moments. Now I double check everytime in lowering the lift lever and attachment before sewing.
Another difficulty with my attachments occurred because they had not been used in a long time. A couple drops of oil at all of the moving points loosened things up and everything slid like it should.
Technically, I should be able to gather and sew my skirt to the bodice at the same time. I didn't do that this time. I am jumping from one size to the next and I have to adjust the gather ratio each time. Plus I am still a bit nervous because of all the needle breakage. But as I become more comfortable, I will give it a try!
I did a quick net search and discovered these attachments (in one form or another) are still available for purchase for about $50, for many machines. But before dropping that kind of cash, check out thrift stores, ebay, etc for the exact same thing at a lower price.
If anyone is curious, I am sewing these dresses on a vintage Singer 503A Rocketeer and a Babylock Evolve. While this is not an industrial set-up, it is working amazing well. One of these days I will be able to afford and find space for a couple of industrial machines.
I would love to hear from anyone else who has used this great attachment!
March 09, 2006
Hawaiian Paradise Line
About six months ago, I had worked on a design project for a friend of mine, Scott, to be placed in his store Blackpearl Designs. His store specializes in Hawaiian products such as pareos (sarongs or lava lavas, jewelry, Tahitian candles, etc.). I had fabric left over from that first project sitting in my design studio. It has been staring at me for months.
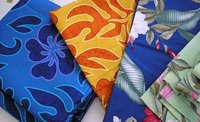
The fabric is truly special. Scott, also a graphic designer, custom designed this fabric for his pareos. The fabric is first dyed and then screen printed by hand in Indonesia. It is exclusively available from him. Scott's fabrics are the blue and gold on the left below. He also has a red and green shown further below. I bought some additional Hawaiian prints that are pretty too.
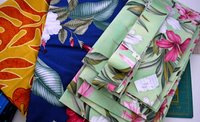
Nothing is more dangerous than leaving really cool fabric laying around in a design studio. It practically screams at you to do something with it. Since I design children's clothing, I didn't think the fabric would be suitable for my customers. That is until I tried it anyway. What has come out is a line of really fun girl's sundresses in 6 colors and sized 0-3M to 24M. Each colorway is limited in quantity and sizing.
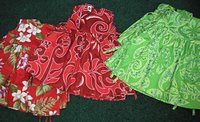
Here is a sneak preview:
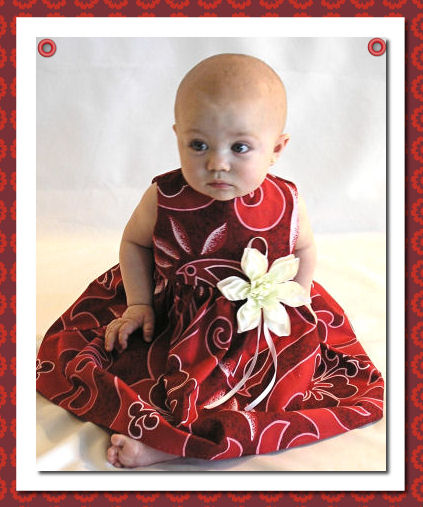
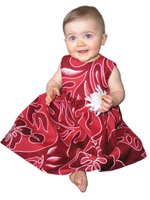
And if you can't get enough pictures, here is a sneak peak at one of our cute models wearing our red dress:
The fabric is truly special. Scott, also a graphic designer, custom designed this fabric for his pareos. The fabric is first dyed and then screen printed by hand in Indonesia. It is exclusively available from him. Scott's fabrics are the blue and gold on the left below. He also has a red and green shown further below. I bought some additional Hawaiian prints that are pretty too.


Nothing is more dangerous than leaving really cool fabric laying around in a design studio. It practically screams at you to do something with it. Since I design children's clothing, I didn't think the fabric would be suitable for my customers. That is until I tried it anyway. What has come out is a line of really fun girl's sundresses in 6 colors and sized 0-3M to 24M. Each colorway is limited in quantity and sizing.
Here is a sneak preview:
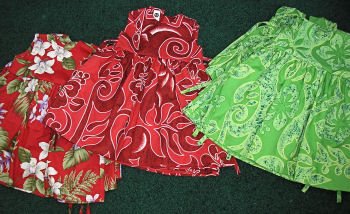
As you can see, we are still in the middle of production and we are working as fast as possible to have them ready by April 1st. The dresses will have flower pins or headbands as accessories. You can currently buy pareos or fabric in Scott's store (hurry, they are selling fast!). These dresses would make a great mother-daughter combo for your Hawaiian vacation.
And if you can't get enough pictures, here is a sneak peak at one of our cute models wearing our red dress:
February 14, 2006
Springtime Lilacs Dress
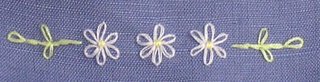
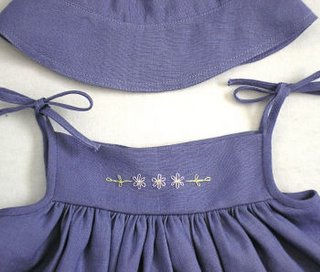
The story of this design is rather simple. I picked up the fabric in New York city in April 2001. I was in love with lavendar at the time, but lost interest when I got home. Five years later, I finally was inspired to turn this into a baby sundress. I had developed a line of beautiful baby clothes with hand embroidery at my last employer. Unfortunately that line was dropped. I am now bringing it back with the embroidery design on this dress. I added a matching hat as an accessory.
Dress description: One of a kind. Size 3 mo. Bias ties for straps. 2 inch deep hem (can easily be lengthened). The skirt has a full 60" sweep. 100% Linen. Dry Clean. The dress is exactly the same in the back, minus embroidery. Made in USA.


Dress description: One of a kind. Size 3 mo. Bias ties for straps. 2 inch deep hem (can easily be lengthened). The skirt has a full 60" sweep. 100% Linen. Dry Clean. The dress is exactly the same in the back, minus embroidery. Made in USA.

A close-up of the embroidery on the dress and hat.


Subscribe to:
Posts (Atom)