Showing posts with label Adjustments. Show all posts

January 23, 2014

Shoulder slope pattern correction

LisaB asked me to explain:

Raise the shoulder at the neckpoint 3/8" on front bodice to correct shoulder slope problem. I need to apply this correction to my t-shirt pattern too.
I tried my first cardigan sample on several times and noticed the shoulder seam was not pointing in the right direction. The seam at the neck point was pointing toward the front rather than laying right on top of my shoulder. I also looked at my t-shirt pattern and observed the same problem. This indicates a possible shoulder slope problem or shoulder to hem length problem on either the front or the back bodice or both. To figure this out, I ran a basting thread in my cardigan shoulder seam area and looked in the mirror to see where I needed to make the adjustment (no fitting buddy or dressform at my house, unfortunately). I also pulled out my blouse pattern and compared the shoulder seam. In the end, I needed to move the shoulder up at the neckpoint 3/8" on the front bodice. This increased the shoulder to hem length on the front just enough to allow the back bodice to relax backward and position the shoulder seam right on top of the shoulder.

Raising the shoulder point at the neck 3/8"

Not everyone will need to make this adjustment. This was a problem inherent in my own patterns to fit me. The drawing below, I hope more clearly shows how the shoulder seam was laying.
View of the correct shoulder point on the body

January 15, 2014

Knitting: Myrtle Cardigan pt. 4 - the sleeves

I started knitting the sleeves a couple of weeks ago. The instructions for the sleeves, like the body, are dependent on the size. This makes sense because the lace pattern needs to be adapted for each size in order to work. The sleeves continue the all over lace pattern in order to seamlessly blend with the body. I had to read the instructions several times before I completely understood what was supposed to happen.

I am knitting the medium size. I followed the instructions exactly (I think) and this is what I ended up with.

For the medium size the pattern is written so that the lace pattern is repeated except for the underarm area. In this area you maintain stockinette stitches until the sleeve increases are completed. Then you start chart F for the length of the sleeve. I knew that if I saw this every time I wore it, it would drive me crazy. I'm not sure if I did something wrong, but this does not seem right.

There is a sleeve increase chart, but it is not used for the medium size. I debated ripping out what I had done and restarting with the sleeve increase chart, but I wasn't sure I really wanted an all lace sleeve. Instead I decided to center just one repeat of the lace down the center of the sleeve and do the rest in stockinette. I think it might work better with the sleeve cap decreases.

December 11, 2013

Adapting a block pattern into something else pt. 7 : Pattern modifications

Testing a neckband construction

Have you ever had a project bug you? I had my first sample hanging in the Design Loft almost taunting me. Originally I wanted a neckband on my cardigan. Then during construction, I changed to a rolled fabric edge along the neckline. The longer I stared at it, the less I liked it. Still unsure how a folded neckband would look, I whipped up a small sample, and what do you know? It worked just fine. It could be improved with a bit of interfacing, but not too bad.

So I pulled out the seam ripper and set to work. In addition, I removed some of the extra ease I had previously added for a closer fit.
Testing the fitting sample
You'll notice there are still a few minor adjustments that need to be made. The sleeves are too long. Yep, I over compensated there. The shoulder needs to be brought back up. And the back neckline needs to be raised. Despite all that, I am fairly pleased with the results. This is the style of cardigan that I really like. It looks sloppy in the photo because I used a rayon/poly jersey knit that is just too lightweight and drapey for the style. The next version will be even better. And yes I do plan to wear this, even in public. It is very, very comfortable.


October 30, 2013

Adapting a block pattern into something else pt. 4 : how to create the neckband pattern piece

T-shirt into cardigan
For review read part 1, 2, and 3 of this series.

All of the major pattern pieces are now done. Next up is to do the neckband, the elastic casing for the back waist, and pocket. These three pieces are just rectangles. In a CAD pattern making environment, I will make pattern pieces for all rectangles and squares. Pattern makers, graders, marker makers and cutters all handle these kinds of pieces a little bit different, so ask if you are not sure.

For me, working on a personal pattern in my own workspace I handle rectangle and square pieces one way. I figure out the dimensions and note them on my style sheet. You can do this for patterns* that will be used in a factory setting too, but you will need to create a cutting guide for any rectangular pieces which might be graded. For now noting the cut dimensions is sufficient.

Up to this point I haven't really needed to consider how the cardigan is to be constructed. The majority of the cardigan has rather simple construction that mimics the construction of the t-shirt. But the neckband can be constructed and attached in a number of different ways. I also have to consider the stretch factor along the back neck. Do I want a 3-piece neckband with seams at the shoulders or a 2-piece neckband with a seam at center back? How do I finish the neckband at the hemline? How wide? All these things have an influence on the dimensions of the cut piece.

I like to keep things simple so I opted for a 2-piece neckband with a seam at center back. A 3-piece band might be necessary if the fabric width is too narrow. A 1-piece neckband might be possible if the cardigan was smaller. Begin by measuring the front and back neckline of the cardigan patterns.

Measure the neckline for the neckband

Now it is a matter of math. There really isn't a formula for this. It's just adding and subtracting.**

Neckband width = (front neck+back neck) - (front and back shoulder seam allowances + hem allowance) + seam allowance for center back + seam allowance at hemline - some stretch factor for the back neck.

Neckband length = 2 * (Desired finished width + seam allowance)

The neckband will be cut across the width of the goods like this:

Cutting guide for the neckband

Dimensions should be written as Length x Width. In this case the Length is the shorter measurement. My neckband pattern piece will then be something like:

5 x 30 inches

A CAD version or hard pattern will look something like this with a pattern number assigned instead of the words neckband:


You'll notice that I have two notches. The notch along the length (the narrow end) instructs the sewing machine operator to stitch the neckband pieces together at that end. The other notch along the width (long direction) is the match point between the neckband and the shoulder seam of the cardigan. This notch is necessary because I reduced the back neck to account for a stretch factor. This will help the back neck fit better rather than stand straight up.

Since I am just making one size and working at home I will draw a picture indicating the notch placement with a measurement along with the cut dimensions for the neckband.


*Managing rectangular and square pattern pieces is the subject for at least two additional blog posts! Yep, it's hard to believe but there is a lot to say on the subject....

**I do all this adding and subtracting right at the calculator.

October 25, 2013

Adapting a block pattern into something else pt. 3 : Modifying the t-shirt back pattern piece and sleeves to make the cardigan

T-shirt into a cardigan
For review read part 1 and 2 of this series.

Next up on my t-shirt block pattern transformation to a cardigan is to work on the pattern pieces for the back. I won't go into too much detail because there isn't much difference from the front.

Trace off the back and add the same length and width adjustments as the front. Extend the shoulder the same amount. Drop the armhole the same amount.

Trace off the back pattern piece, add length and wearing ease


Next I add drill holes to indicate the elastic for the back waist. The elastic takes up some of the extra body ease in the back to make the cardigan appear more fitted. I didn't add additional design ease for extra fullness, just the same wearing ease as the front. If you draft your own pattern, you can add as much or as little as you want. I referenced the cardigan that I am knocking off for placement. In the picture below, the drill holes appear rather large, but that is just for clarity in the drawing. I'll take a picture of the finished pattern pieces when they are ready so you can see what it all looks like. In reality, the holes will only be large enough so a marking pen(cil) can make a mark.

Add drill holes for the back elastic

I also modified my sleeve for length and width. My previous blog post on how to reduce/eliminate sleeve cap ease* should give you an idea of how to adjust the sleeve cap. Walk the sleeve cap along both the front and back armhole of the bodices pieces. The armscye should be longer than the sleeve cap. Note the difference and enlarge the sleeve cap so that it matches the armscye. You can do this by slashing and spreading. Do not add any sleeve cap ease. This is a myth perpetuated by pattern drafting manuals and others. You don't need it.

Adjust the sleeve cap to fit and add length

Finally, I referenced some cardigans in my closet to figure out how long to make the sleeve (plus hem) and how wide to make the wrist. I have a tendency to make my sleeves a little longer than necessary because long sleeves from off the rack stuff tend to be too short for me. Also, I worry about shrinkage. I will be pre-shrinking my knit fabric, but some knits will shrink with multiple washings. In any event, add the length you need for your sleeve.

October 17, 2013

Adapting a block pattern into something else pt. 2 : Pattern modifications to turn a t-shirt into a cardigan

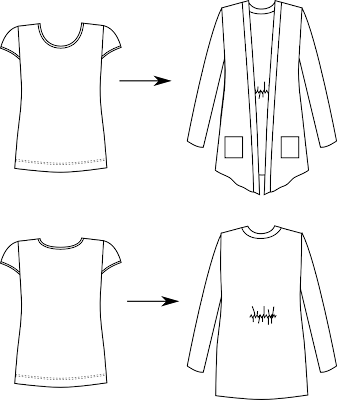
Rather than take pictures of my pattern making process of pencil on paper, I did up some line drawings. Just to refresh, I am tranforming a t-shirt block pattern into a knit cardigan.

T-shirt into a cardigan

I began by laying my t-shirt front pattern piece on to the cardigan that I'm knocking off and took notes on the differences. I had to keep a few things in mind as I compared the two. First, the t-shirt is close fitting with little extra wearing ease. The cardigan I'm knocking off was accidentally shrunk, so I need to add more wearing ease than is immediately apparent. A cardigan or jacket needs enough wearing ease that it is easy to put on and wear over other clothes. I can't tell you exactly how much wearing ease your pattern should have because it depends on what you prefer. Expect to add somewhere between 2-4 inches extra for this style.


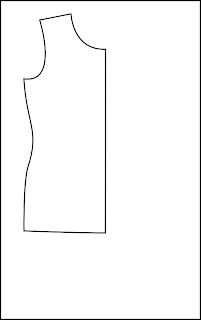
Trace off the bodice pattern
The first step is to trace off half of the front pattern.


Add length to the t-shirt
Next, I lengthened the pattern piece based on my notes. My pattern piece includes the seam allowances and hem allowance. I don't remove the hem allowance, I just make a mental note and add the hem allowance to the length I've added.


Creating the draped opening of the cardigan
To get the angled shape of the cardigan, I extend from the center front at the hemline and draw a line from the high point of the shoulder to the hem. Gravity will pull that point down and create the angle along with a bit of drape.

The greyed out area represents an area that is removed. On paper I scribble in any area to remind myself to ignore it. You could also erase it.
Adding extra wearing ease for the cardigan
Next, I add in extra wearing ease by moving out the side seam, dropping the armhole, and extending the shoulder line. The extra ease added to the side seam should only be 1/4th the total ease added because we are only working on 1/4th of the total body circumference.

I'm still debating on how much wearing ease to add. I need to compare my body measurements to the pattern to make sure it is enough.


And this is a far as I've gotten so far. I need to make similar changes to the back pattern piece. I also haven't assigned pattern piece numbers yet. Blank forms for managing patterns are available in my Pattern Making bundle or in the book with complete instructions.

October 09, 2013

Adapting a block pattern into something else pt. 1 : Noting changes for the new style

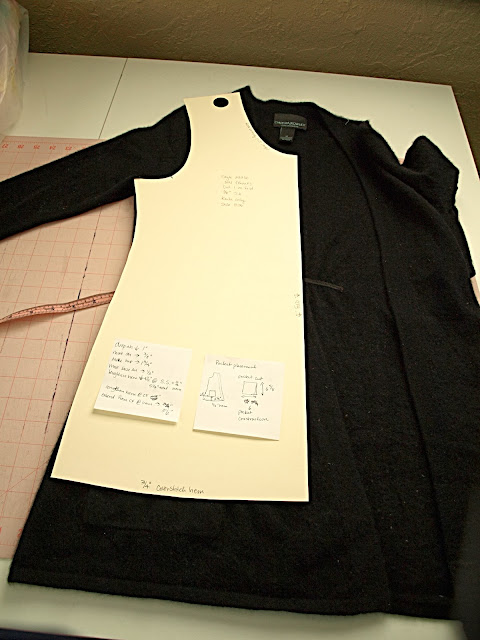
Pattern notations for modifying a pattern

A block pattern is a sewing pattern that has been proven. It is a pattern that has been trued, perfected and finished with seam allowances. The pattern has been sewn up and tested for fit. In other words, a block pattern just works. A block pattern becomes a part of a pattern file which can be used to make other patterns.

In the industry we rarely draft from scratch. Instead we modify existing patterns (or blocks) into something else. Some pattern making gurus talk about using slopers. Slopers are basic patterns drafted from body measurements and do not have seam allowances. Industry level pattern makers use block patterns, with seam allowances on, to make patterns for new styles*. It saves time.

It's easier than you might think to do this and this is just one example. I'm sure other pattern makers have their own procedures. My own procedures adapt to whatever it is I'm working on and whether I'm using CAD or traditional methods.

The problem:

I have this much loved cashmere sweater jacket. I snagged it off a sales rack a couple of years ago and I absolutely love the cut and fit. You know, the perfect layering piece, warm and soft for those cool days. I usually clean it by running it through the dryer using a Dryel kit. This last time was a disaster as I had left a piece of chocolate in a pocket. Chocolate ended up all over the sweater and everything else. So, I decided to run it through the hand wash cycle on my washer. That was a mistake. While the chocolate did come out, the sweater shrank. It shrunk just enough that I'm not sure I can wear it anymore. It made me very sad. And yes, I know better. I should have hand washed it.

The solution:

I always said that once this sweater was in pieces, I would make up a pattern to make a new one. So here it is. I recently finished up my t-shirt pattern, a block pattern ready to go. I began by carefully laying out the sweater and positioning the front t-shirt pattern on top. I then used scraps of paper to note the differences between the sweater and the pattern. You can see my notes in the picture above.

The notes** usually say something like: Move SH pt out 1/2" (left arrow) ; or Extend hem (down arrow) 3 inches. These notes are sometimes accompanied with drawings as needed. If I was working in CAD, I would just mentally note the differences and make the changes as as I went along. Since I'm drafting with pencil and paper, the notes are essential.

The next step is to trace off the t-shirt pattern and start applying the changes. More on that later.

*There are a lot of pattern making myths out there. I'm trying to keep this blog entry very focused but I'm happy to answer pattern making questions and myths in future posts. Please leave your question or comment below.

**These notes eventually find their way to my pattern piece catalog. I assign a pattern piece number, note the style/pattern piece that the new piece came from, and then tell what changes were applied and any other relevant details. Blank forms for managing patterns are available in my Pattern Making bundle or in the book with complete instructions.

March 19, 2013

Blouse refashion : shortening sleeves

This was another lucky thrift store find. This is an Eddie Bauer blouse with a print and interesting yoke detail. The yoke has narrow tucks and a narrow double fold ruffle that measures about 3/8 inch. The button band extends below the yoke at the bottom. (click on the picture for a better view of the yoke details. The buttons are fabric covered. The attention to detail and the construction make this a high quality blouse. There are 6 separate pattern pieces resulting in 12 cut pieces just to make this yoke! I'm still not sure how the seam with the ruffle is not bulky considering it is a folded ruffle.
Eddie Bauer blouse with long sleeves
As much as I liked the blouse, the combination of the print and long sleeves made the blouse feel like I was wearing pajamas. So, I closed my eyes (not really) and chopped the sleeves off. The new shorter sleeves were a bit wide, so I added elastic to pull it in.
Shorter sleeves on an Eddie Bauer blouse
I like this version much better - a fun new top for Spring.

April 11, 2012

T-shirt pattern quest pt. 6 : How to correct the fit of the armhole of a fitted t-shirt

I created some drawings to further explain the armhole problem on my t-shirt pattern. Nearly all drafting instructions that I've seen for t-shirts are pretty much the same. First you enlarge the armhole and drop the shoulder. Then the front and back bodice are traced off with identical bodice shaping and armhole shaping. The only difference might be the neck. If you lay the pattern pieces on top of each other, you will get something like this.

Typical t-shirt pattern shaping
This kind of pattern works ok for a boxy, loose fitting t-shirt. If you want a more fitted t-shirt, then it simply won't work. In my case, the symmetrical armholes caused the front of the shirt to be pulled toward the back. The closer the fit, the less symmetry in general. When you look at the human body, you can see there is no symmetry between the front and back so patterns should reflect this. (Most people are not truly symmetrical left to right either). Children generally are more symmetrical than adults and the patterns for them reflect this. But, even there, the more fitted the style, the less symmetry though the differences are smaller. Anyway, the patterns above resulted in a fit that looked like below. The red arrows help emphasize the shape and length differences of the front and back armholes.

Fitted t-shirt with symmetric front and back pieces
To correct this problem, I needed to lengthen the back armhole. I compared the armhole of my blouse pattern, which was not symmetrical, to the t-shirt armhole to determine how much longer it should be. Slash and spread and the pattern should look like something below.
Pattern adjustment for a fitted t-shirt
 With a result that looks much improved.
The proper fit for a close-fitting t-shirt
The next thing on my list is to make adjustments for front versus back body width.

December 20, 2010

Tutorial: Reduce or Remove Sleeve Cap Ease pt. 2

I received a really great question on my previous tutorial on how to remove or reduce sleeve cap ease. Gina's question deserves it's own blog post.

Well, what do you do if you have big arms but too much ease? If I move it over I will lose bicep room. I am working with a dress right now and everything fits but the sleeves are tight and the have too much ease. How do I widen the sleeve get rid of ease and fit it to the armhole?
Thanks
This is a really great question and may require me to consider re-writing my tutorial. My previous tutorial is based off my experience drafting patterns for children's clothing. Usually it is not a problem to reduce the bicep line because it's usually too big anyway. My overall changes are small because I am perfecting patterns that I have drafted myself.

If you are working with a commercial pattern for adults, the approach will be similar. You can't always reduce the bicep line and the overall changes may be quite significant. Patterns from the Big 4 notoriously have too much sleeve cap ease. To be fair, if you follow the drafting instructions in some pattern drafting books, you end up adding in a fair amount of ease too. One pattern making book has instructions that result in as much as 1.5 inches of ease in a set-in toddler sleeve. Way too much. Such a practice is not common in the fashion industry and the production sewers will refuse to set-in the sleeves.

I had difficulty coming up with a solution and so I had to ask my pattern making friends at the Fashion Incubator Forum. We have to assume that everything fits Gina as it should, though it's possible there is some other fit issue that is contributing to the bicep width problem to begin with.(1) There are two possible solutions and neither is quick nor easy. Both will require testing. To add bicep width, slash and spread or slash and pivot the sleeve to the desired measurement. This alteration will require fixing the sleeve cap anyway.

1. Draft a new sleeve from scratch. (My solution)

2. Reduce the sleeve cap height equal to the amount of ease to be removed. (From Nora of the Fashion Incubator Forum).

Sometimes it's just easier to start over. It may save time in the long run and you will get exactly the sleeve you want.

If you would rather fix the sleeve, you can try Nora's suggestion. Nora's suggestion leaves the bicep width alone and only adjusts the sleeve cap height.

Walking a sleeve along an armscye
1. Begin by walking the sleeve along the armhole in a similar manner to my previous tutorial. In this case, start at the bottom and walk the armhole toward the shoulder. You will need to walk the sleeve on both the front and back armholes matching up the front of the sleeve with the front bodice and the back bodice with the back sleeve. Your sleeve should not be symmetrical and you will need to check the entire armhole. As you work, you may want to check the entire armhole and sleeve cap.

Measurement length difference

2. Measure from the seam line of the shoulder on the bodice to the center notch of the sleeve. This will be equal to the amount of ease on one side of your sleeve. Repeat for the back armhole. Total up the ease for the front and the back of the sleeve. This will equal the total sleeve cap ease.

Reduce ease by lowering cap height

3. Reduce the sleeve cap height equal to the amount of ease that needs to be removed and redraw the sleeve cap. You will need to repeat these steps until you get exactly the amount of ease needed to set the sleeve and no more.


Neither Nora nor I can guarantee that this method is the answer. This method will require lots of back and forth testing and iteration. The method is similar enough to my previous tutorial that I think it will work eventually. If you have the patience for lots of testing, then go for it. Also remember that you may still need *some* ease. When we say zero ease, we don't really mean zero ease. You may need some to help set the sleeve in. The only way to know is to sew up a few samples. 1/4" to 1/2" of total ease is not unusual. This ease is required to help sew opposing curves together. The sleeve should be against the feed dogs as it moves under the foot and the action of the feed dogs may require a little bit of ease so that the sleeve cap and armscye meet up in the end.

1. The armhole could be too small or too big. It may be in the wrong location or scooped wrong under the arms.


Thanks to Nora for her suggestion.

July 06, 2009

Correcting the fit of petal sleeves in a wedding dress pt. 2

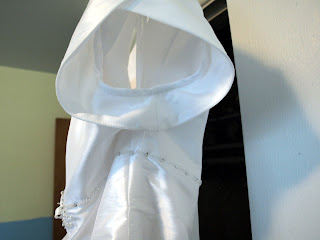
I finally had a chance to do up some line drawings to illustrate the problem with the petal sleeves of the wedding dress I recently altered. There are more pictures in the blog entry Petal Sleeves pt. 1.

Side view of a petal sleeve in a wedding dress

Petal sleeve in a wedding dress
The shape of the sleeve pattern adds a lot of extra material under the arm - creating almost a circular sleeve. The hem of the sleeve flapped around like wings. IMO, it wasn't very attractive. Even though the dress was a plus size dress, I can't imagine any woman wanting this style. I find it hard to believe the designer intended this either. I could be wrong since I am not familiar with wedding dress design. I do know that wedding dresses are designed to be easy to alter so perhaps the designer allowed for extra underarm width to accommodate the size of any upper arm. Even so, with the combination of removing excess shoulder height, recutting the armholes and sleeves, the alteration was not that easy. I dare say, it is either sloppy pattern making and/or grading. I would pin the source of the problem on grading from a size 6 all the way into a plus size. I (and Kathleen) have blogged about this many times (search for "Grading is not morphing" at Fashion-Incubator). Plus sizes should have their own patterns separate from Misses sizes. Trying to save time and effort by "grading" patterns from a size 6 up into the plus sizes leads to problems like this. Of course, I don't really know if this is exactly what happened. I would need to look at the whole size range and even the actual pattern pieces to know for sure.

This is what the pattern pieces and fit looked like on the bride before the alteration. The petal sleeve is a regular cap sleeve in the example below. You can see the extra width added at the hem of the sleeve and the wings it creates under the arm.

Pattern shape of petal sleeve in a wedding dress

Below is the shape of the pattern after the alteration. I probably removed a good 1.5" from the sleeve hemline. The fit of the sleeve looked 100% better.

Corrected pattern shape of petal sleeve
Now if the intent of the pattern maker was to allow the bride to be able to lift her arms for dancing, then it was added in the wrong place. A gusset should be added at the underarm - not the sleeve hemline.

Drawing of a cap sleeve with proper fit

April 23, 2009

A tale of a broken screw, loose screws and a DIY mechanic for the Singer Hemstitcher 72w-19

This lovely 72w19 Singer Hemstitcher (circa 1945) has caused me all kinds of grief this month.

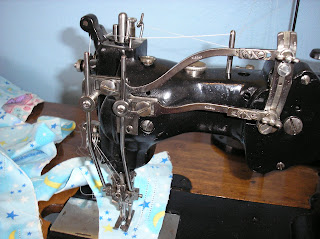
Singer Hemstitcher 72w-19
I have had a persistent problem with this machine every since I purchased it 4 years ago. The left needle thread has a tendency to break, almost randomly. I can stitch some distance, it will start skipping and then get cut by either the needles or the piercer. I have played around with various settings and adjustments continuously over all this time. Sometimes I can improve it, other times it becomes worse. Despite all these adjustments, the right needle continues to behave as it should and the left will not.

One day, I noticed that the piercer holder was loose. I could wiggle it with my finger. This led to me over tightening the piercer holder screw and breaking it. This screw is a size #6 and some of the screw was stuck in the machine. How to get it out?

Broken screw in a Singer Hemstitcher 72w-19 piercer

It would be easy to say I am not a sewing machine mechanic. I have done some basic tuning up on regular sewing machines. Set the timing on both of my sewing machines. Cleaned, oiled, lubed. But that is about it. Armed with my 72w19 manual, I set out to fix my machine, extract that screw and get to the bottom of the thread breakage problem. The engineers who designed this machine and most mechanics who worked on these are all gone now. Those that are left are hobbyists, for the most part. Some are very good, but too far away to consult. Other mechanics rarely work on or understand these machines.

Even with the manual, there are gaps of knowledge. Perhaps later I will post a little about the history of these machines. One thing I did learn is that the ladies who purchased these machines attended a training and certification class so they could adjust them on their own. I am sure they picked up all kinds of information never written in the manual.

So back to the broken screw. Nothing could happen until that screw was extracted and replaced (and luckily I did find a replacement).

Assemble some basic tools:
1. Drill (variable speed, set on slowest setting)
2. Very small metal cutting drill bits (like 5/64")
3. Punch
4. Extractors and/or left hand drill bits
5. A steady hand.

Step 1
Use an auto centering punch to punch a pilot hole into the broken screw. There are different sizes and shapes of punches. I found one that is about the size of an ink pen. You press down on it and an internal spring forces the punch. A very nifty and useful gadget for small spaces (also expensive uni-tasker). You may need to do several punches because the surface of the broken screw will probably be uneven. This punch is critical so that the drill with a metal cutting bit doesn't float around.

Step 2
Using the drill with the regular metal cutting bit, drill a hole in the center of the broken screw. Make sure the drill is on a slow speed setting. In my case, I could drill all the way through the center of the screw to the other side and not risk damaging other components. Even so, drill just far enough to be able insert a slightly larger extractor or left hand drill bit. Stop every so often to clean out the hole and to let the drill bit cool off. The drill bit may dull quickly, so be prepared to replace it.

Step 3
If the screw is not jammed too tightly into the machine, you may be able to insert the extractor and turn the screw out by hand. This is what I ended up doing in my case. If you need more power, use the drill but be sure to reverse the direction of the drill.

And here is the result. You can see how small that broken screw bit was and why I was so nervous about it.
Screw extractor and broken screw part
With the broken screw removed and a new one inserted, I once again began to check all the possible adjustments. In this I discovered more lose screws. There were lose screws on the piercer bar, and underneath the bobbin. Cleaned more lint and gunk out of areas I rarely clean. Oiled every moving part. Adjusted the vibration (zig-zag), pitmans, levers, etc. I could definitely say I have learned a lot by over adjusting some part and seeing what would happen (very carefully of course). I think I may have zeroed in on the vibration setting as the sources of the skipping as the left needle only skips on the inside vibration.

And then the piercer snapped in half the other day. I can't figure out how or why. Did I have it set too low in the machine? Maybe it was just worn out and over abused?

Thankfully, replacement piercers can still be found. Though they are very expensive. I bought two, just in case this happens again. Hopefully not.

April 08, 2009

The Singer Hemstitcher 72w-19 broke down

Every time I sit down to stitch blankets on the hemstitcher, I cave and try to adjust it. The left needle thread continues to break despite everything I have done. One commenter suggested I move the main piercer either up/down or left/right. While I attempted to do this, I discovered that the main piercer holder was loose. Is it possible that the main piercer holder was vibrating or moving as a stitch is formed? It could explain why I could stitch a few inches and then the left thread would break randomly. The holder was only marginally lose but I could moved it ever so slightly with my finger.

So I attempted to tighten the screw on the holder. I wrenched down on the screw and shouldn't have done that. After all it is a 70 year old screw. And yes, the screw broke.

Broken screw in a Singer Hemstitcher 72w-19 piercer

There is a broken part of the screw stuck in the machine. Thankfully, I was able to locate a new screw. One nice thing about the old Singers is that the engineers used as many of the same parts in multiple machines as they could, especially screws. The problem, of course, is extracting the screw. I zoomed in pretty close in the picture above, but that screw opening is only about 1/8 inch. I am very nervous about doing this because I have to be very, very careful to not damage the threads of the piercer holder. That part will be very difficult and expensive to find, if at all. I probably will buy a Dremel as I don't trust myself with my regular drill. I don't know.

I am my own mechanic when it comes to repairing my Singer Hemstitcher 72w-19. There are very few mechanics familiar enough with this machine that I would trust them to work on it. I have really spent a lot of time studying it and I think I now understand how all the important parts work. The movement of the piercer thread holder as it stitches proves that it can break or cut the threads. It moves much more now that the screw is not completely there.

And of course this happened at a time when I have two large blanket orders. Thankfully, my customers are willing to wait. But if I can't fix it, then I will be taking these blankets to one of my competitors to finish. I am a bit stressed about the whole thing.

March 06, 2009

Singer Hemstitcher 72w-19 thread breakage solutions

Singer Hemstitcher 72w-19Hemstitching woes continue to plague me. Thread breakage with the left needle thread continues to be a persistent problem. The breakage is preceded by skipped stitches that cause the thread to wrap around the pierces where the piercers or needles eventually cut the thread. I have run through various scenarios trying to diagnose the problem. The timing of a machine is absolutely critical or no stitches form. In the case of a hemstitcher, the timing is a bit more complex. The position of the needles relative to the piercers and how they move as the fabric moves under the foot is all a part of the timing. A Singer hemstitcher 72w-19 has two bobbins which must be separately adjusted to work in time with the needles as they descend with the piercer. For a while I have thought there was a timing issue with the left needle.

Or maybe not. I have set and checked the timing and it appears to be right on. I have adjusted nearly every possible adjustable part. Even the pitmans that control the needle position and angle - something I dreaded touching. I adjusted the check springs. I have spent countless hours making one fine adjustment after another, studying the manual over and over. I feel as though I have hit a brick wall. It is rather frustrating to be stitching a customers blanket and have the left needle thread break every 5-12" for no apparent reason.

Check Tension


So off to browse the net to try and find some kind of solution. American and Efird is probably one of the best technical websites for manufacturers. They have an excellent article on thread breakage that has given me some insight. A checklist of things that might be causing some of the problems. One thing that I had observed the last mechanic to work on this machine do was wrench down on the tension discs. I have maintained tight tensions ever since. Tonight I loosened the tensions until the bobbin tensions took over than edged back to a balanced stitch. The stitch is better and perhaps that will solve some of the problems.

Needle Orientation


The next step was to look at the orientation of the needles, in particular the rotation of the needle in the needle clamp. Most every blog entry I have read says to turn the needle out to help avoid thread breakage. I think that is the wrong approach because it affects how the hook interacts with the needle. The needles should be aligned with the eyes opposite each other in a straight line. This may not make a lot of sense if you are not familiar with the machine, but mechanically, it does.

In any event, I still must plug away at stitching some customer orders with my fingers crossed that I will have fewer problems. If you are having stitching problems because of skipped stitches or thread breakage, I highly recommend the American and Efird article.

Oh and did I mention I had to fix the belt. Leather belts have a tendency to wear out. I used my last clip, so I must order some more just in case. I have extra belting because my machine can be used as either a treadle or with a motor. I don't have the fancy tool that punches a hole in the belt and compresses the clip. I learned a neat trick of using a drill to create a hole for the clip. It worked great.

Leather belting for a Singer Treadle Sewing Machine