Showing posts with label Pattern making. Show all posts

December 13, 2013

A Pattern Review for J. Bernardoni's Nutcracker Cavalier Doublet Jacket

In the ballet world, the Christmas season is Nutcracker season. This year, I was commissioned to remake the Nutcracker/Prince jacket for Utah Artist School of Ballet's Children's Nutcracker. The director requested red stretch velvet but other than that I designed it. She approved the design and I had a very short period of time to build 2 identical jackets, 4 days to be exact to make photo call. The director was understanding that the jackets for photos would be wearable and only partially decorated. Within a day, I found out one of the two dancer's would not be there for photos. Since this was a short build, I bought a pattern to use from Tutu.com. Pattern No. JB11002 Nutcracker Cavalier Doublet by J. Bernardoni, a New York costume designer. Tutu.com is the only source for this pattern and I believe it is not actually listed on their website but can be ordered via phone. (I am not affiliated nor was I compensated with tutu.com or the pattern designer). Also this pattern comes one size per an envelope and is printed on heavy white paper. I always trace off my patterns and never cut out the original that way I can make changes as needed.

Reviewing the Pattern

In costuming, I am used to not working with pattern instructions. Oftentimes, patterns are drafted in house, cut into fabric and handed over to the stitcher, sometimes with a design sketch and brief verbal instructions. This pattern has instructions but they are written very simply and with the assumption you know what you are doing or built something similar in the past. I briefly skimmed through before I began. I noticed that 1/2" seam allowances are included. Hem allowances are 1" with 1/2 seam allowance making for total of 1 1/2" turned up. The pattern designer, included a pattern pieces diagram with a cutting guideline. He doesn't include yardage amounts nor fabric recommendations. Having made doublets in the past I estimated approximately 2 yards per jacket. My fabric was 60-62" wide which in the end was an over estimate of 1/2 yard per. Usually, I like to buy 10% more than is needed for future repairs or alterations, slightly more if the fabric has nap or one way pattern direction. The pattern designer lists two different flat-linings; coutil (for the body, epaulets and collar) and washed muslin (for the sleeves) and one interfacing of fusible hair canvas.

Fabric Choices


For my project, stretch velvet was chosen. The director wanted it to fit generically so it could be used for years to come. I was hesitant to use a stretch fabric when the look and design is for a woven. Often with men's ballet tunics, woven fabric tops can be made in two pieces,  an over vest and a stretch under shirt with sleeves attached. This enables the dancer to have full movement of arms. I have seen some built without using the undershirt method and instead stretch panels are used in the sides or wherever needed, etc... This pattern doesn't use the undershirt nor does it mention using stretch fabrics. This is where experience and knowledge of a show's choreography is necessary so changes to the pattern can be made. I chose to go completely with stretch fabrics for the jackets. My flat-lining fabrics were 4 way stretch cotton lycra for  the body, shiny milliskin for the sleeves (gives just a little bit of slickness) and rayon bemberg for the collar and tails. Interfacings (from Fashion Sewing Supply) used were shirt crisp for the collar and tricot deluxe for the body front and tail sections. (I am not affiliated nor was I compensated with Fashion Sewing Supply, just really love her products).

Applying interfacing to the jacket tails


Pictured here is a side back. The interfacing is in white and applied to the tail portion. This is where I deviated from the pattern instructions which has you apply fusible hair canvas to the tail lining. The fabric being pinned on top is the flat lining. 


Pinning the flat lining


Side back ready for flat lining as stated in pattern. 


The lining is too short
I made the side seams with 1" seam allowances as well as the
center back.
The jacket is completely flat lined except the tails. This is the way I would have created the pattern. One thing that bothered me about the original patterns is that the lining stops short of the side seam allowances. (see picture). This would look unfinished if the sides were ever let out. Most likely they probably won't be, (most dancers have similar sized bodies) but you never know. I think the pattern designer did this to eliminate bulk which in theory it is a good idea. Also, the front and back are constructed separately, sleeves put in flat and then the sleeve seam and side seams are sewn in one. I don't like this so much. I like to have the sleeves separate and and the jacket finished up to the sleeve insertion for a first fabric fitting. This way I can make adjustments to the shoulder line and arm scye if needed. I have to make a note here, I made the jackets up completely with no fittings nor measurements of dancers ... got to love regional/community theatre).  


Tail lining


Finished linings in the tail. 


Pinning the trim to the jacket front
Almost done!


I only have a female dress form so the jacket looks a little odd. As I was pinning the trim on, I made the decision to hand tack the trim. Velvet can be quite finicky and I didn't it want it to stretch the fabric out. I think a walking foot on a machine would have been nice. One day I will buy one...


Nutcracker Cavalier Doublet Jacket


Even with hand tacking, I got some weird pulling but on stage it was not noticeable. I also got some bagging out on the sleeve, probably due to the flat lining (milliskin) fighting the velvet. These are some of the reasons I wished I used a woven fabric instead. 


Overall, I really liked this pattern. I could tell it was made by a costumer who knows what they are doing. Personally, I would have been fine without seam allowances included. I look forward to trying out more of his work. 


Full Nutcracker ballet costume with jacket
The Nutcracker


Nutcracker jacket on prince
The Prince


December 11, 2013

Adapting a block pattern into something else pt. 7 : Pattern modifications

Testing a neckband construction

Have you ever had a project bug you? I had my first sample hanging in the Design Loft almost taunting me. Originally I wanted a neckband on my cardigan. Then during construction, I changed to a rolled fabric edge along the neckline. The longer I stared at it, the less I liked it. Still unsure how a folded neckband would look, I whipped up a small sample, and what do you know? It worked just fine. It could be improved with a bit of interfacing, but not too bad.

So I pulled out the seam ripper and set to work. In addition, I removed some of the extra ease I had previously added for a closer fit.
Testing the fitting sample
You'll notice there are still a few minor adjustments that need to be made. The sleeves are too long. Yep, I over compensated there. The shoulder needs to be brought back up. And the back neckline needs to be raised. Despite all that, I am fairly pleased with the results. This is the style of cardigan that I really like. It looks sloppy in the photo because I used a rayon/poly jersey knit that is just too lightweight and drapey for the style. The next version will be even better. And yes I do plan to wear this, even in public. It is very, very comfortable.


November 21, 2013

Adapting a block pattern into something else pt. 6 : Sewing a fitting sample

Test fitting sample for a new cardigan design
You can easily spend a lot of time creating a pattern on paper but at some point, it needs to be sewn up. It is while sewing that you'll see your design take shape and lead you to make modifications as needed. I changed the design a bit by eliminating the folded neckband. The neckband is instead a single layer that is allowed to roll. I made this change because the fabric is pretty light and it would need some kind of stabilizer, which I didn't have. The cardigan is very comfortable and fits pretty well. Even so, I added just a bit too much wearing ease. So I need to reduce some of the body width. The upper back is a tad long and the sleeves need shortened.

It's pretty hard to get everything just right on the first attempt. I've done enough girls dress patterns that I don't usually have to do many iterations. Adult clothing takes a bit more tries because I lack experience with it. Industry pattern makers and sample makers will sometimes make many iterations of a design before they get it just right. This is a slightly different approach than home sewists might take. But once the pattern is nailed down, I won't have to worry about it anymore. It will be much easier to create variations on this style too.

Paper sewing pattern
Before I could tackle the pattern adjustments, I needed to stop and get organized. I assigned a style number, created a style and cutting spec sheet, and assigned pattern numbers. I explain how to do this along with providing printable blank forms to fill out in my book. If you prefer keeping a digital record, you can use the examples in the book to create your own spreadsheets. In many ways I still prefer paper and pencil. It forces your brain to think differently - perhaps more analytically. I have used both paper and pencil and spreadsheets. There are advantages to both.

November 12, 2013

Adapting a block pattern into something else pt. 5 : Making the pocket pattern

Sewn sample of the new cardigan style

Here's a sneak peak of the first sample of my cardigan pattern. I'm fairly pleased with the results, though there are a couple of minor pattern modifications to make. So more about all that later.

For now, we need to finish up the pattern. The last two pieces to deal with are the pockets (shown above) and the elastic casing. I referenced my sweater to determine the pocket dimensions and placement, which is basically a rectangle. Pockets come in all sorts of shapes and sizes with varying amounts of functionality. Pockets should be proportional to the overall garment. They can be graded for larger or smaller sizes to maintain proper proportions. Pockets can be applied in various ways and include seam and hem allowances.

I wanted a very casual look to my pocket so I used a narrow 3-thread serger hem around all four sides and topstitched it on. This allowed the fabric at the top of the pocket to roll. This detail mimics the detail on my sweater. I didn't have a lot of confidence in producing a neat topstiched pocket in which the raw edges are turned under. This is partly due to the fabric and my machine. For a more structured pocket this fabric would need a fusible to help stabilize it.

Pocket placement is noted on the pattern piece by a drill hole. In a factory, an actual hole is drilled into the fabric. I have seen knits marked with a drill that also contained a marking medium such as a washable marker. In that case, the drill bit was like a needle. My pattern at home will contain a hole large enough for a chalk marking pencil to fit. Even though there are lines on the pattern pieces indicating placement, they are not transferred to the actual fabric. They are just there for clarity.

Drill holes for pocket placement

The elastic casing is just another rectangle large enough to cover the elastic. I think mine is about 1/2" x 8".

October 30, 2013

Adapting a block pattern into something else pt. 4 : how to create the neckband pattern piece

T-shirt into cardigan
For review read part 1, 2, and 3 of this series.

All of the major pattern pieces are now done. Next up is to do the neckband, the elastic casing for the back waist, and pocket. These three pieces are just rectangles. In a CAD pattern making environment, I will make pattern pieces for all rectangles and squares. Pattern makers, graders, marker makers and cutters all handle these kinds of pieces a little bit different, so ask if you are not sure.

For me, working on a personal pattern in my own workspace I handle rectangle and square pieces one way. I figure out the dimensions and note them on my style sheet. You can do this for patterns* that will be used in a factory setting too, but you will need to create a cutting guide for any rectangular pieces which might be graded. For now noting the cut dimensions is sufficient.

Up to this point I haven't really needed to consider how the cardigan is to be constructed. The majority of the cardigan has rather simple construction that mimics the construction of the t-shirt. But the neckband can be constructed and attached in a number of different ways. I also have to consider the stretch factor along the back neck. Do I want a 3-piece neckband with seams at the shoulders or a 2-piece neckband with a seam at center back? How do I finish the neckband at the hemline? How wide? All these things have an influence on the dimensions of the cut piece.

I like to keep things simple so I opted for a 2-piece neckband with a seam at center back. A 3-piece band might be necessary if the fabric width is too narrow. A 1-piece neckband might be possible if the cardigan was smaller. Begin by measuring the front and back neckline of the cardigan patterns.

Measure the neckline for the neckband

Now it is a matter of math. There really isn't a formula for this. It's just adding and subtracting.**

Neckband width = (front neck+back neck) - (front and back shoulder seam allowances + hem allowance) + seam allowance for center back + seam allowance at hemline - some stretch factor for the back neck.

Neckband length = 2 * (Desired finished width + seam allowance)

The neckband will be cut across the width of the goods like this:

Cutting guide for the neckband

Dimensions should be written as Length x Width. In this case the Length is the shorter measurement. My neckband pattern piece will then be something like:

5 x 30 inches

A CAD version or hard pattern will look something like this with a pattern number assigned instead of the words neckband:


You'll notice that I have two notches. The notch along the length (the narrow end) instructs the sewing machine operator to stitch the neckband pieces together at that end. The other notch along the width (long direction) is the match point between the neckband and the shoulder seam of the cardigan. This notch is necessary because I reduced the back neck to account for a stretch factor. This will help the back neck fit better rather than stand straight up.

Since I am just making one size and working at home I will draw a picture indicating the notch placement with a measurement along with the cut dimensions for the neckband.


*Managing rectangular and square pattern pieces is the subject for at least two additional blog posts! Yep, it's hard to believe but there is a lot to say on the subject....

**I do all this adding and subtracting right at the calculator.

October 25, 2013

Adapting a block pattern into something else pt. 3 : Modifying the t-shirt back pattern piece and sleeves to make the cardigan

T-shirt into a cardigan
For review read part 1 and 2 of this series.

Next up on my t-shirt block pattern transformation to a cardigan is to work on the pattern pieces for the back. I won't go into too much detail because there isn't much difference from the front.

Trace off the back and add the same length and width adjustments as the front. Extend the shoulder the same amount. Drop the armhole the same amount.

Trace off the back pattern piece, add length and wearing ease


Next I add drill holes to indicate the elastic for the back waist. The elastic takes up some of the extra body ease in the back to make the cardigan appear more fitted. I didn't add additional design ease for extra fullness, just the same wearing ease as the front. If you draft your own pattern, you can add as much or as little as you want. I referenced the cardigan that I am knocking off for placement. In the picture below, the drill holes appear rather large, but that is just for clarity in the drawing. I'll take a picture of the finished pattern pieces when they are ready so you can see what it all looks like. In reality, the holes will only be large enough so a marking pen(cil) can make a mark.

Add drill holes for the back elastic

I also modified my sleeve for length and width. My previous blog post on how to reduce/eliminate sleeve cap ease* should give you an idea of how to adjust the sleeve cap. Walk the sleeve cap along both the front and back armhole of the bodices pieces. The armscye should be longer than the sleeve cap. Note the difference and enlarge the sleeve cap so that it matches the armscye. You can do this by slashing and spreading. Do not add any sleeve cap ease. This is a myth perpetuated by pattern drafting manuals and others. You don't need it.

Adjust the sleeve cap to fit and add length

Finally, I referenced some cardigans in my closet to figure out how long to make the sleeve (plus hem) and how wide to make the wrist. I have a tendency to make my sleeves a little longer than necessary because long sleeves from off the rack stuff tend to be too short for me. Also, I worry about shrinkage. I will be pre-shrinking my knit fabric, but some knits will shrink with multiple washings. In any event, add the length you need for your sleeve.

October 17, 2013

Adapting a block pattern into something else pt. 2 : Pattern modifications to turn a t-shirt into a cardigan

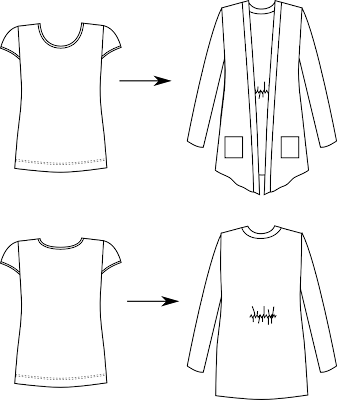
Rather than take pictures of my pattern making process of pencil on paper, I did up some line drawings. Just to refresh, I am tranforming a t-shirt block pattern into a knit cardigan.

T-shirt into a cardigan

I began by laying my t-shirt front pattern piece on to the cardigan that I'm knocking off and took notes on the differences. I had to keep a few things in mind as I compared the two. First, the t-shirt is close fitting with little extra wearing ease. The cardigan I'm knocking off was accidentally shrunk, so I need to add more wearing ease than is immediately apparent. A cardigan or jacket needs enough wearing ease that it is easy to put on and wear over other clothes. I can't tell you exactly how much wearing ease your pattern should have because it depends on what you prefer. Expect to add somewhere between 2-4 inches extra for this style.


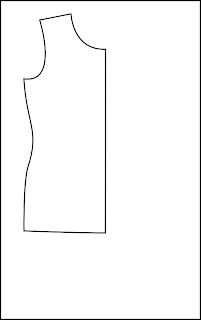
Trace off the bodice pattern
The first step is to trace off half of the front pattern.


Add length to the t-shirt
Next, I lengthened the pattern piece based on my notes. My pattern piece includes the seam allowances and hem allowance. I don't remove the hem allowance, I just make a mental note and add the hem allowance to the length I've added.


Creating the draped opening of the cardigan
To get the angled shape of the cardigan, I extend from the center front at the hemline and draw a line from the high point of the shoulder to the hem. Gravity will pull that point down and create the angle along with a bit of drape.

The greyed out area represents an area that is removed. On paper I scribble in any area to remind myself to ignore it. You could also erase it.
Adding extra wearing ease for the cardigan
Next, I add in extra wearing ease by moving out the side seam, dropping the armhole, and extending the shoulder line. The extra ease added to the side seam should only be 1/4th the total ease added because we are only working on 1/4th of the total body circumference.

I'm still debating on how much wearing ease to add. I need to compare my body measurements to the pattern to make sure it is enough.


And this is a far as I've gotten so far. I need to make similar changes to the back pattern piece. I also haven't assigned pattern piece numbers yet. Blank forms for managing patterns are available in my Pattern Making bundle or in the book with complete instructions.

October 09, 2013

Adapting a block pattern into something else pt. 1 : Noting changes for the new style

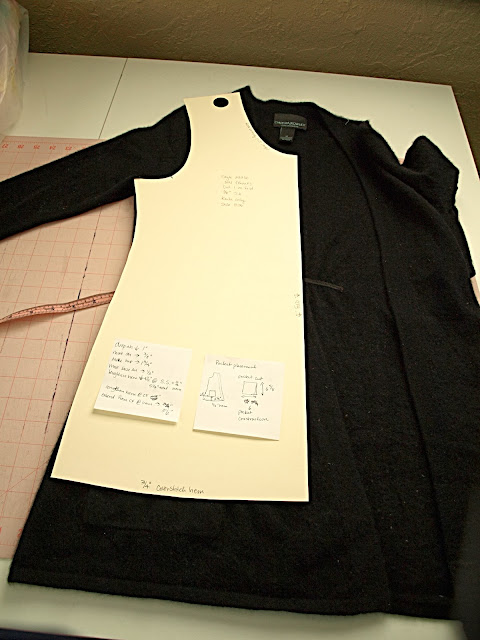
Pattern notations for modifying a pattern

A block pattern is a sewing pattern that has been proven. It is a pattern that has been trued, perfected and finished with seam allowances. The pattern has been sewn up and tested for fit. In other words, a block pattern just works. A block pattern becomes a part of a pattern file which can be used to make other patterns.

In the industry we rarely draft from scratch. Instead we modify existing patterns (or blocks) into something else. Some pattern making gurus talk about using slopers. Slopers are basic patterns drafted from body measurements and do not have seam allowances. Industry level pattern makers use block patterns, with seam allowances on, to make patterns for new styles*. It saves time.

It's easier than you might think to do this and this is just one example. I'm sure other pattern makers have their own procedures. My own procedures adapt to whatever it is I'm working on and whether I'm using CAD or traditional methods.

The problem:

I have this much loved cashmere sweater jacket. I snagged it off a sales rack a couple of years ago and I absolutely love the cut and fit. You know, the perfect layering piece, warm and soft for those cool days. I usually clean it by running it through the dryer using a Dryel kit. This last time was a disaster as I had left a piece of chocolate in a pocket. Chocolate ended up all over the sweater and everything else. So, I decided to run it through the hand wash cycle on my washer. That was a mistake. While the chocolate did come out, the sweater shrank. It shrunk just enough that I'm not sure I can wear it anymore. It made me very sad. And yes, I know better. I should have hand washed it.

The solution:

I always said that once this sweater was in pieces, I would make up a pattern to make a new one. So here it is. I recently finished up my t-shirt pattern, a block pattern ready to go. I began by carefully laying out the sweater and positioning the front t-shirt pattern on top. I then used scraps of paper to note the differences between the sweater and the pattern. You can see my notes in the picture above.

The notes** usually say something like: Move SH pt out 1/2" (left arrow) ; or Extend hem (down arrow) 3 inches. These notes are sometimes accompanied with drawings as needed. If I was working in CAD, I would just mentally note the differences and make the changes as as I went along. Since I'm drafting with pencil and paper, the notes are essential.

The next step is to trace off the t-shirt pattern and start applying the changes. More on that later.

*There are a lot of pattern making myths out there. I'm trying to keep this blog entry very focused but I'm happy to answer pattern making questions and myths in future posts. Please leave your question or comment below.

**These notes eventually find their way to my pattern piece catalog. I assign a pattern piece number, note the style/pattern piece that the new piece came from, and then tell what changes were applied and any other relevant details. Blank forms for managing patterns are available in my Pattern Making bundle or in the book with complete instructions.

September 16, 2013

Organizing my workspace : Storing patterns cut in tag board

T-shirt pattern cut out of tag board

Well over a year ago I had made the final adjustments to my t-shirt pattern. I usually draft my first patterns on medical examination paper. It is a less expensive paper to draft on, but more durable than regular tissue paper. Once I feel the pattern is perfected (or good enough for now), I transfer the tissue paper pattern to tagboard. It took me well over a year to transfer my pattern to tagboard. Really, it is amazing I managed to keep all the pieces together without losing any. The pieces floated between my craft table and the floor in all that time! Now I can use these pattern pieces for some other design ideas that have been floating around in my head. I store the tissue paper patterns in 6" x 9" envelopes for future reference. Both the tagboard pieces and the envelope are labeled with the style number, size, piece name, seam allowances, and cut quantity.

Pieces cut in tag board are put on pattern hooks and then on racks. I prefer punching a hole in the pattern with a smaller hole punch so I can use book rings. The book rings are used to hang all the pieces of a style together but make it easier to remove one piece from the collection. The pattern hooks can be looped around the book ring and then hung on a rack.

*There are different work flows for pattern making. This is mine. Some professional pattern makers do all of their pattern making directly on oak tag and some are CAD only. Also, I do things a little differently in my home studio versus work. For example, the t-shirt pattern pieces are cutout in half because I place the piece on the fold at home. This would not happen in a factory. Generally, a production ready pattern would be the full piece (left and right sides) and not placed on a fold. It's not always so simple though. The pattern pieces are created to meet the specs of the fabric and production facility so variations may exist.

August 05, 2013

The Organized Fashion Designer

The Organized Fashion Designer

I'm pleased to announce that my book, The Organized Fashion Designer, is now available for purchase. This book is a collection of guides and forms that I have developed and used while working in the fashion industry. Every fashion or sewn product business exists in some state of chaos. Out of desperation, I began to create various forms and organizing systems to keep track of all of the information needed to manufacture products. This led to simple tech packs that could be pulled together in an instant. I kept track of information using expensive database management software and simple paper and pencil forms. I have even used these forms with personal projects to keep my design space organized. Now I'm sharing these forms with new designers and home hobbyists in the hope that chaos can be organized.

The book includes blank forms and how to:
  • Create a simple tech pack
  • Develop grade rules
  • Track every major step of your product development
  • figure out how much your product costs to produce
  • List sewing instructions
  • Create a style number system
  • Helpful industry resources
And more!

The Organized Fashion Designer
The book is available in three formats.

Spiral Bound

Saddle stitch (stapled pamphlet style)


eBook (PDF)

8.5" x 11" book
54 pages

or from Amazon.


5 star reviews on Etsy:

Thank you so much! Really helpful guide for designers - Linda

Love the ebook! Can't wait to get organized :) - Diane

Thank you!! This book is a great relief. It makes the paperwork look doable and dare I say appealing. - Trapper Jane

Thank you! Great resource! - Jess S

You can purchase the eBook or bundled selections from the book on Etsy.

January 24, 2013

Review of Simple Modern Sewing pt. 2 : Sewing up a sample

I have to admit that I put off the rest of this review. It's hard to be so down on a book that I had so enjoyed perusing. You can read the gushing in part 1 of my review. First the positive:

The photography and layout of Simple Modern Sewing is great. The instructions are adequate for experienced sewists. The patterns are printed on sturdy white paper.

And then when you pull out the pattern sheet, this is what you get:

Pattern sheet from Simple Modern Sewing


As you can see, nearly all the pattern pieces and sizes use the same exact black line. It would have helped to at least denote the different sizes with different line types and colors for different styles in the same way that Burda does. You have to really look carefully for notches, because they are easy to miss despite extra notations on the pieces. And in just this one snapshot of one part of the pattern sheet, there are 5 pattern pieces that overlap.

The issues with the pattern sheet are relatively minor though, especially if you are comfortable with Burda patterns. I did manage to trace everything off for the wrap blouse and dress. I had to select the large size since that matched up with my measurements best. There did seem to be some discrepancy between the measurement chart, printed finish measurements in the pattern instructions, and the actual pattern pieces. I didn't take the time the track it down and it could be just differences in how one measures. For me, it resulted in a bit more room (which was actually needed) than I expected. One good thing is that the shape of the armhole and sleeve was along the lines of what Kathleen recommends.

A bigger issue did present itself once I started checking the pattern. There is a grading error on the shoulder seam of the bodice pieces of the wrap blouse for the medium and large sizes. In order to fix the large size, you will need to pull the shoulder point of the back shoulder seam in about 3/8 inch. The other smaller sizes match up just fine. I debated whether this was indeed a grading problem because sometimes the back shoulder is eased instead of having a dart. On boxy, loose fitting styles there is no easing or dart, which is what this style is supposed to be. Since the smaller sizes matched, there could be no other explanation. No other bloggers have mentioned the same problem, so I'm not sure if it is just an anomaly on my copy.

After correcting the pattern and adding seam allowances, I proceeded to cut and sew and got this:

DH said it looked like a medical scrub, except it didn't even fit that well. The dart points in the wrong direction, which means I probably should have done a FBA or something else. The skirt part of the blouse has an extremely small gather ratio, less than 1:1.25, which makes the gathers look like a mistake. The result of all of this is that it looked terrible on.


I probably could spend the time to fix the pattern and try again.


But it would take too many iterations.


This project caused me to loose my sewing mojo. Who else hates spending time on something with such disappointing results? I think I can now understand beginning sewists frustrations.


Having said all that, I can recommend this book only for its design and styling inspiration. Go elsewhere for patterns which are similar.


I cannot recommend this book to beginning sewists at all. If you have more experience altering patterns and don't mind endless fiddling, then maybe this book is for you.

January 04, 2013

Review: Simple Modern Sewing pt. 1


Simple Modern Sewing one of the new how-to sew books at my library. I was excited to review this because Japanese sewing books have a reputation for precision and design that elevate the average sewing book. The Pattern Magicand Drape Drape series of books are two notable series that pattern making enthusiasts rave about. I knew that our local patrons would not respond well to Pattern Magic or Drape Drape, but they would probably respond to Simple Modern Sewing.

This book is written by Shufu To Seikatsu Sha. The photography and styling of the designs really grabbed my attention. I personally found the designs very appealing and in this case something that I would actually make and wear. In comparison, I did not find any of the designs in the books I reviewed previously inspiring enough to put in the work necessary to make them up. The book consists of 8 simple patterns that can be used to create 25 garments. Each grouping of patterns can be mixed and matched interchangeably to create the different styles.

The book is divided up into three general sections. The first is the photography/inspiration section that shows each of the style variations. The second is general pattern and sewing instruction. The third contains detailed cutting and sewing instruction for each style variation. This includes a pattern layout, diagrams, and a list of sewing instructions.

The styles in the book are sized for the average Japanese woman. The average American woman may find some of the styles a bit on the small side. Some of the styles are intended to have a lot of wearing ease, so the largest size may fit some American women anyway. There is a size chart and finished measurements for each style, which helped me determine the correct size to trace.

Overall I really like the styles in this book. I selected the wrap blouse, shown on the front cover to sew up as a test for the dress. The biggest downfall of the book is the pattern sheet. It is nice to see the patterns are printed on sturdy white paper rather than tissue paper. But the pattern sheet is a dizzying array of overlapping pattern pieces in multiple sizes in solid black lines. All the patterns and all the sizes are solid black lines. Burda patterns are similar, but they are much easier to sort out. Each style is a different color and the sizes are differentiated by different line types.

To finish up part 1 of the review, the book is inspiring and lovely to look at. The general sewing information and detailed sewing information appear to be adequate for sewists who have some experience. The cutting diagrams and pattern prep require a bit of work. Because of the difficult pattern sheets, I don't know that I can recommend the book for beginning sewists. The styles are simple enough that one could find similar patterns from the Big 4 without the hassle of interpreting the pattern sheet.

Anyway, I've traced off the blouse and dress pieces and begun the pattern checking process. So far I've spent maybe 4 hours just in prep work. Updates as I work my through it.

November 12, 2012

The blouse pattern revisited : recutting tagboard pieces

Bodice pattern pieces cut out of tag board
About a year ago I cut my blouse pattern out of tag board. I had cut the interior of the darts out because I thought it would be more convenient to just trace the dart onto the fabric. Sometimes this is done in the industry, but there is a better way. Anyway, this didn't work out very well.

Recutting blouse pattern pieces out of tagboard

So after I had made my most recent modifications, I recut the front and back blouse pattern pieces. This time I drew the darts in with the addition of drill holes. You can't really see them in the photo, but I used an awl to poke holes into the tag board. A pencil tip fits into the holes to mark the dart on the fabric. This should work better

Now I'm finally ready to buy some more fabric for blouses.

October 10, 2012

Book Reviews : Dressmaking, Collette Sewing Handbook, and Burdastyle

Our library recently acquired three new how-to-sew books. Sewing is picking up in popularity and the numbers of books coming out about sewing reflect that. I took some time to flip through them and here are my thoughts. All of these books give the impression of being exhaustive in their subject. They are also project based meaning the how to sections are emphasized by the included projects.

Dressmaking


Published by DK, Dressmaking has the fantastic photography one comes to expect from DK. The book is written by Allison Smith who previously penned The Sewing Book: An Encyclopedic Resource of Step-by-Step Techniques also put out by DK. The layout and organization of Dressmaking is above average. The how-to photography is clear and easy to understand.

The projects are in the back of the book with additional instructions to complete each project. This means the how to section is designed to support the projects. So, you will have to flip back and forth to get a complete how-to. It also means that the how-to section is not comprehensive. You will likely need a more comprehensive how-to sew book such as the Reader's Digest Guide to Sewing to supplement what is missing. What is missing is the info to complete some other project not included in the book. Much of the information can be applied to other styles. But you may want to do a project with some design feature that requires a different technique, which is not included in this book. Thus the need for some other sewing manual. For advanced sewists, this is not a big deal, but then again an advanced sewist probably wouldn't need the how-to section anyway.

The styles are pretty basic. The graded patterns are printed on grids at the back of the book. This means you would have to enlarge them yourself. Since I didn't make up any of the styles, I can't tell you how accurately the patterns are drafted. I also can't comment on fit. You will almost certainly have to spend time testing the pattern in muslin. The process would be time consuming.

The biggest problem with this book is the binding. It is a large book and while the binding is sewn, it is cheap. Many DK books of this size fall apart with semi-regular use. In the library, we have replaced one very popular DK book several times, which begins to fall apart after only two circulations.

The Collette Sewing Handbook

Written by Sarai Mitnick, the book was written to support Mitnick's indie sewing pattern company Collette Patterns. The book is spiral bound, so it will lay flat when open. The layout and photography is also pretty good.

Mitnick spends time explaining her five basic principles: a thoughtful plan, a precise pattern, a fantastic fit, a beautiful fabric, and a fine finish. I only spent a few minutes reviewing the sections on fit and sewing. The information presented is pretty basic and you will need supplemental resources if you do not have the fit issues described. The sewing information is also basic but will at least help you sew the projects in the book. The patterns are apparently drafted for a C-cup, which means that if that is not you, expect alterations. The patterns are printed on tissue and included in the back of the book. I didn't take the time to check the patterns or sew them up as the styles didn't appeal to me.

Burdastyle

This sewing manual is written by Nora Abousteit, a Hurbert Burda employee and Alison Kelly, a Project Runway alum. The book is designed to support the Burdastyle website and Burda sewing patterns. The book is spiral bound so that it will lay flat when open with the patterns included in the back.

I have an admitted preference for Burda patterns because I have used some of them from the magazine. They are usually drafted pretty well, though the instructions are very anemic, which is a challenge for beginners. This book explains how to use the Burda patterns from the magazine. It explains the pattern notations, how to trace off the patterns, and how to add seam allowances. Burda patterns are based off a European sizing system. It is important to measure yourself to find the appropriate size on the Burda size chart. Unfortunately, the how to measure instructions are pretty pathetic with simple, flat line drawings. The sewing instructions are pretty basic.

There is one thing that I really liked about this book. The book encourages the reader to experiment and redesign the styles. There are only four projects in the book, but the reader is shown several variations. There are instructions for a project with no alterations and then there are instructions for a variation. Additional variations are show in a photograph with no additional instructions in the hope the reader can figure them out on their own. The variation with instructions demonstrates how to alter the patterns to achieve the desired effect. I like how the authors encourage their readers to experiment and play because I feel that is the best way to learn. I think this may be a challenge for beginning or brand new sewists.

I think most of the projects are pretty achievable. I didn't sew any of them up because the styles didn't appeal to me. The jacket would be the most challenging project, especially the variation.

A few final thoughts

All of these books will help either a beginning or intermediate sewist with lots of hand holding for the included projects. Though, I expect there will be some frustration with the patterns and some of the instructions. Additional support material is definitely required for more complete coverage of the subject. The Reader's Digest book is still a gold standard due to it's comprehensive nature. Older how-to sewing books are also better. There really isn't anything new presented with the exception of the included patterns.

There is one popular book that I have not reviewed and that is Gertie's New Book for Better Sewing. The primary reason is that I don't have access to a copy and a full review would be unfair. But, I am admittedly biased against the book already. The content is just an updated version of previously available information. Gertie got her start by working her way through a Vogue sewing manual, and that is the primary source for her book. Some of her tutorials found on her blog have been lifted off of at least one other website. Also, from what I have heard, Gertie is the fit model for the included patterns, which are then graded up and down. If you aren't Gertie, then expect needing to make adjustments.