Showing posts with label Sewing terms. Show all posts

October 26, 2009

Do professional pattern makers work with seams on or off the pattern?

Professional apparel pattern makers work with seam allowances on their patterns nearly all the time. It's faster. I would argue it's more precise. This practice goes counter to what most pattern making classes teach. They teach that you must remove the seam allowances and add them back later. I don't know anyone in the industry that works this way. I think the idea is that working with seam allowances one can create variations that lead to fitting problems later. That's simply not true if you check your new pattern against the original block later. (This is assuming you make a copy or rubbing of your original before you start on a new style. But I'm sure you knew that).

If you are drafting by hand, it is time consuming to remove the seam allowances. Pattern blocks are made with seam allowances on. You would have to keep a set of blocks without seam allowances. It would be so easy to mix up seamed and unseamed pattern blocks. Apparel pattern makers leave their blocks seamed and theatre pattern makers or cutters leave their blocks (or rather slopers) unseamed. In fact a block is a finished pattern piece that includes all pattern markings and is seamed.

If you are drafting in CAD, you can turn the seam allowances on and off. You can work on the cutting line or the stitching line. It's a simple matter of hitting a few buttons. BUT, I have found that CAD programs have difficulty in calculating between seamed and unseamed because it involves a complex series of mathematics. So constantly switching between cutting and stitching lines can produce some weird anomalies. (As an aside, weird things can happen with notches on stitching versus cutting lines too). I have found this is true no matter which CAD system you use. So I work with seam allowances on and directly on the cutting line nearly 99% of the time. This means that I keep the seam allowances in mind while I work.

One Exception


In CAD, it is important to turn the seam allowances off and walk the pattern pieces along the stitching line in a few areas. Collars and necklines is one area that I nearly always check for matching on the stitching line. There are other situations that come up where this important. I learned this the hard way recently.

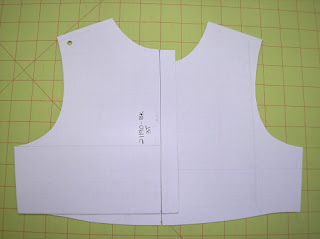
Two pattern pieces with seam allowances on

In this situation, I split a jacket back pattern piece and added corresponding seam allowances along the split line.

Comparing two pattern pieces to see if the cut edges match

Next, I aligned the pattern pieces to make sure they match. At this point they did and I assumed all was right. Until I got complaints from the sewing machine operators that things weren't matching up. I had to go back and double check.

Comparing two pattern pieces with seam allowances off

I took the seam allowances off the pattern pieces and realigned them. They didn't match, so I redrew the stitching line of the side piece to make sure it matched the center. I added back the seam allowances and realigned the edges.

 Correcting the seam allowances so the stitching line matches

The pieces didn't match again. Sewing machine operators also do not like this because they do not know how to align the pieces. In this particular case, the seam allowances are small, so I left the little "dog-ear". It can be difficult to cut those "dog-ears" off by hand when they are really small. It is easier to machine cut. In any event, there are different ways of dealing with this. I show one method below.

Trimming seam allowances on a pattern piece for better matching

Your pattern pieces will then look like this and match up in every way possible.

Two pattern pieces that match on the stitching and cutting lines

November 09, 2007

Standard Pattern Blocks- Flat vs. Classic

Tiki left some questions in comments and I thought I would address them in a separate blog entry.
I am reworking some of my patterns and have both Aldrich's and Armstrong's books as well. As you mentioned, I have noticed that my own kids' clothes from various manufacturers are drafted "flat" as Aldrich describes it, with the front and back patterns basically identical except for the neckline, but was wondering if you could explain more why that is the standard.
Here is a picture of what Tiki is talking about. Aldrich is the only other person I know of that addresses this topic. It is true that most childrenswear manufacturers work off of flat blocks, especially for infants. Aldrich only presents it for infant casual clothing. But I have seen variations of the idea spanning all children's sizes.

An example of a modified classic pattern block
My basic blocks are a variation of the flat method. The armholes and shoulders of the front and backs pieces are identical. The body widths match (the long vertical line indicates the center back/front). The flat fit is a little more boxy and loose. My fit is not too boxy, but it does allow for some growth. You can see the fit of this bodice on one of my dresses. The patterns are not too boxy because the side seams do taper inward and my front waist has some curve. Aldrich's patterns have a straight side seam and waistline. BTW, I am not done refining the shape of this pattern - I am considering narrowing the shoulders and reducing the armhole. You have to start somewhere with your patterns, and they will evolve as you refine your fit.
I have read the discussion of armhole and sleeve shaping from Kathleen's blog and book and was wondering if the standard in the children's wear industry is due to simplicity in drafting, etc (perhaps because there is more ease built into the design of the garment itself) or if there is a specific anatomical/physical reason that makes drafting the asymmetrical sleeve/armhole unnecessary in children's wear. I guess, in other words, is that only the standard in loose children's garments or would drafting a more fitted children's garment with the same symmetrical sleeve still be correct/standard?
I can't say for sure why this is the standard. It is definitely not something I learned in school, but rather on the job. Tiki's instincts are probably right. There is a simplicity in the drafting of flat pattern blocks, and it does save some time. There is a physical limitation too. The smaller the size, the less practical it becomes to draft a classic block. A flat block gives some wearing ease and allows for growth. Children, after all, grow and a little extra ease allows the clothing to be worn longer. And yes, you can draft a more fitted bodice block with symmetrical armholes/sleeves. That is what I did with my patterns because it is what looked right to me. Here are some pictures of a classic, fitted block with asymmetric armholes (click on images for a better view).

Pattern draft of a classic fit bodice blockThis is a set of classic bodices sized three month. You can see the small armhole - there is little room to draw a nice curve. The back armhole is nearly a straight line. These drafts are based off of Aldrich's book. A classic block would be more appropriate for larger sizes.


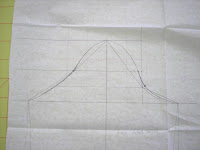
Pattern draft of a sleeve with an asymmetric capThis is a corresponding sleeve with an asymmetric sleeve cap. The sleeve cap seems really high and the curves are abrupt, IMO. These blocks could certainly work, but they require more refining. I opted to modify my blocks so they were semi-fitted and flat. The curves are easier and sewing is easier.

There is a relationship with children's body shapes and the flat method. Young children are simple round cylindrical shapes until about the age of 5 and it makes sense to keep the patterns simple.
I'm having difficulty understanding from Aldrich's book what makes the "flat" block or "classic" block more appropriate for a particular style, so I wondered what was standard practice here in the industry. I hope this makes sense.
I look at it this way. Flat blocks are good for casual styles, like t-shirts. Classic blocks are good for more formal looks. Flat blocks are good for infant sizes, classic for older. Your fit and look defines your design and you can opt for either method. Usually I see a modified classic block for fit, but with symmetrical armholes and shoulders (perhaps more of a convention rather than a standard). I have seen some designers use only classic blocks and others only flat. Really, the decision is up to you.

This is a topic I am still researching and trying to understand. I hate to label flat blocks as a standard because there are several possible methods that may be considered "right" or the "standard". Pattern making is considered a technical, rigid system, but don't be afraid to do things your way. I learn things from those who do not have formal training and are not afraid to do things a little different. Sure there are certain accepted standards for labeling patterns or placing notches. Acceptable shaping and fit is open to interpretation.

July 25, 2007

When do you grade sewing patterns?

Amanda left a comment/question on a previous blog about grading. I thought the answer deserved its own blog entry.
I have what is probably a stupid question. Do you do the grading before or after you add the Seam Allowance to the sloper? Part of my brain says before because you are likely to get a better line, the other says after as it would be easier. I am loving your blog, thank you so very much.
Amanda, not a stupid question at all. The only stupid question is the one not asked. There is a lot of confusion about grading and the difference between a sloper and a block. Let's throw some definitions out and then I'll answer your question.

Sloper - a basic fitting pattern used by costumers and home sewing enthusiasts. The pattern does not have seam allowances, which are added later. People who use slopers do all of their pattern making without seam allowances.

Block - A pattern used by fashion designers and pattern makers which forms the basis of future styles. A block is a perfected pattern that has seam allowances. During the pattern making process the seam allowances remain on the pattern.

Many people believe that using blocks (vs. slopers) is an advanced pattern making technique. It's not really. The pattern making process is no different when using blocks, except for not having to add seam allowances. If anything, it saves time in production settings. It is important for the pattern maker to know what the seam allowances are - which are usually drawn onto the pattern anyway. The exception might be CAD patterns which may or may not have the seam allowances drawn. My CAD patterns do not show seam allowances even though they are there. I do all of my pattern making with the seam allowances already on the pattern. Occasionally, I will turn the seam allowances off to check measurements or to match up seam lines of complex pieces. CAD has greatly simplified the manipulation of seam allowances.

Now to answer the question.... Grading should only occur after the pattern has been perfected and the seam allowances have been added. If you add seam allowances after grading you just add more work to your project and you could introduce errors. This is especially true in a factory setting.

Now in theatrical settings, I know this would never occur. A cutter (aka pattern maker) does their pattern making in the size they need and then adds seam allowances during cutting. If they need two sizes of the same style, they will grade the "slopers". Finally, they trace the pattern onto fabric and add the seam allowances while cutting. This system works in the theater but is not precise enough for apparel production.

March 26, 2007

Thread color does matter!


Thread colors

Most of the time, manufacturers know to match the thread color to the body of your design. If you hand them a sample, then they will reproduce it down to the thread color. Most manufacturers are very good about this, so specifying the thread color is usually overlooked.

But every now and then, you will run across a rare manufacturer that is either color blind or will use whatever thread they have on the shelf. It may or may not match. If you specified the thread color, then you can go back to the manufacturer with a charge-back. If you didn't, well then you might be stuck. (I have seen this happen!)

Another reason to spec out a thread color is to match a screen print, embroidery, or coordinating piece. The thread color becomes an integral part of the design. Would you really want to leave the end color up to chance?

It's really simple. On your spec sheets state "Thread color: American & Efird [color name] [color number]. You may even want to go to the extreme of including a thread color swatch, just in case the manufacturer buys thread elsewhere. Wind off some thread onto your fingers and make a little, mini-hank of thread and tape it onto the page. You can buy thread swatch books from American & Efird (You'll have to talk to a sales rep about a swatch book). You can even get thread dyed to match!

March 09, 2007

A question on binding a leg opening on a onesie

A baby onesie or bodysuit with constrasting binding
Laura sent me this really good question on the binding around the leg opening of onesies:

I don't mind you posting anything -you can use my name. I actually want to ask many things but for now off the top of my head I have a question about making onesies. When I went to my pattern maker he said that the banding that goes around the edges, where the snaps go, comes on rolls. What is it called? I can't even find this. I am using bamboo fabric so that part I would like to be organic. 

It looks like it's just rib fabric, would I have to get it made or how is it usually done? I've been working on getting t shirts right for a while, almost there. That's a whole other thing that's been challenging. The onesies are the next thing.

The banding (or rather BINDING) that goes around the edges does come on rolls (more about this below).

You can choose whatever fabric you like for the binding. I have seen it made out of the same fabric as the onesie (generally an interlock) or a rib knit. You could even use a jersey, but it can be problematic because it doesn't have a lot of stretch. If your onesie is made of an interlock and you choose a rib knit for the binding, you will need to make sure the two fabrics are dyed together. No worries if you use the same fabric or contrasting color.

Here are some things to think about:

How heavy is the fabric? Will it be too bulky?

How much does the fabric stretch? (the manufacturer will need to adjust the machines to accomodate the stretch of the fabric).

How will you apply the binding? - You can do a double fold, single fold on top - flat on bottom, contrasting thread. Also consider the type of stitch - coverstitch, single needle, chain stitch.

I pulled some onesies out of my stash of samples and they all had a different application (pictures below). Do some comparison shopping to get an idea of what you would like. Buy a sample of what you DO want to show your sample maker and patternmaker.

Now how do you get the rolls of binding in the first place? There may be some fabric suppliers that will pre-cut the fabric rolls for you, although I imagine that would be the most expensive option. There is an easier way. When you determine your fabric yields or allocations, you have to figure out how much binding you will need. By doing some math, you can then figure out how many yards of full width fabric you need (maybe I will demonstrate the math for this, just not today). If your binding is the same fabric as the body of the onesie - just order extra fabric for the body. If your binding is different, you may have a separate fabric minimum just for the binding.

There are two ways to get the rolls made. The easiest and simplest is to find a manufacturer that has the ability to cut the rolls for you. There are machines that roll off the fabric onto a second tube and then cut the tubes into rolls with a giant saw. (From what I understand, these machines are difficult to come by and are generally antiques, at least the ones I have used were ancient. I would imagine news ones are $$$). The second option is to roll off the approximate yardage needed for binding onto a separate roll and send it off to be cut by someone like Superior Bias. Be sure to discuss these options with the manufacturer ahead of time.

You can cut your own binding for samples. Binding is generally 1" wide and cut across the width of goods. The actual width will be determined by your application method and fabric stretch.

Just a quick word about knit fabrics. Many knit fabrics are made to order and they have high minimums (sometimes as much as 3,000 yards). Some factories carry stock of their basic - usually a white fabric. When you order sample yardage, make sure to ask if the sample fabric has been completely processed - meaning washed and already dyed. Sometimes the available sample yardage is prepared for dying or printing (in other words, not completely processed). This type of fabric will shrink a lot when washed and is not the ideal for samples.

Ok, now time for some pictures:

A bodysuit leg opening with contrasting binding This is a traditional binding with a contrasting rib knit fabric. The body of the onesie is a printed jersey. The binding is applied with a coverstitch machine. The binding has one fold on top and is flat on bottom. I usually call this a coverstitch binding.


Coverstitch binding on a onesie leg openingThis is also a coverstitch binding similar to the first example. The actual stitch is different from a traditional coverstitch, so the machine requires a different set-up. The binding is folded the same way as the first example. Of course, the design detail comes from the contrasting thread color. The binding is the same rib fabric as the body.


Double fold binding on a bodysuit leg openingThe binding on this onesie is made of the same fabric as the body, just a contrasting color. The fabric is a pebble (or textured) knit with not a lot of stretch. The double fold binding is applied with a single-needle stitch. The binding is a bit bulky because of the double fold and the texture. This application is probably the most appropriate for the style, just not my favorite.

January 26, 2007

Grading Stack Points

Grading stack point
I am going to try and get back to my grading explanations today. My head is a bit fuzzy after a long week and an especially late night. To review, just click on the grading category link to the right. Click on the picture for a bigger view.

The diagram on the left shows three possible grading examples. This is a basic front bodice pattern piece that is folded in half. Each example is called a nest meaning each size is stacked on top of each other from smallest to largest. The stars represent the point of origin for each grade. The numbers at each point correspond to a grade rule. I will briefly explain each of these items below.

By laying your graded patterns on top of each other in a nest, you can easily see if your pattern is grading proportionally. The stars not only show the point of origin, but the stack point. You can stack your patterns in three general areas and have the grade look different each time. In computerized grading, you can move your stack point anywhere you choose and the grading software will update your grades automatically. For consistency's sake, it is important to determine before you start grading where your stack point/grading point of origin will be.

Each stack point will cause your grading to look different. Most of the grading world uses Example 1. The point of origin is placed in the center of the pattern pieces and growth occurs in all directions. In Example 2, the stack point is placed at the center front waistline and growth occurs to the side and upwards to the neck. Example 3 is the same result as 2, but placed at the center front neck.

I prefer Example 3 and all of my patterns are generally graded this way. It makes the most sense to me and the grade rules are simpler. Most of the proportional changes between sizes occur this way in nature. A person's neck doesn't actually move upward in each size, but rather their waist moves down. Perhaps this is just how my mind works. In any event, you can choose which ever point makes the most sense to you.

I have been using the term grade rules rather loosely in my previous grading articles. Grade rules refer to measurement charts broken down into grade steps. Grade rules can also refer to the actual change that occurs at a point. In the drawings above, I have numbers assigned to each point. Those numbers can refer to a grade rule. For example:

Rule X,Y changes
  1. 0, 0
  2. 1/8, 1/8


You can create a chart like the one above, if you prefer. This method is used in computerized grading and each grade rule is placed in a grade library (specific to a size range). Once a style is ready to grade, you simply apply a rule to each point and the pattern pieces will stay graded regardless of pattern changes. It is less helpful when hand grading and may make things more complicated. To be honest, I rarely use grade libraries when computer grading. They can speed things up if you have consistently similar styles. However, things always need tweaking, so I prefer to manually manipulate the grade at each point. Most grading software will allow you to assign a grade rule from a library and still manually edit the point. The computer will begin a grade command by starting with rule #1 and working around through each point. Rule 1 is almost always set as (0,0) and it should always be your stack point.

When hand grading, you should start your grading at your stack point. Once that is set, you then move to the next point, say the neck-shoulder point and mark all of the changes there. Work counter-clockwise (or vice versa, if you choose), around to each point. Setting up a consistent method will help you keep things straight.

Ok. Enough explanation. Decide on your stack point and get ready to grade.