Showing posts with label Patternmaking. Show all posts

December 30, 2019

Transitioning your focus as a fashion designer

The fashion industry is full of possible design opportunities and career tracks. If you are dealing with burnout as a fashion designer, there are alternatives. December is a great time to reflect back on the past year and evaluate successes and failures. It is also a time to evaluate if you are happy in your current position. Does your work energize you and make it easy to get up in the morning or do you have to drag yourself to work? If you dread going to work, then it may be time to plan a transition. As a new year approaches, looking forward to something new can help bring new energy and hope for a bright future.

As a fashion designer there is a way to transition your focus on the things you really want to accomplish. But changing your focus as a fashion designer can be challenging. Designers are attached to their brands and it can become a part of their identity. Letting things go so you can try something new is a bit scary. Though once the decision is made, you can take one step at a time to reach a happier place.


 Evaluate your goals


Writing down your goals

If you have made the decision to transition, it is time to evaluate your goals. Goals can be super specific or more general. Do you want to own and produce your own brand? Do you have financial goals? Do you want to change product categories? It helps to write your goals and vision down. If you start more generally, you can drill down to specific steps. Smaller specific steps leading to your goal are more actionable.

Goals can change over time so it is perfectly fine to cross off or toss goals that are no longer a part of your vision. Goals do not have to be a rigid framework that do not allow for deviation. Life is not like that and changes in life require changes in your goals. As a designer, I have had to make changes in my professional goals as life has happened. This is normal, so allow flexibility in your decision making and goal setting.


Choosing a new focus area


Blurry clothing rack


Fashion designers can design many product categories from shoes and accessories to all types of clothing. Usually a designer specializes in one product category and becomes known for one type of work. This can make a designer feel trapped because they feel like they can only design one thing. Large design houses will design and produce an entire look from head to toe. Smaller design entrepreneurs are not financially able to do the same thing and so they produce they same type of product from one season to the next.

If you own your own business, look at adding a new, but related, product category. For example, a children's clothing designer that creates sleepwear could explore playwear or bedding. Adding that new product category can reinvigorate your motivation and provide a challenge that holds your attention.

As an employee, you could begin working on your own design ideas on the side. Begin to turn your ideas and dreams into an actual product. Draft the patterns and sew up a sample. Work on it until you are satisfied.

Evaluate and sharpen your skills


Regardless of your current position, you can begin to explore related career tracks in the fashion industry. Begin by listing all of your skills. Today's fashion designer has skills in many areas. Here are just a few ideas:

  • Graphic design
  • Artist drawing or painting
  • Social media marketing
  • Adobe Illustrator and Photoshop
  • Sewing
  • Patternmaking
  • Spreadsheets
  • Training/Coaching
  • Sourcing/Outsourcing
  • Product development

Each of the above skills can be used in other employment or freelance. Perhaps you no longer want to create and sell a product or run a business. You could start a consulting business for other designers helping them develop their product. Perhaps you love sourcing materials. You could help other designers find the right fabrics and trims. Or perhaps you love to draw. You could provide freelance drawing services to other designers who can not draw (you would be surprised at how many can't draw). I have a friend that creates drawings of client's wedding dresses as a keepsake.

Perhaps there is an area that you want to improve. Now is the time to sharpen those skills. Take an online class in search engine optimization or social media marketing. Improve your drawing skills by starting a daily drawing practice. Create a portfolio of your work. Create an outline for a training class.


Hire Help


Many fashion designers also run their own companies, bootstrapping as they go. Eventually you reach a point where you need help. The stresses of running a business while also being the creative leader can be overwhelming. At the same time, hiring an employee costs money. If you can't hire an employee to work with you at your office or design studio, look at hiring a virtual assistant. Either way you can outsource or delegate the tasks that you dread doing. If you need or want time to focus on the more creative aspects of your business, then get someone else to handle the more mundane tasks. There are plenty of people that can make phone calls and research sourcing options. A virtual assistant can lessen the financial impact of a regular assistant and still accomplish the small tasks you may not want to deal with on a daily basis.

If you are an employee looking to transition, and have the means to do so, you can still hire an assistant. A virtual assistant can take care of the tasks you can't accomplish during the day when you are at work and help you move things along.


Transitioning your focus to something new


Sometimes it is necessary to make drastic changes. This may mean shutting down a business, switching career tracks, finding new employment, or maybe even starting a new business. If you are in this situation, there are things you can do to help ease the transition.

Before making the leap to something else, have an emergency fund. Prepare financially by building your cash reserves so you can still eat and pay rent. Having to worry about daily living essentials can cause you to abandon your dream and force you to take the next available opportunity even if it does not match your goals. If you are transitioning to freelance work, a fund will greatly improve your chances of success.


Try to have a plan in place with actionable steps. If you quit what you are doing now with no plan, it will take you even longer to transition. Let's say you want to become a coach to other designers. Here is what your plan may look like:

  1. Start an educational blog
  2. Collect email addresses of possible clients
  3. Email potential clients introducing yourself
  4. Create a proposal and determine rates


I've spent the last year or so on my own transition. I've worked as a patternmaker, technical designer and designer for over 20 years specializing in children's special occasion clothing. There are many things I enjoyed about my work. I loved working with expensive fabrics and trims to create something beautiful for a special event that would be kept as an heirloom or memory. Still, I made basically the same product over and over again with minor variation. Creatively, I became bored. At the same time I was battling chronic fatigue and I was being forced to evaluate my current work load. Since then I have evaluated my skills and found a new related focus that has me energized and is bringing me back to the business one step at a time.

December 10, 2018

Home sewing patterns for newborns


I received this question about commercial sewing patterns:
Supposedly the XXS size on commercial patterns (McCalls, Simplicity, Butterick) is supposed to be for babies 7 lbs or less, but they swallow newborns up. If you read around the Internet, there are lots of frustrated grandmothers and mothers-to-be that want to sew for their new or expected baby, but can't find a pattern that will fit. I read that doll clothing patterns don't work because the neck is wrong for a human infant. I tried buying vintage layette patterns from Etsy and they were just as bad. I want to know how to downsize a commercial XXS dress or romper pattern so it fits a NEW 7-8 lb baby. I am sick of gowns and knit sleepers. - Pam
It has been a long time since I have sewn children's clothing from commercial sewing patterns. What I do remember is they are big. Too big. The proportions are bit off too. I don't know why either. Those companies have their own pattern blocks and I suspect they have not really updated or checked them in a long time.

Design school does not spend all that much time on children's clothing. I know there are few pattern making manuals that really get the sizing right, though sizing (exact measurements) is less of an issue than you might think. Regardless of where you start, you will have to make adjustments for fit. Only one manual even addresses infant clothing, and that book is Metric Pattern Cutting for Children's Wear and Babywear by Winifred Aldrich. I have a previous edition, but it covers most of what you might need. For Americans, the book is in metric. I didn't really have a problem drafting basic blocks using metric. You just need a metric ruler, though I did convert back and forth to see if I was on target. But even after drafting your basic blocks, you will need to make adjustments to the pattern until you get the fit you want. I have learned quite a bit by trial and error over many years.


For the home sewist, this is probably not all that practical. There is not really an easy way to size down a home sewing pattern that already has proportion issues (even Burda, which I prefer over the others). The biggest problem with some of the sewing patterns are tops are too wide, pant legs are too short just as examples. You could begin by folding out some of the width. But I can't say how much as it would probably depend on the style and desired size. In other words, no matter what, there will be a bit of back and forth. I guess my advice would be don't be afraid to experiment. Measure your baby and the sewing pattern and reduce width and length as needed. It is a bit of a challenge to measure a baby, but it really is the only way to arrive at your end goal. I wish there was some other way. Perhaps there are some indie sewing patterns for newborns? Please leave suggestions if you know of any.

October 29, 2018

Understanding pattern grading for children's clothing

I'm catching up with some questions and comments. It's been a while since I've answered a grading question.
My brain is spinning with all the reading I've been doing on this subject. Can you please explain to me why I couldn't grade within my separate size ranges by grading, for example, 3-6 with one particular grade rule and then taking then changing my grade rule for the next section? Would this not be taking the difference growth rates and such into account? I feel like there's probably a reason that I haven't quite grasped yet. Thanks so much.
Grading women's clothing is different from grading children's clothing. Women's clothing is graded with either a 1 1/2" or 2" grade between the sizes. This grade rule refers to the change in circumference measurements between the sizes. There is a lot of criticism for this grade rule because it appears to not have a connection to actual body measurements. That assumption is not strictly true, but it is true this practice is a convenience for the industry. It is too difficult to mass produce clothing and create a custom fit for an individual woman. This grading convention has historically proven to fit the most women in the most efficient way.

Men's clothing has many more sizes. These sizes are given size names that correspond to actual body measurements such as waist, pant leg inseam, or neck and sleeve. The circumference difference is usually 1 inch but it may be 2 inches for larger sizes.

Children's clothing is different. Children grow exponentially from birth. Their growth makes it difficult to group children into size groups, but over 70 years ago a measurement study managed to give us enough measurement data to do just that. That measurement data shows that the change between children's sizes is not even. This is true regardless of how sizes are arranged or named. The circumference measurement difference may range between 1/2" to 1" or more. There are similar irregularities in length grades. Children's clothing brands interpret measurements in their own way, so you will see variation in the marketplace.


Speaking to this particular question. If you group your children's sizes so they are called 0-3M, 3-6M, 6-9M, etc., your grade rule will still vary between the sizes. But there will be no grade change between a 3M and a 6M in the size called 3-6M. When developing a grade rule for this kind of size system, I interpret the sizes like this:

0-3M = 3M
3-6M = 6M
6-9M = 9M

You can call your sizes whatever you choose, but for pattern making and grading you have to assign a meaning to that size. Interpreting sizes with a size label of 0-3M as a single size 3M is the easiest way to develop grade rules and it seems to work.

May 21, 2013

I Love Knits! : A guide to buying knit fabrics online

If you were to walk into my sewing studio, you will notice two things. One, I must have kids because it looks like a 2 year old has been in the vicinity and secondly, I have a large stash of knit fabric. I love knits. It is the main fabric of choice I have been buying lately. Back in 2009, I started making clothes for my first daughter and was introduced to Ottobre sewing magazines in my quest to find good children's sewing patterns. (Some other patterns I have used are Studio Tantrum and Roos - out of print). Many of the patterns in Ottobre are for knits.

When I first started working with knits, it was rather difficult to find cute knit fabric but now with the increase in demand many online vendors carry a variety of knits, which makes shopping much more enjoyable. (see my list at the end for some of my favorites).

I have learned several things along the way when working with knits:

Quality is worth the wait, research, and/or price. 


I seldom find good knits locally but do get lucky on occasion. Most of my purchases are online and some vendors send swatches for free. Price is not always a factor. I few years ago, a pattern/fabric designer launched a knit line and charged a pretty penny for it. I felt at the time it was more than I would spend especially since I didn't know what the quality was like. The prints were cute and a number of people I know bought them. Well, it had a horrible shrink factor of 10-12%. I believe this problem has been corrected by the manufacturer since I have noticed the online vendors no longer state the shrinkage rate.  I have bought cheap and still do but there is the risk of the fabric becoming piley and looking worn out quicker.

Analyze stretch. 


Stretch will impact the fit and choice of pattern. I will ask myself how much stretch does the fabric have and does it go back to the original shape and size afterwards. To find out stretch percentage, mark off 4 inches across (in the direction of the greatest stretch), then against a ruler hold down one side at the 0" mark while pulling until the fabric starts to resist, note how far it stretched. Let's say it stretched to 6", making it 2" longer. Now comes the math part (X/Y) x 100 = percentage of stretch. X = the number of inches stretched, here it is 2". Y = the base inches used, 4". 2 divide by 4 times 100 = 50%. If the fabric goes back to the original size/shape, great. If not I will make sure to use that fabric with a style that doesn't need retention, nothing close fitting.

Pick appropriate pattern for fabric


Pick an appropriate pattern for your fabric or know how to adjust to make it work. Last year, I made a dance costume which had a leotard under-structure. The leotard was made from a 4-way stretch miliskin and the attached over dress was made from a 2 way stretch metallic. The pattern for the overdress was based off of the leotard but had to be adjusted in both width and length. I highly recommend reading www.patternschool.com blog authored by Stuart Anderson, a stretch-wear pattern maker. He teaches the mechanics of stretch, fit and pattern making. And quite frankly, the best information I have found on working with knits.

Create your own design


Pointelle rib knit
Pointelle rib knit

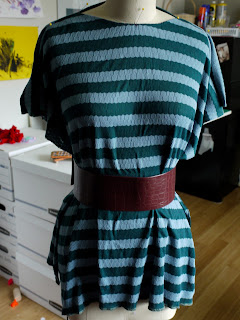
Besides making knitwear for my girls, I have been making t-shirts for myself. Lately, I am liking the looser blousier styles especially since I need to lose 20 lbs. of baby weight. My most recent shirt I made used a ribbed pointelle knit I found in the remnant section of the local chain fabric store. It was just under a yard and I probably paid less than $2.


Draping a knit fabric to design a t-shirt
Playing with the idea of a boatneck, batwing sleeve, and belt.


The fabric is very soft and drapey. I looked through all my patterns and just couldn't find one I liked so I draped it and used an old shirt of mine as a pattern for the neckline. I used the actual fabric to drape in so, when it came time to take it off the mannequin I thread marked the seam allowances instead of using a marking pen.


Since I didn't make a true mock-up, I checked the pattern in fabric. I doubled checked the shoulder length and side seams. I also did a quick and dirty fitting on myself to make sure the neck line laid properly. I have small shoulders and small back width from armscye to armscye. 

Stay tape on the back shoulder seam.

I stabilized the shoulder line which is needed in knits because this is one area that can stretch out of shape. Instead of buying stay tape, I make my own using either lightweight fusible woven or fusible tricot/knit interfacing, cut at 3/8" wide. If using the knit fusible, I cut the length in the direction of least amount of stretch.


I usually sew my seams with a narrow zigzag and then serge together the edges to finish it. I got used to doing it this way because my serger is an industrial 5 stitch machine and has to be threaded in a three thread configuration for knits. So, I sew the seam first on the regular machine for strength and durability. My regular machine does have a stretch stitch but I don't care for it. It is hard to unpick if I make a mistake, so narrow zig zag it is. I have recently acquired a domestic four thread serger which I could use to seam and finish all at once, but I have it set up for roll hems and too lazy to change it back.

Hemming knits


For hemming, I use a twin needle for stretch on a standard sewing machine. I don't own a coverstitch machine and have felt the expense not necessary for the amount of knit sewing I do. That being said, the twin needle works really well for t-shirts and clothing that don't need 100% stretch to function (100% stretch as required by swim wear and some athletic wear or dance wear). Twin needle hems will pop if the hem is over stretched. I have only had to fix a few hems from this happening. Sometimes for more stretch, I will use the triple zigzag, lightening or serpentine stitch (same stitch I just have heard it called all these names). Hemming (as well as bindings used for necklines or sleeves, will post about this later) is one area of sewing with knits that may need to have a sample sewn first before preceding with the actual garment. Below is a picture of a hem done with a twin needle. The fabric stretched out on me. There are some different methods of approach to fix this.

A knit hem sewn on a regular sewing machine
Before pressing
1. Hem using a coverstitch machine, though it can still stretch out.
2. Use the serpentine stitch to hem
3. Stabilize the fabric by placing a tear away stabilizer between the feed dogs and fabric.
4. Starch, lots of it. (just don't stretch the fabric while applying)
5. The lazy method, press with lots of steam and see what happens after hem is in place. (This works if the wonkiness is minimal and is what I used for this shirt).
6. Often times, a combination of any of the above.

A knit hem after pressing
After pressing
Neckline finish in a knit sewn with a twin needle
Neckline using same twin needle.


A simple t-shirt design created by draping
Me in the finished shirt (sorry for the composition my 3.5 year old took the photo)
Oh and lastly, I love working with knits because sewing projects work up really fast. T-shirts typically have 4-6 seams, not counting hems and the fabric is very forgiving.

Some online vendors I have bought knits from or just like to drool over:

Fabric.com
Print Knits Studio
Chez Ami
Girl Charlee
Gorgeous Fabric
Emma One Sock
Spandex World
Stretch House


January 09, 2012

T-shirt pattern quest pt. 4 : Analysis of fit and construction

T-shirt test samples for construction and fit

Here are the results of my first and second pattern test. I had enough fabric to make two shirts. Each shirt revealed problems with my construction and fit. I had added about 1" of extra wearing ease to shirt 1 and that was reduced to 1/2" of extra ease in shirt 2. The pattern was designed with 3/8" seam allowances. This allowed for an 1/8" cut off on the seam edges so that the seams finish at 1/4". I had difficulty in shirt 1 maintaining that cut off allowance, improving on the second.

One thing I did not notice is that this fabric is directional. With napped fabrics, the fabric can look darker or lighter depending on which direction the fabric lays. This interlock is not napped but it definitely looks different in different directions. I had switched the direction of the sleeves on shirt 2 and so there is a color variation. It is subtle and hardly noticeable except in certain light.

Finally, there is an issue with the fit of the armhole, which is just a bit too tight. This creates unsightly wrinkles in the underarm area. I guess I never noticed on the original shirt, but the problem exists there too. So, a bit of adjustment has to happen. I need to lower the armhole a bit and scoop out the front. This means the sleeve will need a bit of adjustment as well. The armholes will no longer be symmetrical front to back, which is how it should be. Anyway, more on that as progress is made.

The shirts are fine and comfortable enough to wear, but a modeled shot may or may not appear on the blog

December 15, 2011

T-shirt pattern quest pt. 2 : Calculating the amount stretch in a knit fabric


Patterns for styles made out of a knit fabric need to include the amount of wearing ease for the desired fit. In some cases the wearing ease is actually negative ease. Negative ease means the pattern measurement is smaller than the actual corresponding body measurement. A good example of this would be yoga pants in which the pants stretch to fit a particular size. In some cases the pattern has positive wearing ease because the style is larger than the corresponding body measurements, such as an oversized sweatshirt. Determining how much to reduce a pattern for a desired type of fit requires first determining a knit fabrics stretch factor.

Note - My pattern is intended for knits that have already been pre-washed and shrunk from retail store knits. So no extra allowance is included for shrinkage.

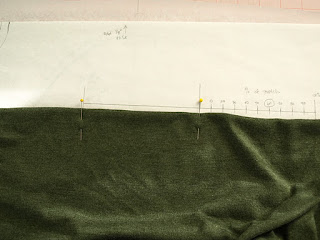
At this point I needed to check the amount of stretch in this fabric. Fold the fabric so that you are not testing on the edge of the fabric. Place two pins 5 inches apart.

Step one of figuring out a fabric stretch factor
Pick up the fabric and hold the left pin in your left hand at the zero mark and then stretch the fabric as far as it will go with your right hand. Watch where the right pin stretches on the stretch ruler. In this case, my fabric stretches about 30%. Only stretch the fabric as far as it will reasonably go without overly stressing the fabric.
Stretching a knit fabric to determine the amount of stretch

Let go of the fabric with your right hand and watch to see if the fabric returns to it's original position. Knits that do not return at all, have no recovery. In this case, my fabric returned to the 10% mark, which isn't great, but probably ok for a top.

I had forgotten, but this particular fabric is an interlock rather than a jersey. Interlocks do not stretch nearly as much as a jersey. I had originally planned on adding about 1 inch of extra wearing ease because I wanted a bit looser fit. Now I wonder if I should add a bit of extra? Once I work that out, I will modify my pattern and cut it out.

December 12, 2011

T-shirt pattern quest pt. 1 : Create a rub-off of an existing t-shirt

Pattern rub-off from an existing t-shirt
My favorite t-shirt company went out of business and I really loved the fit of their t-shirts. The best solution I could come up with was to recreate the pattern by doing a rub-off of one of the t-shirts. This pattern is for my own personal use, but you will find many pattern makers who do rub-offs of existing styles as a starting point. This is one way to study how another pattern maker developed their pattern. I have done this in the industry too, but the resulting style was not an exact copy and bore no resemblance to the initial style. Copying a style in this way for the sake of reproducing an identical product to sell is another thing entirely.

You can see the resulting shape of the pattern that I rubbed-off or traced. The armhole is symmetrical for the front and back bodices, which is fairly typical for t-shirts. Technically, the armhole should be different front to back and if you have fit issues, this would be one place to adjust. For now, I'm leaving it alone.

The original pattern also had binding on the neck and sleeves. I wasn't sure how to accomplish that and have it look neat on a home sewing machine. I think there may be a way that I'll play with later. At this point, I added seam allowances for a narrow neck ribbing.

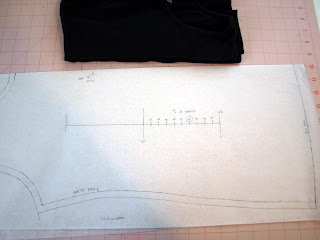
Scale to calculate knit stretch
Patterns for knits are designed with the amount of stretch AND recovery. The original t-shirt had some spandex, which means it stretches and recovers a bit better than a 100% cotton jersey. The original t-shirt is pretty slim fitting because of the spandex and because it is meant as a layering t-shirt to wear under other tops. I wanted to have a pattern I could use with 100% cotton jerseys, so I plan on adding a bit of extra wearing ease.

I noted the amount of stretch for the original knit fabric on the pattern. The stretch ruler is found in the Armstrong pattern drafting book. I'll target my knit fabric shopping for between 50-60% stretch - just have to remember to take a copy of the stretch ruler. I do have some stash knits but it has taken me over a week to find it. More on that later...

December 05, 2011

Product Review : Cash wallet sewing pattern

Finally it is done. I started this thing clear back in May and it has taken me this long to locate all of the supplies and get it finished.


The wallet is designed with a fabric cover stiffened by interfacing and held closed by an elastic band. The interior envelopes are closed with magnets, with one zippered pocket for change. The inside of the wallet has slots for cards, though I doubt I will ever use it because I would be afraid of them falling out. It's hard to see the slots in the picture below, but there are three in front and back.


Pros: The pattern is rather clever. There were some things that I didn't expect and I initially liked the approach. I like the removable envelopes so that I don't have to carry the whole wallet if I don't need it. And the wallet does fit into my purse (barely) whereas my cheap plastic coupon file from Walmart did not. I like the zippered coin envelope because I always had change flying about when I was using paper envelopes. I expect the fabric envelopes will last far longer than the paper.

Cons: Let me first start with the supplies list. The hardest thing for me to find were the magnets. My local hardware store did not carry magnets with the right width. You really do need to have magnets that are 1/32 inch in width. You can have a larger diameter, but the thinner the magnet, the thinner your wallet. I ended buying some from babemagnet for a reasonable price. The magnet search delayed the project the longest.

I used a hair elastic for the closure, but I think 1/8" elastic would have been a bit better. The hair elastic is already stretching out of shape.

The pattern is clever, but could use some refinements. This is just my inner pattern making voice. My construction of the zippered envelope ended up being very sloppy, partly my fault, but partly not. I think some of the pieces could have been adjusted to incorporate the turn of cloth concept to accommodate the bulky seams.

There are some time consuming processes such as fusing the interfacing to the envelopes which drove me batty. In any event, the same Etsy seller that sells the patterns also sells finished wallets and envelopes. Considering the cost and time involved, save yourself the trouble and buy one already finished. I can't remember the price on the finished wallets but they should retail for more than she is selling them, considering the labor involved. Her Etsy shop is currently on vacation, so sign up for an email notification when she reopens.

DH still won't use the cash wallet or envelopes. I should have picked something more manly for the fabric. He'll probably still pullout the cash he needs and stuff it in his wallet or pocket.

Cost:  The cost ended up being more than I anticipated. The pattern is a bit expensive to buy ($10), and then add in all the supplies and it ended up costing almost $50. Sure, I can customize the wallet with whatever fabric I choose, but I'm not sure it is worth making yourself.

My Fail: I used an iron-on transfer to label my envelopes. I didn't trim close enough around the transfer (fail) and so I ended up with awful looking labels. And the labels are on dark fabric. Doh! Let's not talk about the zipper pocket.

Would I make this again? No. The cost and time consuming construction just doesn't make it worth it to me. I am not sure that I am entirely satisfied with the results, nor am I sure that I want to buy this style again. There are other Etsy sellers selling cash wallet systems and I may explore those. I will use this wallet until it wears out before replacing it with something else.

December 02, 2011

Understanding basic block patterns : a few definitions

Shari asked me some questions about basic block patterns.
So pleased I stumbled on you blog - wonderful work by the way!  I am keen to start designing kiddies clothing and I am trying to find block patterns and relevant information on using/adapting them, that is not too confusing.

I have got some info on-line and books out of the library but have not 
found anything that I am happy with.  I am wondering if you could give me any pointers on where to start looking and/or even purchasing basic block templates.
The first thing to do is to define the term block pattern. A block pattern is a finished pattern with all seam allowances, notches, notation, etc. The pattern has been tested and approved for fit. It has been used, perhaps, in a style that has proven to be acceptable with customers.

Developing a basic block pattern


A basic block pattern is a pattern from which all other styles are based. Sometimes they are derived from the original drafts created from body measurements with instructions from a pattern making manual. Sometimes not. A basic block pattern can also be the patterns from an approved style as described above.

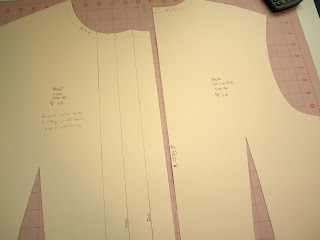
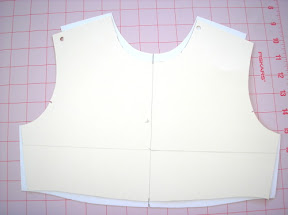
Just as an example, we can look at my recent blouse making venture. After a bit of testing, the pattern pieces for that blouse have become my basic block patterns for future blouse styles. I cut them out of tag board so I can trace them off, either on fabric for cutting or on paper for drafting a new style. The pieces have seam allowances and notes to help for future construction.

Blouse pattern pieces in tag board
Pattern makers in the industry do not draft from zero every season. We trace off existing pattern pieces (blocks) and modify them. Over time we create a library of pattern pieces that can be mixed and match for a variety of styles.

How to acquire basic block patterns

There is no easy way to acquire basic block patterns. These types of patterns are considered proprietary to the business that developed them so they are rarely for sell. That leaves new designers with a few options and none of them are easy. And perhaps, that is how it should be. I know that sounds harsh, but your patterns will be better if you struggle through the development process yourself. You will come to understand how things should fit and be sewn and know how your patterns work.

So what are the options?

1. Draft your own patterns from body measurements using a pattern making manual. This is the most time consuming option, but ultimately the only way to ensure the fit you want.

2. Hire a pattern maker to do it for you. Probably the most expensive option. You will need to be prepared with a basic style, body measurements, etc. Expect a bit of back and forth as you refine fit.

3. Adapting commercial sewing patterns*. You can buy a commercial sewing pattern for a similar style but it will require a bit of fixing - actually a lot. Commercial patterns are usually sloppy and are not production ready by any stretch. One exception are Burda patterns which do not have seam allowances, so they will be easier to fix and adapt. Burda has even released their patterns as "open source", which is actually a misnomer. In other words, Burda has released their patterns with the license to use the pattern as you wish. And lest you think that I am encouraging the violation of the copyrights of commercial patterns, please know that the copyright status of patterns are in a legal quandry. In other words, in the U.S. no one can stop you from using the patterns you purchase as you wish, even though many believe they can. The only way to avoid that mess and confusion is to draft your own patterns from scratch.

4. Buy block patterns from someone else. I've never seen any production ready patterns available for sale. That doesn't mean it will never happen. I've even considered selling mine, but I haven't done it yet.
BTW, my blouse patterns were adapted from some Burda patterns and it worked well for the most part. The collar pattern pieces required a lot of work and I still don't have them right, IMO.

*If you buy a commercial pattern to take to a professional pattern maker to fix, you will probably be turned down. Commercial patterns require a lot of work to fix and it is honestly easier to draft a pattern from scratch. Some may turn you down for ethical reasons. Others may turn you down because you may give the impression that you are not ready or prepared to be a professional. I probably would turn you down too. The only way I would use a commercial pattern from a client is as a reference to match fit and styling while using my own block patterns or drafting from scratch.

November 18, 2011

Transferring patterns to tag board : notches and guides

As part of finishing up my pattern blocks, I needed to add the armhole notches. Double notches for the back and single for the front. The front and back notches are a different distant from the side seam rather than symmetric. This helps ensure that the front sleeve matches the front armhole and vice-versa. The notches indicate nothing other than front and back.

This is my original sleeve from blouse 1.0 and 2.0. This sleeve can be used as the basis for any future variation. The original blouse has an elastic casing, so I noted the details related to that on the pattern piece.

I also finally got around to making the buttonhole guide. My awl from my book making helped make the holes in the tag board, but really any basic awl will work.

Further pattern making work:
1. Redo collar band shaping - again. [sigh]
2. Make a straight, short sleeve pattern in oak tag.
3. Buttonhole guide for collar band.
4. Long sleeve pattern with shirt sleeve placket and cuff.
5. Study/test block fusing of collar

November 09, 2011

Transferring patterns to tag board : an example of a blouse

Front and back bodice pieces in tagboard
 After sewing up Blouse 2.0, I felt confidant enough to transfer my pattern pieces to oak tag or tag board. Tag board is the same stiff paper product used in file folders but available in large sheets or rolls. Some pattern makers do all of their patternmaking on oak tag, which is a better practice. But, I usually do my initial patterns on tracing paper or medical exam paper. At some point I do transfer it oak tag for durability. These patterns aren't necessarily production ready. They are designed for the way I work at home. The darts are cut out so I can trace the dart shape on the fabric. In industry darts are marked with drill holes, just as an example.
Collar and collar band pieces in tagboard
I still need to create a buttonhole placement guide and place the armhole notches. I figured out about how much fabric I need to make a blouse and noted it on the main bodice piece. Fold lines and seam allowances that are different from the norm are indicated. I should have marked the interfacing piece in red ink - forgot to go retrieve the red pen from the office.
Paper pattern pieces ready to store away
Anyway, my paper pieces are stored in an envelope for future reference.

February 09, 2011

Answers to some pattern grading questions


Tabitha of the Refugee Crafter sent me these questions. I thought her questions were enough for a separate blog entry.

What pattern pieces do I grade?


Thank you so much for all the patternmaking information you've provided on this blog! You've helped me make the jump from altering other's patterns to creating my own patterns this last year. (I purchased Aldrich's Metric Pattern Cutting for Children's Wear and Babywear thanks to your recommendation and love it.)

I'd love to now make the move to selling my own patterns but need a little direction in regards to grading which I am hoping you can provide. (I really am quite new to all this so please forgive the naivety of my questions!)

1. If I have created a ruffled shirt pattern in a size 12 months (just for example) can I grade each of its specific pattern pieces up or do I have to go back to the basic block, grade it up, and then alter it (again) to create another larger sized pattern? (Common sense tells me I should just be able to grade my pattern up, but I was confused by a line in the Aldrich book's grading section and thought I'd ask you for clarification. I hope my question makes sense.)

You would grade the pattern pieces for your style.

Can I use a computer software program to grade a pattern?


2. You often refer to grading on a CAD program. What is this program and is it widely available and reasonably priced? Does it have a steep learning curve? (I'm well versed in the vector-based Adobe Illustrator and the rest of the Creative Suite, would that help in learning this?)

There are several CAD programs out there specifically designed for apparel pattern making and grading. Unfortunately, they are not reasonably priced. Software packages start at about $10,000. The grading module is often times extra. If you are computer savvy and have used CAD programs in the past, then making the leap to an apparel specific CAD program is no big deal. For most though, it is a steep learning curve.

I have been following several independent pattern makers that make and sell patterns to the home sewing market. They are using Adobe Illustrator, so I guess it is possible to use that software to draft and grade your patterns. I don't endorse the practice because I don't know that Adobe Illustrator can create drafts that are accurate or precise. I suppose it is possible, but I've tried it in the past and it was an exercise in frustration. It would be a time consuming task regardless because many pattern making procedures are not automated. I would imagine grading would require the use of layers. Adobe Illustrator is not a technical drawing program.

The ideal procedure would be draft your patterns in CAD, grade them, and then export them to Adobe Illustrator to pretty them up. If you draft and/or grade by hand, you will have to digitize your patterns first. And remember that a CAD program will not teach you to grade. It's a tool not unlike a pencil and piece of paper.

What about the Jack Handford book?


3. You also mention Jack Handford's grading book. Is this book only useful if you are doing grading by hand or would it also be useful if used in conjunction with a CAD program? If a CAD program is out of the question is this my best bet?

I grade by hand and with CAD. I use the Jack Handford grading book for both methods. The only difference is that I do not move the pattern around as I would when grading by hand. Instead, I select points and define the change using an x, y coordinate system. The grading charts are useful in either case, but it will take some effort to apply them in a CAD environment. The Jack Handford book would be good to study and learn from because his system is how it is done in the industry. It would be good to learn the hand method first and will certainly be less expensive then buying a CAD program. The Jack Handford grading book is currently out of print and the price is high.

December 20, 2010

Tutorial: Reduce or Remove Sleeve Cap Ease pt. 2

I received a really great question on my previous tutorial on how to remove or reduce sleeve cap ease. Gina's question deserves it's own blog post.

Well, what do you do if you have big arms but too much ease? If I move it over I will lose bicep room. I am working with a dress right now and everything fits but the sleeves are tight and the have too much ease. How do I widen the sleeve get rid of ease and fit it to the armhole?
Thanks
This is a really great question and may require me to consider re-writing my tutorial. My previous tutorial is based off my experience drafting patterns for children's clothing. Usually it is not a problem to reduce the bicep line because it's usually too big anyway. My overall changes are small because I am perfecting patterns that I have drafted myself.

If you are working with a commercial pattern for adults, the approach will be similar. You can't always reduce the bicep line and the overall changes may be quite significant. Patterns from the Big 4 notoriously have too much sleeve cap ease. To be fair, if you follow the drafting instructions in some pattern drafting books, you end up adding in a fair amount of ease too. One pattern making book has instructions that result in as much as 1.5 inches of ease in a set-in toddler sleeve. Way too much. Such a practice is not common in the fashion industry and the production sewers will refuse to set-in the sleeves.

I had difficulty coming up with a solution and so I had to ask my pattern making friends at the Fashion Incubator Forum. We have to assume that everything fits Gina as it should, though it's possible there is some other fit issue that is contributing to the bicep width problem to begin with.(1) There are two possible solutions and neither is quick nor easy. Both will require testing. To add bicep width, slash and spread or slash and pivot the sleeve to the desired measurement. This alteration will require fixing the sleeve cap anyway.

1. Draft a new sleeve from scratch. (My solution)

2. Reduce the sleeve cap height equal to the amount of ease to be removed. (From Nora of the Fashion Incubator Forum).

Sometimes it's just easier to start over. It may save time in the long run and you will get exactly the sleeve you want.

If you would rather fix the sleeve, you can try Nora's suggestion. Nora's suggestion leaves the bicep width alone and only adjusts the sleeve cap height.

Walking a sleeve along an armscye
1. Begin by walking the sleeve along the armhole in a similar manner to my previous tutorial. In this case, start at the bottom and walk the armhole toward the shoulder. You will need to walk the sleeve on both the front and back armholes matching up the front of the sleeve with the front bodice and the back bodice with the back sleeve. Your sleeve should not be symmetrical and you will need to check the entire armhole. As you work, you may want to check the entire armhole and sleeve cap.

Measurement length difference

2. Measure from the seam line of the shoulder on the bodice to the center notch of the sleeve. This will be equal to the amount of ease on one side of your sleeve. Repeat for the back armhole. Total up the ease for the front and the back of the sleeve. This will equal the total sleeve cap ease.

Reduce ease by lowering cap height

3. Reduce the sleeve cap height equal to the amount of ease that needs to be removed and redraw the sleeve cap. You will need to repeat these steps until you get exactly the amount of ease needed to set the sleeve and no more.


Neither Nora nor I can guarantee that this method is the answer. This method will require lots of back and forth testing and iteration. The method is similar enough to my previous tutorial that I think it will work eventually. If you have the patience for lots of testing, then go for it. Also remember that you may still need *some* ease. When we say zero ease, we don't really mean zero ease. You may need some to help set the sleeve in. The only way to know is to sew up a few samples. 1/4" to 1/2" of total ease is not unusual. This ease is required to help sew opposing curves together. The sleeve should be against the feed dogs as it moves under the foot and the action of the feed dogs may require a little bit of ease so that the sleeve cap and armscye meet up in the end.

1. The armhole could be too small or too big. It may be in the wrong location or scooped wrong under the arms.


Thanks to Nora for her suggestion.

March 16, 2010

Dress Design by Hillhouse and Mansfield


I have been looking for Dress Design by Hillhouse and Mansfield (1948) for years. It was a hot item on Ebay at one time and sold for much, much more than it was probably worth. This book has become highly collectible because it contains detailed pattern draping and drafting instructions for 1940's women's clothing design.  I found a very nice copy of this book for a mere $2 at a thrift store. I knew if I kept my eyes open at the thrift store, it would eventually show up and I checked the used books every time I was there. Yep, I was quite excited to finally find this!

This book came to my attention in design school. There was an advanced pattern making/theater class that utilized this book as a textbook. The book was, of course, long out of print and the college gained special permission to print special spiral bound copies. Word spread among the design students about this book and copies of the book would sell out before some of the students of that class could even buy their copies. I was never able to grab a copy when I was in school.

Dress Design by Hillhouse 1940's waist styles Dress Design by Hillhouse 1940's complex dress design

You can see from these two pages that the designs are iconic and also complex. It's these two characteristics that makes the books so highly desireable and collectible to people who wish to reproduce a 1940's vintage style. Many of these styles would be difficult, if not impossible, to replicate in a modern factory. The labor charges would be enormous. Regardless, this pattern drafting manual would be a great resource to study and learn from. I have not yet attempted any of the drafting instructions, so I can't comment on the difficulty. For me the book is for inspiration.

December 15, 2009

Metric pattern cutting for children's wear and babywear - 4th Edition


Winifred Aldrich has released an updated edition of her pattern making book. Besides having a much nicer cover design, it reportedly contains a revised organization and emphasis on flat pattern making. I find this change interesting because more and more design entrepreneurs are utilizing flat pattern making today and this confirms my personal experiences in the industry.

From the abstract at Amazon:

Today’s popularity of easy-fitting styles and knitted fabrics means that basic ‘flat’ pattern cutting is used to construct the majority of children’s wear and babywear and this type of cutting is therefore emphasized in this new edition. Shaped blocks and garments, cut to fit the body form, are still included, and are placed in chapters covering some school uniform garments or more expensive fashion or formal clothes.

One primary difference between flat versus fitted pattern making is that the patterns have the same shape for the front and back pieces. For example, the armhole shaping is symmetrical. Creating patterns in this way results in a looser, more casual fit and it is appropriate for a lot of children's clothing. Even so, I see more of a modified flat method in actual use. Patterns are modified so that they aren't quite so boxy and more fitted. Yet, they retain some symmetry between front and back pieces.

October 26, 2009

Do professional pattern makers work with seams on or off the pattern?

Professional apparel pattern makers work with seam allowances on their patterns nearly all the time. It's faster. I would argue it's more precise. This practice goes counter to what most pattern making classes teach. They teach that you must remove the seam allowances and add them back later. I don't know anyone in the industry that works this way. I think the idea is that working with seam allowances one can create variations that lead to fitting problems later. That's simply not true if you check your new pattern against the original block later. (This is assuming you make a copy or rubbing of your original before you start on a new style. But I'm sure you knew that).

If you are drafting by hand, it is time consuming to remove the seam allowances. Pattern blocks are made with seam allowances on. You would have to keep a set of blocks without seam allowances. It would be so easy to mix up seamed and unseamed pattern blocks. Apparel pattern makers leave their blocks seamed and theatre pattern makers or cutters leave their blocks (or rather slopers) unseamed. In fact a block is a finished pattern piece that includes all pattern markings and is seamed.

If you are drafting in CAD, you can turn the seam allowances on and off. You can work on the cutting line or the stitching line. It's a simple matter of hitting a few buttons. BUT, I have found that CAD programs have difficulty in calculating between seamed and unseamed because it involves a complex series of mathematics. So constantly switching between cutting and stitching lines can produce some weird anomalies. (As an aside, weird things can happen with notches on stitching versus cutting lines too). I have found this is true no matter which CAD system you use. So I work with seam allowances on and directly on the cutting line nearly 99% of the time. This means that I keep the seam allowances in mind while I work.

One Exception


In CAD, it is important to turn the seam allowances off and walk the pattern pieces along the stitching line in a few areas. Collars and necklines is one area that I nearly always check for matching on the stitching line. There are other situations that come up where this important. I learned this the hard way recently.

Two pattern pieces with seam allowances on

In this situation, I split a jacket back pattern piece and added corresponding seam allowances along the split line.

Comparing two pattern pieces to see if the cut edges match

Next, I aligned the pattern pieces to make sure they match. At this point they did and I assumed all was right. Until I got complaints from the sewing machine operators that things weren't matching up. I had to go back and double check.

Comparing two pattern pieces with seam allowances off

I took the seam allowances off the pattern pieces and realigned them. They didn't match, so I redrew the stitching line of the side piece to make sure it matched the center. I added back the seam allowances and realigned the edges.

 Correcting the seam allowances so the stitching line matches

The pieces didn't match again. Sewing machine operators also do not like this because they do not know how to align the pieces. In this particular case, the seam allowances are small, so I left the little "dog-ear". It can be difficult to cut those "dog-ears" off by hand when they are really small. It is easier to machine cut. In any event, there are different ways of dealing with this. I show one method below.

Trimming seam allowances on a pattern piece for better matching

Your pattern pieces will then look like this and match up in every way possible.

Two pattern pieces that match on the stitching and cutting lines

August 31, 2009

Comparing pattern shaping and children's sizes follow-up

Kathleen suggested that I post an update on a previous grading post I did about a year ago. You can read what I wrote previously at When Patterns Collide. In that post I suggested that it would be possible to combine the 24M and 2T and the 4T and the 4. My reasoning being that the 24M and the 2T are essentially the same sizes - why differentiate them? The subject is a little complex and perhaps controversial - at least to pattern making geeks. My goal was to reduce the work load. I was drafting and grading all of my patterns by hand. I am incredibly slow grading by hand. In addition, I was trying to solve one particular sizing problem that shows up in childrenswear, that is hard to illustrate. Since I shut down my Prairie Roses line, I am not knee deep in pattern making as I was a year ago. But perhaps it may be helpful to explain what I ended up doing.

Originally, I broke up my sizes into these ranges:

3M, 6M, 9M, 12M, 18M, 24M - sample size 12M

2T, 3T, 4T - sample size 3T

4, 5, 6, 6x - sample size 5

These ranges are rather typical of what you will find in retail stores. When developing my patterns, I have to make and grade the patterns for each size range separately. You cannot make one set of patterns in one size and grade them up and down all the way. It won't work because that many sizes will cause minute grading errors and strange fit, especially on the smallest and largest sizes. As you define your grading and size measurements, you will find that the 24M and 2T and the 4T and 4 overlap. I followed the Jack Handford grading rules, which are pretty darn good, but end up with a result like this:

Bodice pattern pieces in a size 4T and 4 and how they compare

In the picture above, the size 4 is laying on top of the size 4T. The size 4T is actually too long in length and too wide. I double checked all of my grading and there was no mistake. The size 4T was graded off my 3T and the size 4 off of the 5. The shaping of the sample size pattern pieces varied a little. The toddler was a little boxier because toddlers don't have any waist shaping, whereas a 5 year old does. If I were to leave my patterns this way, someone will eventually hang the two sizes next to each other and think there was some kind of manufacturing mistake. I needed to fix my patterns so that each size is incrementally bigger.

To do this, I rearranged my size ranges, combining some sizes:

3M, 6M, 9M, 12M, 18M - sample size 12M

24M/2T, 3T, 4T/4 - sample size 3T

5, 6, 6x - sample size 5

The next thing I did was reworked the shaping of my toddler sizes to look more like the 4-6x range. I pulled the waist in some and made the armhole smaller. I made these shaping changes because I found that my toddler patterns were just a little too big. Now, I can lay all of my bodice pattern pieces in order and they get incrementally larger from the 3M to the 6x. Your patterns may look different, but it is worth comparing the sizes on the outside edges of your ranges to make sure you don't have something weird show up like I did.

Even though I combined some sizes, I kept this behind the scenes. My customers still saw all of the sizes separated out. If someone ordered a size 24M and another ordered a 2T, the dress would be exactly the same except for the size tag. I offered all of the sizes on my website so that customers would see something familiar. Perhaps it seems a little dishonest? I don't think so because in the real world a 24M child is the same size as a 2T and I was willing to take the chance. For what its worth, no one ever complained or returned those sizes for fit issues.

Now, I don't know that what I did is "the way it should be done". In the past though, I have had people question why the 24M was larger than the 2T and I had no explanation. Once I worked through grading all of my patterns by hand, it started to click in my head. The relationship of the shape of the pattern pieces, the grade, and body measurements are all connected.

July 06, 2009

Correcting the fit of petal sleeves in a wedding dress pt. 2

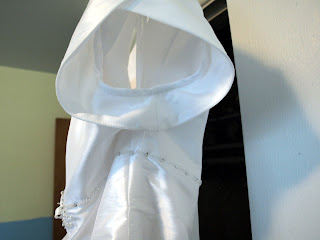
I finally had a chance to do up some line drawings to illustrate the problem with the petal sleeves of the wedding dress I recently altered. There are more pictures in the blog entry Petal Sleeves pt. 1.

Side view of a petal sleeve in a wedding dress

Petal sleeve in a wedding dress
The shape of the sleeve pattern adds a lot of extra material under the arm - creating almost a circular sleeve. The hem of the sleeve flapped around like wings. IMO, it wasn't very attractive. Even though the dress was a plus size dress, I can't imagine any woman wanting this style. I find it hard to believe the designer intended this either. I could be wrong since I am not familiar with wedding dress design. I do know that wedding dresses are designed to be easy to alter so perhaps the designer allowed for extra underarm width to accommodate the size of any upper arm. Even so, with the combination of removing excess shoulder height, recutting the armholes and sleeves, the alteration was not that easy. I dare say, it is either sloppy pattern making and/or grading. I would pin the source of the problem on grading from a size 6 all the way into a plus size. I (and Kathleen) have blogged about this many times (search for "Grading is not morphing" at Fashion-Incubator). Plus sizes should have their own patterns separate from Misses sizes. Trying to save time and effort by "grading" patterns from a size 6 up into the plus sizes leads to problems like this. Of course, I don't really know if this is exactly what happened. I would need to look at the whole size range and even the actual pattern pieces to know for sure.

This is what the pattern pieces and fit looked like on the bride before the alteration. The petal sleeve is a regular cap sleeve in the example below. You can see the extra width added at the hem of the sleeve and the wings it creates under the arm.

Pattern shape of petal sleeve in a wedding dress

Below is the shape of the pattern after the alteration. I probably removed a good 1.5" from the sleeve hemline. The fit of the sleeve looked 100% better.

Corrected pattern shape of petal sleeve
Now if the intent of the pattern maker was to allow the bride to be able to lift her arms for dancing, then it was added in the wrong place. A gusset should be added at the underarm - not the sleeve hemline.

Drawing of a cap sleeve with proper fit