Showing posts with label Technical Design. Show all posts

July 25, 2007

When do you grade sewing patterns?

Amanda left a comment/question on a previous blog about grading. I thought the answer deserved its own blog entry.
I have what is probably a stupid question. Do you do the grading before or after you add the Seam Allowance to the sloper? Part of my brain says before because you are likely to get a better line, the other says after as it would be easier. I am loving your blog, thank you so very much.
Amanda, not a stupid question at all. The only stupid question is the one not asked. There is a lot of confusion about grading and the difference between a sloper and a block. Let's throw some definitions out and then I'll answer your question.

Sloper - a basic fitting pattern used by costumers and home sewing enthusiasts. The pattern does not have seam allowances, which are added later. People who use slopers do all of their pattern making without seam allowances.

Block - A pattern used by fashion designers and pattern makers which forms the basis of future styles. A block is a perfected pattern that has seam allowances. During the pattern making process the seam allowances remain on the pattern.

Many people believe that using blocks (vs. slopers) is an advanced pattern making technique. It's not really. The pattern making process is no different when using blocks, except for not having to add seam allowances. If anything, it saves time in production settings. It is important for the pattern maker to know what the seam allowances are - which are usually drawn onto the pattern anyway. The exception might be CAD patterns which may or may not have the seam allowances drawn. My CAD patterns do not show seam allowances even though they are there. I do all of my pattern making with the seam allowances already on the pattern. Occasionally, I will turn the seam allowances off to check measurements or to match up seam lines of complex pieces. CAD has greatly simplified the manipulation of seam allowances.

Now to answer the question.... Grading should only occur after the pattern has been perfected and the seam allowances have been added. If you add seam allowances after grading you just add more work to your project and you could introduce errors. This is especially true in a factory setting.

Now in theatrical settings, I know this would never occur. A cutter (aka pattern maker) does their pattern making in the size they need and then adds seam allowances during cutting. If they need two sizes of the same style, they will grade the "slopers". Finally, they trace the pattern onto fabric and add the seam allowances while cutting. This system works in the theater but is not precise enough for apparel production.

April 25, 2007

Neck Opening Circumference

Please note: Body measurement charts for infants which include the neck circumference measurement are now available in my book The Essential Guide to Children's Clothing Sizes, available on Amazon.

Libetty left a comment on a recent blog entry and I think the answer deserves its own blog.

So I have a sizing question that you may be able to answer... What is the minimum neck opening circumference that a child needs to get a garment on over their head? I've always thought that it was 18". Is this correct???
Babies are very interesting. Most babies have the head circumference that they will have as adults. There is some growth that occurs between newborns and older babies as the bones in the skull begin to fuse and the head takes shape. Other factors that contribute to head size are genetics and weight. A newborn baby's head circumference may start as small as 14 inches but grow to about 20 inches by age 2. Proportionally, babies appear top heavy because the head looks too big in comparison to the rest of the body.

When designing clothing and patterns for babies, there are some other considerations. Babies do not dress themselves. This means someone else must be able to reach into a shirt, for example, and comfortably pull it over the head. With a dress, you have to reach down through the neck and pull a dress over the hips and ultimately over the shoulders. Some degree of space must be included to allow for ease in dressing (as quickly as possibly too!).

The recommended head opening for children's clothes is 20 inches for all infants and 21-22 inches for toddlers and up. This is a minimum measurement. Additional ease may be required depending on the fabric and/or style. This recommendation comes from my experience working with big box retailers - and they all seem to agree on this point. Over the years, I have seen that this is the measurement that is actually needed. BTW, this measurement refers to the extended neck measurement (see pictures below). There is no US government regulation that I know of - this is an industry standard. You can measure lots of product yourself to see most things follow this guideline.

Incorporating 20 inches into a neck circumference can be very difficult. The assumption is made that the neck circumference of the pattern must meet 20 inches. A neck circumference on a baby is 12-14 inches (measurement taken at the base of the neck). If your pattern has a neck circumference of 20", then your garment will probably fall off. The extra girth needed to meet the extended neck circumference can be added by the addition of a front or back placket, zipper, button placket, lapped shoulders, elastic, or stretchy neck ribbing. In other words, make the neck of the pattern where it should be and add extra length/girth somewhere else.

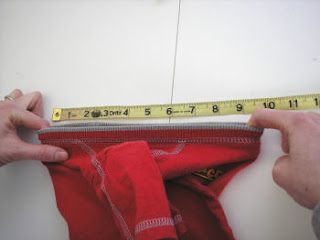
Here are few pictures of me measuring the extended neck circumference of a few different styles. Please note, I used a tape measure because it shows up better in the pictures. You should probably use a flat ruler instead. Plus, DH was taking the pictures off to the side, so it appears that I am not lining things up right, but I am. To measure the extended neck circumference, place one finger in the center front neck and another in the center back and stretch. Double the measurment from the ruler and you will have the extended neck circumference. If drafting a pattern, you can measure the pattern neck circumference plus any additional opening. It is best to double check a measurement after a garment is sewn up because things change.

Measuring a neck opening for a child's blouseThis shirt has an elastic neck. Stretch the elastic as far as it will go without damaging it. You can see this neck measures about 22" extended.


Measuring a neck opening for a child's polo shirtThis infant polo shirt has a front button placket. You can see this shirt stretches to 20".


Measuring a neck opening for a child's t-shirtThis infant t-shirt only stretches to about 18". It is a bit tight IMO. Part of the problem is the stretch of the ribbing and also how it is stitched to the neckline. The topstitching prevents stretching beyond this point and could actually break if I take it any further.


Measuring a neck opening for a girls dressTo measure the neck opening of a dress, measure from the center front neck to the bottom of the skirt placket opening. The extended neck measurement needs to be larger because the waistline needs to either slip over the head or the hips easily. This measures about 26 inches.

April 10, 2007

Country of Origin labeling examples

One comment from a reader on my Designers hate care/content labeling blog made a good point. Labels can be very irritating to the end user. Rest assured, it is perfectly legal to remove labels after purchase. The size and placement of labels should concern designers because it is all related to your brand. I searched through my stash to find examples of how other designers deal with US labeling requirements. I could not find any pieces that did not comply with labeling requirements. I guess I tend to buy product that is honest in their labeling. Clothing that leave off labels or fail to place them properly says something about your company (and it isn't good IMO). All of these examples have the labels correctly placed near the back neck with the country of origin prominently displayed.

Made in the USA clothing label Country of origin as part of the brand label. This is also one of my rare Made in USA pieces.


A brand and country of origin label example A size tag/country of origin label stitched to the bottom of the brand label.


Separate counry of origin and brand labels A separate size/country of origin label placed next to the brand label.


Stacked brand and care/content labels
This is a typical example. The brand label is stacked on top of the care/content tag. The country of origin clearly shows below the brand tag.

April 03, 2007

Designers hate care/content labels

I was shopping a week ago or so in one of my favorite discount stores, Ross Dress for Less. As I was working my way through the blouse rack, I noticed a significant problem with most of the blouses on the rack. The blouses did not have a proper notification of country of origin (I would of counted how many were not in compliance, but DH was getting bored). According to FTC recommendations, items with a neckline must have a label stating the country of origin at or near the inside center back neck. These blouses only had a small brand label. A separate care label was attached to a side seam, with country of origin disclosed there.

I have read the FTC recommendations dozens of times and I am always surprised of the amount of non-compliance that exists in the marketplace. Some companies must be ignoring (or are ignorant) of the requirement. Further, many of the items in this store are imports. This means they had to pass custom inspections. I don't get it.

I follow the rules, and yet I have seen many designers insist they don't have to place a label at the back neck. After all, it is ugly and takes away from hanger appeal. If no one else is doing it, why should they. Children's clothing poses an additional challenge - there is only so much space in the back neck.

Care and content label placementHere is a picture of an infant girl's dress. The label is correctly placed near the back neck. This placement requirement creates consistency across a broad range of products. Customers can know where to find basic product information. If I wanted to purchase Made in USA product, then it would be simple to find out.

It is only required that country of origin information be placed in a reasonable, accessible place (generally the back neck in items with a neck). Care information may be placed in a side seam, or elsewhere. Generally, children's items have the information combined on one tag. Think about your customers. Do you really want them to have to fish through an entire item of clothing to see where it was made and how it should be cleaned?

March 26, 2007

Thread color does matter!


Thread colors

Most of the time, manufacturers know to match the thread color to the body of your design. If you hand them a sample, then they will reproduce it down to the thread color. Most manufacturers are very good about this, so specifying the thread color is usually overlooked.

But every now and then, you will run across a rare manufacturer that is either color blind or will use whatever thread they have on the shelf. It may or may not match. If you specified the thread color, then you can go back to the manufacturer with a charge-back. If you didn't, well then you might be stuck. (I have seen this happen!)

Another reason to spec out a thread color is to match a screen print, embroidery, or coordinating piece. The thread color becomes an integral part of the design. Would you really want to leave the end color up to chance?

It's really simple. On your spec sheets state "Thread color: American & Efird [color name] [color number]. You may even want to go to the extreme of including a thread color swatch, just in case the manufacturer buys thread elsewhere. Wind off some thread onto your fingers and make a little, mini-hank of thread and tape it onto the page. You can buy thread swatch books from American & Efird (You'll have to talk to a sales rep about a swatch book). You can even get thread dyed to match!

March 21, 2007

Big Box Technical Designers

Tape measure
Several years ago (was it really that long ago), I learned a very important lesson. I was working on a private label program for a Big Box retailer, company X. The technical specs they sent us were fairly straight forward. There were a few wonky measurements, but we forced our samples to spec.

As a patternmaker/pseudo tech designer, working on a private label program for a large account, I worked under the assumption that the BIG company knew what it was doing. Their specs were gospel and they could not be adjusted. You meet spec or you risk losing the account. This was true for another private label program for company Y. However, company Y's specs were superior (in other words they worked out of the box).

With any private label program, you take a selected sample and adjust the patterns to meet spec. You re-sew the sample in production fabric and submit it to the company's technical design department. The technical designers will go over every measurment and construction detail. They have the power to cancel the order if you don't meet spec. Usually, the first sample is rejected and you have to submit a second with corrections. (This is especially true if this if the first time on a new private label program). Needless to say, there is a lot of pressure to meet spec the first or second time. There is a lot riding on these samples.

So we submit our sample (with forced spec conformity) to company X. We received back our audit reports with required corrections. The weird thing was that the technical designers changed some of the required specs (now some were really wonky) and they insisted on construction/pattern changes. The construction/pattern changes would have affected several things, especially allocations and labor costs. Private label programs operate on slim margins, and our in-house manufacturer would not agree to the changes. The measurement issues didn't make sense, proportionally.

What to do? Here was a high dollar order and we wouldn't be able to meet spec. The only way to solve the problem was to call the technical designer at Company X and explain the situation. I expected them to reply, "Meet spec or we cancel the order."

To my surprise, the technical designers agreed to allow some of our measurments and construction details to pass. I don't think I explained too much. It was more like, "It would be easier for us to do things this way."

I learned something very valuable that day. If something isn't working, present an alternative - it just might be acceptable. I also learned that the technical designers for Big Box retailers don't know everything.

The reason this experience came back to me is because I am facing a similar situation, except I am the technical designer on the other end. As part of my consulting, I am helping to develop a new style in China. It is a difficult style, so I expected the first samples to have a few problems. Unfortunately, the samples had more than a few problems (some minor, some not). I wish the Chinese factory understood that it would be ok to present an alternative. I could see they struggled to meet my spec, so they forced it (and didn't really succeed). Not sure how this will be resolved....

February 13, 2007

Another Care/Content Label Example

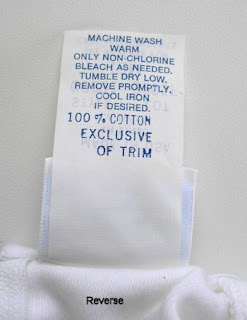
Front of a care content labelBack of a care content labelIt's time to look at another care/content label. These labels were found in a 12M knit top that is part of a two-piece set.

The first thing that caught my eye was the placement of the country of origin. Country of origin information must be placed so that it can be seen without flipping the label over. Nothing can cover the country of origin information, like a brand label. It should be placed in an easily accessible area, like the back neck or waistband.

Another interesting observation is the style number and lot number information included on the front of the label. The lot number probably refers to the production lot and corresponds to a date of manufacture (lot numbers are unique to each company, so it could mean almost anything). Generally, this information is found elsewhere, like the reverse of the tag or even on a separate tag stuck into a side seam. It is certainly not anything that a customer is going to care about. I like the inclusion of this info for easy back-tracking, but it should be placed elsewhere.

This tag contains both an RN and CA numbers. The CA number is the Canadian equivalent to the the US RN number. This product was most likely sold in both Canada and the US, thus the need for two numbers.

The reverse side of the label contains all relevant information. My only nit-pick is the overall formatting. I generally prefer the content information first, followed by the care info. This label is just the opposite. Further, the content information is a different font, font size, and right-aligned compared to the care instructions. It makes the whole reverse side appear sloppy.

My final nit-pick is that the label should say "2 piece set" somewhere. Inevitably, the two pieces will be separated. This helps the shipping and store employees on the retail end realize there should be two pieces on the hanger.

January 26, 2007

Grading Stack Points

Grading stack point
I am going to try and get back to my grading explanations today. My head is a bit fuzzy after a long week and an especially late night. To review, just click on the grading category link to the right. Click on the picture for a bigger view.

The diagram on the left shows three possible grading examples. This is a basic front bodice pattern piece that is folded in half. Each example is called a nest meaning each size is stacked on top of each other from smallest to largest. The stars represent the point of origin for each grade. The numbers at each point correspond to a grade rule. I will briefly explain each of these items below.

By laying your graded patterns on top of each other in a nest, you can easily see if your pattern is grading proportionally. The stars not only show the point of origin, but the stack point. You can stack your patterns in three general areas and have the grade look different each time. In computerized grading, you can move your stack point anywhere you choose and the grading software will update your grades automatically. For consistency's sake, it is important to determine before you start grading where your stack point/grading point of origin will be.

Each stack point will cause your grading to look different. Most of the grading world uses Example 1. The point of origin is placed in the center of the pattern pieces and growth occurs in all directions. In Example 2, the stack point is placed at the center front waistline and growth occurs to the side and upwards to the neck. Example 3 is the same result as 2, but placed at the center front neck.

I prefer Example 3 and all of my patterns are generally graded this way. It makes the most sense to me and the grade rules are simpler. Most of the proportional changes between sizes occur this way in nature. A person's neck doesn't actually move upward in each size, but rather their waist moves down. Perhaps this is just how my mind works. In any event, you can choose which ever point makes the most sense to you.

I have been using the term grade rules rather loosely in my previous grading articles. Grade rules refer to measurement charts broken down into grade steps. Grade rules can also refer to the actual change that occurs at a point. In the drawings above, I have numbers assigned to each point. Those numbers can refer to a grade rule. For example:

Rule X,Y changes
  1. 0, 0
  2. 1/8, 1/8


You can create a chart like the one above, if you prefer. This method is used in computerized grading and each grade rule is placed in a grade library (specific to a size range). Once a style is ready to grade, you simply apply a rule to each point and the pattern pieces will stay graded regardless of pattern changes. It is less helpful when hand grading and may make things more complicated. To be honest, I rarely use grade libraries when computer grading. They can speed things up if you have consistently similar styles. However, things always need tweaking, so I prefer to manually manipulate the grade at each point. Most grading software will allow you to assign a grade rule from a library and still manually edit the point. The computer will begin a grade command by starting with rule #1 and working around through each point. Rule 1 is almost always set as (0,0) and it should always be your stack point.

When hand grading, you should start your grading at your stack point. Once that is set, you then move to the next point, say the neck-shoulder point and mark all of the changes there. Work counter-clockwise (or vice versa, if you choose), around to each point. Setting up a consistent method will help you keep things straight.

Ok. Enough explanation. Decide on your stack point and get ready to grade.

January 11, 2007

Sizing Studies for Children

A few weeks ago, a new mother complained about the variation in infant clothing sizes. She explained that her 12 month daughter wore clothes ranging in size from 6m to 18m. Some marked for 12 months were either too big or too small. Finding clothes that fit was a matter of trying things on a fussy baby.

She stated, "You can't trust what the size tag says."

Kathleen at Fashion-Incubator wrote an article about problems with sizing studies, especially for women. Children's sizing studies present some of the same difficulties. Children's sizing is complicated by the fact that children grow and at different rates. Ethnicity plays a part in proportions, weight, and growth rates. As a technical designer, I feel that I am only taking my best guess when drafting patterns. I have to synthesize about a dozen different size charts and methods to come up with something that works and fits! I firmly believe that even infant children deserve clothing that fits.

My concern with most measurement charts and sizing studies are that they are minimally useful for patternmaking for infants. Many measurement size charts either completely ignore or present limited info for infant sizing. The Armstrong book starts her charts at size 2/2T (some of her measurements are a bit funky too). The Gloria Mortimer-Dunn book is the same way. Childrenswear Design, has some basic information for infant patternmaking although the information is not complete. The best presentation of measurement info is from Winifred Aldrich in her book Metric Pattern Cutting for Children's Wear and Babywear: From Birth to 14 Years .

I have drafted basic blocks using Aldrich's charts and instructions. They turned out ok, but definitely needed refinement for style and fit. I thought the basic, fitted blocks need a little more ease and a lower neck. The flat blocks needed a better armhole shaping. Despite that, with some tweaking, you could have a nice set of infant blocks to work with. Part of my difficulty could be that the British are accustomed to a closer fitting block and the metric system. I had to wrap my head around metric conversions, which probably introduced some inaccuracies.

I haven't talked much about measurement charts available from ASTM. This is because I have not purchased a set of charts from them. I don't have the need at this point. Other government studies are interesting, but don't contain enough of the measurements needed to draft basic blocks. Growth charts and retail size charts (and a few in patternmaking books), list infant sizes by pounds and lengths. Those are interesting for comparison and not useful for drafting patterns.

I am not sure what new childrenswear designers are to do. Most companies develop their own measurement charts and some are better than others. Getting those first, good bodice block patterns are critical because every future design is based off of them. It may be easier to drape your first blocks off of dress forms rather than drafting from measurements. Or maybe a combination of both. This sizing study problem could explain why infant sizing is all over the place.

Over the years, I have settled with basic patterns that have proven to work. They continue to be modified for improvement and someday they will be what I hope is a great pattern.

January 08, 2007

Points of Measure and Grading

In a previous grading blog, I showed the first step in developing grade rules. I usually break my measurement and grading charts into two charts. Here is an example:

An example of developing a grade rule

I usually stop at the middle chart and work the rest of the math out in my head as I grade. Some of you may want to break your measurements down even further. If a pattern piece is symmetrical, you can grade half of the pattern at a time. The third chart shows the grades for half of the pattern width.

My charts have a column on the left titled POM, or point of measure. Those points of measure should correspond to a drawing like this:

Points of measure on a pattern piece

The measurements in the top chart above are based off pattern measurements (which are made up for this example), rather than body measurement charts. The grades are developed from body measurements. To grade successfully, you will need to take a lot of measurements off your base size patterns. For a bodice pattern, you will need armhole circumference, across the shoulder neck circumference, neck width, neck depth, and possibly more. Work between your body measurements, pattern measurements, grade, and ease requirements to develop appropriate grade rules for each point of measure. BTW, if your pattern measurements are finished measurements (minus seam allowances), you can use these charts to measure finished garments while doing quality assessments.

There are standard reference grading charts available from various sources. You can refer to them to develop your grade rules, if you like, and it may save you some time. Standard grading charts are usually available for adult, most often, women's clothing. Children's grading charts are available, but I have found them less useful. There are too many variations in children's body measurements, and every company has their own set. I usually have to develop grading charts that are unique for each company. When a designer asks me to grade a pattern, I have to work off of their measurement charts and basic pattern pieces for the grade to make sense. I will compare their measurement charts with my own to make sure their measurement and grades fall within an acceptable range.

If you do use a standard reference grading chart, you will need to double check your pattern/body measurements across the range. Standard grade charts do not accommodate variations in body type that your company may try to fit.

In the next grading blog, I will begin to explain the actual process of grading.

January 02, 2007

Country of origin labeling for clothing


I couldn't resist writing a blog about this particular care/content tag found in a t-shirt that was a Christmas present. This is perhaps one of the worst labels I have seen in a long time. In fact, I believe it was purposely written to make it look like it was made in the USA.

The maker of this shirt did a few things right. The tag clearly states the content of 100% Cotton and it was placed at the back of the neck. Unfortunately, this is the only thing they did right.

The first obvious problem is the different font sizes. Notice how the words Dominican Republic are smaller than anything else. You might think they made those words smaller so they could fit on one line of the tag. But the placement of all the words could make a consumer believe the shirt was actually made in the USA. I did when I first looked at it. Further, the addition of the phrase "of USA Fabric" is extraneous. It should simply state, "Made in Dominican Republic" period.

This tag would not be acceptable by FTC guidelines. When writing a tag, all of the words on the tag should be of a uniform, legible font size. The tag would be rejected for more than the font size issue. This particular shirt is missing a care tag and manufacturer identification. The content tag does not need to include the manufacturers name or RN number. That information should be included on the care tag and/or other packaging. It would be impossible to track down who manufactured this shirt. The FTC could go after the retailer, in this case.

This kind of thing should have been caught when the items were brought into the US. I am, however, not surprised to see it was missed.

December 28, 2006

Grading Rulers

Kathleen Fasanella posted a blog back in Feb 2006 about grading rulers. Imagine my surprise when I opened a book I picked up at a thrift store. Inside the front cover was a little used hinged grading ruler in it's original packaging with instructions! The ruler was stashed in an older edition of the Price/Zamkoff grading book. The book was priced at a measly $2 - the original price sticker for the ruler was still on the packaging of $5.35. Funny thing is, I bought the book about 3 years ago and stuck it on a shelf. I only opened it up a few days ago as I was working on my new infant grading charts. I wanted the book as a grading reference, but rarely use it because of how poorly it explains grading. What a great bonus to find the ruler!

A hinged grading ruler About 98% of the grading I do is in a CAD program. Grading on the computer is so easy! Select a point and tell the computer how much growth should occur in the X,Y directions. It redraws the curves automatically. It is easy to double check the grade in the larger sizes by laying the pieces on top of each other or walking the pieces along side.

Every CAD program varies in ease of use. I have done computerized grading using Gerber's Accumark, Autocad/Betacad and Optitex. I will blog in the future about the differences between the three. Suffice it to say, Optitex is the easiest to use thus far, and quickly becoming my favorite. Grading by hand, is another story. It is tedious and takes a lot of time. I can see why grading is considered an art form. I am grading my personal patterns by hand and it is a big learning process.

In design school, I learned to grade with only a ruler. My 18" clear ruler with 1/16" increments, is photographed above. Grading with only a simple ruler is fairly straightforward. You measure out the changes and re-draw your pattern for each size step. Using a grading ruler makes the process so much simpler! I graded my infant flat block patterns with the grading ruler in a couple of hours (I was re-working some of my grades at the same time). The ruler is marked in 1/16" increments. Your grade rules need to be in 1/16", 1/8", 1/4", 1/2" increments to use this ruler effectively, which means you may need to re-work some of your basic pattern measurements to make grading easier.

I hope to demonstrate the process of actual grading, but for now I am enjoy playing with my lucky find!

Comparing Butterick 6030 neckline measurement

An example of a well fitting boys shirt

I didn't realize I had so many boys' shirts in my stash! Each shirt has a slightly different construction technique. They range from casual to dressy. Some have a convertible collar with a facing and others have a traditional 2-piece collar. This is a great resource for me to figure out more of what is wrong with the Butterick pattern.

The first thing I did was take some key measurements off of the size 24M shirts. The button bands averaged 1.125" and I adjusted my new pattern accordingly. The second measurement was the necklines. Both 24M and 2T shirts measured 12 inches, which I think is right on target. Compare these numbers:

Actual neck measurement = 10.125"
Butterick neck measurement = 15" (4.875" of ease!)
My pattern measurement (1st attempt) = 14" (3.875" of ease)
Both RTW shirts neck = 12" (2" of ease, right on!)

To draft the neckline of the pattern small enough, I need to have a basic 24M block made up. I am not going to keep guessing -- it just wastes too much time. This is enough motivation for me to work on my basic blocks again (My New Year's Resolution!). I pulled them out yesterday and made some important decisions. I can officially announce I have a basic bodice block that I like. The next step is to figure out my grade rules and grade my basic block up to a 24M.

Figuring grade rules and grading my blocks will take me some time, so the shirt project will be put off for a little while. In the mean time, I may get back to my promised grading blogs. Hopefully, you won't get too bored by it. Grading is as dry and boring as a topic can get.

December 26, 2006

Fixing the neckline on Butterick 6030 sewing pattern

Sewing pattern shoulder alignment
I started to deconstruct the Butterick 6030 pattern for my boy's shirt pattern fix. At this point, I am thinking it would be so much easier to start from scratch. More glaring problems showed up after looking closer. In the picture on the right, I lined up the shoulders of the shirt. I know, I did not align the pattern pieces along their true seam lines. In production sewing, though, the pieces are lined up along their cut edges, not sewing lines. If I did this, the sewing operator would bring this back to me as a mistake. Those edges should meet.

Also, look closely at the armhole shaping. The front armhole has a nice curve and the back is rather straight and flat. This was how I was formally trained in classic pattern making for adults. Adults require more shaping in front than in back around the arm. In children's pattern making, the patterns are made the same front to back, except for the neckline. This means the side seams, shoulders, and armhole shapings are exactly the same. Children do not require the extra shaping front to back. This is a typical industry method for children's patternmaking, especially infant and toddler. It is called the flat method by Aldrich.

Another problem not shown in the picture above are the side seams. The side seams swing out at the hem. I am guessing the patternmaker did this to accomodate an infant's protuding belly. Many babies have a belly until they get older. The assumption is that width must be added to accomodate the extra girth. The problem with Butterick's pattern is that it creates an a-line shirt. The photo on the pattern cover shows a plaid shirt. The side seams should be straight in order to match stripes and plaids. A basic shirt block already has extra wearing ease at the chest and waist. There is no reason to add even more room at the waist. I drew my side seams straight.

Here is my modified neckline. You can see the v-shaping more clearly. I rounded the neck, raised it at center-front, and made it smaller (my changes are in red). Corrected neckline shaping in sewing patternA 24 month old's neck measures about 10.125 inches. Butterick's neck measurement for a 24M is 15" - my modified neck is 14". I am thinking it is still too large. This is just my first rough pattern - I have a long way to go. Later, I will trace these off, with seam allowances. You can see I removed the cumbersome facing and created a double fold facing. Also, my back pattern is going to be exactly the same as my front, except for the neckline. You can see my back neckline above my front (red) neckline. I am going to double check neck measurements by measuring some necklines on some RTW shirts. When all else fails, see what your competition is doing.

December 20, 2006

A boy's shirt pattern fix for Butterick 6030


About a year ago I was asked to make a a white shirt for an infant boy's christening. I didn't have the time to draft the pattern myself, so I turned to a ready-made pattern. Out of the big 4 pattern companies only one had a "traditional" woven shirt pattern. I could have saved myself a lot of stress by drafting the pattern anyway. I didn't really have time to fix the problems in the pattern either and I was disappointed by the results. Here is a picture of the pattern envelope. Maybe you can spot the problems too.

The first obvious problem is the collar and neck. The collar points splay apart too far. The collars don't meet at the center front neck and the front neck seems too low. On top of that the collar looks proportionally too large. Compare the drawings with the actual pictures. The drawings show a convertible collar with a stand in the back.

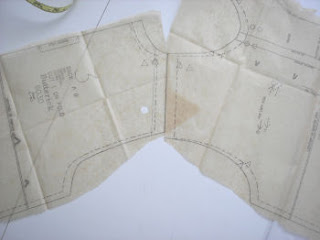
The problems become more obvious when you study the pattern pieces (sorry the pictures are fuzzy - tissue paper is hard to photograph).


1. On the front bodice piece the front neck is a V-shape and the neck is too low at center front. The front neck is just too big. To correct this problem the neck needs to be raised at center front and the front neck needs more curve.

2. Notice the large, built-in front facing. It is at least 2" wide, way too large for an infant shirt. This should have had a traditional built-in, double fold facing found in adult shirts. I will illustrate this later.

3. The collar is too wide. Of course, this piece has the obligatory 5/8" seam allowances. The collar has little shaping, except for a slight narrowing at the back neck. It is essentially a rectangle.

4. When I sewed the sleeves in the first time - there was too much ease. The shirt has dropped sleeves. There should be no ease in this style of sleeve at all. Also notice the strange jog on the right side seam. I have no idea why the sleeve turn back would be extended longer on one side than the other. I drew a red arrow down to indicate that the sleeve cap needs to be flatter.

5. The other major issue is the sizing used by the pattern company. The infant patterns are sized S-M-L-XL, divided up by height and weight. To me, those size labels are almost meaningless. I had to pull out my size charts to figure out what size matched up with the appropriate ages, heights, and weights. The sizing doesn't break-down very well because their height-weight measurements didn't match up with any of my industry charts. This is my best guess on Butterick's sizing:

Small=3-6M
Medium=6-9M
Large=12-18M
X-Large=24M

I have wanted a basic infant shirt pattern for a while, so I am going to take this pattern and fix it. The first step is to trace off the pattern pieces, minus the seam allowances. Normally, I do my pattern drafting with the seam allowances on - typical of the industry. In this case, I want to redo the seam allowances so they are appropriate for the seam. I will add 1/4" seam allowances for the neck and collars and 3/8" for everything else. The hem will have a 1/4" rolled hem - 1/2" hem allowance. I will fix the neckline and correct the sleeve. Finally, I will redraft the collar completely - the original is useless.

Once the pattern is fixed, I will re-sew it up. The hope is, it will look better and be easier to sew.

December 17, 2006

Button style can add interest to a design

Small flower buttonSometimes design inspiration comes from the most utilitarian part of a garment. And yet, if one pays attention to such small details, you can take an ordinary piece of clothing and turn it into something special.

This tiny little flower button jazzed up an otherwise boring knit jacket. The jacket is made from a french terry knit with a ruffle trim on the hems. If this had a regular two-hole button, the jacket would have been plain boring.

A regular two-hole button costs less than one cent each. They are generally one of the least expensive items found on an item of clothing. That changes when you start to add novelty buttons. There are tons of special and extra special buttons available. Most manufacturers can't afford wholesale button costs of 20 cents a piece or more. This flower button would be less than 5 cents because it is still rather basic. Special buttons are saved for the front of the garment where they can be seen.

If you truly want to set your garment apart, pay attention to details like buttons on the back of a dress, for example. Special occasion girl's dresses sometimes have interesting and fun button details. Buttons on the back may match a colored sash, skirt band, or trim. Maybe use some of the buttons as part of an embellishment. Can you imagine using a different thread color to sew the buttons on this jacket? How about a soft yellow center to correspond with a flower embroidery on a pocket? Boutique children's designers can certainly play with this seemingly small detail.

While the jacket is not cutting edge fashion, this manufacturer did some interesting things that I may blog about in the future. Knits can be difficult to work with, especially when topstitching or adding a woven fabric trim. Knits and wovens do not like to work together happily. One or the other ends up stretched or distorted. You can see how nicely this trim lays with no stretching of the knit jacket.

This jacket was obviously well loved. It is worn and stained. Even so, the previous owner did not clip the threads left by the manufacturer. You can see one of five errant threads in the picture above. This is a big pet peeve of mine. Any finishing and inspection should include clipping threads.

December 12, 2006

Care/Content Label Example in Two Languages

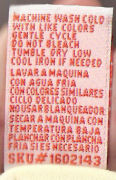
Writing a care/content label can be difficult. There are government regulations, department store requirements, company budgets, and a lot of info to fit in a small space. Every company comes up with creative solutions. If I get stuck on how to write a care label, I go shopping (or at least my closet)! I have seen a lot of good examples and poor examples of how to write a care/content label. I may blog about care/content labels in the real world on a semi-regular basis. New designers need a better understanding of labeling requirements. Since my blog focuses on children's clothing, I will try to pull labels from children's clothing. Children's clothing presents some difficulty when creating a care/content label.

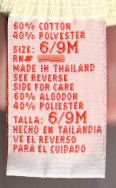
In my first example, I pulled a label from a cotton t-shirt with a screen print, sized 6-9M. I smudged out the RN# because I want to keep the manufacturer anonymous. I apologize for the pictures being a bit fuzzy - labels are harder to scan than I thought. I will do better on my next blog. The front of the label is on the left, the back is on the right.

Front of a care content labelBack of a care content label


The first thing that caught my eye about this label is the colors. The label is a folded woven, satin label with orange lettering. This kind of label is a bit more expensive than a regular printed label. I wouldn't have expected this style in an ordinary t-shirt, especially one that came from a major discounter. The label is in English and Spanish. This is a typical requirement for department and chain stores.

I had previously blogged about keeping track of production by recording some kind of information on the label. This label has a SKU # on the bottom of the reverse side of the label. It is a little unusual to see a SKU number, but it does occur. 

The only thing I would change is the repetition of the size information. The English/Spanish could be combined on one line: "Size/Talla 6/9M. It is also preferred to keep the font size for all of the characters and numbers on the tag the same size.

October 30, 2006

Product Development Manager, hmmm....

Every now and then, I will peruse help wanted ads that may be of interest to me. I will look in places that I may be interested in living someday - say tropical islands. When I read this ad, I am sorry, but I had to laugh. I know what kind of salary I would ask for this particular position. I would consider this position a Technical Design position, which should be connected to the Design department. This would be a senior level position. Instead, look at the department it is assigned and to whom you would report.

After you read the job requirements, next look at the required qualifications. Wow, is all I can say. They are willing to consider someone with 3-5 years of merchandising experience (something unrelated to most of the job functions described)! I have shopped in the retail store this company owns and I know how many styles they produce each season. They have a men's, women's, and children's clothing line, in various sizes and fabrications that changes seasonally. What they really need is someone with 10-20 years of senior level Technical Design experience. The patternmaking and grading functions would be a full-time job all by itself. If you are truly interested in this job, you can read the entire job description at Expo, but be prepared to say goodbye to your life.

I really don't blame the company for this ad. I am sure this was written by a human resource person who doesn't really have a clue what is involved here.

Position: Product Development Manager
Department: Merchandising
Reports To: Senior Product Development Manager

SUMMARY
Responsible for style development and all components of spec packet, which include style, fit, trim, labels, hangtags, care instructions, care label, packing, wash test, and buyer samples. Works directly with production factories and vendors to assure all information is complete and consistent.

ESSENTIAL DUTIES & RESPONSIBILITIES include the following, other duties may be assigned.

COMPANY PRINCIPLES

As an employee of Company X, promotes the Vision and Mission of the Company. Performs the position duties and responsibilities in accordance with the Company’s Statement of Values.

1. Works with Art Team & Buyers to develop and design seasonal style line.
2. Analyzes samples and prototypes.
3. Sources fabrics and trims.
4. Works with factories to cost garments and arrive at best possible value through garment construction and fabric utilization.
5. Responsible for all style specification packages for internal & vendor use. Assures information is complete and consistent.
6. Works directly with factory on all components of spec packet. I.e. style, fit, and trim, labels, hangtags, care instructions, care label, packing, and buyer samples.
7. Finalize fit corrections on design fit model.
8. Grade garments on computer to be produced according to seasonal style line.
9. Responsible for all pattern making & revisions.
10. Responsible for the creation of all line sketches.
11. Responsible for numbering/tracking system for styles, fabrications and prints.
12. Responsible for all components of PDM computer software.
13. Assists in presentations of assortment plans.
14. All other related duties assigned by manager.

Requirements:
QUALIFICATIONS
To perform this position successfully, an individual must be able to perform each essential duty satisfactorily. The requirements listed below are representative of the knowledge, skill, and/or ability required. Reasonable accommodations may be made to enable individuals with disabilities to perform the essential functions.

EDUCATION and/or EXPERIENCE
§ Bachelor’s degree (BA) or equivalent.
§ 3-5 years of apparel product development or merchandising experience preferred
§ Textile Art, fashion design or merchandising education preferred
§ Knowledge and understanding of the relation between fabric, art, print, fabrication and style
§ Detail oriented
§ Strong analytical and problem solving skills
§ Experience with Microsoft Word, Microsoft Excel, Adobe Photo Shop.

October 27, 2006

Creating a grading standard pt. 2

In a previous blog, I wrote about the first steps in creating a grading standard, but failed to discuss the details. It would be helpful to also review my blog entry titled Too Many Sizes! In this blog, I will try to explain grading terms and the rules by which grading can occur. In the future, I will show how to develop your actual grade rules and how I grade a pattern (which is different from any other method I have seen).

There seems to be a lot of confusion about grading. Some people view grading as a magical process that can turn your beautiful pattern in one size into any other size you desire. Before anyone can grade your pattern, you should have already done some homework. You should have chosen a category, size range, and measurement chart. Your category and size standard should be fairly simple. You should only be working in one category and your size range should not have more than 6 sizes. You may want to work in men and womens plus and regular sizes all at once, but it is just not possible.

Now, I have to stop here for a moment and explain the concept of categories. I don't know if this is the appropriate term or not. I work in a children's category, but you may work in Misses, Juniors, Mens, or whatever. Within those broad categories, there are sub-categories or classifications based on your sizing system. A classification is based on a specific figure type such as Misses, Petites, Plus, or Talls. Each of these designations have a separate and distinct sizing system. You can't magically start with a Misses size and turn it into a Plus size by grading it. That is not how grading works, so don't even attempt it. There is no magic formula.

Grading is a simple, yet difficult concept for people to grasp. Grading is a process by which a base pattern is proportionally changed to create smaller or larger sizes. Grading is always based on a set of measurements specific to a size range and classification. Successful grading does not change the overall proportions of the intended design as the size changes. This is why a size range should be limited to about 6 sizes. Any more than that and the largest or smallest size will be proportionally wrong.

Successful grading is all about having a good starting point. A base pattern is a pattern created and perfected to fit a sample size. From that base pattern, you will create the other sizes in your size range. Now some of you want to offer Plus sizes in addition to your Misses Sizes. It should be as simple as grading your base Misses patterns up to the appropriate plus size, right? After all, it would save a great deal of work. You already have a perfect pattern and why would you want to go to the work of creating a whole new set of patterns.

The reality is, you will have to create a whole new set of patterns in a new base size contained in a new size range and classification. I know this sounds like a lot of work. The truth is that it is, at least initially. You will have to develop a set of base patterns for your Misses sizes and a separate set for your Plus sizes. You may sample a new style in a Misses size initially. Once a style is approved, your patternmaker will then create patterns in any other size ranges you want to offer. The process required to create the plus size patterns will be very similar, if not identical, to the process required to draft the Misses size patterns. There may be a little tweaking for fit during sampling, but the process will be faster than the original style development. Your patternmaker will already know what should be done.

For example, one company I work for will create a new style in a size 5 (in a children's size range of 4-6x). They then decide they want to offer that style in the entire range 2T-16 and plus sizes. I have already broken up the sizes into ranges of 2T-4T, 4-6x, 7-16, and 8+ to 20+. I then make patterns in the sample sizes of 3T, 5 (which is already done), 10, and 10+. The patterns for each sample size are then graded within their range. It may sound like a lot of work, especially if done entirely by hand. Since I work in a CAD environment, I can accomplish this task in less than a day. By hand, it may take 2-3 days.

Going back to our previous example......Once your set of Misses patterns and Plus size patterns are finished, you will then send those off to be graded. And this is where you have to create your grade rules. To create grade rules, you will need your measurement charts. So here is your homework assignment. Read your measurement chart. If you are offering more than one classification, compare the two. How does a Plus size differ from a Misses? Do your measurements make sense? Do the measurements decrease for the smaller sizes and increase for the bigger? In the next blog, I will show how to create your grade rules from your measurement charts. Once you see the grade rules, you will then understand why you can't grade a Misses size into a Plus size.

August 08, 2006

An analysis of a girls spring time dress

I found some time to analyze a dress from another manufacturer. I do this from time to time to see some of the innovative engineering that others have built into their infant clothing. (Infant clothing requires a lot of engineering, btw). This is the best way to learn how to put things together. This dress is a department store dress from Baby Togs. It would retail for about $20. There are some things that make this a department-store quality dress, with some interesting observations. The dress is a three piece set, made from a cotton/poly gingham. The dress is very cute and a good value. BTW, this dress was made in China.


Good Quality Points
1. The fabric is not a regular gingham. It is more like a dobby fabric. It is a better quality check fabric than I usually see. The content is 55% cotton 45% poly.

2. Embroidery. Anytime embroidery is added to a dress, the cost goes up, especially if made in the USA. This style has embroidered daisies only on the front bodice and embroidered flowers on the pockets. There is a minimum charge to run both pieces. They get bonus points for the amount on the dress.

3. The flower on the dress is not tacked on with a tacker. Instead the flower center is actually embroidered through to the hat band. This ensures the flower does not fall off!


4. The diaper cover is rather ordinary, but it has wider elastic at the waist - 1/2". Normally, budget clothing will have 1/4". The elastic is fully encased for a smooth finish and is not stitched through. They also probably saved money by doing a 4-piece diaper. This allows the cutter to move the pieces around to save money on fabric. Of course, it adds additional labor - but so far that is not an issue in China. In China, fabric is more expensive then labor.

Some interesting observations
1. The first thing I noticed about this dress was the skirt gather ratio - it is rather skimpy. Looking closer, you can tell the skirt is actually A-line. Even more amazing, they were able to put a straight grain band on the skirt. This kind of application would frustrate most people. The skirt hem could easily stretch out of shape, and yet I could only find minor stretching on one side seam. I did find evidence of basting, perhaps that helped. Personally, I would have cut the skirt straight and use the width of the fabric. The a-line skirt sweep is about 45". If you are using a 45" fabric, then there would be no difference in making the skirt straight. Plus it would have been easier to sew.


2. I have only seen one way of gathering skirts in China. This is because most Chinese manufacturers do not have shirring arms on their overlock machines. As incredible as this may seem, it is true. (And believe me, I have tried to show them this labor saving device, but labor is very cheap in China and they are not motivated to change). Instead of gathering and attaching the skirt in one operation, it is done in 3-4 steps. They will use a straight stitch machine with a gathering foot to create the gathers. Then they will baste the skirt to the bodice, and finally overedge the seam. This dress also has topstitching along the waist seam (a fourth step). It is hard to see in this picture, but here it is. You can see two rows of straight stitching. Another problem with this method is the gathers do not look neat and even. From the face side, it looks fine, but the inside is another story.


3. The final interesting point is where the manufacturer attempted to save fabric. The front bodice is fully lined, but the back is only partial. I am not sure this would have saved any fabric. Chances are the fabric saved was actually tossed out.

This was a fun dress to inspect. I don't quite understand some of the things they did, but despite that, it still turned out cute. It is right on for a department store dress and hits the right price point.

2019 notes - I lost some of the original pictures of this blog post, but the notes are still interesting!