Showing posts with label Sewing Machines. Show all posts

November 11, 2019

Follow-up on free motion quilting on a Singer Rocketeer

After leaving this project sitting for months, I could not convince myself to actually use my Singer 503A to machine quilt one of my quilts.

Results of free motion quilting on a Singer 503A

None of my samples were really satisfactory. The effort to push this small sample under the foot in an all-over swirl pattern was much more work than it should be. I actually had to push and pull the sample with some effort, which is not normal. I had a hard time visualizing myself doing this for a queen size quilt. With a proper foot or machine, it would be easier and probably fun.

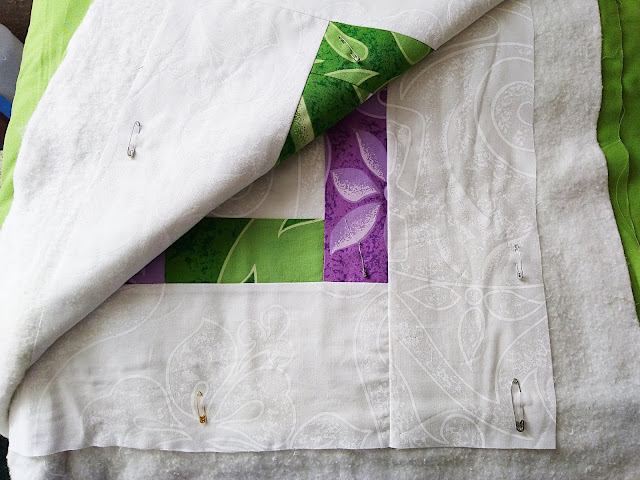
So the decision is made and I will likely be hand quilting my Hawaiian quilt instead. I used safety pins to baste it together.

Basted Hawaiian quilt ready for quilting


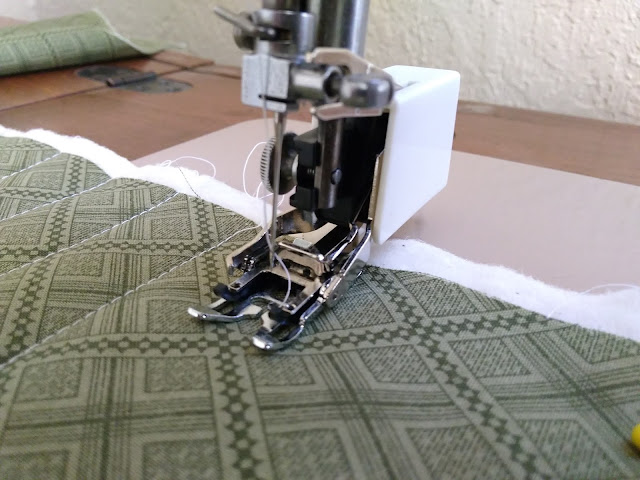
As an alternative, I also purchased a walking foot attachment. This attachment actually works well. It does have a cheap feel, so I'm not sure about long term durability. If I choose to quilt in straight lines, then, this is a possibility I may use this attachment on my next quilt.

Singer slant walking foot attachment

*Amazon links are affiliate links.

January 07, 2019

Free motion quilting on a Singer 503a Rocketeer

**This tutorial is a work in progress and will be updated as I practice more.

After finishing up the piecing of the Patches and Pinwheels quilt, I began debating on how to quilt it. Do I quilt it myself on my Singer Rocketeer? Do I handquilt? Do I pay someone to do it for me? I am still debating on this quilt because it is so big but I do have my smaller Hawaiian quilt that I may try.

I did buy an aftermarket free motion/embroidery foot from Amazon. The Singer Rocketeer has a slant shank and there are two versions of a free motion foot. The first is a spring design and the second use a curved piece of metal as the spring. The second version has technically been discontinued but you can pick it up on ebay. The spring design is available from various sources.

Free motion quilting foot on a Singer 503A

Free motion quilting foot on a Singer 503A

This version is made by Honeysew and is available on Amazon for about $9.00. My understanding is that as the needle bar moves, the bar at the top of the spring lifts the foot so it hops as you sew. Having never used something like this, I don't know if that is true. In this case that little bar is at least a 1/2" above the needle bar and does not ever touch. In other words, it doesn't work the way I think it is supposed to work.

I had to refer to the machine manual and Amazon review comments to figure out how to make this work. The interesting thing about this Singer and many older models is that the instructions for free motion embroidery and darning instruct you to remove the presser foot and use a bare needle!

Singer 503 manual on Darning

This setup requires the use of a hoop, which is not practical for a quilt. Also, it exposes your fingers to the needle much more easily if you are not paying attention! So after a bit of trial and error, I eventually figured out the best setup. The manual has instruction on a few different pages, so I missed a few key steps at first.

1. Set the pressure to the "D" setting. This dial is on the inside of the machine and the "D" and is for Darning. This setting removes all pressure off the foot. This will allow you to move the fabric under the needle.

The D or Darning setting on a Singer 503 Rocketeer

2. Lift the feed dog plate.

Lift the feed dog plate for darning on a Singer 503A

3. Tension settings may need to be adjusted. I loosened it a bit only to turn it back to my normal setting. This may depend on your machine, thread, etc.

4. Bring the bobbin thread to the top and sew a little slower at first. It will take practice to determine the ideal speed for you. Also, I ended up wearing garden gloves with that nylon coating to help move the fabric under the needle.

My initial results are not pretty, but I think with a bit more practice I may be able to do free motion quilting on this machine.

Free motion quilting on a Singer 503 Rocketeer

If you have done free motion quilting on your sewing machine, please leave a comment on what machine you used and how it went.

*Links to Amazon are affiliate links.

November 12, 2018

The Singer Hemstitcher 72w19 - Questions and Answers

Singer Hemstitcher 72w-19

I sold my hemstitcher. It took almost a year once I decided it was time. I was not getting enough work to justify the space anymore. At the same time, I wasn't enjoying the work that I did get because I just didn't have the energy. I did love this machine and it was very difficult to let it go. Luckily, I think the person who bought this was very excited and happy about acquiring the machine.

Over the years, I have received a lot of questions about this machine. My previous blog entry on this machine is one of my most popular entries. I was supposed to get notifications anytime someone reached out to me through my Contact page. It didn't work and I didn't think to check until recently. So, in one grand finale for the hemstitcher, I'll try to answer those questions.

Repairs

I have a Singer 72W19 and I'm trying to find someone in the southeast that works on them. Do you know of anyone?

I would appreciate knowing the names for the 3 people in Utah that service Hemstitching machines. I have a hemstitching machine that I inherited from my husbands grandmother. It is a model No. 72w19 fitted with a motor. I think the timing is out as it doesn't seem to do what it's supposed to. Could you tell me who in Utah works on these old machines and how I can get in touch with them.

Could you share the contact info of person that showed you to care and maintain your hemstitcher. I have one but I can't find anyone to help me adjust and maintain the machine. Thank you so much.

The person I found to help me repair my machine many years ago was past retirement. He would be close to 90 years old now, if he is still alive. I'm grateful I found him because he taught me enough that I could adjust the machine myself. It took me calling every sewing machine repair person I could find asking them if they worked on these machines. Most repair people, technicians, or industrial sewing machine mechanics do not really know how to adjust these machines. Some will say they will try, but that always made me nervous. Incorrectly adjusted machines could cause damage to the machine. The timing on the machine has a lot of variables and each component has to be adjusted in order for it to work.

That said, I only know of one place that MIGHT work on these. Daines sold new versions of the hemstitcher. But, I will warn you that they may decline or charge you a lot of money. Your best bet is to get a copy of the manual and learn to adjust the machine yourself.

I recommend purchasing the manual and parts list. I believe I bought my copies on ebay or some other site that sold old manuals. Well worth the investment!

Specific Repairs

I cannot figure out how to replace my needle that broke. I can’t seem to fit it into the ‘slot’. Anyone who can walk me through it?!? Please!!

It is hard to provide advice on this because I can't see what you are doing. Perhaps the needle clamp screw needs to be loosened more?

I wanted to verify which screw on the instruction page to turn - is it the "S" screw? A friend said that I could mess up everything if I unscrewed the wrong one, and I am scared to try! I bought this machine a couple of months ago and it runs, but has a broken right needle. Thank you so much!

I'm not sure which screw is the "S" screw. There is a needle clamp screw facing toward the front near the top of the needle in the needle bar. If you could refer to a manual and/or parts list, you will find the correct screw.

That said, you will not mess everything up by loosening a screw. If something came out of adjustment by doing so, you will just have to work to put things back correctly. This is how I learned how to adjust the timing.

I have a Singer 72w19 and need to change the needles. First time for this. When looking at the front of the machine there are 2 sets of needles. Do I use the top set or the bottom set? I'm thinking the bottom set but when I loosen the screw the needle doesn't even budge. Any instruction on this would be appreciated. Thank you, Denise

There is only one set of needles and they look like regular sewing machine needles. Perhaps you are referring to the piercers? A look at the manual/parts list will help you identify what you are looking at.

Hi, I have a Singer 72w 19 hemstitch machine and I am having trouble with the thread breaking. I was stitching on it and suddenly the left needle broke for some unknown reason. I replaced both needles and now I'm having trouble with the thread breaking about every six inches of sewing.

This is a common problem with these machines, especially the left needle thread. I did not completely eliminate the problem with my machine, but I did minimize it. First, make sure the needles are entering the fabric correctly. Very minor adjustments there can make a big difference. It is possible the left needle is too close to the piercer and the piercer is cutting the thread. Or the left needle is not rotated to the right position. Next, be sure to oil all the moving parts on the front of the machine where metal touches metal. The needle bars and levers all need to be able to move freely. I would add a drop of oil on each of those parts before sewing. I also had a screw that would work itself loose on one of the levers and cause the needle to move out of adjustment. A drop of loctite eventually prevented the screw from coming loose from the machine vibration. Finally, use the best polyester thread you can find. In my case, a Gutermann polyester thread from a cone worked best.

I have seen on our classified ads that there is a hemstitcher head for sale for 500 dollars. I have an old industrial serger in a table that has been converted to house power. Here is my question: Do you think that I could swap out the serger for the hemstitcher?

Most likely no. The table tops are cut specifically for the machine. A hemstitcher will not fit in an industrial serger table. If you had the correct table top and stand, you could move the motor over provided you have the correct wheel size on the motor. Some motors have fly wheels that will cause the machine to run too fast.

Machine Parts

I need a complete needle and piercer holder for my hemstitcher. Do you have any of them? Please let me know what parts you have. Thank you.

Where do you purchase your needles for your hemstitch machine? I have two of them (one 1904 and one 1928), but I need to order needles. Can you help me out? Thank you, Marcia

I recently received a Singer 72-19 and need resources for supplies and how to use it. Suggestions? I live in Sandy, Utah

You can buy needles from an industrial sewing machine supply. Daines had needles at one time, but they charge a lot for shipping (it's not something they normally do and they don't really like to do it). For piercers, I ended up using google to find a source from China. Some industrial supplies or hardware store will have some of the screws. All other parts would have to come from a parts machine.

Machine Value

I have inherited Singer 72w-19 Hemsticher, W522308. I think it is from 1920. It has lots of needles and misc attachments. I am wondering if there is a market for it. it comes with a table. I would appreciate any info on it. Thank You. Jenny

Yes, there is some value if the machine is in good working order and comes with a table and motor. I have read there are attachments available for the machine, but I have never seen them. A good machine will go for a few thousand dollars, but I can't put an exact value on one. I was pretty firm on the price I asked for my machine and eventually got what I wanted. It did take me a while to sell it though

Machine Operation

How can I make the hemstitch go faster it is so slow thanks Linda Farnsworth.

It may seem as though the machine is too slow. Each rotation requires several things happening at once. First the pre-punch piercer punches the fabric and the fabric moves forward. The main piercer then enters the pre-punched hole along with the needles. The needles enter the same hole about three times. This process is longer than a regular sewing machine. Speeding up the machine with a different size pulley increases the likelihood of parts hitting each other or the throat plate and throwing everything off. It is essential the machine run slower because that is how it is designed.

Yahoo Group

Did you run the hemstitch Yahoo group? I hadn't checked on my groups lately and discovered it's gone...darn! I will admit to googling Esther + hemstitch machine and finding your lovely blog..... So even if you aren't the same Esther, I'm glad I found your blog anyway!

Yes, I ran a Yahoo Group for Hemstitchers for a while. At least a couple of years. It received almost no traffic and I just didn't have the time to continue it. I did ask for volunteers to take it over before shutting it down, but no one seemed interested. It's a bit of a moot point now since Yahoo Groups are dying and Yahoo has done nothing to update or improve the Group software in over 10 years. I think Yahoo Groups will eventually be shut down.

September 23, 2013

Repairing a leather sewing machine belt

If you own a sewing machine (industrial or otherwise) with a leather sewing machine belt, chances are that you will have to either replace or repair it at some point. Leather belts will stretch or shrink, and/or break. The climate of your workspace and other variables play into the life and condition of the belt. The area around the belt clip tends to get a lot of wear too. Leather belts are a little old school, but they do have a few advantages. They are customizable and relatively easy to fix.

You'll know you have a problem when the belt ends up in pieces or the machine is not operating properly. The leather belt on my Singer Hemstitcher 72w-19 machine stretched out over time and my machine was not going as fast as it should. It was time to shorten the belt.

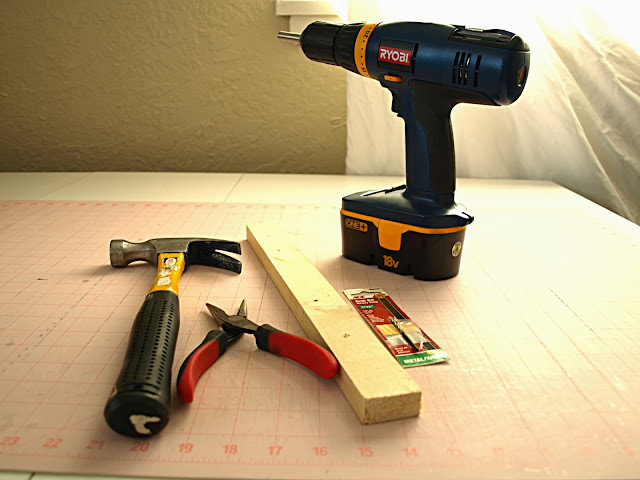
Tools needed to repair a leather sewing machine belt.
Any workshop should have a toolbox. For this job, you'll need these tools:

  1. Drill
  2. 3/32nd drill bit
  3. Scrap wood
  4. Pliers
  5. Hammer
  6. Utility knife (not pictured)
  7. Belt clips (not pictured)
I purchased a box of 500 belt clips from Southstar Supply. It sounds like overkill, but believe me, you will probably mess up the clip the first time you do it. Southstar also sells leather belting. You'll want extra length because you never know when you'll need it. Leather belting is not cheap, and there are other places on the net that will sell it in cut lengths. So it pays to repair a belt when you can.

One more note. There is a special tool designed to punch a hole in the leather belt for the belt clip. It's expensive. It doesn't work well (from what I'm told) and you don't need it. A drill with the right drill bit works really, really well.

Drilling a hole in a leather belt for a sewing machine

In my case, I first removed the belt from the machine by bending the existing belt clip apart with pliers. You won't be able to reuse it, so don't bother trying to save it (this is why you want a box of 500!).

Next, determine how much to shorten the belt. It won't be as much as you think. If you make the belt too short, the belt won't fit or the belt will exert too much tension on the machine causing the machine to work harder than it should. Using the utility knife, I only shortened the belt 1/4".

About 1/4" from the cut end, drill a hole through the center of the belt. Be sure to drill the hole on top of some scrap wood so you don't damage your work table! You do need your other hand to help steady the belt as you drill, but I was taking a demo picture by myself. All other safe tool handling rules apply.
Inserting a belt clip into a leather sewing machine belt

Place the belt clip through both holes to test, but don't mash the belt clip closed yet (Yes, I've done this!). Take the belt clip off one side and take the belt to the machine and thread it through the holes in the table. Attach the belt clip to the belt ends and place it over the handwheel and motor pulley to test the tension.

Leather sewing machine belt in place

How much tension is needed? It depends on your machine. You need just enough to turn the handwheel properly. In the photo below I'm testing the tension (or slack) on the belt. This is about how much I need to have the machine operate properly.

Testing the tension of a leather sewing machine belt

Finally, mash the belt clip closed with the pliers (sometimes you need a hammer) and you're good to go. It's amazing that a 1/4" shorter in length makes a big difference!

January 03, 2012

T-shirt pattern quest pt. 3 : Sewing up the first sample


The next step in recreating my favorite t-shirt pattern is to test out some different construction options by sewing up a sample. This sample will also be used to double check fit. I began by testing some binding options on some scraps. I eventually discovered the best method for my machines that gave the best looking results.

Testing binding options for knits

Before stitching the neckbinding to the t-shirt, I stitched one shoulder and overedged one edge of the neck binding.
Sewing a should seam on a t-shirt
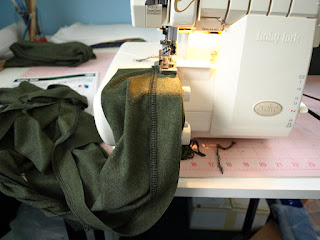
In the picture below I am stitching the binding strip to the neck. The binding strip is on top so that I can stretch it as it goes through the machine. The shirt is supported by the table. Don't let it hang down in front of the machine or gravity will do more stretching of the shirt than you intend. I did edge finish one edge of the binding strip by serging. I didn't have enough green thread, so some of it is in black.
Stitching a neck binding to a t-shirt
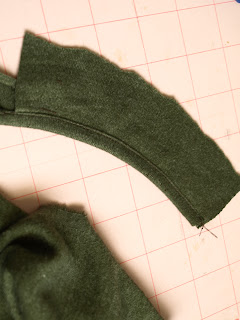
Next, I followed the same steps in stitching the binding to the sleeve hem edge. These sleeves show about how much I stretch the binding as it went through the machine.

Attaching the sleeve binding

I then stitched the remaining shoulder seam closed through the neckbinding. This means there is a visible seam at the shoulder. This type of shoulder - neckline construction is also visible on the original t-shirt.
Neck and shoulder seam construction
After closing up the second shoulder, attach the sleeves and sew up the side seams. This is the shirt just prior to topstitching. Just fold the binding strip to the inside and topstitch carefully from the right. You can see an example in the first picture of how it turned out, but I'll post a picture of the finished shirt later. I used a regular straight stitch for topstitching. I don't need the neck to stretch to pull it over my head, so it actually turned out fine. My Babylock Evolve does have a chain stitch option, and that is how it should be done. BUT, it takes a good amount of time to switch it over and because of the overly large presser foot, you can't easily see where you are stitching - too much bother. Industrial chain stitch machines look a lot like regular machines. I believe some vintage domestic Singers also have the ability to do a chain stitch, so if you have that option, than use that.

A few last words on the binding. The original shirt had a double fold binding, which is difficult to reproduce at home without the proper folders and adjustments to your machines. The binding I did is less bulky and easier to execute with home sewing equipment and it turned out just fine.