Showing posts with label Dresses. Show all posts
Showing posts with label Dresses. Show all posts
March 17, 2014
Vintage pattern reivew : Simplicity 5040
It's rare that I find a vintage pattern in my size, or close to my size, at the thrift store. I can't help looking through them anyway. I have yet to make up any of the styles that I've acquired over the years because I would need to grade them up or down in order for them to fit. I was happy when I found this one, Simplicity 5040, in my size and in a style that I like.
I initially assumed this style would have a side zipper and that the skirt was gathered. How else would one get it on? There is no back zipper and only the button front closure that ends at the waist. I was a little surprised to find that the skirt has a placket hidden under a pleat below the front button closure. A pleated skirt is, in many ways, more flattering than a gathered skirt - at least on me..
The suggested fabrics run quite a range: cottons, synthetics, blends, silk, linen, chiffon, brocade, lightweight wools, wool-crepe, wool jersey, and corduroy. While I'm sure any of those fabrics might work, they would all give an entirely different look and require different handling. I don't have a fabric picked out for this yet, but I'm leaning toward cotton. I'll have to look at my stash and see what might work. I'll also need to make a petticoat slip.
Even though the pattern has all the appearances of being my size, the measurements on the back envelope indicate I will have to make adjustments. This is looking more and more like a lot of work. Hmm... I do plan to make this up, just not sure when.
March 08, 2013
Natalie Christening Gown pt. 2 : Heirloom sewing details
I finished the gown a few weeks ago but have been busy with other projects; Chinese New Year, Valentine and DD2 second birthday. The gown came out very well for being my first heirloom project and would recommend this pattern (Natalie in Sew Beautiful issue 135 March/April 2011) to anyone else looking for a beginner project.
There was no lace insertion but strips of lace were sewn together to create a wide lace border at the bottom of the skirt. I used this website for tips and hints on how to do this.
I didn't have an edger foot for my machine and so I tried my blindstitch foot. It worked ok but in the end found I had better or more control with my regular foot. Decreasing upper thread tension is a must otherwise the lace will become puckery. The hardest row was the last one which was sewing a gathered lace edge to entredeux. I gathered the lace by pulling one of top header threads in the lace. I had to sew really slow and adjust the gathers as I went with a straight pin. The presser foot wanted to keep pulling out the gathers but it worked out in the end just lots of patience.
One change I made to the construction was finishing the edge of the dupioni skirt before adding the lace band. According to heirloom sewing, the lace would be attached using a narrow zigzag roll described here as flat lace to flat fabric technique. This method rolls the fabric very narrowly while attaching the lace. I have worked with dupioni and feared the unraveling would cause some problems with this, at least to my inexperience heirloom sewing skills. I instead opted to serge the bottom edge first and then overlap the top lace edge over the serger stitching with a narrow zigzag. I don't think anyone will notice.
Here is the end result, enjoy.
Update: Baby was blessed this last Sunday, June 2, 2013
 |
| Maria in her dress |
January 20, 2013
Natalie Christening Gown pt. 1 : Prep work
I am very excited to be able to join Esther's blog. As she mentioned, I am costume designer by trade but currently have taken some time off to raise my girls. Before children, I worked as a university professor teaching costume design, theatre technology, and special effects makeup. I have recently started to dabble in tutu making and have done some freelance work in that area. Hopefully, my posts will be of interest.
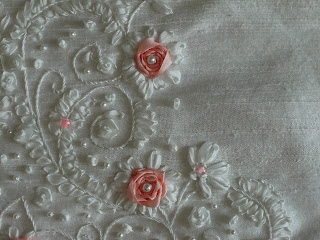
So right now I am working on a Christening/blessing gown for baby #3. I decided to go the heirloom route. The pattern is from Sew Beautiful issue 135 March/April 2011, the Natalie Christening Gown. I have never done anything heirloom before except for making some 19th century women's blouses for various theatrical productions. Materials I am using are silk dupioni, French cotton laces, silk ribbon and glass beads. I haven't bought all the lace yet but will need to soon. The cost of this project is a bit on the expensive side. I think the cost of the laces will end up being the most expensive items. I goal is to have this finished by the end of the month.
Below are some pics of what I have done so far (Hopefully, you can make out the details, photographing white is tricky).
Center Front panel traced onto fabric using pencil (This is marking cutting lines so no worries of it showing through once sewn). Center front is marked using a disappearing ink pen.
I chose to pencil mark the embroidery pattern.
Detail of finished ribbon embroidery. Still debating on adding more but will look at it when the dress is sewn together.
July 15, 2010
Potato Sack Dress
My local town in Idaho has a little museum and this dress was on display with a fun story. The story is that high school freshman girls had to wear a potato sack dress for a full day as part of their initiation in the 1950's. Back then potatoes were bagged in burlap sacks. I couldn't imagine wearing this dress for a full day. One girl felt sorry for a freshman and sewed ruffles on one of the dresses to pretty it up.
The tradition has long since disappeared as potatoes are now packed in paper sacks. Some local resident donated this to the town museum along with a picture of the girls in the dress.
The tradition has long since disappeared as potatoes are now packed in paper sacks. Some local resident donated this to the town museum along with a picture of the girls in the dress.
July 06, 2009
Correcting the fit of petal sleeves in a wedding dress pt. 2
I finally had a chance to do up some line drawings to illustrate the problem with the petal sleeves of the wedding dress I recently altered. There are more pictures in the blog entry Petal Sleeves pt. 1.
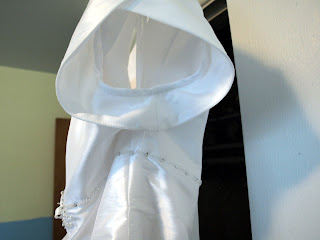

The shape of the sleeve pattern adds a lot of extra material under the arm - creating almost a circular sleeve. The hem of the sleeve flapped around like wings. IMO, it wasn't very attractive. Even though the dress was a plus size dress, I can't imagine any woman wanting this style. I find it hard to believe the designer intended this either. I could be wrong since I am not familiar with wedding dress design. I do know that wedding dresses are designed to be easy to alter so perhaps the designer allowed for extra underarm width to accommodate the size of any upper arm. Even so, with the combination of removing excess shoulder height, recutting the armholes and sleeves, the alteration was not that easy. I dare say, it is either sloppy pattern making and/or grading. I would pin the source of the problem on grading from a size 6 all the way into a plus size. I (and Kathleen) have blogged about this many times (search for "Grading is not morphing" at Fashion-Incubator). Plus sizes should have their own patterns separate from Misses sizes. Trying to save time and effort by "grading" patterns from a size 6 up into the plus sizes leads to problems like this. Of course, I don't really know if this is exactly what happened. I would need to look at the whole size range and even the actual pattern pieces to know for sure.
This is what the pattern pieces and fit looked like on the bride before the alteration. The petal sleeve is a regular cap sleeve in the example below. You can see the extra width added at the hem of the sleeve and the wings it creates under the arm.

Below is the shape of the pattern after the alteration. I probably removed a good 1.5" from the sleeve hemline. The fit of the sleeve looked 100% better.

Now if the intent of the pattern maker was to allow the bride to be able to lift her arms for dancing, then it was added in the wrong place. A gusset should be added at the underarm - not the sleeve hemline.


The shape of the sleeve pattern adds a lot of extra material under the arm - creating almost a circular sleeve. The hem of the sleeve flapped around like wings. IMO, it wasn't very attractive. Even though the dress was a plus size dress, I can't imagine any woman wanting this style. I find it hard to believe the designer intended this either. I could be wrong since I am not familiar with wedding dress design. I do know that wedding dresses are designed to be easy to alter so perhaps the designer allowed for extra underarm width to accommodate the size of any upper arm. Even so, with the combination of removing excess shoulder height, recutting the armholes and sleeves, the alteration was not that easy. I dare say, it is either sloppy pattern making and/or grading. I would pin the source of the problem on grading from a size 6 all the way into a plus size. I (and Kathleen) have blogged about this many times (search for "Grading is not morphing" at Fashion-Incubator). Plus sizes should have their own patterns separate from Misses sizes. Trying to save time and effort by "grading" patterns from a size 6 up into the plus sizes leads to problems like this. Of course, I don't really know if this is exactly what happened. I would need to look at the whole size range and even the actual pattern pieces to know for sure.
This is what the pattern pieces and fit looked like on the bride before the alteration. The petal sleeve is a regular cap sleeve in the example below. You can see the extra width added at the hem of the sleeve and the wings it creates under the arm.

Below is the shape of the pattern after the alteration. I probably removed a good 1.5" from the sleeve hemline. The fit of the sleeve looked 100% better.

Now if the intent of the pattern maker was to allow the bride to be able to lift her arms for dancing, then it was added in the wrong place. A gusset should be added at the underarm - not the sleeve hemline.

Labels:
Adjustments,
Alterations,
Cap sleeve pattern,
Dresses,
Patternmaking,
Sleeve,
Wedding dress
July 02, 2009
Wedding Dress Alteration: The Whole Picture?
I don't think I posted pictures of the whole dress I recently altered. Here is the top with the alterations marked with pins. Recutting the armhole and adjusting the sleeves was probably the most difficult part of the alterations. The bride really needed a little bit taken in at the back, but that is one alteration I did not attempt. The zipper and lining would have to be ripped out and I had no time for that. The dress shop provided double sided tape to help keep things in place (maybe they knew how poor fitting this dress would be). I recommended the bride go ahead and use it for the gap-osis I would not be able to fix - though I did fix most of it.

Here is the skirt. Really, the simplest style of skirt to shorten if needed. Just make the tucks a bit deeper. I probably should have gone ahead and taken 1" off the bottom hem too, but I just advised the bride to buy some heels. The skirt is completely underlined with tulle to help give the skirt some shape and hold the draped tucks.

The wedding was this last week and the bride was absolutely radiant with joy. She looked lovely and no one was the wiser that a neophyte alterationist did the job. Maybe I will post a picture of the big day once I get the pictures off the camera.

Here is the skirt. Really, the simplest style of skirt to shorten if needed. Just make the tucks a bit deeper. I probably should have gone ahead and taken 1" off the bottom hem too, but I just advised the bride to buy some heels. The skirt is completely underlined with tulle to help give the skirt some shape and hold the draped tucks.

The wedding was this last week and the bride was absolutely radiant with joy. She looked lovely and no one was the wiser that a neophyte alterationist did the job. Maybe I will post a picture of the big day once I get the pictures off the camera.
Labels:
Alterations,
Dresses,
Patternmaking,
Sewing Techniques,
Sleeve,
Wedding dress
June 16, 2009
Wedding Dress Alteration: The Underlining
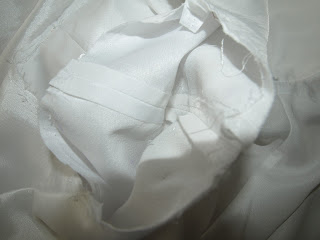
I expected to find boning in a size 18 wedding dress. I think I even put it in my dress, though the style didn't really need it. This dress doesn't have it at all. It does have the addition of padded bust cups - a feature I have not seen before (I would still recommend the bride wear a supportive bra anyway). The bodice and lining have been completely underlined with fusible. The outer fabric has a stiffer woven fusible and the lining has a softer knitted fusible. Click on the picture to get a better view of the inside of the dress. I am still debating on whether the dress should have boning or not. I think if the bride wears a body-shaping undergarment, it will help smooth out any bulges she doesn't want seen. Even so, it looks and fits pretty good in the waist area.
BTW, a common alteration in wedding dresses is to take it in some at the top of the princess line as it goes into the armhole. If this is indeed "common", it leads me to believe there is a grading or underlying pattern fit issue with wedding dress manufacturers. This alteration, plus taking it up in the shoulders, requires the alterationist to recut the armhole and sleeve (if a cap sleeve). A nasty set of alterations, IMO.
Labels:
Dresses,
Patternmaking,
Product Review,
Sewing Techniques,
Wedding dress
June 09, 2009
Correcting the fit of petal sleeves in a wedding dress pt. 1
I have been working on altering a wedding dress. It is, admittedly, a budget wedding dress available for less than $200 imported from China. I am by no means a wedding dress expert, so this little assignment is teaching me a lot about how wedding dresses are made today. There are some things about this dress that I found very interesting and innovative - things I have never seen before. And it is true, I haven't really looked at wedding dresses since my wedding many moons ago. In any event, dresses now have attached petticoats (I had to buy a separate one) and embedded, uh-hum, bust padding. On the other hand, there are some problems with this dress that clearly label it a budget dress, albeit a very pretty dress for the bride. And I should say the budget dresses available now are much prettier than they used to be. They have embroidery with beading, nicer fabrics, and that full, attached petticoat. Much fodder for future blog posts.
I'll show the nice features of the dress later. For now I will show show one of the problems. It is an annoying problem and one I was surprised to find. The dress has petal sleeves, which I have drafted before. I have even had this same problem show up. Can you spot the problem with the sleeves?
 Even though this is on a hanger, the sleeves hang like this on the bride.
 Here is the sleeve off the dress. I not only had to bring up the shoulders, but take the sleeves completely off to recut the armholes. The shoulders and armholes are part of a larger, but separate problem. This picture should give the problem away.

I'll show the nice features of the dress later. For now I will show show one of the problems. It is an annoying problem and one I was surprised to find. The dress has petal sleeves, which I have drafted before. I have even had this same problem show up. Can you spot the problem with the sleeves?
 Even though this is on a hanger, the sleeves hang like this on the bride.
 Here is the sleeve off the dress. I not only had to bring up the shoulders, but take the sleeves completely off to recut the armholes. The shoulders and armholes are part of a larger, but separate problem. This picture should give the problem away.
October 18, 2007
Stewart Girl's Dress Patent of 1922
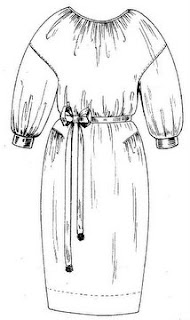
From the USPTO comes a patent filing for a girl's dress in 1922. The claim made by Gladys Matson Stewart is for the ornamental design of the dress, which I found rather difficult to see. Perhaps the ribbon belt? I guess the claim depends on the definition of ornamental design and I find her claim rather dubious. Perhaps if she filed the claim on the basis of how the dress is constructed, then perhaps her claim may be more legitimate. The design of the dress is structural and also very intriguing. I would like to sit down with designer and see how she constructed it. The gather details on the upper skirt sides would be especially difficult to sew in an industrial setting. I have tried in the past to come up with an easy way to do it, but haven't yet. The pattern itself is rather easy to create, its the construction that is the challenge.
The difficulty would be in getting the gathers to start right at the end of the slit and have them evenly distributed across the length of it. The next difficulty is overcasting or serging the seam so there are no raw edges while avoiding unsightly tucks. There is a physical/space limitation in inserting the skirt piece under a gather foot on a sewing machine. The detail would almost certainly require some kind of hand manipulation and would be too expensive for modern manufacturing.
The gather detail on the skirt would not be very attractive on an adult woman unless done in a certain way. It would add weight and attention to an area that most women choose not to emphasize. But a girl's dress could certainly get away with it. As a design idea, the detail could show up in lots of different ways and locations on a piece of clothing. The only road block is coming up with an easy mass construction technique.

Labels:
Analysis,
Design,
Dresses,
Intellectual Property,
Manufacturing,
Patents,
Sewing Techniques
April 03, 2006
Hawaiian Paradise Line pt 4 : Photoshoot
We finally had our photo shoot for our Hawaiian Sundress Line. It was so fun to see our dresses on live babies. And the girls were so adorable. Here are a few pictures:


Labels:
Design,
Dresses,
Hawaiian dresses,
Photography,
Portfolio
March 27, 2006
Hawaiian Paradise Line pt. 3 : Adding flowers
This is my favorite part of the production process. Decoration time! The dresses really come alive. Here are some sneak peaks at some of the silk flowers and ribbons I used on these dresses:

The flowers have a pin back for easy removal during cleaning. The pins have a safety latch to prevent poking by a sharp point.
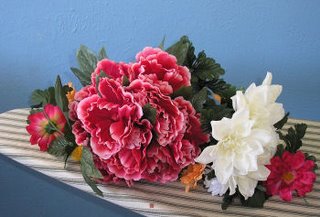
I had many flowers to choose from!
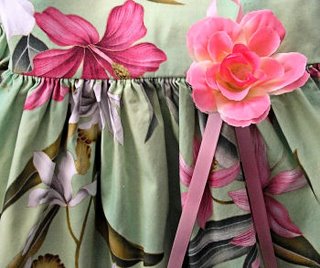
I love the combination of pink and light green! Very pretty.

The flowers have a pin back for easy removal during cleaning. The pins have a safety latch to prevent poking by a sharp point.

I had many flowers to choose from!

I love the combination of pink and light green! Very pretty.
Labels:
Accessories,
Design,
Dresses,
Hawaiian dresses,
Trims
March 15, 2006
Hawaiian Paradise Line pt. 2 : The Singer Ruffler Attachment.
As a part of this project, I have utilized a new attachment for my sewing machine. It is not really new - I acquired a couple of these for about 50 cents from a thrift store years ago. But I have never really needed it. I just thought it might be useful one day. Finally, I DID need it and it IS useful.
Let me introduce the Singer Ruffler. This attachment makes pretty ruffles, tucks or pleats. I am primarily using it for gathering the skirts of my Hawaiian sundresses and it has saved me loads of time.

Since I am a newbie to this attachment, I did break several needles. There is not a lot of clearance under the attachment for fabric. Because of this, it is difficult to tell if the foot is actually all the way down against the feed dogs. My needles were breaking because I had not lowered the lift lever and my needle was hitting the gathering blade. With it properly lowered, there is plenty of clearance for the needle and less needle breakage. It was one of those Duh! moments. Now I double check everytime in lowering the lift lever and attachment before sewing.
Another difficulty with my attachments occurred because they had not been used in a long time. A couple drops of oil at all of the moving points loosened things up and everything slid like it should.
Technically, I should be able to gather and sew my skirt to the bodice at the same time. I didn't do that this time. I am jumping from one size to the next and I have to adjust the gather ratio each time. Plus I am still a bit nervous because of all the needle breakage. But as I become more comfortable, I will give it a try!
I did a quick net search and discovered these attachments (in one form or another) are still available for purchase for about $50, for many machines. But before dropping that kind of cash, check out thrift stores, ebay, etc for the exact same thing at a lower price.
If anyone is curious, I am sewing these dresses on a vintage Singer 503A Rocketeer and a Babylock Evolve. While this is not an industrial set-up, it is working amazing well. One of these days I will be able to afford and find space for a couple of industrial machines.
I would love to hear from anyone else who has used this great attachment!
Let me introduce the Singer Ruffler. This attachment makes pretty ruffles, tucks or pleats. I am primarily using it for gathering the skirts of my Hawaiian sundresses and it has saved me loads of time.

Since I am a newbie to this attachment, I did break several needles. There is not a lot of clearance under the attachment for fabric. Because of this, it is difficult to tell if the foot is actually all the way down against the feed dogs. My needles were breaking because I had not lowered the lift lever and my needle was hitting the gathering blade. With it properly lowered, there is plenty of clearance for the needle and less needle breakage. It was one of those Duh! moments. Now I double check everytime in lowering the lift lever and attachment before sewing.
Another difficulty with my attachments occurred because they had not been used in a long time. A couple drops of oil at all of the moving points loosened things up and everything slid like it should.
Technically, I should be able to gather and sew my skirt to the bodice at the same time. I didn't do that this time. I am jumping from one size to the next and I have to adjust the gather ratio each time. Plus I am still a bit nervous because of all the needle breakage. But as I become more comfortable, I will give it a try!
I did a quick net search and discovered these attachments (in one form or another) are still available for purchase for about $50, for many machines. But before dropping that kind of cash, check out thrift stores, ebay, etc for the exact same thing at a lower price.
If anyone is curious, I am sewing these dresses on a vintage Singer 503A Rocketeer and a Babylock Evolve. While this is not an industrial set-up, it is working amazing well. One of these days I will be able to afford and find space for a couple of industrial machines.
I would love to hear from anyone else who has used this great attachment!
March 09, 2006
Hawaiian Paradise Line
About six months ago, I had worked on a design project for a friend of mine, Scott, to be placed in his store Blackpearl Designs. His store specializes in Hawaiian products such as pareos (sarongs or lava lavas, jewelry, Tahitian candles, etc.). I had fabric left over from that first project sitting in my design studio. It has been staring at me for months.
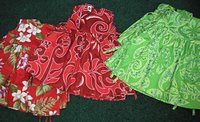
The fabric is truly special. Scott, also a graphic designer, custom designed this fabric for his pareos. The fabric is first dyed and then screen printed by hand in Indonesia. It is exclusively available from him. Scott's fabrics are the blue and gold on the left below. He also has a red and green shown further below. I bought some additional Hawaiian prints that are pretty too.
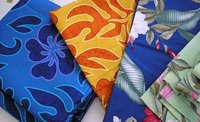
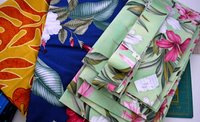
Nothing is more dangerous than leaving really cool fabric laying around in a design studio. It practically screams at you to do something with it. Since I design children's clothing, I didn't think the fabric would be suitable for my customers. That is until I tried it anyway. What has come out is a line of really fun girl's sundresses in 6 colors and sized 0-3M to 24M. Each colorway is limited in quantity and sizing.
Here is a sneak preview:
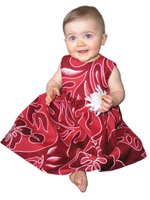
And if you can't get enough pictures, here is a sneak peak at one of our cute models wearing our red dress:
The fabric is truly special. Scott, also a graphic designer, custom designed this fabric for his pareos. The fabric is first dyed and then screen printed by hand in Indonesia. It is exclusively available from him. Scott's fabrics are the blue and gold on the left below. He also has a red and green shown further below. I bought some additional Hawaiian prints that are pretty too.


Nothing is more dangerous than leaving really cool fabric laying around in a design studio. It practically screams at you to do something with it. Since I design children's clothing, I didn't think the fabric would be suitable for my customers. That is until I tried it anyway. What has come out is a line of really fun girl's sundresses in 6 colors and sized 0-3M to 24M. Each colorway is limited in quantity and sizing.
Here is a sneak preview:

As you can see, we are still in the middle of production and we are working as fast as possible to have them ready by April 1st. The dresses will have flower pins or headbands as accessories. You can currently buy pareos or fabric in Scott's store (hurry, they are selling fast!). These dresses would make a great mother-daughter combo for your Hawaiian vacation.
And if you can't get enough pictures, here is a sneak peak at one of our cute models wearing our red dress:

Labels:
Clothing for Children,
Design,
Dresses,
Hawaiian dresses,
Patternmaking,
Portfolio,
Sizing
February 14, 2006
Springtime Lilacs Dress
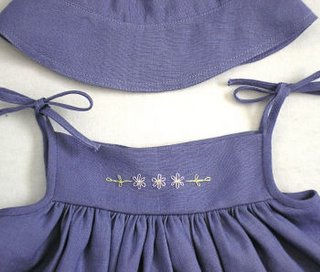
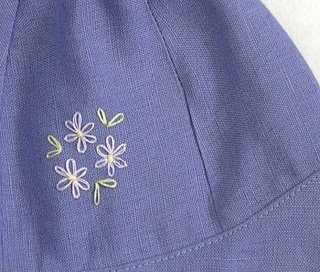
The story of this design is rather simple. I picked up the fabric in New York city in April 2001. I was in love with lavendar at the time, but lost interest when I got home. Five years later, I finally was inspired to turn this into a baby sundress. I had developed a line of beautiful baby clothes with hand embroidery at my last employer. Unfortunately that line was dropped. I am now bringing it back with the embroidery design on this dress. I added a matching hat as an accessory.
Dress description: One of a kind. Size 3 mo. Bias ties for straps. 2 inch deep hem (can easily be lengthened). The skirt has a full 60" sweep. 100% Linen. Dry Clean. The dress is exactly the same in the back, minus embroidery. Made in USA.
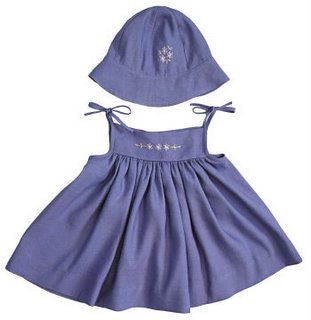

Dress description: One of a kind. Size 3 mo. Bias ties for straps. 2 inch deep hem (can easily be lengthened). The skirt has a full 60" sweep. 100% Linen. Dry Clean. The dress is exactly the same in the back, minus embroidery. Made in USA.

A close-up of the embroidery on the dress and hat.


Labels:
Design,
Dresses,
embroidery,
knitting,
Manufacturing,
Patternmaking,
Portfolio,
Sizing
Subscribe to:
Comments (Atom)


