Showing posts with label Cap sleeve pattern. Show all posts

June 16, 2014

Sleeve cap ease to fit around your shoulder is a myth

Vintage sleeve pattern draft

My most popular blog entry is Tutorial: Reduce/Remove Sleeve Cap Ease. Excessive ease in set-in sleeves continues to be a source of frustration for many. Still, there are those that continue to insist that sleeve cap ease is necessary in order for a sleeve to fit over the curve of your shoulder. Another well meaning sewist claimed my tutorial only worked for children's clothing (my specialty) because children are smaller, but adults definitely need ease.

Kathleen has written a now classic blog entry, Sleeve Cap Ease is Bogus (including a sequel). She even did a series on how to draft an armhole and sleeve correctly so that no ease is needed (partially gated). It would be worth your time to go back and reread those blog entries.

This idea that ease is needed for proper fit is interesting. Unfortunately, it is a false concept. A sleeve should not fit over the curve of a shoulder. Instead, the sleeve should hang straight down from the shoulder. The shoulder seam needs to extend long enough that it reaches to the widest part or tip of the shoulder. In the picture below you can see the shape of both the shoulder and armhole. This draft will allow the sleeve to hang from the shoulder.

Vintage pattern draft of a suit jacket
Kathleen goes into greater detail about this in her blog entries. If you draft a sleeve as instructed by many pattern making manuals with the recommended 1-2 inches of ease, you will not be able to get beautiful looking sleeves like the ones found being worn by the actors of His Girl Friday. Notice the placement of the armhole seams.

His Girl Friday - notice the nice fitting sleeves

Instead, you will get a sleeve that looks something like this:

A sleeve cap with too much ease
Photo courtesy of Kelly Hogaboom and is licensed under the Creative Commons Attribution-Share Alike 2.0 Generic license.

Sleeve caps with ease amount to lazy pattern making, or at the very least pattern making without knowing better.

Children are really not much different when it comes to fit and pattern design. They do have fewer overall curves, so in many ways pattern making and fit are simpler. What curves they do have though, are smaller. Sewing a set-in sleeve in an infant sized bodice is in many ways more difficult. There is less length to work with and tighter curves. If ease is included it is just enough to allow the operator to get around that smaller circumference easier. The amount of ease is very small (1/4 to 1/2 inch) and is entirely dependent on the fabric. In many cases, it is not needed at all because the differential of a machine can be adjusted.

I can understand if this seems unbelievable. It certainly goes against the grain of conventional sewist wisdom. The best way to know, is to try it for yourself. Try using a pattern with sleeve cap ease and one without. Which sleeve is easier to sew in? Which looks better? At the end of the day, you choose which sleeve you prefer to work with.

April 11, 2012

T-shirt pattern quest pt. 6 : How to correct the fit of the armhole of a fitted t-shirt

I created some drawings to further explain the armhole problem on my t-shirt pattern. Nearly all drafting instructions that I've seen for t-shirts are pretty much the same. First you enlarge the armhole and drop the shoulder. Then the front and back bodice are traced off with identical bodice shaping and armhole shaping. The only difference might be the neck. If you lay the pattern pieces on top of each other, you will get something like this.

Typical t-shirt pattern shaping
This kind of pattern works ok for a boxy, loose fitting t-shirt. If you want a more fitted t-shirt, then it simply won't work. In my case, the symmetrical armholes caused the front of the shirt to be pulled toward the back. The closer the fit, the less symmetry in general. When you look at the human body, you can see there is no symmetry between the front and back so patterns should reflect this. (Most people are not truly symmetrical left to right either). Children generally are more symmetrical than adults and the patterns for them reflect this. But, even there, the more fitted the style, the less symmetry though the differences are smaller. Anyway, the patterns above resulted in a fit that looked like below. The red arrows help emphasize the shape and length differences of the front and back armholes.

Fitted t-shirt with symmetric front and back pieces
To correct this problem, I needed to lengthen the back armhole. I compared the armhole of my blouse pattern, which was not symmetrical, to the t-shirt armhole to determine how much longer it should be. Slash and spread and the pattern should look like something below.
Pattern adjustment for a fitted t-shirt
 With a result that looks much improved.
The proper fit for a close-fitting t-shirt
The next thing on my list is to make adjustments for front versus back body width.

April 09, 2012

T-shirt pattern quest pt. 5 : Evaluating the fit of the armhole


I sewed up two more samples of my t-shirt pattern. I was still not satisfied with the fit. There were wrinkles around the armhole and elsewhere. I spent a bit of time studying the pictures below to try understand the fitting problem and how to solve it.

The back armhole is too short and pulling the t-shirt toward the back

It finally occurred to me why the armhole was giving me so many problems. The back armhole was too short. You can actually see in the picture that the front of the t-shirt is being pulled toward the back at the shoulder seam and underarm. The fix was rather simple - make the back armhole longer.

The back armhole has been lengthened
What a difference, don't you think? There are some other fit problems. I'm still debating the amount that I scooped out on the front armhole. I think I may need some extra width across the front. And then there is the sleeve that wants to twist. But overall, this is pretty good and those complaints are minor. Will there be a version 5.0? Probably.

December 20, 2010

Tutorial: Reduce or Remove Sleeve Cap Ease pt. 2

I received a really great question on my previous tutorial on how to remove or reduce sleeve cap ease. Gina's question deserves it's own blog post.

Well, what do you do if you have big arms but too much ease? If I move it over I will lose bicep room. I am working with a dress right now and everything fits but the sleeves are tight and the have too much ease. How do I widen the sleeve get rid of ease and fit it to the armhole?
Thanks
This is a really great question and may require me to consider re-writing my tutorial. My previous tutorial is based off my experience drafting patterns for children's clothing. Usually it is not a problem to reduce the bicep line because it's usually too big anyway. My overall changes are small because I am perfecting patterns that I have drafted myself.

If you are working with a commercial pattern for adults, the approach will be similar. You can't always reduce the bicep line and the overall changes may be quite significant. Patterns from the Big 4 notoriously have too much sleeve cap ease. To be fair, if you follow the drafting instructions in some pattern drafting books, you end up adding in a fair amount of ease too. One pattern making book has instructions that result in as much as 1.5 inches of ease in a set-in toddler sleeve. Way too much. Such a practice is not common in the fashion industry and the production sewers will refuse to set-in the sleeves.

I had difficulty coming up with a solution and so I had to ask my pattern making friends at the Fashion Incubator Forum. We have to assume that everything fits Gina as it should, though it's possible there is some other fit issue that is contributing to the bicep width problem to begin with.(1) There are two possible solutions and neither is quick nor easy. Both will require testing. To add bicep width, slash and spread or slash and pivot the sleeve to the desired measurement. This alteration will require fixing the sleeve cap anyway.

1. Draft a new sleeve from scratch. (My solution)

2. Reduce the sleeve cap height equal to the amount of ease to be removed. (From Nora of the Fashion Incubator Forum).

Sometimes it's just easier to start over. It may save time in the long run and you will get exactly the sleeve you want.

If you would rather fix the sleeve, you can try Nora's suggestion. Nora's suggestion leaves the bicep width alone and only adjusts the sleeve cap height.

Walking a sleeve along an armscye
1. Begin by walking the sleeve along the armhole in a similar manner to my previous tutorial. In this case, start at the bottom and walk the armhole toward the shoulder. You will need to walk the sleeve on both the front and back armholes matching up the front of the sleeve with the front bodice and the back bodice with the back sleeve. Your sleeve should not be symmetrical and you will need to check the entire armhole. As you work, you may want to check the entire armhole and sleeve cap.

Measurement length difference

2. Measure from the seam line of the shoulder on the bodice to the center notch of the sleeve. This will be equal to the amount of ease on one side of your sleeve. Repeat for the back armhole. Total up the ease for the front and the back of the sleeve. This will equal the total sleeve cap ease.

Reduce ease by lowering cap height

3. Reduce the sleeve cap height equal to the amount of ease that needs to be removed and redraw the sleeve cap. You will need to repeat these steps until you get exactly the amount of ease needed to set the sleeve and no more.


Neither Nora nor I can guarantee that this method is the answer. This method will require lots of back and forth testing and iteration. The method is similar enough to my previous tutorial that I think it will work eventually. If you have the patience for lots of testing, then go for it. Also remember that you may still need *some* ease. When we say zero ease, we don't really mean zero ease. You may need some to help set the sleeve in. The only way to know is to sew up a few samples. 1/4" to 1/2" of total ease is not unusual. This ease is required to help sew opposing curves together. The sleeve should be against the feed dogs as it moves under the foot and the action of the feed dogs may require a little bit of ease so that the sleeve cap and armscye meet up in the end.

1. The armhole could be too small or too big. It may be in the wrong location or scooped wrong under the arms.


Thanks to Nora for her suggestion.

July 06, 2009

Correcting the fit of petal sleeves in a wedding dress pt. 2

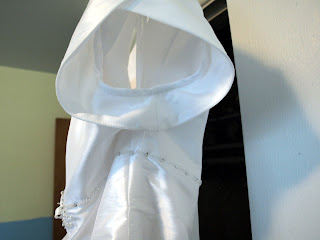
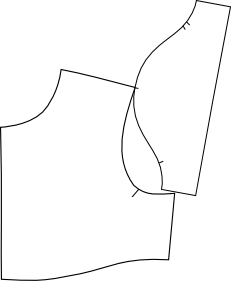
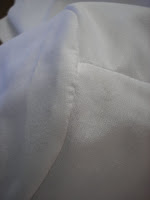
I finally had a chance to do up some line drawings to illustrate the problem with the petal sleeves of the wedding dress I recently altered. There are more pictures in the blog entry Petal Sleeves pt. 1.

Side view of a petal sleeve in a wedding dress

Petal sleeve in a wedding dress
The shape of the sleeve pattern adds a lot of extra material under the arm - creating almost a circular sleeve. The hem of the sleeve flapped around like wings. IMO, it wasn't very attractive. Even though the dress was a plus size dress, I can't imagine any woman wanting this style. I find it hard to believe the designer intended this either. I could be wrong since I am not familiar with wedding dress design. I do know that wedding dresses are designed to be easy to alter so perhaps the designer allowed for extra underarm width to accommodate the size of any upper arm. Even so, with the combination of removing excess shoulder height, recutting the armholes and sleeves, the alteration was not that easy. I dare say, it is either sloppy pattern making and/or grading. I would pin the source of the problem on grading from a size 6 all the way into a plus size. I (and Kathleen) have blogged about this many times (search for "Grading is not morphing" at Fashion-Incubator). Plus sizes should have their own patterns separate from Misses sizes. Trying to save time and effort by "grading" patterns from a size 6 up into the plus sizes leads to problems like this. Of course, I don't really know if this is exactly what happened. I would need to look at the whole size range and even the actual pattern pieces to know for sure.

This is what the pattern pieces and fit looked like on the bride before the alteration. The petal sleeve is a regular cap sleeve in the example below. You can see the extra width added at the hem of the sleeve and the wings it creates under the arm.

Pattern shape of petal sleeve in a wedding dress

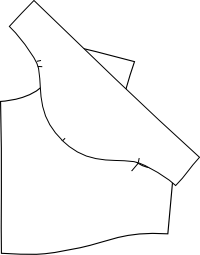
Below is the shape of the pattern after the alteration. I probably removed a good 1.5" from the sleeve hemline. The fit of the sleeve looked 100% better.

Corrected pattern shape of petal sleeve
Now if the intent of the pattern maker was to allow the bride to be able to lift her arms for dancing, then it was added in the wrong place. A gusset should be added at the underarm - not the sleeve hemline.

Drawing of a cap sleeve with proper fit

March 06, 2008

Tutorial: Reduce/Remove Sleeve Cap Ease

I have written an additional entry on sleeve cap ease. After reading this entry be sure to check out Reduce/Remove sleeve cap ease pt. 2.

Melissa wrote some comments on my blog entry A Problem with Cap Sleeves:

I was really excited when I found your blog on the children's sleeve draft from Armstrong's book. I have been working on a project for weeks now and I'm having a lot of trouble with the sleeve. Starting with the Basic Sleeve Draft, I found there was too much ease and took 2cm off the bicep measurement when I read that you take the ease out. But my worry is the shaping of the sleeve cap, it just doesn't look right to me. Even before I took out the ease, it looked like the under arm shaping was really short. When I compare it to bought patterns and the pictures in the book, it just looks like the notches are really low, and there is a very small amount left to go under the arms. I have tried a zillion things and it's been driving me crazy and I hope you might be able to shed some light on my sleeve shaping problem. Thanks so much!
I responded:

One thing that is probably causing you trouble is the placement of your notches. The notches should match up with the notches on your bodice. They don't necessarily imply that is where you should start easing. Home sewing patterns use those notches to indicate the start and end of easing and thus some of the confusion.

And just as an aside, There is more than one way to remove ease. You can lower the sleeve cap, fold out extra (like a tuck), or shorten the bicep at the underarm seam. I'm sure I did some combination of the above.
This is my promised tutorial. Even though I prefer the Armstrong shaping for cap sleeves, it still leaves too much ease. If you draft the sleeve exactly as outlined in her book, you will have to correct your draft by reducing or removing that ease. On page 68 (second edition) she explains that a sleeve should measure 2 inches bigger than the bicep and have an average of 1.5 inches of sleeve cap ease. On pages 69-70 she illustrates how to reduce/add ease to your sleeve. As I have stated before 1.5 inches of ease is simply too much. Some fabrics require 0.25 to 0.5 inches of ease, but not much more. Armstrong does use the notches to indicate easing. If your sleeve has no ease then the notches are just match points.

Just a few more words before you get to the drawings. This is just my method - Armstrong's is similar. My hope is to just illustrate the principle and not hard fast rules. You can have ease, if you choose, thus the tutorial is on how to reduce or remove the ease. You can use this same method to fix the patterns from the Big 4 - which notoriously have too much sleeve cap ease.

First step in walking a pattern to match corresponding edgesBefore you can remove/reduce sleeve cap ease, you need to know how much ease the sleeve already has. To do this you need to "walk" the sleeve cap along the armscye - without seam allowances. This is one of the few times I actually remove seam allowances when pattern making because they actually might get in the way. Align the center sleeve notch with the shoulder seam and walk the pattern along until you get to the underarm seam. Armstrong does this procedure just the opposite by starting at the underarm seam and moving toward the shoulder. Either way will work and her method is probably better. I usually do this in a CAD environment and my brain says start at the shoulder. It doesn't really matter so do what you think is right.


Continue to walk the sleeve cap along the armscye More walking.


Matching the notches while walking the sleeve along the armscye Still walking. You can see at this point that my underarm notches meet up. This won't be true in the real world - this is just how my drawing ended up. When I am done altering the sleeve, I move the notches where I need them to be. Right now my goal is to get the sleeve cap and armscye to be the same distance. This is where the Armstrong method might work better for you as the underarm notches don't move.


Measure any difference in length Finally done walking. Now measure any of the sleeve cap that is left over. This is how much ease you have on the front. Yes, sleeves have a front and a back and I only walked my sleeve along the front armscye. You will need to repeat the procedure since most of you will have assymetric sleeves. My sleeves tend to be symmetric for children so I only have to walk the pattern on one side. Make sense? Now that you know how much ease you have, you can decide how much to remove.

Two options to reduce sleeve cap easeThis is where things can get a little fiddly... There are a few different ways to remove sleeve cap ease. I usually use a combination of these methods because I want to maintain a nice sleeve cap shape. Not too flat and not too round. My eyes have been trained to recognize a good sleeve cap shaping and it is not something I can pass along to you. You will have to experiment a little bit to see what works best. Try to keep the convex and concave curves balanced (again, how to explain that?). In this drawing I show two places to reduce ease. The first is to shorten the bicep line by moving in the underarm seam. Armstrong's extra 2 inches is too much for children. It may be too much for adults too. It all depends on your desired fit. The next place to remove ease is to lower the sleeve cap height. With my cap sleeve, I lowered the sleeve cap height at least 1/2 inch and re-drew the cap. Again it depends on your fit and the shape of your sleeve to begin with.

Remove sleeve cap ease by splitting the pattern and overlapping Another way to reduce sleeve cap ease is to split the pattern and overlap it - similar to these drawings (remember I am only working on the front side so don't forget to do the back). Redraw the sleeve cap. This method reduces the bicep but may help preserve the cap shaping.

Remove sleeve cap ease by splitting the pattern and overlapping As I stated before, I probably did a combination of these three methods so that I didn't do anything too drastic. It will take subtle changes to distribute the ease reductions to retain a nice sleeve cap shaping. Finally, check your notch placement on the sleeve and move it to where it should be.

Any questions?

November 05, 2007

Sewing Tutorial - Set-in sleeves

This is my first sewing tutorial for sewing set-in sleeves flat - please forgive the photo intensive entry and anything that is not too clear. Here, I am testing some refinements to my cap sleeve pattern. I am doing the sewing with my domestic Singer 503 (a fabulous machine, btw). The technique is essentially the same on a 4-5 spool serger or industrial straight stitch machine. Some of this is my personal opinion, some fairly standard fabric handling techniques. Please note, my sleeve pattern has no ease.

Start sewing a sleeve with a sleeve cap against the feed dogsPlace the sleeve against the feed dogs, the body on top. Notice that I am using no pins, no basting, and no ease stitching. There is a single notch at the center of the sleeve cap. My sleeve is symmetrical front to back so there are no extra notches to indicate the back or front of the sleeve. Adult clothing would have extra notches, so make sure to match up fronts or backs or you will have a funny looking sleeve.


Hand position for sewing a sleeve without pins Do you see the placement of my hands? My left hand is holding the body and my right hand is controlling the sleeve. This is one of the major differences of industrial vs. home sewing. Home sewists like to pin the two layers together and have everything move together in lock step. With this method I can control the two layers as they move under the foot by ever so subtly pulling or pushing. It takes time, practice, and confidence in your pattern to develop this skill but it is absolutely essential.

Matching notches when sewing a sleeveThis picture just shows that the shoulder seam and the sleeve notch meet up. Another industrial technique is that the operators will tap the foot pedal. Home sewers press down on the foot pedal like they are at the races. But during certain operations, the operator can gain more control by tapping the foot pedal. This can help while going around a curve.


A set-in sleeve sewn flatThis picture tries to illustrate why the sleeve should be next to the feed dogs. If there is any ease (and it should be minimal) the feed dogs will do the work of easing for you. My sleeve has no ease so this picture isn't accurate. If there were ease, it would look something like this on the inside.


View of the sleeve capThis is a view of the top of the sleeve cap. There seems to be a few puckers, but that is a combination of poor lighting and the fabric - a poly-cotton broadcloth. The sleeve cap is actually nice and smooth.


Sew a side seam from waist to sleeve hemStitch the side seam from the waist to the sleeve hem making sure the armscye/sleeve cap seam allowances are turned toward the sleeve. The seam allowances, when turned in the right direction, will fill the sleeve cap and help give it a nice rounded shape from the outside. Some operators will allow the seams to lay in opposite directions (for bulk, they may go in opposite directions, but otherwise they shouldn't).


Finished sewn sleeveThe finished sleeve.

November 01, 2007

A Problem With Cap Sleeves

Over the last couple of months I have struggled with drafting a toddler cap sleeve. For whatever reason, my infant cap sleeve came off without a hitch. I tried some quick and dirty pattern making by grading the infant sleeve up to 24M and using it as my toddler base. The shaping just didn't work and I had to actually draft a 3T sleeve. I used the opportunity to compare draft instruction between Aldrich and Armstrong and these are my results.

The actual draft instructions for either cap sleeve are fairly simple and easy to draft. Even so, I didn't like the shaping and resultant styles of either sleeve. I'll try to explain the differences of each. I had a stronger preference for the Armstrong version, but I still modified hers considerably.Sewing pattern of different sleeve cap shapes
The top sleeve is the Aldrich version, the bottom my modified Armstrong sleeve. The Aldrich sleeve is very straight - such a sleeve results in a large sleeve cuff opening. Her sleeve is not a fitted cap sleeve. The instructions were easy to follow, I just had a styling disagreement.

I much prefer a fitted cap sleeve. The basis of the sleeve draft must start with a regular sleeve block. Just draw in a style line similar to what you see in the photo for the shaping at the hem. There are some minor refinements detailed in the Armstrong book. The problem with the Armstrong draft is that the sleeve cap height was too high for a toddler. I decreased the cap height by about a good 1/2". Walk the sleeve cap along the armscye and adjust any length differences. Armstrong states there should be 1-1 1/2" of ease in the sleeve cap, which is simply too much. My sleeves have virtually no ease because I removed it. Sometimes the fabric calls for 1/4-1/2" of ease, but not anymore. A sewing operator will return a bundle with too much sleeve cap ease. It is just too difficult to sew in an industrial sewing. And in IMO, it doesn't do anything for fit or wearing ease. Armstrong's draft instructions are easy to follow and you can make any adjustments you prefer after you have the shape you want.

If you look closely, you will notice that my sleeves are symmetrical. This is because my bodice armhole shapes are identical for the front and back. This is typical in the industry for infant and toddler styles. In older children, this is not true and Aldrich's basic sleeve drafts illustrate the differences very well. Kathleen Fasanella has blogged much on the proper shaping of sleeve caps.

A sewn sample with two sleeve that have different sleeve cap shapesHere is a sewn sample. On the right is the Aldrich cap sleeve and my modified Armstrong sleeve is on the left. Can you see the difference in the sleeve shaping and cuff openings? The sleeve on the right is good for t-shirts and casual styles. The sleeve on the left is better for more formal, fitted styles. I have a few minor refinements to make and at least one more sew test and I will have my toddler cap sleeve done! (I am debating on adding 1/4" back to the sleeve cap height, overall I like it).

Either book will get you a basic cap sleeve. My eyes prefer the fitted style. Any questions? Anyone need draft instructions?