Showing posts with label Design. Show all posts

November 19, 2018

Book Review: Mending Matters


Mending Matters by Katrina Rodabaugh is a visually beautiful book. There is full color photography on every page. The pages are thick and glossy with a sewn binding in a hardcover book. The layout and graphic design work is really well done. Those qualities alone may justify the price.

Mending Matters is a book with two blended parts. The first part contains essays on Rodabaugh's journey to Slow Fashion. She explains what Slow Fashion is and the values that are important to the movement. There are also essays from other bloggers involved in the movement. The second part involves tutorials on mending with step-by-step photography for each project.

I have mixed opinions on this book. The first involves the discussion on Slow Fashion. Like the traditional food crowd, there are certain values involved with the consumption of clothing and textiles. There are words like sustainability, ethics, social justice, and activism used throughout. I almost felt brow-beaten by the philosophy. For Rodabaugh, Slow Fashion means buying and wearing only biodegradable fibers like cotton and linen. It means rejecting Fast Fashion trends completely and wearing clothing until there is no hope of repairing it. It means buying only clothing at a thrift store and using fabric dyes made from plants. There are a lot of little decisions one must make in order to be a part of the Slow Fashion movement. My first introduction to Slow Fashion was the Alabama Chanin trend, which has many beautiful examples. Rodabaugh's book goes a step further.


But even the author concedes that as you become more aware and educated about how clothing and textiles are produced, you will likely have to compromise on the very values you proclaim. This is because the entire production cycle from fiber to fabric to clothing to retail involves some process that may harm the environment or conflict with some other value. As an example, Rodabaugh wears linen because it is a biodegradable fiber. But the process in creating that linen fiber involves manual labor in foreign countries that do not necessarily pay what we would consider fair wages, followed by bleaching, dying, and transportation across long distances.

But as I have trouble with the Slow Fashion movement, I am actually participating. For me it is less about a political statement or personal philosophy. Granted, I think that we should work to find safer ways to grow and process fibers and find ways to reduce waste. Those are good things. My participation is more about thriftiness and economy. As I read this book, I realized that a majority of my wardrobe comes from the thrift store. There are, of course, certain things I can't buy at a thrift store, and those are purchased new, but on discount. I also repair and mend as needed and up-cycle what I can. Everything else goes back to the thrift store at some point. I never put a label on those activities because it was something that I naturally did.

The second part of the book contains tutorials on how to mend. The tutorials themselves are rather simple projects. Many similar projects can be found through online tutorials from various places. Rodabaugh does have a certain aesthetic and it really shines in the photography. Her mending uses sashiko stitching to elevate a mend or patch to something artistic. Sashiko thread is a cotton thread with long cotton staples and is known for its smooth, lustrous quality. Pearl cotton thread is a bit more economical, comes in many colors, and is pretty much the same thing. Sashiko stitching is precise stitching in a repeated pattern. Rodabaugh relaxes her stitching, though there are many beautiful examples of true Sashiko stitching online that you could follow if you choose.


In the past mending was meant to be invisible, if possible. In this case, it is meant to be a focal point. Some of the projects, such as the bags, lack practicality and would likely not hold up to heavy use. Hand stitching with large stitches lack strength. But, for some things it is probably fine. Below is a link to my pinterest board with more mending ideas.


As I said, I have mixed feelings. It is a beautiful book, no doubt. The projects are inspiring in their aesthetic appeal. It is making me rethink a few mending projects of my own. But is the book as a whole worth the cost? I'm not sure. What are your thoughts on the Slow Fashion movement?

*I am an Amazon affiliate and any links to Amazon are affiliate links.

January 21, 2014

Adapting a block pattern into something else pt. 8 : the final pattern alterations and a finished design

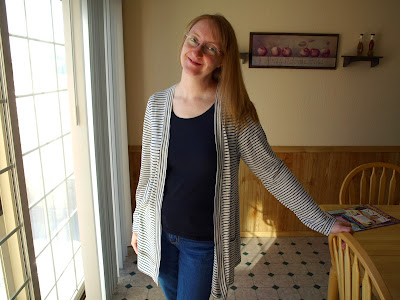
Modeling the final version of the cardigan
It took me quite a while to finish up the pattern modifications for this style. I would try on the first sample and look in the mirror, then go back to the pattern many times. There were a few things that were not right. Each time I would try it on, I would pull the jacket forward so the back neck rested higher. This would throw off the shoulder line. Finally, I realized I needed to raise the back neck and raise the shoulder at the neck point on the front bodice. This situated everything nicely. The first jacket is definitely a wearable first muslin, but the second sample turned out great.

Final pattern alterations:
  1. Remove extra wearing ease. I noticed that many similar cardigans are not really that much bigger than the average t-shirt, so keep this in mind when adapting your t-shirt pattern.
  2. Raise the back neck 3/4". I had left the original neckline of the t-shirt, which ended up being lower than I wanted for the cardigan.
  3. Raise the shoulder at the neckpoint 3/8" on front bodice to correct shoulder slope problem. I need to apply this correction to my t-shirt pattern too.
  4. Shorten sleeve length.
Cardigan with scarf


All that's left is to double check the seams to make sure they match and cut the pattern out of tagboard. This jacket is now ready for further iterations. Maybe a shorter or slimmer version. A waist line with darts. It's all possible.

If I wanted to take this cardigan into production, I already have some of the information needed and recorded in my blank forms:
  1. Style and cutting sheet lists all the pattern pieces with spec drawing.
  2. Sewing spec lists each step of construction.
  3. Fabric swatch cards with content information.
  4. Recorded the pieces in the pattern catalog.
To turn this into a more complete spec package, I just need to add:
  1. Finished pattern measurements for quality control
  2. Grading spec
  3. Cost analysis
I've also added a wash testing data form, which is not yet available (soon!) and not included in the book. This form records shrinkage information which is critical for knit fabrics.

November 21, 2013

Adapting a block pattern into something else pt. 6 : Sewing a fitting sample

Test fitting sample for a new cardigan design
You can easily spend a lot of time creating a pattern on paper but at some point, it needs to be sewn up. It is while sewing that you'll see your design take shape and lead you to make modifications as needed. I changed the design a bit by eliminating the folded neckband. The neckband is instead a single layer that is allowed to roll. I made this change because the fabric is pretty light and it would need some kind of stabilizer, which I didn't have. The cardigan is very comfortable and fits pretty well. Even so, I added just a bit too much wearing ease. So I need to reduce some of the body width. The upper back is a tad long and the sleeves need shortened.

It's pretty hard to get everything just right on the first attempt. I've done enough girls dress patterns that I don't usually have to do many iterations. Adult clothing takes a bit more tries because I lack experience with it. Industry pattern makers and sample makers will sometimes make many iterations of a design before they get it just right. This is a slightly different approach than home sewists might take. But once the pattern is nailed down, I won't have to worry about it anymore. It will be much easier to create variations on this style too.

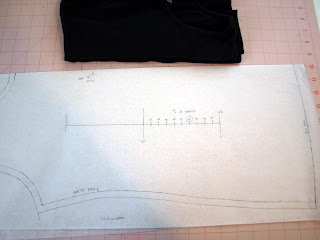
Paper sewing pattern
Before I could tackle the pattern adjustments, I needed to stop and get organized. I assigned a style number, created a style and cutting spec sheet, and assigned pattern numbers. I explain how to do this along with providing printable blank forms to fill out in my book. If you prefer keeping a digital record, you can use the examples in the book to create your own spreadsheets. In many ways I still prefer paper and pencil. It forces your brain to think differently - perhaps more analytically. I have used both paper and pencil and spreadsheets. There are advantages to both.

October 09, 2013

Adapting a block pattern into something else pt. 1 : Noting changes for the new style

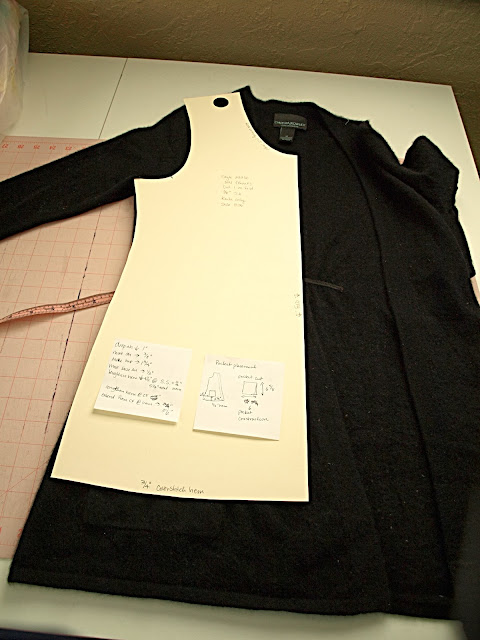
Pattern notations for modifying a pattern

A block pattern is a sewing pattern that has been proven. It is a pattern that has been trued, perfected and finished with seam allowances. The pattern has been sewn up and tested for fit. In other words, a block pattern just works. A block pattern becomes a part of a pattern file which can be used to make other patterns.

In the industry we rarely draft from scratch. Instead we modify existing patterns (or blocks) into something else. Some pattern making gurus talk about using slopers. Slopers are basic patterns drafted from body measurements and do not have seam allowances. Industry level pattern makers use block patterns, with seam allowances on, to make patterns for new styles*. It saves time.

It's easier than you might think to do this and this is just one example. I'm sure other pattern makers have their own procedures. My own procedures adapt to whatever it is I'm working on and whether I'm using CAD or traditional methods.

The problem:

I have this much loved cashmere sweater jacket. I snagged it off a sales rack a couple of years ago and I absolutely love the cut and fit. You know, the perfect layering piece, warm and soft for those cool days. I usually clean it by running it through the dryer using a Dryel kit. This last time was a disaster as I had left a piece of chocolate in a pocket. Chocolate ended up all over the sweater and everything else. So, I decided to run it through the hand wash cycle on my washer. That was a mistake. While the chocolate did come out, the sweater shrank. It shrunk just enough that I'm not sure I can wear it anymore. It made me very sad. And yes, I know better. I should have hand washed it.

The solution:

I always said that once this sweater was in pieces, I would make up a pattern to make a new one. So here it is. I recently finished up my t-shirt pattern, a block pattern ready to go. I began by carefully laying out the sweater and positioning the front t-shirt pattern on top. I then used scraps of paper to note the differences between the sweater and the pattern. You can see my notes in the picture above.

The notes** usually say something like: Move SH pt out 1/2" (left arrow) ; or Extend hem (down arrow) 3 inches. These notes are sometimes accompanied with drawings as needed. If I was working in CAD, I would just mentally note the differences and make the changes as as I went along. Since I'm drafting with pencil and paper, the notes are essential.

The next step is to trace off the t-shirt pattern and start applying the changes. More on that later.

*There are a lot of pattern making myths out there. I'm trying to keep this blog entry very focused but I'm happy to answer pattern making questions and myths in future posts. Please leave your question or comment below.

**These notes eventually find their way to my pattern piece catalog. I assign a pattern piece number, note the style/pattern piece that the new piece came from, and then tell what changes were applied and any other relevant details. Blank forms for managing patterns are available in my Pattern Making bundle or in the book with complete instructions.

August 16, 2013

6 tips for organizing a design workspace

How does one start organizing a space. I've broken it down into some pretty common sense steps.
  1. Just start. If the area is too overwhelming, then pick just one spot.
  2. Clear the area. Try to put things away that belong in other rooms. Move things to a temporary new home, if necessary. The organizing tv shows always clear an entire room out, but don't feel like you have to do this.
  3. Sort your stuff into keep, charity, and trash/recycle.
  4. Study your available space and arrange furniture in an attractive and efficient workspace. Make a list of organizing needs like shelves, baskets, labels, etc.
  5. Bring things back in. Rework your plan as needed to accommodate your things.
  6. Maintain. Once you've set up your space, you'll need to keep it up. Put things away when done, etc. It's easy to backslide back into a chaotic space if some do diligence isn't implemented.
As you organize your workspace, try to create zones. For example, I have a cutting table, sewing machines, ironing board, and storage. Each of these areas have certain tools and supplies that need to be readily available. This may mean having multiple pairs of scissors, pin cushions, etc so that you aren't having to walk across the room multiple times.

In my case, I've picked one hot spot in my work space and that is my cutting table. I've put stuff away and cleared most of it off. The remaining items are the things that always float around the table while I'm trying to work (not ideal when trying to cut something out!)

Sewing tools that need a home


So, I'm looking for wall baskets to hang near my work table to contain all these things. I found a few ideas on Amazon and Ikea, but I'll check out my local hardware stores first. I know that I'll probably need at least three wall baskets, so might as well stock up. Anyway, here are a few ideas from Amazon (click on the images to go to Amazon).

I like the looks of these baskets.

This one would be easy to mount to a wall.

There is probably a simple way to mount this style too.


Find more ideas in The Organized Fashion Designer.

December 12, 2011

T-shirt pattern quest pt. 1 : Create a rub-off of an existing t-shirt

Pattern rub-off from an existing t-shirt
My favorite t-shirt company went out of business and I really loved the fit of their t-shirts. The best solution I could come up with was to recreate the pattern by doing a rub-off of one of the t-shirts. This pattern is for my own personal use, but you will find many pattern makers who do rub-offs of existing styles as a starting point. This is one way to study how another pattern maker developed their pattern. I have done this in the industry too, but the resulting style was not an exact copy and bore no resemblance to the initial style. Copying a style in this way for the sake of reproducing an identical product to sell is another thing entirely.

You can see the resulting shape of the pattern that I rubbed-off or traced. The armhole is symmetrical for the front and back bodices, which is fairly typical for t-shirts. Technically, the armhole should be different front to back and if you have fit issues, this would be one place to adjust. For now, I'm leaving it alone.

The original pattern also had binding on the neck and sleeves. I wasn't sure how to accomplish that and have it look neat on a home sewing machine. I think there may be a way that I'll play with later. At this point, I added seam allowances for a narrow neck ribbing.

Scale to calculate knit stretch
Patterns for knits are designed with the amount of stretch AND recovery. The original t-shirt had some spandex, which means it stretches and recovers a bit better than a 100% cotton jersey. The original t-shirt is pretty slim fitting because of the spandex and because it is meant as a layering t-shirt to wear under other tops. I wanted to have a pattern I could use with 100% cotton jerseys, so I plan on adding a bit of extra wearing ease.

I noted the amount of stretch for the original knit fabric on the pattern. The stretch ruler is found in the Armstrong pattern drafting book. I'll target my knit fabric shopping for between 50-60% stretch - just have to remember to take a copy of the stretch ruler. I do have some stash knits but it has taken me over a week to find it. More on that later...

October 26, 2009

Do professional pattern makers work with seams on or off the pattern?

Professional apparel pattern makers work with seam allowances on their patterns nearly all the time. It's faster. I would argue it's more precise. This practice goes counter to what most pattern making classes teach. They teach that you must remove the seam allowances and add them back later. I don't know anyone in the industry that works this way. I think the idea is that working with seam allowances one can create variations that lead to fitting problems later. That's simply not true if you check your new pattern against the original block later. (This is assuming you make a copy or rubbing of your original before you start on a new style. But I'm sure you knew that).

If you are drafting by hand, it is time consuming to remove the seam allowances. Pattern blocks are made with seam allowances on. You would have to keep a set of blocks without seam allowances. It would be so easy to mix up seamed and unseamed pattern blocks. Apparel pattern makers leave their blocks seamed and theatre pattern makers or cutters leave their blocks (or rather slopers) unseamed. In fact a block is a finished pattern piece that includes all pattern markings and is seamed.

If you are drafting in CAD, you can turn the seam allowances on and off. You can work on the cutting line or the stitching line. It's a simple matter of hitting a few buttons. BUT, I have found that CAD programs have difficulty in calculating between seamed and unseamed because it involves a complex series of mathematics. So constantly switching between cutting and stitching lines can produce some weird anomalies. (As an aside, weird things can happen with notches on stitching versus cutting lines too). I have found this is true no matter which CAD system you use. So I work with seam allowances on and directly on the cutting line nearly 99% of the time. This means that I keep the seam allowances in mind while I work.

One Exception


In CAD, it is important to turn the seam allowances off and walk the pattern pieces along the stitching line in a few areas. Collars and necklines is one area that I nearly always check for matching on the stitching line. There are other situations that come up where this important. I learned this the hard way recently.

Two pattern pieces with seam allowances on

In this situation, I split a jacket back pattern piece and added corresponding seam allowances along the split line.

Comparing two pattern pieces to see if the cut edges match

Next, I aligned the pattern pieces to make sure they match. At this point they did and I assumed all was right. Until I got complaints from the sewing machine operators that things weren't matching up. I had to go back and double check.

Comparing two pattern pieces with seam allowances off

I took the seam allowances off the pattern pieces and realigned them. They didn't match, so I redrew the stitching line of the side piece to make sure it matched the center. I added back the seam allowances and realigned the edges.

 Correcting the seam allowances so the stitching line matches

The pieces didn't match again. Sewing machine operators also do not like this because they do not know how to align the pieces. In this particular case, the seam allowances are small, so I left the little "dog-ear". It can be difficult to cut those "dog-ears" off by hand when they are really small. It is easier to machine cut. In any event, there are different ways of dealing with this. I show one method below.

Trimming seam allowances on a pattern piece for better matching

Your pattern pieces will then look like this and match up in every way possible.

Two pattern pieces that match on the stitching and cutting lines

February 17, 2009

Deciding on whether to file a patent on a new child's product design or not


2019 Note - The amazon affiliate link to the nursing cover above is from a different manufacturer then the one described below. I do not know the current status of the Bebe Aulait patent or protection efforts. Regardless there are dozens of similar ideas on Amazon and other places.

I don't know why, but some baby clothing and accessory designers are under the impression they need to go to extremes to protect their product. This includes patent, trademark, and copyright protection. Maybe it is the inner paranoia of being copied. I don't know. It seems that there are A LOT of baby/child related products that have been patented. Why? Some products are truly patent worthy but most are not. Regardless, patents are only worth as much as the effort used to protect the patent. In other words, it may cost you more to protect your patent than the money you make off it. That isn't true for all products, but for many. For many design entrepreneurs it will be a waste of time and money. There are few processes or ideas that are unique in this industry. Most designs are just reinterpretations or a new combination of existing ideas.
There are three types of patents:
1) Utility patents may be granted to anyone who invents or discovers any new and useful process, machine, article of manufacture, or composition of matter, or any new and useful improvement thereof;
2) Design patents may be granted to anyone who invents a new, original, and ornamental design for an article of manufacture; and
3) Plant patents may be granted to anyone who invents or discovers and asexually reproduces any distinct and new variety of plant.

In addition:
Even if the subject matter sought to be patented is not exactly shown by the prior art, and involves one or more differences over the most nearly similar thing already known, a patent may still be refused if the differences would be obvious. The subject matter sought to be patented must be sufficiently different from what has been used or described before that it may be said to be nonobvious to a person having ordinary skill in the area of technology related to the invention. For example, the substitution of one color for another, or changes in size, are ordinarily not patentable
I don't know under which of the three types of patents that Bebe Aulait has filed their patent for their Nursing Cover and I am not sure their claim is truly new or novel. (Bebe Aulait purchased the invention from the inventors and have become the new patent asignees). The idea has been around for a long time (one friend claimed she used one 20+ years ago). I think their claim as an invention centers around the addition of boning (stiffener) in the neckline of the apron that helps hold the apron away from the body. One interesting part of the patent is end caps on the boning. I haven't seen end caps for boning before and I could get behind that one small aspect of the patent. Have any of you seen endcaps for boning before?

In any event, there are some problems with the patent and I think it could be challenged. But who has the time and money. The nursing cover is a glorified apron.

Rumor on the street is that Bebe Aulait is enforcing their patent pending product in the same vein as Taggies, which I have blogged about before. It calls into question the value of their patent since it is so easy to copy. Not that I am encouraging copying. If you do, you will receive a threatening "cease and desist" letter from a lawyer.

I don't know what it takes to challenge a patent. I am sure at some point an IP lawyer will have to be employed and they are very expensive.

Trademarks are issued to brand names. Like patents, it creates a property right over a brand name. I will write about a trademark problem with onesies (owned by Gerber) at a later date. The next problem is copyrights. Taggies claims copyright protection on their products. Such a claim is not valid because there is currently no copyright protection on clothing or textile items. Copyright protection can apply to textile designs such as fabric prints. A measure has been in the works to extend copyright to apparel but is apparently stuck in committee. Such an extension of copyright would have a devastating affect on the apparel industry in the US.

What do you think?

Thanks to MyPreciousKid and Trinlayk for bringing this to my attention.

May 15, 2008

Does your fashion clothing line tell a story?

A clothing line that tells a story

In a previous blog entry I answered, "What is a line?". That recent blog and other things I have been reading have led me to the next logical question. Does your line tell a story? I partially addressed it in the previous blog.

Some say a line tells a story. That is the more difficult thing to interpret or even observe. Not too many customers care about your source of inspiration unless it is an integral value that they share.

There is a line story and a company story/history/values and some people confuse the two. Does the line story have to reflect the company story? Does each piece have to reflect the company values? How much do the two overlap? Or should they?

A story or narrative describes a sequence of events or parts through the written word or visual depiction. The story contains clues, pieces, or parts that the reader or observer can put together to make a whole picture or concept. At least this is the dictionary definition.

How does this apply to a line of clothes or even a clothing business? You will hear on tv shows like Project Runway that a line should tell a "story". Each piece should be part of a whole. There should be a beginning, middle, and end. If you watch a runway show, the storytelling becomes even more important because a runway show is part entertainment. The runway show of a high-end designer is an easy, not necessarily the best, example. They may start with a strong day piece, maybe some office wear, and usually end on an evening gown. It's as though their customer will be able to visualize wearing each piece as they go through their day.

In the regular old fashion business, the concept becomes more abstract. Still, each piece of your line should look like it belongs to the whole. A sales rep will merchandise your line as though it has a story. They will start with a beginning piece and end with the logical ending piece. They may start with the strongest piece, weakest, or maybe the middle and put it all together so it is most appealing to the buyer. Each buyer may get a different story. A skilled sales rep will know what will appeal best to get the buyer to buy. The entertainment value is overshadowed by the business side of buying and selling.

This why I stated above that the buyer, and even the end consumer, doesn't really care about your source of inspiration or all the blood, sweat, and tears that were shed to complete the line. You shouldn't have to tell them any of that. It isn't relevant. A customer should look at your line and pick out the pieces they like well enough to buy. The story should be subconscious.

A line sometimes has a theme, inspiration, color, style, mood that ties each piece together. If you look at Tea Collection again, you can see an apparent theme. I see beach, sand, and casual. There is a beginning, middle, and end. Do you see it too?

This is not to be confused with your company values, history or story. Now there are some design companies out there that mix their company values and history into each piece. Their story lies on the surface. It is apparent what their clothing stands for, how it was made, and why. There is nothing wrong with doing that, if you choose. But ask yourself, "How long will my story be relevant? How long will the customers care? Will they care?"

What if you create an organic cotton line of screen printed t-shirts for baby with rock star sayings made in a sweatshop free factory? Perhaps those things are part of your core company values or history. How long will this story last before it becomes stale or passe. By mixing your brand, line, and company philosophy too closely, you will limit your company's growth and creativity. If you wear your story on your shirt sleeves, people will eventually tire of you. Such a story can and should be an integral part of you as a designer, not something blasted in their face.

What do you think? How much should your line story and company values overlap?

May 05, 2008

What is a clothing line?

A merchandised clothing line

In terms of fashion, a line is a group or collection of 5-7 related pieces. Sometimes it is more. Sometimes the pieces are actually sets because children's lines tend to be sold as sets (bringing the total pieces to around 10-20). The point is that the pieces are related. The pieces have similar colors, tones, mood, feel. From a manufacturing end, the pieces repeat fabrics to minimize and utilize fabric purchases. The clothes have a consistent fit.

Some say a line tells a story. That is the more difficult thing to interpret or even observe. Not too many customers care about your source of inspiration unless it is an integral value that they share. Usually customers care about price, fit, comfort, and finally, "Does it look good?".

To muddy the waters, newer children's designers on Ebay and Etsy do collections based around a fabric grouping. They offer up one of a kind outfits that utilize a particular theme or fabric print. They will call that one outfit or piece a collection. Some of these designers evolve and manage to present a true line. In any event, they are inspiring some RTW collections.

A good example of a well merchandised line can be found at Tea Collection. They do some things really well. They have repeated fabrics. The pieces can be mixed and matched. It has a consistent feel, colors, and look. Each piece looks like it belongs. You could even say it tells a story. Can anyone else see it?

What lines are out there that you like? Post links in comments.

February 20, 2008

Design a clothing line with a plan

Coffee and notebook
If you watch Project Runway or believe any of the stereotypical Fashion Designer drivel, you may think a line is designed by pure inspiration. A designer goes to a museum and is inspired by a piece of artwork and can magically create 5-7 pieces that all work together. Or perhaps a designer flips through some swatches and tosses some to an assistant to make samples out of. This kind of thinking is silly nonsense and will lead to disaster.

It is true that a designer can be inspired by a piece of artwork, a fabric print, color, etc. But unless one designs with a plan, or end goal, it will only be an exercise in design for design's sake. A design plan should follow some basic steps and answer basic questions:
  1. Review the past line.
    1. What sold best/worst?
    2. Customer comments
    3. Returns
  2. Review past goals and set new ones.
    1. Did you meet sales expectations?
    2. What are my sales goals for this season?
    3. How is my budget?
    4. Set design budget for the next season.
  3. Shop the market between seasons.
    1. What are my competitors selling?
    2. What are their price points?
    3. Do I hang with them?
You'll notice that none of these questions have anything to do with design. They are ordinary business questions and it is good practice to review them at the end/start of a new season. Finally, I sit down and actually "design" my line.
  1. Shop for fabric/trims. (this is where I find my "inspiration".
    1. Does the fabric express the brand?
    2. Does it fit within the price point for raw materials?
  2. Determine number of styles/pieces.
    1. Can any styles be carried over in new color/print?
I then sketch, come up with words to describe the group and generally get lost in the design process for about 2 days. I sample my styles directly in the real fabric. I don't do muslins or toiles - those are only to work out pattern problems. The sample making process can take a few weeks and gets a little nitty gritty, but at the end of the process you will have designed you line.

November 07, 2007

Americana Apron from a 1950's sewing pattern

Ok, this is day 7 of the Sew, Mama, Sew challenge of 30 gifts in 30 days. Here is my entry that was supposed to be for day 1. Of course, I made two, because I was in desperate need of a new one. DH used our only apron to carve some elk - let's just say it's not too pretty anymore. From here on out, I am only doing one of each item on the list that I can manage to accomplish.

1950's apronI chose a pattern I had made as a teenager - it came from an old high school Home Ec manual of the 1950s. I loved this pattern as a teenager, but what I failed to realize is that I (ahem) am not a teenager anymore. The original pattern has a cute bib with ties. I am thinking my younger, shorter sister, aka Twiggy, should be able to wear this with no problem. She recently has expressed an interest in cooking, so I will tuck a couple of my favorite go-to recipes in the pocket.

I know that I said most of my gifts would be made from scraps. Well, I purchased this fabric from the thrift store for about $2 and it has been collecting dust in my stash for at least 5 years. I think it counts - plus, this fabric may show up in other scrappy projects.

1950's apron without the bibI left the bib off of my apron, which works just fine. DH says it makes me look like a 1950s housewife. Not sure what to say about that..... Anyhoo, both aprons are trimmed with some left over ribbon along the hem and pocket. And yes, I am wearing socks with my shoes because the mountains are chilly this time of year.....


Homemaking for teenagersHere is the book that I acquired as a teenager. I still love it. I wish modern Home Ec books were so practical about making a home as this one.

Up next on the list for Nov 8th is "Whimsy". I have no idea what I will come up with. I may browse some books at the library for ideas. Whimsical is something I am not so this may be a good design exercise.

October 23, 2007

Warning - Taggies Blankets have a patent


You probably have seen them. These blankets are made of two squares of fabric with ribbon loops sandwiched around the edge. I have seen them sold on Ebay, online web sites and demonstrated in blogs and mommy discussion groups. Some well intentioned new designer could find themselves in a heap of trouble if they attempt to sell a similar product.

This is the kind of patent I dislike. The product is so simple. There is nothing unique to the concept other than the brand name. It is easy to copy and reproduce. It would be easy to unintentionally copy the concept. Just attach a ribbon loop to a product, and oops - patent infringement. (This particular patent extends to related products and not just the blankets, and would, of course, have to be tested in a court of law).

This is how the designer intends to treat potential customers and fellow designers. The designer states:
In our appreciation of your notification of any product infringements that you may find, a donation of TAGGIES will be made to a charity. In addition, your first name and state of origin only will appear on our Random Acts of Kindness page as sincere recognition of your efforts.
I think there are better ways to protect your product. Try superior product quality, customer service, shopping experience. Sure, others will copy and imitate, but you can do better in all of those areas. Build loyalty on trust - not threatened action.

Patent protection is only as valuable as the intended enforcement of the patent owner. This designer is actively protecting her patent and products. (They claim copyright protection too, although that claim is rather dubious IMO). Anyway, just a warning to any other designers - stay away from the "Taggies" concept.

[This blog entry has been edited to remove some of my stronger opinions on this subject. If you would like to share your opinion, please leave it in comments.]

October 18, 2007

Stewart Girl's Dress Patent of 1922

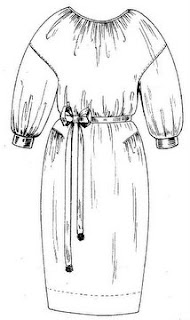
From the USPTO comes a patent filing for a girl's dress in 1922. The claim made by Gladys Matson Stewart is for the ornamental design of the dress, which I found rather difficult to see. Perhaps the ribbon belt? I guess the claim depends on the definition of ornamental design and I find her claim rather dubious. Perhaps if she filed the claim on the basis of how the dress is constructed, then perhaps her claim may be more legitimate. The design of the dress is structural and also very intriguing. I would like to sit down with designer and see how she constructed it. The gather details on the upper skirt sides would be especially difficult to sew in an industrial setting. I have tried in the past to come up with an easy way to do it, but haven't yet. The pattern itself is rather easy to create, its the construction that is the challenge.

The difficulty would be in getting the gathers to start right at the end of the slit and have them evenly distributed across the length of it. The next difficulty is overcasting or serging the seam so there are no raw edges while avoiding unsightly tucks. There is a physical/space limitation in inserting the skirt piece under a gather foot on a sewing machine. The detail would almost certainly require some kind of hand manipulation and would be too expensive for modern manufacturing.

The gather detail on the skirt would not be very attractive on an adult woman unless done in a certain way. It would add weight and attention to an area that most women choose not to emphasize. But a girl's dress could certainly get away with it. As a design idea, the detail could show up in lots of different ways and locations on a piece of clothing. The only road block is coming up with an easy mass construction technique.

Dress from 1922 with a US patent

September 13, 2007

Make a Design Storyboard

As I was designing Prairie Roses for Fall 2007, I created a digital design board. In school it was all about literally cutting and pasting paper onto illustration board. I like the digital version because it is much faster and more professional looking.

A design storyboard
I had a hard time identifying and explaining the look I wanted. When I started it was simply a feeling. I decided a story board was the best way for me to explain my line to myself. I have rarely done this in the past - it always seemed like busy work. This time, I have convinced myself of it's necessity. As I struggled to find pictures that explained the mood, everything else seemed to fall into place. The words A Country Sensibility came to me and it was perfect for so many reasons. It made me think of Sense and Sensibility and Jane Austen - how can I translate Jane Austen's "look" into little girl's dresses. It made me think about sensible country living. Being grateful for what you have. Not living too extravagantly - but comfortably.

Anyway, I headed out with my camera and took pictures of the flowers growing in my flower beds and nearby scenery. There was my mood. I already had purchased the fabrics and they meshed perfectly. The red ombre ribbon roses were the highlight and the key to the brand name.

Prairie Roses was a difficult brand name to nail down. Do you know how hard it is to find a brand name that is not already in use? One that fits the mood and explains the look without the customer ever seeing the clothing? This is complicated by trying to find an internet domain name that is available. It took weeks of research.

The work required to pull all of this together had other benefits. I emailed a graphic designer a copy of my design board and she was able to design my logo (which is shown on the right). I am fairly pleased with the results of the line, the logo, the brand. It all meshed together so perfectly. It feels good to be focused and I am excited about designing more for this line.

Next week is even better. I have been working on toddler patterns and I have a fitting/photo shoot scheduled. I am excited!

September 12, 2007

Making Children's Clothes by Joan Moloney

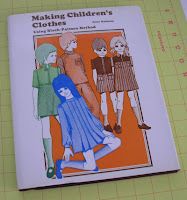
Making children's clothes using block-pattern method 1971I received my copy of Making Children's Clothes Using Block-Pattern Method (1971) by Joan Moloney today.

Just so you know, this book has no measurement charts, detailed drafting instructions, or sewing instructions. Think of it as looking on the back of a home sewing pattern envelope. The author shows the pattern pieces that make up a style next to an illustration or photograph of that style. The text is full of ideas but little how-to.

On the positive side, this is one of the few books I have seen that show all of the pattern pieces that make up a complete style. This may help designers who struggle with the complete design. Also, the book clearly illustrates the shapes of the pattern pieces. Sometimes that is all one needs to draft your own version. The illustrations are charming and I will add this book to my collection as a possible source of inspiration.

Homemade child's dressformThe author does describe how to make your own children's dress form, although briefly. Her version made me laugh for a second and then I wondered if I should be scared. It may give you an idea of how to make your own dress form. I did make my own, which I am using now. Children do not have the patience to be fit models for very long - so I do recommend obtaining dress forms at some point. Still, it is worth the time to try clothing on a child because you may notice differences in how the fabric drapes on a moving child.

This is not a must-have book to add to your reference collection. Used copies are available through Amazon for as little as $1 plus shipping so there is really no reason to not add it either.

August 23, 2007

Who puts whom in a corner?

You have probably seen them. Those cute infant-toddler shirts with quotes, phrases, and images inspired by popular culture. You can buy those shirts everywhere from CafePress, on-line retailers, shopping malls, and even street corners. I am sure no one ever thought some of those phrases would be trademarked. If you follow the link, you will find that Lions Gate is going after people who print a quote from their movie on t-shirts. The defendants are producers of baby t-shirts and products.

The case will be difficult to prove. The phrase that can't be said has been "borrowed" by various companies since the movie came out 20 years ago. Lions Gate sells approved merchandise with the phrase that can't be said. But until now, they have failed to adequately defend their own trademark. After 20 years, is the trademark valid? I did a quick search for it at the USPTO and couldn't find it. Was it ever registered?

If Lions Gate wins this case, can you imagine other movie studios going after people for similar things? If you can't say the phrase that can't be said, how many other phrases can't be uttered? Maybe CafePress should be nervous - so many of their baby products are inspired by movie utterances.

Ethics aside, this case illustrates a danger to the freedom of speech. Who knew a common phrase could be trademarked? Should we be concerned when we use the word Apple or ask where the beef is?

Let's take another tack. The movie studios are benefiting from essentially free advertising. Think about all of those babies wearing shirts with the phrase that can't be said. Their parents will remember that movie and perhaps want to see it again through video purchases or rentals. Perhaps movie studios have a right to protect their intellectual property, but at what cost? Are they willing to risk losing free advertising and potential customers? Apparently they are.

August 22, 2007

The color purple for children's clothes

Baby clothes hanging on a clothesline

For years I have heard rumors about the color purple and children's clothing, and more specifically girls dresses. Specifically the rumors suggested that purple was associated with death. That children who pass away are buried in purple in certain countries. Sales of purple dresses seemed to lag behind other colors, and some retailers refused to carry the color. If you shop the market you will probably not see much purple in the infant/toddler range.

Purple is an odd fashion color. It seems to run through the fashion cycle rather quickly. Either you love it or hate it. Of course a designer must consider the shade and intensity and other such things. And yet one hot color combo for girls is orange and purple. I haven't figured it out.

Read more about the color purple at Wikipedia and Sensational Color.

August 18, 2007

Careful - This Bib is Patented


I have seen a few children's accessory designers make this bib. I can't say for sure if they have made it exactly, but there is enough similarities that caution should be advised. There are a few children's apparel/accessory products that have been patented. I don't generally like the idea of patenting these kinds of products because they are usually so simple. With a quick search I found over 200 patents on bibs and related items and some of them are extremely simple products. If you do register a patent, you also must be willing to defend it legally. This bib is patented by Nancy Sell with the bib being sold at Wal-Mart.

Other things to consider with patents. They take time and money to prepare. This bib was "invented" in 1993 and the patent filing wasn't completed until 1996. There are some interesting related inventions of a coat and an apron that had similar pockets.

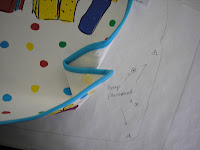
Crumb catcher bibThis style of bib is called a "crumb catcher". It has a folded pocket on the bottom that is secured with strategically placed snaps. The bib is made of a vinyl type material on the face and a fuzzy fabric on the back.


Close-up of a bib with pocketHere is a close-up of the folding used to create the pocket.

I haven't decided if this was really worth going through the process of obtaining a patent. It is interesting enough that I traced it off for further study and that is when I noticed the label with patent info. If you do patent a design you must include the patent info on a label. Anyway, if you do make a "crumb catcher" bib, just make sure it doesn't violate this patent.