Showing posts with label Manufacturing. Show all posts

February 11, 2019

Frequently Asked Questions about Tech Packs

With the release of my Tech Pack, there are a lot of questions on how to use it.

Q: Is there an industry standard for Tech Packs?


No, but there is industry expected information. There are several tech pack templates and forms available for purchase on the Internet, and they are all a bit different in presentation. Generally, those tech packs seek the same information. A Tech Pack contains any and all information needed to manufacture your product. This information includes a cover page, technical drawings, cutting specs, labels, etc. The forms included in my Tech Pack allow for a lot of flexibility so it doesn't matter if you are manufacturing clothing, bags or tents.

Q: Does a Tech Pack include a cutting spec?


I have seen some statements that imply a cutting spec is usually not included in a tech pack. That has not been my experience. If a cutting spec is needed to make your product, then it should be included in a tech pack.

Q: What forms do I send to a contractor?


Only the forms that are needed for the work contracted. It is possible to hire a contractor that can do everything from product development to cutting, sewing, finishing and shipping. Usually, a sewing contractor is hired to do cutting and sewing. In that case they only need a cover sheet, style sheet/cutting spec, bill of materials, colorways (if needed), labels, swatches, and anything else needed to complete the work. Forms that contain proprietary info are for your own in-house use, such as a cost analysis.

Q: What is the difference between a Cost Analysis and a Bill of Materials?


A Bill of Materials contains a list of every input (fabric, trim, supplies) needed to manufacture your product. It does not contain pricing. This form can be used for ordering and inventory.

A Cost Analysis also contains a list of every input but also includes pricing and quantity. This form is used to figure the cost of manufacturing, sale price, and gross profit. This information is kept confidential.

Q: What else should my Tech Pack include?


A tech pack is usually just the paper work involved in product development. But if you are sending a tech pack to a sewing contractor, you should include a perfectly sewn sample and fabric and trim swatches. This is especially important if you are manufacturing overseas where there may be a language barrier. The sample will help clarify what you want when the contractor may not understand or read the tech pack. Swatches are also helpful if the contractor is also buying materials overseas.

Q: I don't draw well, do I have to include technical drawings?


Any drawing is better than no drawing. It is the primary way you will communicate with a technical designer and/or pattern maker. You can also hire people to create the drawings for you at reasonable cost.

Q: Can I customize The Simple Tech Pack?


Yes. Included in your purchase is a spreadsheet workbook version (Excel and LibreOffice Calc). You can add your company info and logo. You can also rearrange, rename information if you choose. The only caveat is that the forms are copyrighted and cannot be resold.

Q: I'm an indie pattern designer. Will this tech pack help me?


Yes. An indie pattern designer is very similar to a fashion designer. You will still need to develop a style, cutting spec, measurements, sewing instructions and grade rules. The cost analysis will help you price your product. The Simple Tech Pack can help you organize the information needed for your final product.

Q: Why does your Tech Pack have a Style Sheet instead of a simple cutting spec?


I created a combination form called a Style Sheet. This form contains both a technical drawing and a cutting spec. I have found it very useful in product development to include a technical drawing with the cutting spec as it travels through sampling. That way every person along the way has the same point of reference. It reduces both paperwork and questions.


Do you have any other questions? Please leave a comment and I'll answer your question in an upcoming blog post.

March 19, 2015

Production Systems, Sizing, and Quality Control

Having worked in the apparel industry for a while now, I sometimes have to take a step back to see how much goes into the design, production and selling of just one item. The goal is to work out all of the bugs before an item goes into production. Still, things can and do go wrong and those things can affect the size of an item. Where can things go wrong?

1. Pattern making and grading


A poor pattern or poor grading certainly affects the size. Inadequate seam allowances, missing notches. There are a lot of little things that can go wrong, though if you read the rest of the list, you can see there are a lot of other areas that can cause problems.

2. Marking


Marking is the process of laying pieces out in preparation for cutting. Many markers are now made by computer, some automatically. There are various setting that allow the marker maker to bump pieces closer together, tilt, or rotate pieces. Each of these options can affect the final outcome, so they must be used rarely.

3. Spreading


Spreading is the process of laying fabric on a cutting table in layers. Certain fabrics stretch during this process and need a certain amount of time to relax. If the style is cut without the fabric being allowed to relax, then the pieces will relax after being cut and the item will end up too small. Layers can also shift and move.

4. Cutting


Accurate cutting is the only way to ensure the item ends up as intended.

5. Sewing


Taking too big or too small of a seam allowance affects a size. Seam allowances should allow a cut off allowance because nearly all operators trim off a little bit.

6. Finishing


Finishing includes steaming or ironing. Too hot a temperature can shrink an item.

These problems can be minimized by implementing systems and policies during each phase of development and production. One company I worked for had a quality audit system that checked each step of production. Anything that had finally made it to production had been perfected, for the most part. There was that one style that shared patterns with another style. A problem came up in production where the obvious solution was to make a new pattern for the new fabric, but that never happened. Production just had to deal with it. But those situations are rare.

In any event, systems (procedures/policies) have to be implemented for development, production, and finishing to catch problems before the item is shipped to the customer..

This blog entry was inspired by the article Production systems, garment specifications, and sizing by S. P. Ashdown, L. M. Lyman-Clark, J. Smith, and S. Loker in the book Sizing in Clothing.

January 27, 2015

Creating sizing systems for clothing

This is a continuation of my review of Sizing in Clothing. The previous blog entries are History of Sizing, and the Book Review.

Vintage tape measure
By Downtowngal (Own work)
[CC BY-SA 3.0], via Wikimedia Commons
What does it take to create a sizing system? We often taken for granted a size chart on a retail website or print catalog. And when something doesn't fit, it's easy to blame the size system used by the manufacturer. And we've all been there. Shopping for blue jeans or a swimsuit causes a lot of anxiety and stress as we go through more than one size to find something that fits. A. Petrova discussed all of the variables that go into making those size charts that help you select the right size in the article Creating Sizing Systems found in the Sizing in Clothing book.

So what does it take? The first big step is to measure a population and then to divide that population into various body shapes such as Misses, Petites, Tall, Plus, etc. Each category is defined by certain control dimensions such as height, weight, waist, chest, hips, or whatever is considered the key dimensions. Usually there are 3-4 key body measurements. These kind of measurement studies are expensive and are usually undertaken by government, universities, and trade organizations.

Next, each category is subdivided into sizes contained within a size range. Each category is labelled a size designation. It could be Small-Medium-Large, or numbers such as 2, 4, 6, 8, 10. These size labels are meaningless until associated with a set of body measurements. (We could get into a discussion of vanity sizing here but it really doesn't matter what you call a size. It's the underlying body measurements that are key). In the US, we are accustomed to knowing what size to start with when shopping without knowing our body measurements. In the EU, there are similar difficulties though there has been some push to adopt the centilong system. This system identifies a size by height with some corresponding girth measurements. Not all European manufacturers have done this and some are as inconsistent in application as their American counterparts.

A. Petrova continues the article with some ideas on how to develop size systems or charts based on garment styles versus just body measurements. The biggest disadvantage to this idea is that the customer would need to know several size scales when shopping, making shopping a complicated experience. The advantage is that fit could be fine tuned, maybe.

So who is to blame when clothes don't fit? Is it the size chart? Maybe, maybe not. There are so many variables that it is hard to select just one reason. The fit model used in pattern development may match the size chart, but not be representative of the consumer. In other words there could be a mismatch between expectations and reality between the manufacturer and the customer. Grade rules may not match or equal actual body grades - which is a discussion for another article. Perhaps the size chart information was incomplete, lacked sufficient instruction, or had a typo. Poor construction or poor fabric quality play a factor. When analyzing sales information and returns, all of these things have to be considered.

September 23, 2013

Repairing a leather sewing machine belt

If you own a sewing machine (industrial or otherwise) with a leather sewing machine belt, chances are that you will have to either replace or repair it at some point. Leather belts will stretch or shrink, and/or break. The climate of your workspace and other variables play into the life and condition of the belt. The area around the belt clip tends to get a lot of wear too. Leather belts are a little old school, but they do have a few advantages. They are customizable and relatively easy to fix.

You'll know you have a problem when the belt ends up in pieces or the machine is not operating properly. The leather belt on my Singer Hemstitcher 72w-19 machine stretched out over time and my machine was not going as fast as it should. It was time to shorten the belt.

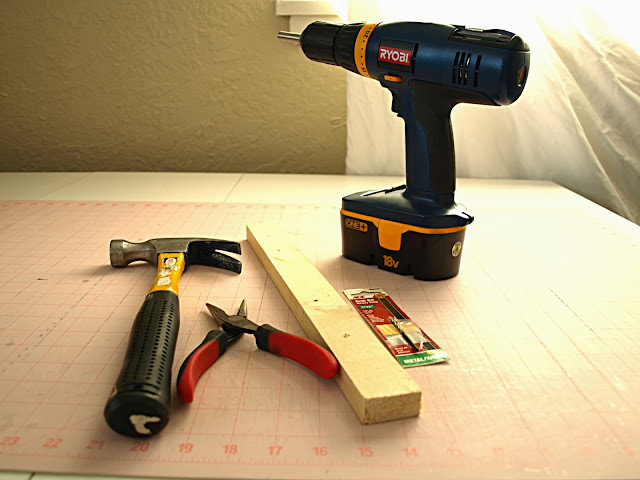
Tools needed to repair a leather sewing machine belt.
Any workshop should have a toolbox. For this job, you'll need these tools:

  1. Drill
  2. 3/32nd drill bit
  3. Scrap wood
  4. Pliers
  5. Hammer
  6. Utility knife (not pictured)
  7. Belt clips (not pictured)
I purchased a box of 500 belt clips from Southstar Supply. It sounds like overkill, but believe me, you will probably mess up the clip the first time you do it. Southstar also sells leather belting. You'll want extra length because you never know when you'll need it. Leather belting is not cheap, and there are other places on the net that will sell it in cut lengths. So it pays to repair a belt when you can.

One more note. There is a special tool designed to punch a hole in the leather belt for the belt clip. It's expensive. It doesn't work well (from what I'm told) and you don't need it. A drill with the right drill bit works really, really well.

Drilling a hole in a leather belt for a sewing machine

In my case, I first removed the belt from the machine by bending the existing belt clip apart with pliers. You won't be able to reuse it, so don't bother trying to save it (this is why you want a box of 500!).

Next, determine how much to shorten the belt. It won't be as much as you think. If you make the belt too short, the belt won't fit or the belt will exert too much tension on the machine causing the machine to work harder than it should. Using the utility knife, I only shortened the belt 1/4".

About 1/4" from the cut end, drill a hole through the center of the belt. Be sure to drill the hole on top of some scrap wood so you don't damage your work table! You do need your other hand to help steady the belt as you drill, but I was taking a demo picture by myself. All other safe tool handling rules apply.
Inserting a belt clip into a leather sewing machine belt

Place the belt clip through both holes to test, but don't mash the belt clip closed yet (Yes, I've done this!). Take the belt clip off one side and take the belt to the machine and thread it through the holes in the table. Attach the belt clip to the belt ends and place it over the handwheel and motor pulley to test the tension.

Leather sewing machine belt in place

How much tension is needed? It depends on your machine. You need just enough to turn the handwheel properly. In the photo below I'm testing the tension (or slack) on the belt. This is about how much I need to have the machine operate properly.

Testing the tension of a leather sewing machine belt

Finally, mash the belt clip closed with the pliers (sometimes you need a hammer) and you're good to go. It's amazing that a 1/4" shorter in length makes a big difference!

August 05, 2013

The Organized Fashion Designer

The Organized Fashion Designer

I'm pleased to announce that my book, The Organized Fashion Designer, is now available for purchase. This book is a collection of guides and forms that I have developed and used while working in the fashion industry. Every fashion or sewn product business exists in some state of chaos. Out of desperation, I began to create various forms and organizing systems to keep track of all of the information needed to manufacture products. This led to simple tech packs that could be pulled together in an instant. I kept track of information using expensive database management software and simple paper and pencil forms. I have even used these forms with personal projects to keep my design space organized. Now I'm sharing these forms with new designers and home hobbyists in the hope that chaos can be organized.

The book includes blank forms and how to:
  • Create a simple tech pack
  • Develop grade rules
  • Track every major step of your product development
  • figure out how much your product costs to produce
  • List sewing instructions
  • Create a style number system
  • Helpful industry resources
And more!

The Organized Fashion Designer
The book is available in three formats.

Spiral Bound

Saddle stitch (stapled pamphlet style)


eBook (PDF)

8.5" x 11" book
54 pages

or from Amazon.


5 star reviews on Etsy:

Thank you so much! Really helpful guide for designers - Linda

Love the ebook! Can't wait to get organized :) - Diane

Thank you!! This book is a great relief. It makes the paperwork look doable and dare I say appealing. - Trapper Jane

Thank you! Great resource! - Jess S

You can purchase the eBook or bundled selections from the book on Etsy.

July 22, 2009

More aggressive intellectual property enforcement by Taggies and Gerber

Taggies


My most popular blog entries have to do with taggies. Taggies are those square blankets with ribbon loops around all edges. I have received a lot of comments asking what the latest is on the patent and enforcement. I can only repeat what other commenters have stated:

1. The Taggies people are continuing to enforce their patent.
2. The patent enforcement lawyers appear to be going after anyone who has any form of a ribbon loop on a blanket edge, whether it is one ribbon loop or several.
3. No one has taken up the task of challenging the patent.

If Etsy or Ebay receive notice from Taggie's lawyers that the product is a potential infringement, those companies will pull your listing. These companies have little resources to investigate the claims, so legitimate or not the listing will be pulled down. You will not be able to defend yourself. If you list an item in your own store or blog for sale, you will receive a letter directly.

To date, it would appear there is plenty of evidence that the patent can be challenged. Commenters claim they had these style of blankets as children or that they have bought a current home sewing pattern with this style. Patterns and instructions abound on the net as do product listings in various online stores. The Taggies people were the first to obtain a patent and therefore believe they own it despite the evidence that the idea has been around for decades. This only illustrates the problem with the current patent protection system. The system is just complex enough that ordinary people have no idea what patents are being sought and if they should be challenged. The patent bureaucrats and lawyers don't understand the manufacturing processes and how common a folded ribbon loop in a seam is. Who has the time and money to fix the problem? Taggies is expanding into Europe and South America, so despite calls for a boycott the company appears to be growing.

Gerber and the word Onesie

Another aggressive brand enforcement problem has to do with the word onesie. Onesie is a registered trademark brand owned by Gerber. You cannot use that particular word to describe an infant bodysuit or unitard unless it is an actual Gerber branded Onesie. Various acquaintances of mine and online shop owners are receiving threatening letters about their use of this word in their product descriptions. Gerber appears to be ramping up their enforcement of their trademark.

These companies have not technically done anything illegal. They have the right to apply for patent and trademark protection. That protection is only worth as much as they are willing to enforce it. So, IMO, let them waste spend their money on it. The one thing these companies are doing is creating ill will among potential customers and retailers. Customers and retailers have long memories and will think twice about buying or indirectly promoting those products to friends. They may be doing more damage than they know.

Baby and children's apparel products seem to have more patent and trademark protection than other sewn product categories. There are bibs, hand covers, sensory objects, diapers, and so much more that have patent protection. I haven't quite figured out why.

April 23, 2009

A tale of a broken screw, loose screws and a DIY mechanic for the Singer Hemstitcher 72w-19

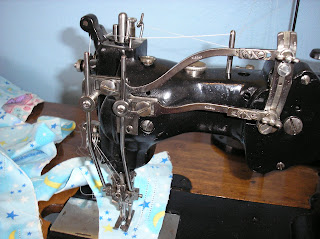
This lovely 72w19 Singer Hemstitcher (circa 1945) has caused me all kinds of grief this month.

Singer Hemstitcher 72w-19
I have had a persistent problem with this machine every since I purchased it 4 years ago. The left needle thread has a tendency to break, almost randomly. I can stitch some distance, it will start skipping and then get cut by either the needles or the piercer. I have played around with various settings and adjustments continuously over all this time. Sometimes I can improve it, other times it becomes worse. Despite all these adjustments, the right needle continues to behave as it should and the left will not.

One day, I noticed that the piercer holder was loose. I could wiggle it with my finger. This led to me over tightening the piercer holder screw and breaking it. This screw is a size #6 and some of the screw was stuck in the machine. How to get it out?

Broken screw in a Singer Hemstitcher 72w-19 piercer

It would be easy to say I am not a sewing machine mechanic. I have done some basic tuning up on regular sewing machines. Set the timing on both of my sewing machines. Cleaned, oiled, lubed. But that is about it. Armed with my 72w19 manual, I set out to fix my machine, extract that screw and get to the bottom of the thread breakage problem. The engineers who designed this machine and most mechanics who worked on these are all gone now. Those that are left are hobbyists, for the most part. Some are very good, but too far away to consult. Other mechanics rarely work on or understand these machines.

Even with the manual, there are gaps of knowledge. Perhaps later I will post a little about the history of these machines. One thing I did learn is that the ladies who purchased these machines attended a training and certification class so they could adjust them on their own. I am sure they picked up all kinds of information never written in the manual.

So back to the broken screw. Nothing could happen until that screw was extracted and replaced (and luckily I did find a replacement).

Assemble some basic tools:
1. Drill (variable speed, set on slowest setting)
2. Very small metal cutting drill bits (like 5/64")
3. Punch
4. Extractors and/or left hand drill bits
5. A steady hand.

Step 1
Use an auto centering punch to punch a pilot hole into the broken screw. There are different sizes and shapes of punches. I found one that is about the size of an ink pen. You press down on it and an internal spring forces the punch. A very nifty and useful gadget for small spaces (also expensive uni-tasker). You may need to do several punches because the surface of the broken screw will probably be uneven. This punch is critical so that the drill with a metal cutting bit doesn't float around.

Step 2
Using the drill with the regular metal cutting bit, drill a hole in the center of the broken screw. Make sure the drill is on a slow speed setting. In my case, I could drill all the way through the center of the screw to the other side and not risk damaging other components. Even so, drill just far enough to be able insert a slightly larger extractor or left hand drill bit. Stop every so often to clean out the hole and to let the drill bit cool off. The drill bit may dull quickly, so be prepared to replace it.

Step 3
If the screw is not jammed too tightly into the machine, you may be able to insert the extractor and turn the screw out by hand. This is what I ended up doing in my case. If you need more power, use the drill but be sure to reverse the direction of the drill.

And here is the result. You can see how small that broken screw bit was and why I was so nervous about it.
Screw extractor and broken screw part
With the broken screw removed and a new one inserted, I once again began to check all the possible adjustments. In this I discovered more lose screws. There were lose screws on the piercer bar, and underneath the bobbin. Cleaned more lint and gunk out of areas I rarely clean. Oiled every moving part. Adjusted the vibration (zig-zag), pitmans, levers, etc. I could definitely say I have learned a lot by over adjusting some part and seeing what would happen (very carefully of course). I think I may have zeroed in on the vibration setting as the sources of the skipping as the left needle only skips on the inside vibration.

And then the piercer snapped in half the other day. I can't figure out how or why. Did I have it set too low in the machine? Maybe it was just worn out and over abused?

Thankfully, replacement piercers can still be found. Though they are very expensive. I bought two, just in case this happens again. Hopefully not.

March 06, 2009

Singer Hemstitcher 72w-19 thread breakage solutions

Singer Hemstitcher 72w-19Hemstitching woes continue to plague me. Thread breakage with the left needle thread continues to be a persistent problem. The breakage is preceded by skipped stitches that cause the thread to wrap around the pierces where the piercers or needles eventually cut the thread. I have run through various scenarios trying to diagnose the problem. The timing of a machine is absolutely critical or no stitches form. In the case of a hemstitcher, the timing is a bit more complex. The position of the needles relative to the piercers and how they move as the fabric moves under the foot is all a part of the timing. A Singer hemstitcher 72w-19 has two bobbins which must be separately adjusted to work in time with the needles as they descend with the piercer. For a while I have thought there was a timing issue with the left needle.

Or maybe not. I have set and checked the timing and it appears to be right on. I have adjusted nearly every possible adjustable part. Even the pitmans that control the needle position and angle - something I dreaded touching. I adjusted the check springs. I have spent countless hours making one fine adjustment after another, studying the manual over and over. I feel as though I have hit a brick wall. It is rather frustrating to be stitching a customers blanket and have the left needle thread break every 5-12" for no apparent reason.

Check Tension


So off to browse the net to try and find some kind of solution. American and Efird is probably one of the best technical websites for manufacturers. They have an excellent article on thread breakage that has given me some insight. A checklist of things that might be causing some of the problems. One thing that I had observed the last mechanic to work on this machine do was wrench down on the tension discs. I have maintained tight tensions ever since. Tonight I loosened the tensions until the bobbin tensions took over than edged back to a balanced stitch. The stitch is better and perhaps that will solve some of the problems.

Needle Orientation


The next step was to look at the orientation of the needles, in particular the rotation of the needle in the needle clamp. Most every blog entry I have read says to turn the needle out to help avoid thread breakage. I think that is the wrong approach because it affects how the hook interacts with the needle. The needles should be aligned with the eyes opposite each other in a straight line. This may not make a lot of sense if you are not familiar with the machine, but mechanically, it does.

In any event, I still must plug away at stitching some customer orders with my fingers crossed that I will have fewer problems. If you are having stitching problems because of skipped stitches or thread breakage, I highly recommend the American and Efird article.

Oh and did I mention I had to fix the belt. Leather belts have a tendency to wear out. I used my last clip, so I must order some more just in case. I have extra belting because my machine can be used as either a treadle or with a motor. I don't have the fancy tool that punches a hole in the belt and compresses the clip. I learned a neat trick of using a drill to create a hole for the clip. It worked great.

Leather belting for a Singer Treadle Sewing Machine

July 25, 2008

Product Review: Jacket and Pants set for a child pt. 3


Only one person ventured a guess on the size and price point of the hooded yellow jacket and pants I reviewed last week. Jennifer ventured a guess that it would be about $25-30 (AUS) and the Aussie size range of 0000 to 2.

Firstly, it's awesome that an Australian reads my blog! Very cool, this internet blogging thing. Secondly, I acquired this set from a thrift store so I don't know the exact price for which it originally sold. I think this set is private label for JcPenney, but I am not 100% sure. I used to do private label for JcPenney and some other big box stores so the brand looks very familiar.

You would have to look closely to see on the brand tag (partly smeared) was the word layette. Layette sizes normally run 3M-6M-9M or some variation of that (not sure how that translate into Aussie sizes, but probably similar). The set I showed is a size 3M.

Jennifer is probably right with the price point. JcPenney layette price points run about $15-$30 (USD), sometimes a little more. This set was made in China and there is a huge price savings because of cheap labor. A similar layette is available at JcPenney's online store for $20.

The only reason I made a big deal about the price point is because of the amount of detail included in a size 3M. What 3M old child really needs functional welt pockets on a jacket? Such detailing appeals to adults because it appears to add value. But does it really? We like to dress our babies up in clothing similar to ours with all of the same details. BabyGap sells 5 pocket denim jeans for infants too. Not really necessary and perhaps not as comfortable for a newborn, but it sells. Anyway something to think about.

BTW, it would be difficult, if not impossible, to manufacture this item in the US for this price point.

May 05, 2008

What is a clothing line?

A merchandised clothing line

In terms of fashion, a line is a group or collection of 5-7 related pieces. Sometimes it is more. Sometimes the pieces are actually sets because children's lines tend to be sold as sets (bringing the total pieces to around 10-20). The point is that the pieces are related. The pieces have similar colors, tones, mood, feel. From a manufacturing end, the pieces repeat fabrics to minimize and utilize fabric purchases. The clothes have a consistent fit.

Some say a line tells a story. That is the more difficult thing to interpret or even observe. Not too many customers care about your source of inspiration unless it is an integral value that they share. Usually customers care about price, fit, comfort, and finally, "Does it look good?".

To muddy the waters, newer children's designers on Ebay and Etsy do collections based around a fabric grouping. They offer up one of a kind outfits that utilize a particular theme or fabric print. They will call that one outfit or piece a collection. Some of these designers evolve and manage to present a true line. In any event, they are inspiring some RTW collections.

A good example of a well merchandised line can be found at Tea Collection. They do some things really well. They have repeated fabrics. The pieces can be mixed and matched. It has a consistent feel, colors, and look. Each piece looks like it belongs. You could even say it tells a story. Can anyone else see it?

What lines are out there that you like? Post links in comments.

January 09, 2008

Grading Pants Notes pt. 2

The following are my notes on grading infant-toddler pants. Having a copy of the Jack Handford grading manual will be helpful in understanding what these notes mean. Hopefully you have at least read the introduction and the instructions for grading a bodice. If you don't have a copy of the book, save these notes anyway - they may come in handy. This is part 2 of the series. Part 1 contains an explanation of direction arrows.

This will be a short entry and only partially about grading pants. Mostly it is about Handford's notation and what caused me confusion.

Overlaying directional arrows on a pattern that is to be gradedIn this drawing I superimposed the direction arrows onto a bodice pattern. There is a similar drawing in Handford's book, page 6 and in Kathleen Fasanella's book, pg 174. All movements start from your point of origin which I have indicated in my drawing. Depending on how you set-up your grading, it will be helpful to draw direction arrows on your patterns.

Now notice the little black triangle under the point of origin. Handford uses this triangle in many drawings. I interpreted those triangles to mean the "point of origin" and that is where I messed up.

Compare the drawings for pants of women (pg 77), men (188-189), and children (219). You'll notice that Handford adds or drops those black triangles almost randomly. Some drawings have them, some don't.

The black triangles don't indicate "point of origin". Instead, I think Handford is borrowing the notation from geometry where it means "right angle". Your direction arrows should be perpendicular - at 90 degrees. If you look at the pants drafts (sorry no more drawings for today), you can see his direction arrows are drawn down the center of the pant legs with two black triangles - meaning the lines should all be perpendicular. In my head, I was seeing "point of origin" or (0,0) on an X-Y coordinate plane. Interpreting things this way caused me to move my pattern pieces incorrectly (my own dumb fault for trying to over analyze things).

Anyway, by nesting my pieces I found my error and realized Handford's direction arrows do not always show the point of origin on all of his drawings. They just show direction.

Clear as mud?

November 05, 2007

Sewing Tutorial - Set-in sleeves

This is my first sewing tutorial for sewing set-in sleeves flat - please forgive the photo intensive entry and anything that is not too clear. Here, I am testing some refinements to my cap sleeve pattern. I am doing the sewing with my domestic Singer 503 (a fabulous machine, btw). The technique is essentially the same on a 4-5 spool serger or industrial straight stitch machine. Some of this is my personal opinion, some fairly standard fabric handling techniques. Please note, my sleeve pattern has no ease.

Start sewing a sleeve with a sleeve cap against the feed dogsPlace the sleeve against the feed dogs, the body on top. Notice that I am using no pins, no basting, and no ease stitching. There is a single notch at the center of the sleeve cap. My sleeve is symmetrical front to back so there are no extra notches to indicate the back or front of the sleeve. Adult clothing would have extra notches, so make sure to match up fronts or backs or you will have a funny looking sleeve.


Hand position for sewing a sleeve without pins Do you see the placement of my hands? My left hand is holding the body and my right hand is controlling the sleeve. This is one of the major differences of industrial vs. home sewing. Home sewists like to pin the two layers together and have everything move together in lock step. With this method I can control the two layers as they move under the foot by ever so subtly pulling or pushing. It takes time, practice, and confidence in your pattern to develop this skill but it is absolutely essential.

Matching notches when sewing a sleeveThis picture just shows that the shoulder seam and the sleeve notch meet up. Another industrial technique is that the operators will tap the foot pedal. Home sewers press down on the foot pedal like they are at the races. But during certain operations, the operator can gain more control by tapping the foot pedal. This can help while going around a curve.


A set-in sleeve sewn flatThis picture tries to illustrate why the sleeve should be next to the feed dogs. If there is any ease (and it should be minimal) the feed dogs will do the work of easing for you. My sleeve has no ease so this picture isn't accurate. If there were ease, it would look something like this on the inside.


View of the sleeve capThis is a view of the top of the sleeve cap. There seems to be a few puckers, but that is a combination of poor lighting and the fabric - a poly-cotton broadcloth. The sleeve cap is actually nice and smooth.


Sew a side seam from waist to sleeve hemStitch the side seam from the waist to the sleeve hem making sure the armscye/sleeve cap seam allowances are turned toward the sleeve. The seam allowances, when turned in the right direction, will fill the sleeve cap and help give it a nice rounded shape from the outside. Some operators will allow the seams to lay in opposite directions (for bulk, they may go in opposite directions, but otherwise they shouldn't).


Finished sewn sleeveThe finished sleeve.

October 18, 2007

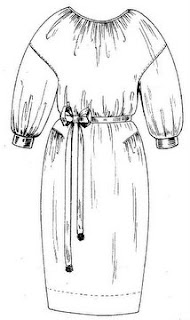
Stewart Girl's Dress Patent of 1922

From the USPTO comes a patent filing for a girl's dress in 1922. The claim made by Gladys Matson Stewart is for the ornamental design of the dress, which I found rather difficult to see. Perhaps the ribbon belt? I guess the claim depends on the definition of ornamental design and I find her claim rather dubious. Perhaps if she filed the claim on the basis of how the dress is constructed, then perhaps her claim may be more legitimate. The design of the dress is structural and also very intriguing. I would like to sit down with designer and see how she constructed it. The gather details on the upper skirt sides would be especially difficult to sew in an industrial setting. I have tried in the past to come up with an easy way to do it, but haven't yet. The pattern itself is rather easy to create, its the construction that is the challenge.

The difficulty would be in getting the gathers to start right at the end of the slit and have them evenly distributed across the length of it. The next difficulty is overcasting or serging the seam so there are no raw edges while avoiding unsightly tucks. There is a physical/space limitation in inserting the skirt piece under a gather foot on a sewing machine. The detail would almost certainly require some kind of hand manipulation and would be too expensive for modern manufacturing.

The gather detail on the skirt would not be very attractive on an adult woman unless done in a certain way. It would add weight and attention to an area that most women choose not to emphasize. But a girl's dress could certainly get away with it. As a design idea, the detail could show up in lots of different ways and locations on a piece of clothing. The only road block is coming up with an easy mass construction technique.

Dress from 1922 with a US patent

July 24, 2007

Boy's dress pants - an analysis


Here is a look at a pair of budget dress pants sized 24M. These were most likely sold by a big box retailer as part of a set that included a dress shirt and vest. They are 65% polyester, 35% rayon, made in Taiwan. Since these were likely sold as a set, it probably is not necessary for them to have all of the same details as an adult pair of pants. I call these pants budget because they would have sold for a low price point and were made from an inexpensive fabric. Still, there are some nice quality features.

Boys dress pantsThe pants have 4 pleats in the front. 1" cuffs on pant legs. There are no pockets or other trimming details. (Click on the images for bigger close-ups). The front waist band is flat.


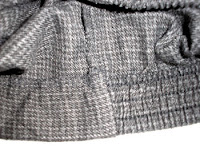
Boys pants waistbandThe back waistband has 1.25" stitch through elastic. Most infant/toddler pants or skirts have an elasticized back waist. This age group has a longer front waist than back waist. Combine this with a large seat (padded with a diaper) and it becomes necessary to take up the extra back width of the pant waist with elastic. The elastic is applied with a specialized machine that stretches the elastic while it is stitched on. Be sure to spec out the finished elastic measurement (the measurement of the elastic after it has been stitched). If you don't, the elastic will end up being too big or too small. A quality auditor (or you) should do in-line inspections during production. This is the one area that is the easiest to mess up.


Close up of waistband at side seam You can see the nice neat finish of the waist side seam. The front waist band is stitched onto the front pant. The back waist has the elastic applied, turned to the inside and top stitched down. Some manufacturers will have a separate back waistband piece, but I like the nice smooth back waistband of this pant. The side seam is stitched by folding the front waistband to the front over the back elastic waist band. When the front band is turned out, the back waist is enclosed. Lower quality pants do not enclose this seam. Even though these pants are budget, the topstitching of the front waist band runs even with the lowest line of stitching for the elastic.

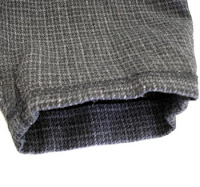
Pant leg hemThis is the only place where I could find the manufacturer truly skimped. The inside leg hem has a 1/2" hem which is topstitched down. This is a quicker finish than a blind hem and it can be hidden underneath the 1" cuff. To allow for future growth, you can add to the hem depth and do a blind hem instead. I wonder if there are many that would actually take the time to let the hem and cuff down, as simple as it is. Most parents would probably just buy another pair of pants.

May 04, 2007

The State of the Childrenswear Industry in 2007

The information for this blog entry comes from one of those fantastic business databases available from my local library. One of the biggest hurdles in my business plan was trying to describe the current state of the industry. From experience, I could say things were in decline. And really, if I included that in my business plan, it wouldn't give a financial institution much incentive to loan me money. Who would invest in a business where the entire industry is in decline? Now I can write something with a bit more substance and support that things aren't so bad (not great, but not dismal either). I am not looking to secure financing through the SBA, but some of you might and this resource is something that could help.

The database where this information is found is called the Business & Company Resource Center powered by InfoTrac (owned by Thomson-Gale). Be sure to do an industry search. In the description area enter the word children. Several descriptions should pull up for children's and women's clothing industries. I selected #2361 - Girls', Children's and Infants' Dresses, Blouses and Shirts description.

The article has too much info to repeat here. Here are some tidbits that may interest you:

As was true for much of the U.S. apparel industry, these establishments tended to be small, family-run businesses, and they faced stiff competition from low-cost imports.
As of 2005, Wal-Mart carried a 12 percent share of the apparel industry, though it aimed for 30 percent. With more than 4,000 stores offering a wide variety of apparel falling within this industry, Wal-Mart's annual clothing and footwear budget alone was $35 billion.
Also contributing to the industry's decline in the United States was the reliance of manufacturers on offshore assembly of pieces cut in the United States, which actually increased during the mid-2000s.
By using computers to track inventory and sales, as well as consumers' responses to particular items, manufacturers gained the ability to respond quickly to market demand. This allowed them to get a jump on foreign producers who were often half a world away, and minimize their vulnerability to imports.
One interesting observation comes from the first paragraph. Most apparel businesses are small, family-run businesses. This is exactly how most childrenswear companies start! It is a good place to be. Later, I may pull up information on the industry leaders: OshKosh, Carter's, and Gerber. Very interesting.

When you read things like this, it makes you wonder why anyone would enter the childrenswear business in the first place. And yet, I discover new businesses starting up all of the time (they must not have read these reports). The truth is, there is room and growth in this business, and you can do it! These types of reports look at the big guys with the big numbers. The biggest thing to remember is that you should not compete with Wal-Mart or the industry leaders on price or even look. The specialty market is always looking for something new and exciting.

Other tidbits included in the article: News (from the last few years), company profiles and industry rankings.

Source Citation: "Girls', Children's, and Infants' Dresses, Blouses, and Shirts." Encyclopedia of American Industries. Online Edition. Thomson Gale, 2006. Reproduced in Business and Company Resource Center. Farmington Hills, Mich.:Gale Group. 2007. http://galenet.galegroup.com/servlet/BCRC

March 26, 2007

Thread color does matter!


Thread colors

Most of the time, manufacturers know to match the thread color to the body of your design. If you hand them a sample, then they will reproduce it down to the thread color. Most manufacturers are very good about this, so specifying the thread color is usually overlooked.

But every now and then, you will run across a rare manufacturer that is either color blind or will use whatever thread they have on the shelf. It may or may not match. If you specified the thread color, then you can go back to the manufacturer with a charge-back. If you didn't, well then you might be stuck. (I have seen this happen!)

Another reason to spec out a thread color is to match a screen print, embroidery, or coordinating piece. The thread color becomes an integral part of the design. Would you really want to leave the end color up to chance?

It's really simple. On your spec sheets state "Thread color: American & Efird [color name] [color number]. You may even want to go to the extreme of including a thread color swatch, just in case the manufacturer buys thread elsewhere. Wind off some thread onto your fingers and make a little, mini-hank of thread and tape it onto the page. You can buy thread swatch books from American & Efird (You'll have to talk to a sales rep about a swatch book). You can even get thread dyed to match!

March 09, 2007

A question on binding a leg opening on a onesie

A baby onesie or bodysuit with constrasting binding
Laura sent me this really good question on the binding around the leg opening of onesies:

I don't mind you posting anything -you can use my name. I actually want to ask many things but for now off the top of my head I have a question about making onesies. When I went to my pattern maker he said that the banding that goes around the edges, where the snaps go, comes on rolls. What is it called? I can't even find this. I am using bamboo fabric so that part I would like to be organic. 

It looks like it's just rib fabric, would I have to get it made or how is it usually done? I've been working on getting t shirts right for a while, almost there. That's a whole other thing that's been challenging. The onesies are the next thing.

The banding (or rather BINDING) that goes around the edges does come on rolls (more about this below).

You can choose whatever fabric you like for the binding. I have seen it made out of the same fabric as the onesie (generally an interlock) or a rib knit. You could even use a jersey, but it can be problematic because it doesn't have a lot of stretch. If your onesie is made of an interlock and you choose a rib knit for the binding, you will need to make sure the two fabrics are dyed together. No worries if you use the same fabric or contrasting color.

Here are some things to think about:

How heavy is the fabric? Will it be too bulky?

How much does the fabric stretch? (the manufacturer will need to adjust the machines to accomodate the stretch of the fabric).

How will you apply the binding? - You can do a double fold, single fold on top - flat on bottom, contrasting thread. Also consider the type of stitch - coverstitch, single needle, chain stitch.

I pulled some onesies out of my stash of samples and they all had a different application (pictures below). Do some comparison shopping to get an idea of what you would like. Buy a sample of what you DO want to show your sample maker and patternmaker.

Now how do you get the rolls of binding in the first place? There may be some fabric suppliers that will pre-cut the fabric rolls for you, although I imagine that would be the most expensive option. There is an easier way. When you determine your fabric yields or allocations, you have to figure out how much binding you will need. By doing some math, you can then figure out how many yards of full width fabric you need (maybe I will demonstrate the math for this, just not today). If your binding is the same fabric as the body of the onesie - just order extra fabric for the body. If your binding is different, you may have a separate fabric minimum just for the binding.

There are two ways to get the rolls made. The easiest and simplest is to find a manufacturer that has the ability to cut the rolls for you. There are machines that roll off the fabric onto a second tube and then cut the tubes into rolls with a giant saw. (From what I understand, these machines are difficult to come by and are generally antiques, at least the ones I have used were ancient. I would imagine news ones are $$$). The second option is to roll off the approximate yardage needed for binding onto a separate roll and send it off to be cut by someone like Superior Bias. Be sure to discuss these options with the manufacturer ahead of time.

You can cut your own binding for samples. Binding is generally 1" wide and cut across the width of goods. The actual width will be determined by your application method and fabric stretch.

Just a quick word about knit fabrics. Many knit fabrics are made to order and they have high minimums (sometimes as much as 3,000 yards). Some factories carry stock of their basic - usually a white fabric. When you order sample yardage, make sure to ask if the sample fabric has been completely processed - meaning washed and already dyed. Sometimes the available sample yardage is prepared for dying or printing (in other words, not completely processed). This type of fabric will shrink a lot when washed and is not the ideal for samples.

Ok, now time for some pictures:

A bodysuit leg opening with contrasting binding This is a traditional binding with a contrasting rib knit fabric. The body of the onesie is a printed jersey. The binding is applied with a coverstitch machine. The binding has one fold on top and is flat on bottom. I usually call this a coverstitch binding.


Coverstitch binding on a onesie leg openingThis is also a coverstitch binding similar to the first example. The actual stitch is different from a traditional coverstitch, so the machine requires a different set-up. The binding is folded the same way as the first example. Of course, the design detail comes from the contrasting thread color. The binding is the same rib fabric as the body.


Double fold binding on a bodysuit leg openingThe binding on this onesie is made of the same fabric as the body, just a contrasting color. The fabric is a pebble (or textured) knit with not a lot of stretch. The double fold binding is applied with a single-needle stitch. The binding is a bit bulky because of the double fold and the texture. This application is probably the most appropriate for the style, just not my favorite.

February 28, 2007

The search for a mechanic to fix my Singer Hemstitcher 72w-19

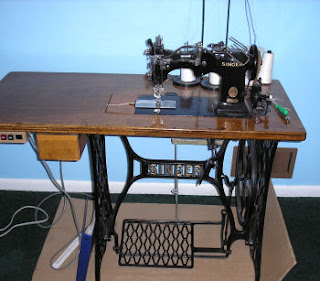
Singer hemstitcher 72w-19This is my Singer 72w-19 Hemstitcher. It was made sometime in the 1940's - the exact date can't be determined because of lost manufacturing information. It was refurbished, complete with a new paint job, before I purchased it. It is in incredibly good condition. The curious thing is this industrial machine originally came as a treadle. I would have expected manufacturers to buy machines outfitted with motors in the 1940's. My machine has been retrofitted with a new, modern motor, but I can switch over to the treadle if the power were to go out.

Speaking of power outages... Have you ever been stitching on an industrial machine when the power DID go out? Usually, there is enough reserve power to allow the operator to get the piece out of the machine. This is good because you don't want to leave pieces in a machine because of oil spotting. If the power stays off for more than a few hours, the operators usually get sent home. BUT, if the machines could be switched over to manual power, no lost productivity! There is a learning curve with manual treadles, and I certainly need more practice.

[back from sidetrack] I need to buy a rug and those plastic mover thingy's to put under the legs. It weighs a ton! The cardboard is meant to protect my carpet until I can get a rug.

Here is a close-up of the needle-assembly. You can see there are two needles and two punches. The pre-punch starts a hole. As the fabric moves through, the two needles move in a zig-zag type motion in tandem with a second punch. BTW, the punches are really called piercers. I prefer the term punches because the pierces do not cut the yarns of the fabric. Rather, they just move the yarns apart.

Close up of the needles on a Singer hemstitcher 72w-19When I first purchased the machine, I needed to have some minor adjustments made to improve the stitch quality. These types of machine, and especially the age, make it difficult to find mechanics willing to work on it. Even when new, each hemstitcher would have it's own unique "personality". A mechanic would have to adjust each machine until it stitched properly, which could be about a dozen possible minor adjustments. Over time, it's personality becomes more distinct. This translates into a lot of time for mechanics who have to tinker around with moving things as little as 1/16".

I ended up calling every sewing machine mechanic within a 500 mile radius. I finally found a hobbyist mechanic who specialized in old hemstitchers. He took the time to teach me how to make many of the adjustments myself, including proper threading. He was worth every penny! Plus, he has hard to find replacement parts. A true treasure.

The most difficult situation I now face is replacing the needles. The two needles need to be oriented just exactly right or I may end up with skipped stitches or broken threads. It is a task I dread, so I don't push the machine to its limits. It is capable of stitching 1300 SPM!

Thread stands for a Singer hemstitcher 72w-19I need to purchase a proper 3-spool thread stand. Here is my make-do set-up. The hanger stuck into an elastic spool works great for the bobbin winder.

In case you are wondering what a hemstitcher does, here is a stitch sample. A hemstitcher creates holes, held open by the stitching. My stitch sample is done on flannels close to the edge. A crochet edging can then be applied as a decorative treatment. I have seen the hemstitching, itself, used as a decorative element on clothing and linens. There really are a lot of possibilities. I hemstitch baby flannel blankets and burp cloths for local customers.

BTW, modern embroidery machines can reproduce a hemstitch, but the quality can't even compare to the real thing. Also, it takes twice as long to stitch.

Hemstitched burp cloths

January 23, 2007

A chair from the factory floor

This is the chair I sit on nearly every day and it has a story. It's not fancy, in fact it is rather ugly and uncomfortable. It has a few paint splatters from being used to repaint rooms in my house. The seat and paint is worn. What makes this chair so special?

This chair came from a local sewing factory as it was closing its manufacturing operations - the factory where I was first employed out of college. I don't know what possessed me to buy it other than it was cheap. It was after I brought it home that I noticed the date on the bottom of the chair. The same year I was born. A foreshadowing of destiny? More like life coming around full circle.

This particular factory produced little girls' dresses. My mother bought dresses from their factory outlet store - and yes I wore them. No one ever thought that I would be working in that same factory.

Sitting on this chair every day reminds me of where I came from, where I got my start. It is also give me tremendous sympathy for the poor women (literally) who sat on this chair and sewed little girls dresses day after day. Dresses that literally thousands have worn. All in an effort to earn meager wages. Even though the chair is uncomfortable, it keeps me from getting too cocky.

January 02, 2007

Knits-Wovens - How to tame the stretch


Remember my previous blog on flower buttons? I promised to blog further on how this manufacturer worked with combining knits and wovens. Combining knits and wovens opens up wonderful design opportunities, that is until you try to sew the two together. The knits invariably stretch out of shape and the wovens will stubbornly refuse to stretch.

The most frustrating thing is trying to gather a skirt (with a high gather ratio) to a knit bodice. Imagine a pretty gathered taffeta skirt sewn to a stretch velvet top. While I am not going to explain every tip and trick out there, this well-loved jacket has some excellent examples of how to do this.

The most important thing to remember when combining the two is that knits will have to be stabilized in some way. This jacket has a facing which has been interfaced with a light-weight interfacing appropriate for a stretch fabric. In other words, after the interfacing is applied, the knit fabric retains some of its knit characteristics - it doesn't feel stiff as a board. The interfacing prevents the buttonholes from stretching out and the topstitching is straight and even.

As a design inspiration, you can see how the facing is an entirely different fabric. The neckline and center front seams would have been too bulky if faced with the french terry knit. Instead, they used a flower print jersey. I am sure this jacket was part of a two piece set that had a matching pair of flower print pants.

The gathered eyelet trim was pre-gathered onto a twill tape and then applied to the hem. The manufacturer could have applied a twill tape to the jacket and then gathered the trim directly to the hem. In either case, the knit fabric has to be stabilized to prevent stretching. The jacket, sleeve and pocket hems all have this gathered eyelet trim. Wow!

The manufacturer gets bonus points for their patch pocket application. The rounded pocket would have been very difficult to maintain the round shape and topstitch it without stretching. They used a 1/2" strip of interfacing around the edge of the pocket. This picture is a close-up of the inside of the pocket.

The final tip is not easily observable. In a factory, the sewing machines can be adjusted to help prevent stretching. How the fabric is fed through the machine is part of the reason store-bought knits look so good. This adjustment is often called the differential and it refers to the movement of the feed dogs. Industrial machines with differential feed have two sets of feed dogs. These feed dogs can be adjusted in how far they move back and forth and up and down, in relation to each other. The front feed dogs can either pull extra fabric or pull less in relation to the back feed. This is not to be confused with the stitch length, also controlled by the feed dogs. Few home machines, with the exception of some overlock sergers, have this ability, requiring knits to be stabilized even more when sewn. A walking-foot attachment, or machine, may help with seam distortion too. American and Efird has some good suggestions on sewing knits.