Showing posts with label Pattern Drafting. Show all posts

January 13, 2015

What size is your pixel? Precision drawing in Inkscape and Adobe Illustrator

Last September I began to follow a discussion on pixels in the Inkscape Developer's mailing list. The concern was centered around units and how they are used in Inkscape. In the early days of graphical drawing it was assumed the user would want to see their drawing full scale. In other words if you drew a box that was 1 inch square, you would want to see that displayed on the screen. In order for that to happen, a definition had to be created to tell the computer how many pixels were equivalent to one inch.

In digital imaging, a pixel, pel,[1] or picture element[2] is a physical point in a raster image, or the smallest addressable element in an all points addressable display device; so it is the smallest controllable element of a picture represented on the screen. The address of a pixel corresponds to its physical coordinates. LCD pixels are manufactured in a two-dimensional grid, and are often represented using dots or squares, but CRT pixels correspond to their timing mechanisms and sweep rates.  (Wikipedia)
Over the years pixel sizes, and screen resolutions, have changed. We have far superior displays on our desktops then those early developers did. We can fit more pixels into that one inch than was ever thought possible. The whole discussion about pixel sizes and resolutions, gets rather complicated. Generally speaking, what a user sees on screen is what they want to get in print. How to achieve that is rather difficult.

Inkscape and Adobe Illustrator are vector drawing programs. This means that drawing lines and objects are stored on the computer as mathematical equations. Vector drawing programs are known for their precision, accuracy, and scalability. Programs like Gimp and Photoshop are raster-based drawing programs, programs that allow you to manipulate individual pixels. You cannot scale images up, only down, because the computer cannot fill in the holes. Lines are fuzzy because they are built of individual pixels. Both pieces of software have their advantages for different uses. The differences have begun to blur in the last few years. Inkscape and AI can now do things that were exclusively in the domain of Photoshop, and yet store the drawing as a vector drawing. Of course, Inkscape and AI are used in an environment in which the vector drawing is displayed via Pixels.


There is one reason to bring this topic up, as complex and boring as it may be. There is an increasing trend among indie pattern makers in the use of Inkscape and Adobe Illustrator for pattern making. In fact, you can take classes on the subject from various sources. These software programs do work - to a point. I've noticed with Inkscape a tendency for a certain fuzziness. I've created precise drawings where I've entered the dimensions and printed them. The measurements of the printed drawing were always a little off. Inkscape is not entirely at fault, though the developers have worked on improving this in the up coming release. There are a lot of variables that we have to contend with. Your display, drawing, and printer all play a factor in the accuracy of the measurements used.

The best way to test your current setup is to draw a square in your program, such as 1 inch x 1 inch. Print it out and measure it. Be sure to look at the print quality and width of your lines. Are the lines cleanly and clearly defined? Does your square measure as expected? Do you have to measure to the outside or inside of the line to achieve the desired measurement?

I took some time to test Inkscape with my current display and printer. First, I'll show you the printed results.

Measuring a 2 inch square for accuracy
The print out is pretty good. I drew a 2 inch square and it printed out as a 2 inch square. BTW, this was a square with a 1px stroke and no fill. You would think with these results, there would be no problem.

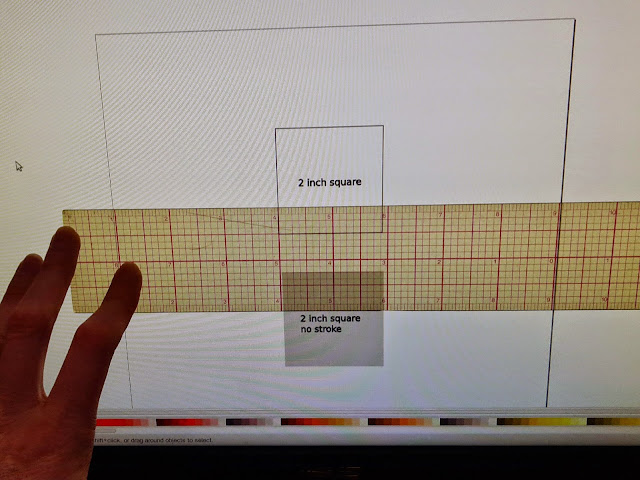
Measuring the screen version of a 2 inch square
But next, I measured what I saw on the screen. The 2 inch square actually measures 1.875" x 1.875".  If this were an actual pattern piece, an 1/8" can make a difference, especially in grading. This kind of error would become magnified with each grade step. Also, the placement of critical components such as pockets, drill holes, buttonholes, seam allowances, darts, and notches could all be off by just a little bit. This is part of the problem that the Inkscape developers were concerned about.

And here is where the fuzzy math comes in.

Dimensional anomalies in precision drawing in Inkscape

I drew a square and entered in the exact dimensions for width and height of 2.000. Clicking off the square and then reselecting it shows that the square now measures 2.011 x 2.011 inches. Not a big deal if creating a drawing for the web or a poster. But it is a big deal when creating a precise drawing. As a user, until I print something out, I have no idea if the drawing will measure as expected. If I make adjustments, I have to take into account what I see on the screen and what Inkscape reports back to me. Fuzzy, much?

I don't know if this is a bug specific to Inkscape (0.48) or my hardware. I also don't know if this will be true in the next release (0.91). I don't know how Adobe Illustrator tests out. I do know that Inkscape and AI are not the greatest tools for pattern making and grading.

Perhaps you are thinking this is much to do about nothing. If it mostly works, then why worry about it? Specialized apparel CAD systems are optimized to not only create high precision drawings, but to do it efficiently. Sure Inkscape and AI have their place, maybe they will work for you. But if you really want to get to the next level, you need the right tools.

March 27, 2014

A bolero sewing pattern search

A mink bolero
A mink bolero

An anonymous commenter left this inquiry:
Do you know of a good pattern for making bolero (sp)? I want to make some pretty but basic ones to go over shirts, etc. I can't seem to find a pattern for a basic one.
I have a personal preference for boleros or shrugs made of knitted fabric or actually crocheted or knitted. I haven't sewn any for myself, so I can't really recommend any patterns. Though after looking at Pinterest, there are several I might actually look at trying. I pinned several possible sewing patterns to a pinterest board titled Boleros, but as I haven't actually sewn them I can't recommend any of them.

The simplest bolero/shrug is merely a rectangle, folded in half with short seams sewn along the long edge to form an underarm or sleeve seam. There are of course many variations that can be created from this by modifying the shape from a rectangle.

Pattern drafting for a simple bolero or shrug


Style is always subjective and I'm not sure what would be helpful. Boleros come in all kinds of shapes, from fitted to structured, and many fabrics. There are tailored, modern, and vintage styles. It is difficult to offer a suggestion without knowing more. If you have a suggestion, please leave a comment.

February 03, 2014

Pattern drafting in LibreCAD

At the start of the new year I commented about trying to figure out what to do next. I described my feelings as reaching the end of one road and trying to decide which road to take next. You might assume there were only a few options, but in reality there are many. One option was to look at languishing projects to pick back up. I have two rather large projects. One will take me many years, the other is about half done.

The really large project is sodaCAD. I started a software project back in 2010, but let it drop because I lacked the skills to work on it. SodaCAD is my attempt at an open source pattern making software. Most commercial or enterprise level pattern making software packages are very expensive and have onerous maintenance fees and licensing. I've always wanted to provide an alternative.

sodacad logo and icon


After much research and a few different attempts, I stumbled upon LibreCAD. LibreCAD is a free alternative to AutoCAD. Commercial pattern making packages have AutoCAD at its core. LibreCAD contains many essential CAD drawing functions already, so it is a perfect foundation to build on. I actually learned how to draft patterns using AutoCAD in college. What I lack is programming skills, but that is slowly coming.

Before I can work on optimizing LibreCAD, I had to test it out and actually try drafting a pattern to test its capabilities. It took a bit of time, but I managed to draft a bodice front.*

A bodice front pattern drafted in Librecad
LibreCAD is by no means the ideal solution (not yet!) for this kind of work. It is, in many ways better than Adobe Illustrator or Inkscape. Illustrator and Inkscape lack precision and efficiency. Inkscape in particular, tends to be fuzzy when it comes to numbers. Say you draw a square that is 25 x 25, but you move one side out 1 inch. Now you have a rectangle that is 25 x 25.95. LibreCAD has no issues with precision. It does lack efficiency for pattern making, so I made many mental notes for improvement.

LibreCAD is available for use now on Windows, Mac, and Linux. If you do decide to try it out, I would recommend watching some video tutorials on YouTube. The interface and drawing functions take some learning. I have no idea how long it will take to get SodaCAD ready for use.

*This pattern piece is available in sodaCAD source files for demonstration and testing purposes.

January 23, 2014

Shoulder slope pattern correction

LisaB asked me to explain:

Raise the shoulder at the neckpoint 3/8" on front bodice to correct shoulder slope problem. I need to apply this correction to my t-shirt pattern too.
I tried my first cardigan sample on several times and noticed the shoulder seam was not pointing in the right direction. The seam at the neck point was pointing toward the front rather than laying right on top of my shoulder. I also looked at my t-shirt pattern and observed the same problem. This indicates a possible shoulder slope problem or shoulder to hem length problem on either the front or the back bodice or both. To figure this out, I ran a basting thread in my cardigan shoulder seam area and looked in the mirror to see where I needed to make the adjustment (no fitting buddy or dressform at my house, unfortunately). I also pulled out my blouse pattern and compared the shoulder seam. In the end, I needed to move the shoulder up at the neckpoint 3/8" on the front bodice. This increased the shoulder to hem length on the front just enough to allow the back bodice to relax backward and position the shoulder seam right on top of the shoulder.

Raising the shoulder point at the neck 3/8"

Not everyone will need to make this adjustment. This was a problem inherent in my own patterns to fit me. The drawing below, I hope more clearly shows how the shoulder seam was laying.
View of the correct shoulder point on the body

December 12, 2011

T-shirt pattern quest pt. 1 : Create a rub-off of an existing t-shirt

Pattern rub-off from an existing t-shirt
My favorite t-shirt company went out of business and I really loved the fit of their t-shirts. The best solution I could come up with was to recreate the pattern by doing a rub-off of one of the t-shirts. This pattern is for my own personal use, but you will find many pattern makers who do rub-offs of existing styles as a starting point. This is one way to study how another pattern maker developed their pattern. I have done this in the industry too, but the resulting style was not an exact copy and bore no resemblance to the initial style. Copying a style in this way for the sake of reproducing an identical product to sell is another thing entirely.

You can see the resulting shape of the pattern that I rubbed-off or traced. The armhole is symmetrical for the front and back bodices, which is fairly typical for t-shirts. Technically, the armhole should be different front to back and if you have fit issues, this would be one place to adjust. For now, I'm leaving it alone.

The original pattern also had binding on the neck and sleeves. I wasn't sure how to accomplish that and have it look neat on a home sewing machine. I think there may be a way that I'll play with later. At this point, I added seam allowances for a narrow neck ribbing.

Scale to calculate knit stretch
Patterns for knits are designed with the amount of stretch AND recovery. The original t-shirt had some spandex, which means it stretches and recovers a bit better than a 100% cotton jersey. The original t-shirt is pretty slim fitting because of the spandex and because it is meant as a layering t-shirt to wear under other tops. I wanted to have a pattern I could use with 100% cotton jerseys, so I plan on adding a bit of extra wearing ease.

I noted the amount of stretch for the original knit fabric on the pattern. The stretch ruler is found in the Armstrong pattern drafting book. I'll target my knit fabric shopping for between 50-60% stretch - just have to remember to take a copy of the stretch ruler. I do have some stash knits but it has taken me over a week to find it. More on that later...