Showing posts with label Cutting. Show all posts

January 20, 2013

Natalie Christening Gown pt. 1 : Prep work

I am very excited to be able to join Esther's blog. As she mentioned, I am costume designer by trade but  currently have taken some time off to raise my girls. Before children, I worked as a university professor teaching costume design, theatre technology, and special effects makeup. I have recently started to dabble in tutu making and have done some freelance work in that area. Hopefully, my posts will be of interest.

So right now I am working on a Christening/blessing gown for baby #3. I decided to go the heirloom route. The pattern is from Sew Beautiful issue 135 March/April 2011, the Natalie Christening Gown. I have never done anything heirloom before except for making some 19th century women's blouses for various theatrical productions. Materials I am using are silk dupioni, French cotton laces, silk ribbon and glass beads. I haven't bought all the lace yet but will need to soon. The cost of this project is a bit on the expensive side. I think the cost of the laces will end up being the most expensive items. I goal is to have this finished by the end of the month.

Below are some pics of what I have done so far (Hopefully, you can make out the details, photographing white is tricky).


Marking the pattern on silk
 Center Front panel traced onto fabric using pencil (This is marking cutting lines so no worries of it showing through once sewn). Center front is marked using a disappearing ink pen.


Marking the embroidery pattern on silk
I chose to pencil mark the embroidery pattern.


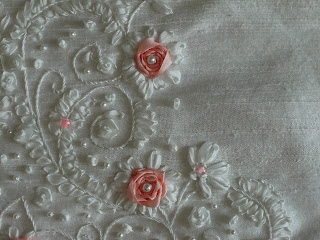
Silk ribbon embroidery
Detail of finished ribbon embroidery. Still debating on adding more but will look at it when the dress is sewn together. 


November 09, 2011

Transferring patterns to tag board : an example of a blouse

Front and back bodice pieces in tagboard
 After sewing up Blouse 2.0, I felt confidant enough to transfer my pattern pieces to oak tag or tag board. Tag board is the same stiff paper product used in file folders but available in large sheets or rolls. Some pattern makers do all of their patternmaking on oak tag, which is a better practice. But, I usually do my initial patterns on tracing paper or medical exam paper. At some point I do transfer it oak tag for durability. These patterns aren't necessarily production ready. They are designed for the way I work at home. The darts are cut out so I can trace the dart shape on the fabric. In industry darts are marked with drill holes, just as an example.
Collar and collar band pieces in tagboard
I still need to create a buttonhole placement guide and place the armhole notches. I figured out about how much fabric I need to make a blouse and noted it on the main bodice piece. Fold lines and seam allowances that are different from the norm are indicated. I should have marked the interfacing piece in red ink - forgot to go retrieve the red pen from the office.
Paper pattern pieces ready to store away
Anyway, my paper pieces are stored in an envelope for future reference.

January 11, 2007

Disappearing Ink Pens for the Sewing Room

These disappearing ink pens are among my favorite tools. I go through several of them every year. I use them to trace around a pattern directly on to fabric for cutting. I also use them to mark stitching lines like darts, fly-fronts, or even quilting lines. It is great for marking match points in the middle of a piece. I rarely make tailor tacks or sew-baste thread markings.

In this picture, you can see how well the line shows up, even on difficult to mark fabrics like blue. This drawn line came from a pen that is nearly dead (I use them until they are dead). It works on most light to medium colored fabrics. It has difficulty with anything that is pink, red and of course black. For those colors I whip out chalk pencils or soap remnants (soap usually works better). I have used these pens on a variety of fabrics from silks, satins, laces, flannels, broacloths, to denims. I use them on personal projects and in industry settings.

The back of the package says to test on fabrics before using. I have had very few problems with the ink not disappearing. If I were to topstitch a fly, I may test it. The last pair of pants I made, the fabric had a finish on it that prevented some of the ink from disappearing. But it all came out in the wash. I wouldn't iron over the ink until it has completely disappeared - the heat/steam from the iron may set it. It would be rare for the ink to become permanent. Most of my ink lines are from tracing around pattern pieces, so they would never be seen anyway. The package states the ink disappears within 24-72 hours. I find it disappears much faster than that, especially when exposed to air. The age of the pen also determines how long the mark will last.

I have difficulty finding this exact pen in the fabric stores. They carry disappearing ink pens, but they don't work as well. For some strange reason fabric stores (the ones near me) carry Dritz marking pens, but not this one. This pen is from Dritz and I can be ordered from Amazon.