Showing posts with label Fashion. Show all posts

May 15, 2008

Does your fashion clothing line tell a story?

A clothing line that tells a story

In a previous blog entry I answered, "What is a line?". That recent blog and other things I have been reading have led me to the next logical question. Does your line tell a story? I partially addressed it in the previous blog.

Some say a line tells a story. That is the more difficult thing to interpret or even observe. Not too many customers care about your source of inspiration unless it is an integral value that they share.

There is a line story and a company story/history/values and some people confuse the two. Does the line story have to reflect the company story? Does each piece have to reflect the company values? How much do the two overlap? Or should they?

A story or narrative describes a sequence of events or parts through the written word or visual depiction. The story contains clues, pieces, or parts that the reader or observer can put together to make a whole picture or concept. At least this is the dictionary definition.

How does this apply to a line of clothes or even a clothing business? You will hear on tv shows like Project Runway that a line should tell a "story". Each piece should be part of a whole. There should be a beginning, middle, and end. If you watch a runway show, the storytelling becomes even more important because a runway show is part entertainment. The runway show of a high-end designer is an easy, not necessarily the best, example. They may start with a strong day piece, maybe some office wear, and usually end on an evening gown. It's as though their customer will be able to visualize wearing each piece as they go through their day.

In the regular old fashion business, the concept becomes more abstract. Still, each piece of your line should look like it belongs to the whole. A sales rep will merchandise your line as though it has a story. They will start with a beginning piece and end with the logical ending piece. They may start with the strongest piece, weakest, or maybe the middle and put it all together so it is most appealing to the buyer. Each buyer may get a different story. A skilled sales rep will know what will appeal best to get the buyer to buy. The entertainment value is overshadowed by the business side of buying and selling.

This why I stated above that the buyer, and even the end consumer, doesn't really care about your source of inspiration or all the blood, sweat, and tears that were shed to complete the line. You shouldn't have to tell them any of that. It isn't relevant. A customer should look at your line and pick out the pieces they like well enough to buy. The story should be subconscious.

A line sometimes has a theme, inspiration, color, style, mood that ties each piece together. If you look at Tea Collection again, you can see an apparent theme. I see beach, sand, and casual. There is a beginning, middle, and end. Do you see it too?

This is not to be confused with your company values, history or story. Now there are some design companies out there that mix their company values and history into each piece. Their story lies on the surface. It is apparent what their clothing stands for, how it was made, and why. There is nothing wrong with doing that, if you choose. But ask yourself, "How long will my story be relevant? How long will the customers care? Will they care?"

What if you create an organic cotton line of screen printed t-shirts for baby with rock star sayings made in a sweatshop free factory? Perhaps those things are part of your core company values or history. How long will this story last before it becomes stale or passe. By mixing your brand, line, and company philosophy too closely, you will limit your company's growth and creativity. If you wear your story on your shirt sleeves, people will eventually tire of you. Such a story can and should be an integral part of you as a designer, not something blasted in their face.

What do you think? How much should your line story and company values overlap?

May 05, 2008

What is a clothing line?

A merchandised clothing line

In terms of fashion, a line is a group or collection of 5-7 related pieces. Sometimes it is more. Sometimes the pieces are actually sets because children's lines tend to be sold as sets (bringing the total pieces to around 10-20). The point is that the pieces are related. The pieces have similar colors, tones, mood, feel. From a manufacturing end, the pieces repeat fabrics to minimize and utilize fabric purchases. The clothes have a consistent fit.

Some say a line tells a story. That is the more difficult thing to interpret or even observe. Not too many customers care about your source of inspiration unless it is an integral value that they share. Usually customers care about price, fit, comfort, and finally, "Does it look good?".

To muddy the waters, newer children's designers on Ebay and Etsy do collections based around a fabric grouping. They offer up one of a kind outfits that utilize a particular theme or fabric print. They will call that one outfit or piece a collection. Some of these designers evolve and manage to present a true line. In any event, they are inspiring some RTW collections.

A good example of a well merchandised line can be found at Tea Collection. They do some things really well. They have repeated fabrics. The pieces can be mixed and matched. It has a consistent feel, colors, and look. Each piece looks like it belongs. You could even say it tells a story. Can anyone else see it?

What lines are out there that you like? Post links in comments.

March 27, 2008

Peasant Blouse Pattern Conquered


There are a few styles that have always perplexed me. The peasant top with an elastic neck and elastic sleeve cuff has always driven me crazy. When I relied on pattern making books to develop the pattern, I would start off with a kimono style. Bad move because it will create a neckline on the bias. On most styles, this will happen by default. But try tunneling elastic into a neckline casing that is on the bias? It doesn't happen. At least not well. Funny thing is, I have a RTW sample with tunneled elastic on a curved neckline. I am fairly certain the factory that sewed it had a set-up with a 1/4" rolled ball hemmer with an elastic feed. Anyhoo. I don't have one of those nifty set-ups.

The secret is that the neckline should be on the straight grain. I received a helpful tip from the blog Just Tutes with her peasant blouse tutorial. I didn't copy her method exactly. I had to study why it works and where her measurements came from. I drafted a peasant blouse off of my basic blocks and my measurements to get the same basic shape as hers. Amazingly, it worked well enough and I just need to grade my pattern for other sizes.

February 20, 2008

Design a clothing line with a plan

Coffee and notebook
If you watch Project Runway or believe any of the stereotypical Fashion Designer drivel, you may think a line is designed by pure inspiration. A designer goes to a museum and is inspired by a piece of artwork and can magically create 5-7 pieces that all work together. Or perhaps a designer flips through some swatches and tosses some to an assistant to make samples out of. This kind of thinking is silly nonsense and will lead to disaster.

It is true that a designer can be inspired by a piece of artwork, a fabric print, color, etc. But unless one designs with a plan, or end goal, it will only be an exercise in design for design's sake. A design plan should follow some basic steps and answer basic questions:
  1. Review the past line.
    1. What sold best/worst?
    2. Customer comments
    3. Returns
  2. Review past goals and set new ones.
    1. Did you meet sales expectations?
    2. What are my sales goals for this season?
    3. How is my budget?
    4. Set design budget for the next season.
  3. Shop the market between seasons.
    1. What are my competitors selling?
    2. What are their price points?
    3. Do I hang with them?
You'll notice that none of these questions have anything to do with design. They are ordinary business questions and it is good practice to review them at the end/start of a new season. Finally, I sit down and actually "design" my line.
  1. Shop for fabric/trims. (this is where I find my "inspiration".
    1. Does the fabric express the brand?
    2. Does it fit within the price point for raw materials?
  2. Determine number of styles/pieces.
    1. Can any styles be carried over in new color/print?
I then sketch, come up with words to describe the group and generally get lost in the design process for about 2 days. I sample my styles directly in the real fabric. I don't do muslins or toiles - those are only to work out pattern problems. The sample making process can take a few weeks and gets a little nitty gritty, but at the end of the process you will have designed you line.

November 09, 2007

Standard Pattern Blocks- Flat vs. Classic

Tiki left some questions in comments and I thought I would address them in a separate blog entry.
I am reworking some of my patterns and have both Aldrich's and Armstrong's books as well. As you mentioned, I have noticed that my own kids' clothes from various manufacturers are drafted "flat" as Aldrich describes it, with the front and back patterns basically identical except for the neckline, but was wondering if you could explain more why that is the standard.
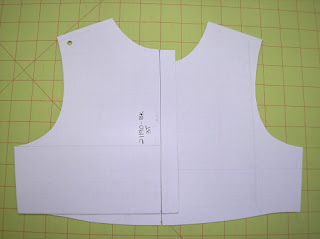
Here is a picture of what Tiki is talking about. Aldrich is the only other person I know of that addresses this topic. It is true that most childrenswear manufacturers work off of flat blocks, especially for infants. Aldrich only presents it for infant casual clothing. But I have seen variations of the idea spanning all children's sizes.

An example of a modified classic pattern block
My basic blocks are a variation of the flat method. The armholes and shoulders of the front and backs pieces are identical. The body widths match (the long vertical line indicates the center back/front). The flat fit is a little more boxy and loose. My fit is not too boxy, but it does allow for some growth. You can see the fit of this bodice on one of my dresses. The patterns are not too boxy because the side seams do taper inward and my front waist has some curve. Aldrich's patterns have a straight side seam and waistline. BTW, I am not done refining the shape of this pattern - I am considering narrowing the shoulders and reducing the armhole. You have to start somewhere with your patterns, and they will evolve as you refine your fit.
I have read the discussion of armhole and sleeve shaping from Kathleen's blog and book and was wondering if the standard in the children's wear industry is due to simplicity in drafting, etc (perhaps because there is more ease built into the design of the garment itself) or if there is a specific anatomical/physical reason that makes drafting the asymmetrical sleeve/armhole unnecessary in children's wear. I guess, in other words, is that only the standard in loose children's garments or would drafting a more fitted children's garment with the same symmetrical sleeve still be correct/standard?
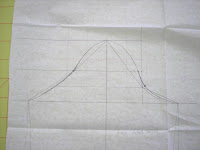
I can't say for sure why this is the standard. It is definitely not something I learned in school, but rather on the job. Tiki's instincts are probably right. There is a simplicity in the drafting of flat pattern blocks, and it does save some time. There is a physical limitation too. The smaller the size, the less practical it becomes to draft a classic block. A flat block gives some wearing ease and allows for growth. Children, after all, grow and a little extra ease allows the clothing to be worn longer. And yes, you can draft a more fitted bodice block with symmetrical armholes/sleeves. That is what I did with my patterns because it is what looked right to me. Here are some pictures of a classic, fitted block with asymmetric armholes (click on images for a better view).

Pattern draft of a classic fit bodice blockThis is a set of classic bodices sized three month. You can see the small armhole - there is little room to draw a nice curve. The back armhole is nearly a straight line. These drafts are based off of Aldrich's book. A classic block would be more appropriate for larger sizes.


Pattern draft of a sleeve with an asymmetric capThis is a corresponding sleeve with an asymmetric sleeve cap. The sleeve cap seems really high and the curves are abrupt, IMO. These blocks could certainly work, but they require more refining. I opted to modify my blocks so they were semi-fitted and flat. The curves are easier and sewing is easier.

There is a relationship with children's body shapes and the flat method. Young children are simple round cylindrical shapes until about the age of 5 and it makes sense to keep the patterns simple.
I'm having difficulty understanding from Aldrich's book what makes the "flat" block or "classic" block more appropriate for a particular style, so I wondered what was standard practice here in the industry. I hope this makes sense.
I look at it this way. Flat blocks are good for casual styles, like t-shirts. Classic blocks are good for more formal looks. Flat blocks are good for infant sizes, classic for older. Your fit and look defines your design and you can opt for either method. Usually I see a modified classic block for fit, but with symmetrical armholes and shoulders (perhaps more of a convention rather than a standard). I have seen some designers use only classic blocks and others only flat. Really, the decision is up to you.

This is a topic I am still researching and trying to understand. I hate to label flat blocks as a standard because there are several possible methods that may be considered "right" or the "standard". Pattern making is considered a technical, rigid system, but don't be afraid to do things your way. I learn things from those who do not have formal training and are not afraid to do things a little different. Sure there are certain accepted standards for labeling patterns or placing notches. Acceptable shaping and fit is open to interpretation.

November 01, 2007

A Problem With Cap Sleeves

Over the last couple of months I have struggled with drafting a toddler cap sleeve. For whatever reason, my infant cap sleeve came off without a hitch. I tried some quick and dirty pattern making by grading the infant sleeve up to 24M and using it as my toddler base. The shaping just didn't work and I had to actually draft a 3T sleeve. I used the opportunity to compare draft instruction between Aldrich and Armstrong and these are my results.

The actual draft instructions for either cap sleeve are fairly simple and easy to draft. Even so, I didn't like the shaping and resultant styles of either sleeve. I'll try to explain the differences of each. I had a stronger preference for the Armstrong version, but I still modified hers considerably.Sewing pattern of different sleeve cap shapes
The top sleeve is the Aldrich version, the bottom my modified Armstrong sleeve. The Aldrich sleeve is very straight - such a sleeve results in a large sleeve cuff opening. Her sleeve is not a fitted cap sleeve. The instructions were easy to follow, I just had a styling disagreement.

I much prefer a fitted cap sleeve. The basis of the sleeve draft must start with a regular sleeve block. Just draw in a style line similar to what you see in the photo for the shaping at the hem. There are some minor refinements detailed in the Armstrong book. The problem with the Armstrong draft is that the sleeve cap height was too high for a toddler. I decreased the cap height by about a good 1/2". Walk the sleeve cap along the armscye and adjust any length differences. Armstrong states there should be 1-1 1/2" of ease in the sleeve cap, which is simply too much. My sleeves have virtually no ease because I removed it. Sometimes the fabric calls for 1/4-1/2" of ease, but not anymore. A sewing operator will return a bundle with too much sleeve cap ease. It is just too difficult to sew in an industrial sewing. And in IMO, it doesn't do anything for fit or wearing ease. Armstrong's draft instructions are easy to follow and you can make any adjustments you prefer after you have the shape you want.

If you look closely, you will notice that my sleeves are symmetrical. This is because my bodice armhole shapes are identical for the front and back. This is typical in the industry for infant and toddler styles. In older children, this is not true and Aldrich's basic sleeve drafts illustrate the differences very well. Kathleen Fasanella has blogged much on the proper shaping of sleeve caps.

A sewn sample with two sleeve that have different sleeve cap shapesHere is a sewn sample. On the right is the Aldrich cap sleeve and my modified Armstrong sleeve is on the left. Can you see the difference in the sleeve shaping and cuff openings? The sleeve on the right is good for t-shirts and casual styles. The sleeve on the left is better for more formal, fitted styles. I have a few minor refinements to make and at least one more sew test and I will have my toddler cap sleeve done! (I am debating on adding 1/4" back to the sleeve cap height, overall I like it).

Either book will get you a basic cap sleeve. My eyes prefer the fitted style. Any questions? Anyone need draft instructions?

September 13, 2007

Make a Design Storyboard

As I was designing Prairie Roses for Fall 2007, I created a digital design board. In school it was all about literally cutting and pasting paper onto illustration board. I like the digital version because it is much faster and more professional looking.

A design storyboard
I had a hard time identifying and explaining the look I wanted. When I started it was simply a feeling. I decided a story board was the best way for me to explain my line to myself. I have rarely done this in the past - it always seemed like busy work. This time, I have convinced myself of it's necessity. As I struggled to find pictures that explained the mood, everything else seemed to fall into place. The words A Country Sensibility came to me and it was perfect for so many reasons. It made me think of Sense and Sensibility and Jane Austen - how can I translate Jane Austen's "look" into little girl's dresses. It made me think about sensible country living. Being grateful for what you have. Not living too extravagantly - but comfortably.

Anyway, I headed out with my camera and took pictures of the flowers growing in my flower beds and nearby scenery. There was my mood. I already had purchased the fabrics and they meshed perfectly. The red ombre ribbon roses were the highlight and the key to the brand name.

Prairie Roses was a difficult brand name to nail down. Do you know how hard it is to find a brand name that is not already in use? One that fits the mood and explains the look without the customer ever seeing the clothing? This is complicated by trying to find an internet domain name that is available. It took weeks of research.

The work required to pull all of this together had other benefits. I emailed a graphic designer a copy of my design board and she was able to design my logo (which is shown on the right). I am fairly pleased with the results of the line, the logo, the brand. It all meshed together so perfectly. It feels good to be focused and I am excited about designing more for this line.

Next week is even better. I have been working on toddler patterns and I have a fitting/photo shoot scheduled. I am excited!

August 22, 2007

The color purple for children's clothes

Baby clothes hanging on a clothesline

For years I have heard rumors about the color purple and children's clothing, and more specifically girls dresses. Specifically the rumors suggested that purple was associated with death. That children who pass away are buried in purple in certain countries. Sales of purple dresses seemed to lag behind other colors, and some retailers refused to carry the color. If you shop the market you will probably not see much purple in the infant/toddler range.

Purple is an odd fashion color. It seems to run through the fashion cycle rather quickly. Either you love it or hate it. Of course a designer must consider the shade and intensity and other such things. And yet one hot color combo for girls is orange and purple. I haven't figured it out.

Read more about the color purple at Wikipedia and Sensational Color.

May 22, 2007

Clothing for Children: Chapter 3, part 3

Essentials in the Layette
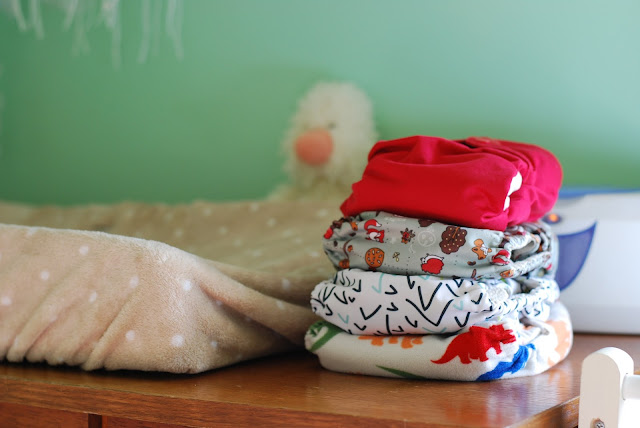
Cloth diapers

This section discusses what is needed in an infant layette. Diapers are considered one of the most important layette items to have, especially cloth diapers. Disposable diapers were available in 1949 but they were bulky and used mostly during travel. Disposable diapers have certainly improved since 1949 and many people use them. However, do we want to trade convenience for landfills brimming with diapers that don't decompose? It's past time to return to cloth diapers.

I will be the first to admit that I haven't paid much attention to cloth diapers. I have designed special occasion dresses for several years. When I think of cloth diapers, I think of diaper flannel. It's soft and absorbent. But there are many more choices today, not only in fabric but print and design. Suzanne from The Good Mama gave me a rundown of fabrics used in her diapers. Bamboo velour and organic cottons are both renewable resources, and soft, comfortable fabrics. The prints are adorable too.

In 1949 the typical diaper was a large rectangle of flannel fabric that was folded a certain way and pinned on with diaper pins. The diaper was then covered with rubber pants, wool soakers, or water-repellent batiste pants. The authors encouraged limited use of diaper covers because they did not breathe, especially the rubber pants. Wool soakers were preferred because they kept the baby dry and breathed. The wool soakers were made from a knit fabric.

The cloth diapers of today are engineered much better. They have closures like snaps and velcro - no need for diaper pins. They are absorbent and rarely leak, so no need for plastic diaper covers. They are constructed to withstand lots of washing. The fabrics are soft and more durable. The price may be a little higher, initially, than disposables but they will last a long time.

The rest of the chapter discusses all the rest of layette essentials, which is pretty common knowledge.

May 14, 2007

Clothing for Children: Chapter 3, part 1

A smiling baby in comfortable clothes
I am going to do a series of posts on Chapter 3 of Clothing for Children because each section deserves its own emphasis. This is perhaps the best chapter in the book. It discusses standards, layettes, diapers, various pieces of clothing, etc.

The first section of the chapter is titled Standards for Infants' Clothing, pages 103-104. Most of the information is still relevant today and designers should keep these things in mind when designing. If you have an opinion or question of how these standards apply today, please leave a comment.

1. A baby's clothes should be made of material that is soft, pliable, and absorbent. Garments worn next to the skin, especially, should not be irritating.

2. The material should be durable, easily laundered, and, whenever possible, it should not require ironing.

3. The clothing should be light in weight but sufficient to keep the body at the normal uniform temperature of 98.6 degrees. The material and garment should both be constructed to allow ventilation.

4. The design of the garments should make them easy to put on and to remove. If you plan to make the garment, the design should be one easy to make.

5. The garments should be comfortable and allow freedom of movement.

6. The clothing should be well constructed with smooth flat seams and have easy simple fastenings.

7. The design, as well as any decoration, should be simple. Trimming should not add to the bulk of the garment. Baby's clothing should be attractive, but this does not depend on elaborateness.

8. The garments should be designed to allow for growth and development of muscles.

9. The garments should be safe.
Most of the standards seem pretty straight forward and practical. You can read my blog entry on Clothing for Children, Chapter 9 for my opinions about standard #7. I am not sure how to take standard #8. Most of the designs I have seen that allow for growth (such as an extra deep hem, tucks, etc), have been ugly. Plus, by the time a child has grown, the garment is worn out. I would like to see a practical solution to allowing for growth.

From a practical stand point, #2 is true for the majority of children's clothing sales. But as your price point moves up, the more likely that your customer may be willing to buy a dry clean or hand wash item. A higher price point customer expects specialty fabrics and they are willing to buy them despite special care. Still, I think higher-end designers tend to go overboard with feather boa trimmings and sparkles. There is a happy medium somewhere.

The point of #3 is that babies need to have their temperature moderated. Not too hot or too cold. It would be easy to assume that babies need to be bundled up all of the time, but it is better to remove or add layers as needed.

Finally, the authors give some sage advice. They suggest buying minimum amounts of clothing before the baby arrives. It is hard to know the size of the baby until born, plus babies grow fast. It is wiser to invest in clothing as needed. At baby showers moms are overwhelmed by lots of clothing sized 0-3M. If you do buy clothing to give, try buying clothes sized 6-12M as that size is mostly overlooked.

March 26, 2007

Thread color does matter!


Thread colors

Most of the time, manufacturers know to match the thread color to the body of your design. If you hand them a sample, then they will reproduce it down to the thread color. Most manufacturers are very good about this, so specifying the thread color is usually overlooked.

But every now and then, you will run across a rare manufacturer that is either color blind or will use whatever thread they have on the shelf. It may or may not match. If you specified the thread color, then you can go back to the manufacturer with a charge-back. If you didn't, well then you might be stuck. (I have seen this happen!)

Another reason to spec out a thread color is to match a screen print, embroidery, or coordinating piece. The thread color becomes an integral part of the design. Would you really want to leave the end color up to chance?

It's really simple. On your spec sheets state "Thread color: American & Efird [color name] [color number]. You may even want to go to the extreme of including a thread color swatch, just in case the manufacturer buys thread elsewhere. Wind off some thread onto your fingers and make a little, mini-hank of thread and tape it onto the page. You can buy thread swatch books from American & Efird (You'll have to talk to a sales rep about a swatch book). You can even get thread dyed to match!

March 15, 2007

Bundiebaby - A good idea that could be great

Competing in the childrenswear fashion industry is all about finding a niche and doing it well. Jody Williams is one such individual who has a great niche, but is struggling with the execution. Jody was recently highlighted in Forbes magazine, (March 26, 2007 issue). (You have to register at Forbes online to read the article, so I am not providing the link to the article. Head to the library instead).

Jody creates clothing for children with special needs. Specifically children who need feeding tubes and ostomy bags. Her business idea developed after a rather difficult night with a special needs foster child. She sat down in front of her sewing machine to solve a problem and created a one-piece swaddling outfit with only one opening for diaper changes.

The article was not all that positive towards Jody. It reveals some interesting facts about her costs versus her retail prices. DE's need to pay attention to this kind of stuff, or it could sink a start-up. And please don't get me wrong. I WANT her to succeed. Her idea is very much needed. This is one DE that would benefit from reading Kathleen's book.

She has spent $35,000 and four years to sell only 100 units. Her wholesale cost for retailers is $22 and she retails them for about $40. She spends $10/each to manufacture. One very revealing detail is that she spends 26 cents for each label! But to be fair, many people will pay $40 for a bodysuit/onesie at a specialty boutique. I think she can overcome the sticker shock if she finds the right distribution and marketing.

She certainly needs to lower her manufacturing costs, but she has also chosen a difficult customer profile. Cash-strapped parents of special needs children have to be convinced to part with $40 for one outfit. Plus, hospitals are very difficult to work with because of fierce competition for high dollar contracts.

I hope she does well. Special needs children need her.

February 22, 2007

A CEO's experience is important - the Difficulty at The Gap in 2007

I love BabyGap. I think the designers do an incredible job. The product looks fresh and cute, and it is priced reasonably. I read a very interesting article in February's 26th Business Week, Paul Pressler's Fall From The Gap. My first reaction was here is someone who didn't read Kathleen's book. Reading through the article (and if you can believe everything in it), one can see he clearly didn't understand the fashion business. It would be easy to put all of the blame on him because he was the new guy. The truth is that GAP has corporate culture issues not unlike any large company.

I met an assistant designer for GAP years ago. The impression she left was not very favorable. At least I decided I would not work there, if given the choice. It was a pretty cut throat environment with people climbing the corporate ladder rather quickly because of constant turn over. She left the impression that she could be become one of the head designers within a few years. Success like that does not happen without a lot of back-stabbing.

So I don't blame him entirely for his failure to turn things around at GAP. It would not have been an easy task to walk into a difficult corporate culture, with little fashion experience. Some of his decisions illustrated in the article were indeed poor, others just missed the mark. I think design entrepeneurs can learn from him. Here are my thoughts on some of his decisions:

1. Combining fabric purchases. He made the mistake of combining denim sales for all four divisions of GAP, including Old Navy, Banana Republic, and Forthe and Towne. The result was that all divisions ended up with exactly the same denim to use in all of their denim styles. There is no point in having four divisions if there is not some kind of difference in the clothing. Why buy denim jeans at Banana Republic when you can get the same thing at Old Navy for less money?

The idea is not without merit. I have had corporate execs suggest the same in the past. The goal is to negotiate a lower price for the raw materials by buying in bulk. A small company can combine fabric purchases to also negotiate a lower price. The point is that you shouldn't buy only one fabric, or one style of fabric. Large fabric mills will push you in that direction because it is less expensive for them to run 10,000 yards of the same denim fabric. But what are you going to do with 10,000 yards of denim?

A small business is more likely going to need, say, 300 yards of denim, which will cost more than what GAP will pay. But you can still negotiate a lower price. Sometimes, your order can be combined with an order from another company. Both companies could benefit with a lower price. Perhaps, you could up your order to 500 yards and you can use the extra fabric the next season or in another style. If the fabric company has more than one type of fabric, perhaps you could combine your fabric needs with one company. A long term relationship between supplier and buyer can lead to lower prices.

A small business should never buy ALL of their fabric from one source. You never know what could happen, so make sure to have back-up choices.

2. Outsourcing development. Pressler required his designers to create their patterns in the states and then have the samples made in Asia. Sample making in Asia is cheaper. The problem is time. It takes time to mail samples and patterns back and forth. Even with internet technology, there are many barriers to the ease of communication. Language differences is the biggest. This kind of product development can take as long as 3-4 months for final product approval, especially on a new style. Pressler would not give approval for expedited shipping.

You can outsource product development. It should be something to consider, especially for childrenswear designers. A lot of children's clothing is made overseas - just shop the competition and you will see very few USA labels. Because competition is so stiff, you can save a lot in labor by moving overseas.

If you decide to take this road, give yourself plenty of time. Time to find a reputable manufacturer. Time to find a manufacturer that will run smaller lots (small is a relative term, but expect 500-1000 pc runs to be termed "small"). Time to teach the manufacturer and their technical people your product and quality standards. You can do a lot of things long distance. One Chinese manufacturer preferred that designers actually come and spend a few weeks in China working directly with a patternmaker to develop samples. Not only was it faster, but it ensured the designer got what they wanted.

3. Market Research. Pressler tried to use traditional market research tactics to predict the next big trend. The problem is that customers look to their favorite brands to lead on the next trend. This means that designers predict or envision what should happen next. Fashion companies rely on their designers for this.

Market research is important for building a better brand and better product. Designers do need to listen to their customers. I have seen a few online fashion companies add product reviews and customer comments on their sites. This type of system can help a company improve problems faster. Inspect returns for product defects. Learning from the past can help you move forward.


What will happen at the GAP next? They are now on the hunt for a CEO with apparel experience. I don't see the death of GAP, but I do see some serious growing problems.

December 17, 2006

Button style can add interest to a design

Small flower buttonSometimes design inspiration comes from the most utilitarian part of a garment. And yet, if one pays attention to such small details, you can take an ordinary piece of clothing and turn it into something special.

This tiny little flower button jazzed up an otherwise boring knit jacket. The jacket is made from a french terry knit with a ruffle trim on the hems. If this had a regular two-hole button, the jacket would have been plain boring.

A regular two-hole button costs less than one cent each. They are generally one of the least expensive items found on an item of clothing. That changes when you start to add novelty buttons. There are tons of special and extra special buttons available. Most manufacturers can't afford wholesale button costs of 20 cents a piece or more. This flower button would be less than 5 cents because it is still rather basic. Special buttons are saved for the front of the garment where they can be seen.

If you truly want to set your garment apart, pay attention to details like buttons on the back of a dress, for example. Special occasion girl's dresses sometimes have interesting and fun button details. Buttons on the back may match a colored sash, skirt band, or trim. Maybe use some of the buttons as part of an embellishment. Can you imagine using a different thread color to sew the buttons on this jacket? How about a soft yellow center to correspond with a flower embroidery on a pocket? Boutique children's designers can certainly play with this seemingly small detail.

While the jacket is not cutting edge fashion, this manufacturer did some interesting things that I may blog about in the future. Knits can be difficult to work with, especially when topstitching or adding a woven fabric trim. Knits and wovens do not like to work together happily. One or the other ends up stretched or distorted. You can see how nicely this trim lays with no stretching of the knit jacket.

This jacket was obviously well loved. It is worn and stained. Even so, the previous owner did not clip the threads left by the manufacturer. You can see one of five errant threads in the picture above. This is a big pet peeve of mine. Any finishing and inspection should include clipping threads.

July 26, 2006

Fashion Challenged Wal-Mart

Evidently Wal-mart's sales of it's women's clothes is down. This according to a recent Business Week article. It's no surprise really. I almost never buy clothing at Wal-Mart. There are a couple of reasons. One, the fitting rooms are too close to the registers. They are small, dirty, and cramped. If I feel I should try something on before buying it, I won't buy it. The last few pieces I bought I should have tried on - the mediums were really sized as a large. Oh well, at least it was only $5 wasted and a lesson learned.

In the book Nickled and Dimed on Not Getting by in America, author Barbara Ehrenreich worked covertly for Wal-mart. As a sales associate in the women's department, she spent most of her time putting away returns from the fitting rooms, store returns, and cleaning. She never spent any time assisting customers or pushing sales. According to her anecdotal evidence, 80-90% of the clothing taken to the fitting room is rejected. This points to fitting issues.

The next reason I don't buy clothing at Wal-mart is the clothing looks cheap. Some of the styles were cute, but the finishing details were lacking or the colors were too garish. One outfit had simple, exposed serged hems instead of a rolled or blind hem. This screams cheap. I also know this won't hold up in the wash.

Girls dresses also scream cheap. Their isn't enough fabric in the gathered skirts to look like a skirt. Ribbon and flower trims are wrinkled. Same issue with the garish colors. To be fair, the basic children's clothing is fine. You can get a great value on Carter's brand clothing. But skip the Rose Cottage label.

At one company, I helped create private label merchandise for the Rose Cottage Brand. It is true that Wal-Mart has greatly improved its quality program. But they are still missing the boat. In order to get the product to hit their price point, you have to reduce gather ratio's, remove linings, reduce trimmings. When you are done with the dress, it looks incredibly cheap. For a couple dollars more, you could get a dress that looks like a real dress at another store.

So the secret for Wal-Mart's success is to take a cue from Target. Create affordable merchandise with improved quality, the right colors, the right fit, and be mistaken for a more expensive piece. Oh, and move the clothing department away from the main drag of the store. Do I really want my neighbors to know I buy my underwear at Wal-mart?