December 28, 2006

Grading Rulers

Kathleen Fasanella posted a blog back in Feb 2006 about grading rulers. Imagine my surprise when I opened a book I picked up at a thrift store. Inside the front cover was a little used hinged grading ruler in it's original packaging with instructions! The ruler was stashed in an older edition of the Price/Zamkoff grading book. The book was priced at a measly $2 - the original price sticker for the ruler was still on the packaging of $5.35. Funny thing is, I bought the book about 3 years ago and stuck it on a shelf. I only opened it up a few days ago as I was working on my new infant grading charts. I wanted the book as a grading reference, but rarely use it because of how poorly it explains grading. What a great bonus to find the ruler!

A hinged grading ruler About 98% of the grading I do is in a CAD program. Grading on the computer is so easy! Select a point and tell the computer how much growth should occur in the X,Y directions. It redraws the curves automatically. It is easy to double check the grade in the larger sizes by laying the pieces on top of each other or walking the pieces along side.

Every CAD program varies in ease of use. I have done computerized grading using Gerber's Accumark, Autocad/Betacad and Optitex. I will blog in the future about the differences between the three. Suffice it to say, Optitex is the easiest to use thus far, and quickly becoming my favorite. Grading by hand, is another story. It is tedious and takes a lot of time. I can see why grading is considered an art form. I am grading my personal patterns by hand and it is a big learning process.

In design school, I learned to grade with only a ruler. My 18" clear ruler with 1/16" increments, is photographed above. Grading with only a simple ruler is fairly straightforward. You measure out the changes and re-draw your pattern for each size step. Using a grading ruler makes the process so much simpler! I graded my infant flat block patterns with the grading ruler in a couple of hours (I was re-working some of my grades at the same time). The ruler is marked in 1/16" increments. Your grade rules need to be in 1/16", 1/8", 1/4", 1/2" increments to use this ruler effectively, which means you may need to re-work some of your basic pattern measurements to make grading easier.

I hope to demonstrate the process of actual grading, but for now I am enjoy playing with my lucky find!

Comparing Butterick 6030 neckline measurement

An example of a well fitting boys shirt

I didn't realize I had so many boys' shirts in my stash! Each shirt has a slightly different construction technique. They range from casual to dressy. Some have a convertible collar with a facing and others have a traditional 2-piece collar. This is a great resource for me to figure out more of what is wrong with the Butterick pattern.

The first thing I did was take some key measurements off of the size 24M shirts. The button bands averaged 1.125" and I adjusted my new pattern accordingly. The second measurement was the necklines. Both 24M and 2T shirts measured 12 inches, which I think is right on target. Compare these numbers:

Actual neck measurement = 10.125"
Butterick neck measurement = 15" (4.875" of ease!)
My pattern measurement (1st attempt) = 14" (3.875" of ease)
Both RTW shirts neck = 12" (2" of ease, right on!)

To draft the neckline of the pattern small enough, I need to have a basic 24M block made up. I am not going to keep guessing -- it just wastes too much time. This is enough motivation for me to work on my basic blocks again (My New Year's Resolution!). I pulled them out yesterday and made some important decisions. I can officially announce I have a basic bodice block that I like. The next step is to figure out my grade rules and grade my basic block up to a 24M.

Figuring grade rules and grading my blocks will take me some time, so the shirt project will be put off for a little while. In the mean time, I may get back to my promised grading blogs. Hopefully, you won't get too bored by it. Grading is as dry and boring as a topic can get.

December 26, 2006

Fixing the neckline on Butterick 6030 sewing pattern

Sewing pattern shoulder alignment
I started to deconstruct the Butterick 6030 pattern for my boy's shirt pattern fix. At this point, I am thinking it would be so much easier to start from scratch. More glaring problems showed up after looking closer. In the picture on the right, I lined up the shoulders of the shirt. I know, I did not align the pattern pieces along their true seam lines. In production sewing, though, the pieces are lined up along their cut edges, not sewing lines. If I did this, the sewing operator would bring this back to me as a mistake. Those edges should meet.

Also, look closely at the armhole shaping. The front armhole has a nice curve and the back is rather straight and flat. This was how I was formally trained in classic pattern making for adults. Adults require more shaping in front than in back around the arm. In children's pattern making, the patterns are made the same front to back, except for the neckline. This means the side seams, shoulders, and armhole shapings are exactly the same. Children do not require the extra shaping front to back. This is a typical industry method for children's patternmaking, especially infant and toddler. It is called the flat method by Aldrich.

Another problem not shown in the picture above are the side seams. The side seams swing out at the hem. I am guessing the patternmaker did this to accomodate an infant's protuding belly. Many babies have a belly until they get older. The assumption is that width must be added to accomodate the extra girth. The problem with Butterick's pattern is that it creates an a-line shirt. The photo on the pattern cover shows a plaid shirt. The side seams should be straight in order to match stripes and plaids. A basic shirt block already has extra wearing ease at the chest and waist. There is no reason to add even more room at the waist. I drew my side seams straight.

Here is my modified neckline. You can see the v-shaping more clearly. I rounded the neck, raised it at center-front, and made it smaller (my changes are in red). Corrected neckline shaping in sewing patternA 24 month old's neck measures about 10.125 inches. Butterick's neck measurement for a 24M is 15" - my modified neck is 14". I am thinking it is still too large. This is just my first rough pattern - I have a long way to go. Later, I will trace these off, with seam allowances. You can see I removed the cumbersome facing and created a double fold facing. Also, my back pattern is going to be exactly the same as my front, except for the neckline. You can see my back neckline above my front (red) neckline. I am going to double check neck measurements by measuring some necklines on some RTW shirts. When all else fails, see what your competition is doing.

December 20, 2006

A boy's shirt pattern fix for Butterick 6030


About a year ago I was asked to make a a white shirt for an infant boy's christening. I didn't have the time to draft the pattern myself, so I turned to a ready-made pattern. Out of the big 4 pattern companies only one had a "traditional" woven shirt pattern. I could have saved myself a lot of stress by drafting the pattern anyway. I didn't really have time to fix the problems in the pattern either and I was disappointed by the results. Here is a picture of the pattern envelope. Maybe you can spot the problems too.

The first obvious problem is the collar and neck. The collar points splay apart too far. The collars don't meet at the center front neck and the front neck seems too low. On top of that the collar looks proportionally too large. Compare the drawings with the actual pictures. The drawings show a convertible collar with a stand in the back.

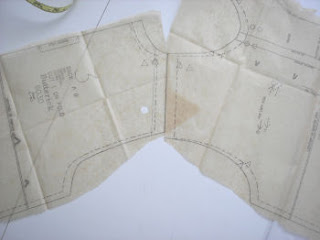
The problems become more obvious when you study the pattern pieces (sorry the pictures are fuzzy - tissue paper is hard to photograph).


1. On the front bodice piece the front neck is a V-shape and the neck is too low at center front. The front neck is just too big. To correct this problem the neck needs to be raised at center front and the front neck needs more curve.

2. Notice the large, built-in front facing. It is at least 2" wide, way too large for an infant shirt. This should have had a traditional built-in, double fold facing found in adult shirts. I will illustrate this later.

3. The collar is too wide. Of course, this piece has the obligatory 5/8" seam allowances. The collar has little shaping, except for a slight narrowing at the back neck. It is essentially a rectangle.

4. When I sewed the sleeves in the first time - there was too much ease. The shirt has dropped sleeves. There should be no ease in this style of sleeve at all. Also notice the strange jog on the right side seam. I have no idea why the sleeve turn back would be extended longer on one side than the other. I drew a red arrow down to indicate that the sleeve cap needs to be flatter.

5. The other major issue is the sizing used by the pattern company. The infant patterns are sized S-M-L-XL, divided up by height and weight. To me, those size labels are almost meaningless. I had to pull out my size charts to figure out what size matched up with the appropriate ages, heights, and weights. The sizing doesn't break-down very well because their height-weight measurements didn't match up with any of my industry charts. This is my best guess on Butterick's sizing:

Small=3-6M
Medium=6-9M
Large=12-18M
X-Large=24M

I have wanted a basic infant shirt pattern for a while, so I am going to take this pattern and fix it. The first step is to trace off the pattern pieces, minus the seam allowances. Normally, I do my pattern drafting with the seam allowances on - typical of the industry. In this case, I want to redo the seam allowances so they are appropriate for the seam. I will add 1/4" seam allowances for the neck and collars and 3/8" for everything else. The hem will have a 1/4" rolled hem - 1/2" hem allowance. I will fix the neckline and correct the sleeve. Finally, I will redraft the collar completely - the original is useless.

Once the pattern is fixed, I will re-sew it up. The hope is, it will look better and be easier to sew.

December 17, 2006

Button style can add interest to a design

Small flower buttonSometimes design inspiration comes from the most utilitarian part of a garment. And yet, if one pays attention to such small details, you can take an ordinary piece of clothing and turn it into something special.

This tiny little flower button jazzed up an otherwise boring knit jacket. The jacket is made from a french terry knit with a ruffle trim on the hems. If this had a regular two-hole button, the jacket would have been plain boring.

A regular two-hole button costs less than one cent each. They are generally one of the least expensive items found on an item of clothing. That changes when you start to add novelty buttons. There are tons of special and extra special buttons available. Most manufacturers can't afford wholesale button costs of 20 cents a piece or more. This flower button would be less than 5 cents because it is still rather basic. Special buttons are saved for the front of the garment where they can be seen.

If you truly want to set your garment apart, pay attention to details like buttons on the back of a dress, for example. Special occasion girl's dresses sometimes have interesting and fun button details. Buttons on the back may match a colored sash, skirt band, or trim. Maybe use some of the buttons as part of an embellishment. Can you imagine using a different thread color to sew the buttons on this jacket? How about a soft yellow center to correspond with a flower embroidery on a pocket? Boutique children's designers can certainly play with this seemingly small detail.

While the jacket is not cutting edge fashion, this manufacturer did some interesting things that I may blog about in the future. Knits can be difficult to work with, especially when topstitching or adding a woven fabric trim. Knits and wovens do not like to work together happily. One or the other ends up stretched or distorted. You can see how nicely this trim lays with no stretching of the knit jacket.

This jacket was obviously well loved. It is worn and stained. Even so, the previous owner did not clip the threads left by the manufacturer. You can see one of five errant threads in the picture above. This is a big pet peeve of mine. Any finishing and inspection should include clipping threads.