April 23, 2009

A tale of a broken screw, loose screws and a DIY mechanic for the Singer Hemstitcher 72w-19

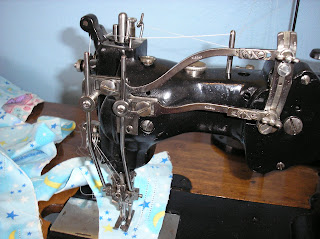
This lovely 72w19 Singer Hemstitcher (circa 1945) has caused me all kinds of grief this month.

Singer Hemstitcher 72w-19
I have had a persistent problem with this machine every since I purchased it 4 years ago. The left needle thread has a tendency to break, almost randomly. I can stitch some distance, it will start skipping and then get cut by either the needles or the piercer. I have played around with various settings and adjustments continuously over all this time. Sometimes I can improve it, other times it becomes worse. Despite all these adjustments, the right needle continues to behave as it should and the left will not.

One day, I noticed that the piercer holder was loose. I could wiggle it with my finger. This led to me over tightening the piercer holder screw and breaking it. This screw is a size #6 and some of the screw was stuck in the machine. How to get it out?

Broken screw in a Singer Hemstitcher 72w-19 piercer

It would be easy to say I am not a sewing machine mechanic. I have done some basic tuning up on regular sewing machines. Set the timing on both of my sewing machines. Cleaned, oiled, lubed. But that is about it. Armed with my 72w19 manual, I set out to fix my machine, extract that screw and get to the bottom of the thread breakage problem. The engineers who designed this machine and most mechanics who worked on these are all gone now. Those that are left are hobbyists, for the most part. Some are very good, but too far away to consult. Other mechanics rarely work on or understand these machines.

Even with the manual, there are gaps of knowledge. Perhaps later I will post a little about the history of these machines. One thing I did learn is that the ladies who purchased these machines attended a training and certification class so they could adjust them on their own. I am sure they picked up all kinds of information never written in the manual.

So back to the broken screw. Nothing could happen until that screw was extracted and replaced (and luckily I did find a replacement).

Assemble some basic tools:
1. Drill (variable speed, set on slowest setting)
2. Very small metal cutting drill bits (like 5/64")
3. Punch
4. Extractors and/or left hand drill bits
5. A steady hand.

Step 1
Use an auto centering punch to punch a pilot hole into the broken screw. There are different sizes and shapes of punches. I found one that is about the size of an ink pen. You press down on it and an internal spring forces the punch. A very nifty and useful gadget for small spaces (also expensive uni-tasker). You may need to do several punches because the surface of the broken screw will probably be uneven. This punch is critical so that the drill with a metal cutting bit doesn't float around.

Step 2
Using the drill with the regular metal cutting bit, drill a hole in the center of the broken screw. Make sure the drill is on a slow speed setting. In my case, I could drill all the way through the center of the screw to the other side and not risk damaging other components. Even so, drill just far enough to be able insert a slightly larger extractor or left hand drill bit. Stop every so often to clean out the hole and to let the drill bit cool off. The drill bit may dull quickly, so be prepared to replace it.

Step 3
If the screw is not jammed too tightly into the machine, you may be able to insert the extractor and turn the screw out by hand. This is what I ended up doing in my case. If you need more power, use the drill but be sure to reverse the direction of the drill.

And here is the result. You can see how small that broken screw bit was and why I was so nervous about it.
Screw extractor and broken screw part
With the broken screw removed and a new one inserted, I once again began to check all the possible adjustments. In this I discovered more lose screws. There were lose screws on the piercer bar, and underneath the bobbin. Cleaned more lint and gunk out of areas I rarely clean. Oiled every moving part. Adjusted the vibration (zig-zag), pitmans, levers, etc. I could definitely say I have learned a lot by over adjusting some part and seeing what would happen (very carefully of course). I think I may have zeroed in on the vibration setting as the sources of the skipping as the left needle only skips on the inside vibration.

And then the piercer snapped in half the other day. I can't figure out how or why. Did I have it set too low in the machine? Maybe it was just worn out and over abused?

Thankfully, replacement piercers can still be found. Though they are very expensive. I bought two, just in case this happens again. Hopefully not.

April 08, 2009

The Singer Hemstitcher 72w-19 broke down

Every time I sit down to stitch blankets on the hemstitcher, I cave and try to adjust it. The left needle thread continues to break despite everything I have done. One commenter suggested I move the main piercer either up/down or left/right. While I attempted to do this, I discovered that the main piercer holder was loose. Is it possible that the main piercer holder was vibrating or moving as a stitch is formed? It could explain why I could stitch a few inches and then the left thread would break randomly. The holder was only marginally lose but I could moved it ever so slightly with my finger.

So I attempted to tighten the screw on the holder. I wrenched down on the screw and shouldn't have done that. After all it is a 70 year old screw. And yes, the screw broke.

Broken screw in a Singer Hemstitcher 72w-19 piercer

There is a broken part of the screw stuck in the machine. Thankfully, I was able to locate a new screw. One nice thing about the old Singers is that the engineers used as many of the same parts in multiple machines as they could, especially screws. The problem, of course, is extracting the screw. I zoomed in pretty close in the picture above, but that screw opening is only about 1/8 inch. I am very nervous about doing this because I have to be very, very careful to not damage the threads of the piercer holder. That part will be very difficult and expensive to find, if at all. I probably will buy a Dremel as I don't trust myself with my regular drill. I don't know.

I am my own mechanic when it comes to repairing my Singer Hemstitcher 72w-19. There are very few mechanics familiar enough with this machine that I would trust them to work on it. I have really spent a lot of time studying it and I think I now understand how all the important parts work. The movement of the piercer thread holder as it stitches proves that it can break or cut the threads. It moves much more now that the screw is not completely there.

And of course this happened at a time when I have two large blanket orders. Thankfully, my customers are willing to wait. But if I can't fix it, then I will be taking these blankets to one of my competitors to finish. I am a bit stressed about the whole thing.

March 06, 2009

Singer Hemstitcher 72w-19 thread breakage solutions

Singer Hemstitcher 72w-19Hemstitching woes continue to plague me. Thread breakage with the left needle thread continues to be a persistent problem. The breakage is preceded by skipped stitches that cause the thread to wrap around the pierces where the piercers or needles eventually cut the thread. I have run through various scenarios trying to diagnose the problem. The timing of a machine is absolutely critical or no stitches form. In the case of a hemstitcher, the timing is a bit more complex. The position of the needles relative to the piercers and how they move as the fabric moves under the foot is all a part of the timing. A Singer hemstitcher 72w-19 has two bobbins which must be separately adjusted to work in time with the needles as they descend with the piercer. For a while I have thought there was a timing issue with the left needle.

Or maybe not. I have set and checked the timing and it appears to be right on. I have adjusted nearly every possible adjustable part. Even the pitmans that control the needle position and angle - something I dreaded touching. I adjusted the check springs. I have spent countless hours making one fine adjustment after another, studying the manual over and over. I feel as though I have hit a brick wall. It is rather frustrating to be stitching a customers blanket and have the left needle thread break every 5-12" for no apparent reason.

Check Tension


So off to browse the net to try and find some kind of solution. American and Efird is probably one of the best technical websites for manufacturers. They have an excellent article on thread breakage that has given me some insight. A checklist of things that might be causing some of the problems. One thing that I had observed the last mechanic to work on this machine do was wrench down on the tension discs. I have maintained tight tensions ever since. Tonight I loosened the tensions until the bobbin tensions took over than edged back to a balanced stitch. The stitch is better and perhaps that will solve some of the problems.

Needle Orientation


The next step was to look at the orientation of the needles, in particular the rotation of the needle in the needle clamp. Most every blog entry I have read says to turn the needle out to help avoid thread breakage. I think that is the wrong approach because it affects how the hook interacts with the needle. The needles should be aligned with the eyes opposite each other in a straight line. This may not make a lot of sense if you are not familiar with the machine, but mechanically, it does.

In any event, I still must plug away at stitching some customer orders with my fingers crossed that I will have fewer problems. If you are having stitching problems because of skipped stitches or thread breakage, I highly recommend the American and Efird article.

Oh and did I mention I had to fix the belt. Leather belts have a tendency to wear out. I used my last clip, so I must order some more just in case. I have extra belting because my machine can be used as either a treadle or with a motor. I don't have the fancy tool that punches a hole in the belt and compresses the clip. I learned a neat trick of using a drill to create a hole for the clip. It worked great.

Leather belting for a Singer Treadle Sewing Machine

February 17, 2009

Deciding on whether to file a patent on a new child's product design or not


2019 Note - The amazon affiliate link to the nursing cover above is from a different manufacturer then the one described below. I do not know the current status of the Bebe Aulait patent or protection efforts. Regardless there are dozens of similar ideas on Amazon and other places.

I don't know why, but some baby clothing and accessory designers are under the impression they need to go to extremes to protect their product. This includes patent, trademark, and copyright protection. Maybe it is the inner paranoia of being copied. I don't know. It seems that there are A LOT of baby/child related products that have been patented. Why? Some products are truly patent worthy but most are not. Regardless, patents are only worth as much as the effort used to protect the patent. In other words, it may cost you more to protect your patent than the money you make off it. That isn't true for all products, but for many. For many design entrepreneurs it will be a waste of time and money. There are few processes or ideas that are unique in this industry. Most designs are just reinterpretations or a new combination of existing ideas.
There are three types of patents:
1) Utility patents may be granted to anyone who invents or discovers any new and useful process, machine, article of manufacture, or composition of matter, or any new and useful improvement thereof;
2) Design patents may be granted to anyone who invents a new, original, and ornamental design for an article of manufacture; and
3) Plant patents may be granted to anyone who invents or discovers and asexually reproduces any distinct and new variety of plant.

In addition:
Even if the subject matter sought to be patented is not exactly shown by the prior art, and involves one or more differences over the most nearly similar thing already known, a patent may still be refused if the differences would be obvious. The subject matter sought to be patented must be sufficiently different from what has been used or described before that it may be said to be nonobvious to a person having ordinary skill in the area of technology related to the invention. For example, the substitution of one color for another, or changes in size, are ordinarily not patentable
I don't know under which of the three types of patents that Bebe Aulait has filed their patent for their Nursing Cover and I am not sure their claim is truly new or novel. (Bebe Aulait purchased the invention from the inventors and have become the new patent asignees). The idea has been around for a long time (one friend claimed she used one 20+ years ago). I think their claim as an invention centers around the addition of boning (stiffener) in the neckline of the apron that helps hold the apron away from the body. One interesting part of the patent is end caps on the boning. I haven't seen end caps for boning before and I could get behind that one small aspect of the patent. Have any of you seen endcaps for boning before?

In any event, there are some problems with the patent and I think it could be challenged. But who has the time and money. The nursing cover is a glorified apron.

Rumor on the street is that Bebe Aulait is enforcing their patent pending product in the same vein as Taggies, which I have blogged about before. It calls into question the value of their patent since it is so easy to copy. Not that I am encouraging copying. If you do, you will receive a threatening "cease and desist" letter from a lawyer.

I don't know what it takes to challenge a patent. I am sure at some point an IP lawyer will have to be employed and they are very expensive.

Trademarks are issued to brand names. Like patents, it creates a property right over a brand name. I will write about a trademark problem with onesies (owned by Gerber) at a later date. The next problem is copyrights. Taggies claims copyright protection on their products. Such a claim is not valid because there is currently no copyright protection on clothing or textile items. Copyright protection can apply to textile designs such as fabric prints. A measure has been in the works to extend copyright to apparel but is apparently stuck in committee. Such an extension of copyright would have a devastating affect on the apparel industry in the US.

What do you think?

Thanks to MyPreciousKid and Trinlayk for bringing this to my attention.

February 04, 2009

Who creates grade rules?

Tape measure

Some one asked me a grading question the other day. She wanted to know who creates grade rules?

A pattern maker, grader, or you could make the grade rules. If you choose to make the grade rules yourself, I have some guides available in The Organized Fashion Designer and The Simple Tech Pack. It's harder with children's clothing because there isn't as much standardization. An experienced grader should have some standard charts or be able to develop rules off of your measurement charts. I would personally start developing grade rules by referencing the Jack Handford book and make modifications as needed. I would only let a pattern maker or grader do it who has experience with it.

You can buy measurement charts from ASTM as a place to start. The ASTM measurement charts for children are probably the best resource for children's body measurements. Be cautious of using free charts found on the Internet. I have seen free measurement charts on the Internet riddled with inconsistencies that could lead to serious errors.

If you have time, you may want to sew up the smallest and largest sizes just to double check the grade and sizing. It doesn't have to be in your production fabric or anything. A fitting is the only way to know if your grade is correct. You won't need to do this on every style or very often. Kind of important when starting out though.