December 15, 2009

Metric pattern cutting for children's wear and babywear - 4th Edition


Winifred Aldrich has released an updated edition of her pattern making book. Besides having a much nicer cover design, it reportedly contains a revised organization and emphasis on flat pattern making. I find this change interesting because more and more design entrepreneurs are utilizing flat pattern making today and this confirms my personal experiences in the industry.

From the abstract at Amazon:

Today’s popularity of easy-fitting styles and knitted fabrics means that basic ‘flat’ pattern cutting is used to construct the majority of children’s wear and babywear and this type of cutting is therefore emphasized in this new edition. Shaped blocks and garments, cut to fit the body form, are still included, and are placed in chapters covering some school uniform garments or more expensive fashion or formal clothes.

One primary difference between flat versus fitted pattern making is that the patterns have the same shape for the front and back pieces. For example, the armhole shaping is symmetrical. Creating patterns in this way results in a looser, more casual fit and it is appropriate for a lot of children's clothing. Even so, I see more of a modified flat method in actual use. Patterns are modified so that they aren't quite so boxy and more fitted. Yet, they retain some symmetry between front and back pieces.

October 26, 2009

Do professional pattern makers work with seams on or off the pattern?

Professional apparel pattern makers work with seam allowances on their patterns nearly all the time. It's faster. I would argue it's more precise. This practice goes counter to what most pattern making classes teach. They teach that you must remove the seam allowances and add them back later. I don't know anyone in the industry that works this way. I think the idea is that working with seam allowances one can create variations that lead to fitting problems later. That's simply not true if you check your new pattern against the original block later. (This is assuming you make a copy or rubbing of your original before you start on a new style. But I'm sure you knew that).

If you are drafting by hand, it is time consuming to remove the seam allowances. Pattern blocks are made with seam allowances on. You would have to keep a set of blocks without seam allowances. It would be so easy to mix up seamed and unseamed pattern blocks. Apparel pattern makers leave their blocks seamed and theatre pattern makers or cutters leave their blocks (or rather slopers) unseamed. In fact a block is a finished pattern piece that includes all pattern markings and is seamed.

If you are drafting in CAD, you can turn the seam allowances on and off. You can work on the cutting line or the stitching line. It's a simple matter of hitting a few buttons. BUT, I have found that CAD programs have difficulty in calculating between seamed and unseamed because it involves a complex series of mathematics. So constantly switching between cutting and stitching lines can produce some weird anomalies. (As an aside, weird things can happen with notches on stitching versus cutting lines too). I have found this is true no matter which CAD system you use. So I work with seam allowances on and directly on the cutting line nearly 99% of the time. This means that I keep the seam allowances in mind while I work.

One Exception


In CAD, it is important to turn the seam allowances off and walk the pattern pieces along the stitching line in a few areas. Collars and necklines is one area that I nearly always check for matching on the stitching line. There are other situations that come up where this important. I learned this the hard way recently.

Two pattern pieces with seam allowances on

In this situation, I split a jacket back pattern piece and added corresponding seam allowances along the split line.

Comparing two pattern pieces to see if the cut edges match

Next, I aligned the pattern pieces to make sure they match. At this point they did and I assumed all was right. Until I got complaints from the sewing machine operators that things weren't matching up. I had to go back and double check.

Comparing two pattern pieces with seam allowances off

I took the seam allowances off the pattern pieces and realigned them. They didn't match, so I redrew the stitching line of the side piece to make sure it matched the center. I added back the seam allowances and realigned the edges.

 Correcting the seam allowances so the stitching line matches

The pieces didn't match again. Sewing machine operators also do not like this because they do not know how to align the pieces. In this particular case, the seam allowances are small, so I left the little "dog-ear". It can be difficult to cut those "dog-ears" off by hand when they are really small. It is easier to machine cut. In any event, there are different ways of dealing with this. I show one method below.

Trimming seam allowances on a pattern piece for better matching

Your pattern pieces will then look like this and match up in every way possible.

Two pattern pieces that match on the stitching and cutting lines

August 31, 2009

Comparing pattern shaping and children's sizes follow-up

Kathleen suggested that I post an update on a previous grading post I did about a year ago. You can read what I wrote previously at When Patterns Collide. In that post I suggested that it would be possible to combine the 24M and 2T and the 4T and the 4. My reasoning being that the 24M and the 2T are essentially the same sizes - why differentiate them? The subject is a little complex and perhaps controversial - at least to pattern making geeks. My goal was to reduce the work load. I was drafting and grading all of my patterns by hand. I am incredibly slow grading by hand. In addition, I was trying to solve one particular sizing problem that shows up in childrenswear, that is hard to illustrate. Since I shut down my Prairie Roses line, I am not knee deep in pattern making as I was a year ago. But perhaps it may be helpful to explain what I ended up doing.

Originally, I broke up my sizes into these ranges:

3M, 6M, 9M, 12M, 18M, 24M - sample size 12M

2T, 3T, 4T - sample size 3T

4, 5, 6, 6x - sample size 5

These ranges are rather typical of what you will find in retail stores. When developing my patterns, I have to make and grade the patterns for each size range separately. You cannot make one set of patterns in one size and grade them up and down all the way. It won't work because that many sizes will cause minute grading errors and strange fit, especially on the smallest and largest sizes. As you define your grading and size measurements, you will find that the 24M and 2T and the 4T and 4 overlap. I followed the Jack Handford grading rules, which are pretty darn good, but end up with a result like this:
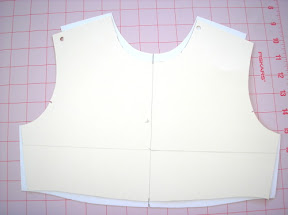
Bodice pattern pieces in a size 4T and 4 and how they compare

In the picture above, the size 4 is laying on top of the size 4T. The size 4T is actually too long in length and too wide. I double checked all of my grading and there was no mistake. The size 4T was graded off my 3T and the size 4 off of the 5. The shaping of the sample size pattern pieces varied a little. The toddler was a little boxier because toddlers don't have any waist shaping, whereas a 5 year old does. If I were to leave my patterns this way, someone will eventually hang the two sizes next to each other and think there was some kind of manufacturing mistake. I needed to fix my patterns so that each size is incrementally bigger.

To do this, I rearranged my size ranges, combining some sizes:

3M, 6M, 9M, 12M, 18M - sample size 12M

24M/2T, 3T, 4T/4 - sample size 3T

5, 6, 6x - sample size 5

The next thing I did was reworked the shaping of my toddler sizes to look more like the 4-6x range. I pulled the waist in some and made the armhole smaller. I made these shaping changes because I found that my toddler patterns were just a little too big. Now, I can lay all of my bodice pattern pieces in order and they get incrementally larger from the 3M to the 6x. Your patterns may look different, but it is worth comparing the sizes on the outside edges of your ranges to make sure you don't have something weird show up like I did.

Even though I combined some sizes, I kept this behind the scenes. My customers still saw all of the sizes separated out. If someone ordered a size 24M and another ordered a 2T, the dress would be exactly the same except for the size tag. I offered all of the sizes on my website so that customers would see something familiar. Perhaps it seems a little dishonest? I don't think so because in the real world a 24M child is the same size as a 2T and I was willing to take the chance. For what its worth, no one ever complained or returned those sizes for fit issues.

Now, I don't know that what I did is "the way it should be done". In the past though, I have had people question why the 24M was larger than the 2T and I had no explanation. Once I worked through grading all of my patterns by hand, it started to click in my head. The relationship of the shape of the pattern pieces, the grade, and body measurements are all connected.