This is part two of an ongoing discussion about N. A. Schofield's article Pattern Grading found in the Sizing in Clothing book. Part one is here.
My initial reaction to the idea of grading from body measurements was, "Well, of course we should." And in fact, we do for children's clothing. It seemed rather obvious to me to look at children's clothing as a model. Children's sizing is based on the idea of growth, meaning that the measurement intervals between sizes are not always consistent.
Let's look at an example for a 4-6x size range.*
For sizes 4, 5, 6, 6x
Chest: 23, 24, 25, 25.5
Waist: 21.5, 22, 22.5, 23
Hip: 23.5, 24.5, 25.5, 26.5
The grade works out to be, choosing size 5 as the base size:
Chest: 1, 0, 1, 1.5
Waist: 0.5, 0, 0.5, 0.5
Hip: 1, 0, 1, 1
In this example, we have a 1" chest grade, except for size 6x which is 1.5". The waist is a 0.5" inch grade and the hip returns to a 1" grade for all sizes. Each body measurement area has it's own grade.
In women's clothing a 2" grade means that the interval change between the sizes will be 2" for chest, waist, and hips. Though even this isn't true across all brands, and you will find variations. (IMO, this is a good thing)
I don't know the history of women's sizing well enough to explain how this mode of practice came to be nor exactly why. It is clear that it does make grading, especially hand grading, much easier in practice. It is also unclear to me that grading is the source of our fitting woes. Nevertheless, it does make sense to me to go back and look at body measurements and devise a more precise grade rule.
The question then becomes, which body measurements do we use? In my children's example above, the numbers are still nice and easy to work with. The body measurements have been intentionally manipulated to be easy to work with. Raw measurement data was averaged, sorted, and studied to arrive at some numbers. Those numbers were not easy to work with, so a group of industry professionals sat down and made them that way. They modified certain measurements by about 1/8" to achieve consistency. Their modifications were rather minor and easily fall within a statistical margin of error. If you read their reasoning, it makes sense. This manipulation of measurement data for ease of use continues today in more modern measurement studies. It seems deceitful, but at the end of the day is infinitely practical. ASTM D4910 inherits this method of data handling from the measurement studies done in the 1940s, but does provide some updated measurements.
Looking at the Misses body measurement chart, ASTM D5585, it seems to be arranged and handled in the same way as the children's body measurement chart. IOW, the chart does not show a 1, 1.5, or 2 inch grade in the body measurements. It is a lot like the children's example above. There does seem to be a disconnect between measurement data and grading, at least on the surface. Individual companies will decide how to interpret and implement measurement data, and therefore their grade rules. (IMO, I think this is a good thing). And some will use a 2 inch grade, and some will not.
So what measurement data did Schofield use? She rejected the ASTM charts and created her own version of measurements derived from body measurement studies. This presented a problem because measurement studies do not always include the measurements needed for pattern making and grading. Schofield did not normalize the data, in other words make it easy to work with. Also she had to figure out how to deal with missing measurement data. I no longer have a copy of the article and can't look back, but Schofield selected certain measurements over others. How and why she handled those measurements puzzled me.
I believe Schofield's goal was to remove the idea of maintaining an ideal proportion or predictable pattern shape. She wanted to see what the body measurements really did between sizes.
Her results were almost predictable. More on that later.
*These measurements come from the withdrawn child measurement standard CS151-50. Measurements are in inches.

Showing posts with label Proportion. Show all posts
Showing posts with label Proportion. Show all posts
April 16, 2015
January 20, 2015
Relying on old body measurements and pattern drafting instructions

There is a certain bit of nostalgia when looking back in time. We often say, "They don't build things like they used to," implying that we paid closer attention to quality and details. This same kind of thinking is also found in pattern making and sewing. There is a general assumption that the way things were done in the past are better then they are now. Some pull out old measurement charts and drafting instructions to recreate the past for a better present. We don't even have to go very far. There is the hope of a stylish outfit made of a 1950's sewing pattern and thinking that it will fit.

Before I go any further, let me say there is nothing wrong with looking backward and trying to understand how things were done. It is a fun exercise to draft a pattern using old instructions or sewing up that vintage pattern. This is about using old body measurement data and pattern drafting instructions to create modern clothing.
There are some key factors that make up a size - height, weight, girth, and shape. I suppose in the 1890s pattern makers and tailors were just beginning to understand the relationships between each of those factors. At least for men's clothing. Women's clothing was still a guessing game requiring customized fit. It wasn't until the 1940s that we began to see the connection to height, weight, and girth. Statistical analysis could finally show that when one factor changes, the others do as well. The studies done by Ruth O'Brien and her committee allowed us to see and understand body proportions and shapes and use that information to predict overall size. This information was not truly implemented until the 1950s and 1960s. Other studies have come along to add to our knowledge. A study in the early 1970s expanded our knowledge of children's body measurements. Another study, SizeUSA, was released in 2004 and greatly enhanced our knowledge of the US population using 3D body scanners.*
If you draft a pattern using older drafting instructions and body measurement charts, you will create something that is based on that time's understanding of body proportions and measurements. If that is your goal, then all is well and good. But if you find a free measurement chart dating back even 50 years, then you are placing your product in the 1950s.
We know this because not only has our understanding of anthropometry increased, but we know that the body measurements of a population change over time. If you are interested in creating your own line, it is in your best interest to obtain the most recent (and reliable) measurement data you can.
*Unfortunately the SizeUSA data is held behind a very expensive lock and key. Access is only available to those willing to pay a pretty hefty sum despite the study receiving tax dollars. Some ASTM body measurement charts have been updated to incorporate the study data. The ASTM children's body measurement chart is a mash-up of data that incorporates multiple studies dating back to Ruth O'Brien's 1941 study and some more modern data.
January 08, 2015
The history of standardized sizes for clothing
Do you ever wonder how people came up with the idea of sizing clothes? The creation of sizes allowed for the mass production of ready-to-wear garments. It was not created at a meeting of industry professionals, but evolved over time. Great leaps in sizing occurred because of war - somebody had to quickly and efficiently outfit an army.
Winifred Aldrich traces the development of sizes and ready to wear in her article History of Sizing and Ready-to-Wear Garments found in the Sizing in Clothing book*. Aldrich is a British pattern maker, designer, and researcher. I own two of her pattern drafting manuals and consider them among the best drafting manuals available (link in the sidebar to the left for the children's drafting manual). She knows her stuff, and she presents it well.
The understanding of body proportions began slowly with tailors producing clothing for men. They used strips of paper to measure the body and transfer the measurements to cloth. In time tailors devised tape measures and drafting systems. A size was not the beginning of the drafting job, rather the completed garment represented the size of the customer. As the industrial revolution progressed, tailors began to teach and sell their drafting systems. This included some already drafted patterns, sometimes in more than one size.


The concept was revolutionary and men began to be able to purchase their clothing ready made. Women, on the other hand, still had most of their clothing custom made into the early 20th century. There were attempts at creating patterns for women with named sizes, but it still required customization. There was a lack of knowledge of women's body measurements most likely because of the Victorian ideals of the time.

It is important to understand that our understanding of body measurements and proportions were not formalized until the 1940's. Ruth O'Brien, an employee of the U.S. Department of Home Economics and the Department of Agriculture, was commissioned to conduct a body measurement study of the American population. The purpose was to create a set of size standards based on reliable data that the apparel industry could use. The work involved in this study was enormous and revolutionary. O'Brien and her department created a measurement procedure that is still in existence today (only to be superseded by 3D body scanning). The data from these studies have been study and analyzed around the world.
To put this in perspective, it wasn't until the 1940s that we could finally see and understand human proportions with any clarity. It's easy to pan this early work as outdated and wrong but the 1940's was not that long ago. We still have so much to learn and understand.
A fun little factoid. Grading using the shifting or slide method, a common method still used today, can be traced back to 1908.
Aldrich's article goes into much more depth about the history of sizing. She includes pictures of early patterns and sizing systems. It is well worth a read if you can get a copy of it. This article is a combination and expansion of two previously written articles found in the journal Textile History.
*As I review individual articles from the Sizing in clothing book, I will not give a detailed discussion of each article. Rather, I will summarize and highlight a few key points along with my own thoughts on the subject.
Winifred Aldrich traces the development of sizes and ready to wear in her article History of Sizing and Ready-to-Wear Garments found in the Sizing in Clothing
The understanding of body proportions began slowly with tailors producing clothing for men. They used strips of paper to measure the body and transfer the measurements to cloth. In time tailors devised tape measures and drafting systems. A size was not the beginning of the drafting job, rather the completed garment represented the size of the customer. As the industrial revolution progressed, tailors began to teach and sell their drafting systems. This included some already drafted patterns, sometimes in more than one size.


The concept was revolutionary and men began to be able to purchase their clothing ready made. Women, on the other hand, still had most of their clothing custom made into the early 20th century. There were attempts at creating patterns for women with named sizes, but it still required customization. There was a lack of knowledge of women's body measurements most likely because of the Victorian ideals of the time.

It is important to understand that our understanding of body measurements and proportions were not formalized until the 1940's. Ruth O'Brien, an employee of the U.S. Department of Home Economics and the Department of Agriculture, was commissioned to conduct a body measurement study of the American population. The purpose was to create a set of size standards based on reliable data that the apparel industry could use. The work involved in this study was enormous and revolutionary. O'Brien and her department created a measurement procedure that is still in existence today (only to be superseded by 3D body scanning). The data from these studies have been study and analyzed around the world.
To put this in perspective, it wasn't until the 1940s that we could finally see and understand human proportions with any clarity. It's easy to pan this early work as outdated and wrong but the 1940's was not that long ago. We still have so much to learn and understand.
A fun little factoid. Grading using the shifting or slide method, a common method still used today, can be traced back to 1908.
Aldrich's article goes into much more depth about the history of sizing. She includes pictures of early patterns and sizing systems. It is well worth a read if you can get a copy of it. This article is a combination and expansion of two previously written articles found in the journal Textile History.
*As I review individual articles from the Sizing in clothing book, I will not give a detailed discussion of each article. Rather, I will summarize and highlight a few key points along with my own thoughts on the subject.
August 31, 2009
Comparing pattern shaping and children's sizes follow-up
Kathleen suggested that I post an update on a previous grading post I did about a year ago. You can read what I wrote previously at When Patterns Collide. In that post I suggested that it would be possible to combine the 24M and 2T and the 4T and the 4. My reasoning being that the 24M and the 2T are essentially the same sizes - why differentiate them? The subject is a little complex and perhaps controversial - at least to pattern making geeks. My goal was to reduce the work load. I was drafting and grading all of my patterns by hand. I am incredibly slow grading by hand. In addition, I was trying to solve one particular sizing problem that shows up in childrenswear, that is hard to illustrate. Since I shut down my Prairie Roses line, I am not knee deep in pattern making as I was a year ago. But perhaps it may be helpful to explain what I ended up doing.
Originally, I broke up my sizes into these ranges:
3M, 6M, 9M, 12M, 18M, 24M - sample size 12M
2T, 3T, 4T - sample size 3T
4, 5, 6, 6x - sample size 5
These ranges are rather typical of what you will find in retail stores. When developing my patterns, I have to make and grade the patterns for each size range separately. You cannot make one set of patterns in one size and grade them up and down all the way. It won't work because that many sizes will cause minute grading errors and strange fit, especially on the smallest and largest sizes. As you define your grading and size measurements, you will find that the 24M and 2T and the 4T and 4 overlap. I followed the Jack Handford grading rules, which are pretty darn good, but end up with a result like this:
In the picture above, the size 4 is laying on top of the size 4T. The size 4T is actually too long in length and too wide. I double checked all of my grading and there was no mistake. The size 4T was graded off my 3T and the size 4 off of the 5. The shaping of the sample size pattern pieces varied a little. The toddler was a little boxier because toddlers don't have any waist shaping, whereas a 5 year old does. If I were to leave my patterns this way, someone will eventually hang the two sizes next to each other and think there was some kind of manufacturing mistake. I needed to fix my patterns so that each size is incrementally bigger.
To do this, I rearranged my size ranges, combining some sizes:
3M, 6M, 9M, 12M, 18M - sample size 12M
24M/2T, 3T, 4T/4 - sample size 3T
5, 6, 6x - sample size 5
The next thing I did was reworked the shaping of my toddler sizes to look more like the 4-6x range. I pulled the waist in some and made the armhole smaller. I made these shaping changes because I found that my toddler patterns were just a little too big. Now, I can lay all of my bodice pattern pieces in order and they get incrementally larger from the 3M to the 6x. Your patterns may look different, but it is worth comparing the sizes on the outside edges of your ranges to make sure you don't have something weird show up like I did.
Even though I combined some sizes, I kept this behind the scenes. My customers still saw all of the sizes separated out. If someone ordered a size 24M and another ordered a 2T, the dress would be exactly the same except for the size tag. I offered all of the sizes on my website so that customers would see something familiar. Perhaps it seems a little dishonest? I don't think so because in the real world a 24M child is the same size as a 2T and I was willing to take the chance. For what its worth, no one ever complained or returned those sizes for fit issues.
Now, I don't know that what I did is "the way it should be done". In the past though, I have had people question why the 24M was larger than the 2T and I had no explanation. Once I worked through grading all of my patterns by hand, it started to click in my head. The relationship of the shape of the pattern pieces, the grade, and body measurements are all connected.
April 18, 2008
Grading Complex Styles pt. 2
Part 2 of this series continues the discussion of how to grade complex styles. It is not necessary to have the Handford book to understand the concept, but some experience with grading would be helpful.
This part of the series was going to contain a lot of explanation with lots of examples. There are two reasons that I held off on that. The first is I am considering writing a book on the subject. I am sure it will be a best seller and I will be able to retire early [eye-roll]. The second is that it would be impossible to discuss every possible scenario. It would be best to explain the principle and let you work out your specific grading problem on your own. You will benefit with having to struggle with the material and learn lots in the process.
Just a side note, these pieces have been simplified, no darts or extra gathers. I am also ignoring the seam allowances. The grading is done the same way regardless. This demonstration only shows how to figure out a length grade. The same principle works for widths.
Anyway, let's move on to the examples....


In order to grade a complex style, you need to have basic blocks that are already graded. On top I have a basic block that is already graded. Below that is my ungraded pattern pieces for a bodice with a mid-riff.

There are many ways to determine the total length grade. In this case, I just want to know what the length difference is between the graded basic block and the ungraded pieces. I want to grade my pieces up to the next larger size. To do this, I just lay the ungraded pattern pieces on top of the next size and align the pieces along the horizontal and vertical axis. My drawings are missing the horizontal, but you can pretend there is a line that runs from the side-seam/armscye points across the pieces. BTW if you would rather, you can figure all this out mathematically....
Once you know the length grade difference, you can then decide where you want that length growth to occur on your ungraded pattern pieces. In the examples below, you can have that length split between the two pieces or all of it in one piece or the other (shown in red).


The question you have to ask is:

This is where the beauty of computerized grading happens. I can play with the grade as much as I want - plugging in different numbers until the proportions look the way I want for each size. Hand grading would be a little more complex. The more complex the style, the more difficult the grade can become when doing it by hand. Handford's suggestion to tape the pieces together with long strips of tagboard can work in hand grading. The grader will have to determine if additional grade points should be added and how much movement should occur. This can be done by using Handford's red lines of distribution. Sophisticated manipulation at each grade point can only occur in CAD.
Still the principle works the same regardless of how complex the style or method.
1. Determine your total length/width grades.
2. Calculate the length/width difference between sizes at the grade points.
3. Decide where the growth should occur by comparing the total grade and the difference between each size at the needed grade points. What proportionally looks correct? How is my fit affected?
This part of the series was going to contain a lot of explanation with lots of examples. There are two reasons that I held off on that. The first is I am considering writing a book on the subject. I am sure it will be a best seller and I will be able to retire early [eye-roll]. The second is that it would be impossible to discuss every possible scenario. It would be best to explain the principle and let you work out your specific grading problem on your own. You will benefit with having to struggle with the material and learn lots in the process.
Just a side note, these pieces have been simplified, no darts or extra gathers. I am also ignoring the seam allowances. The grading is done the same way regardless. This demonstration only shows how to figure out a length grade. The same principle works for widths.
Anyway, let's move on to the examples....
In order to grade a complex style, you need to have basic blocks that are already graded. On top I have a basic block that is already graded. Below that is my ungraded pattern pieces for a bodice with a mid-riff.

There are many ways to determine the total length grade. In this case, I just want to know what the length difference is between the graded basic block and the ungraded pieces. I want to grade my pieces up to the next larger size. To do this, I just lay the ungraded pattern pieces on top of the next size and align the pieces along the horizontal and vertical axis. My drawings are missing the horizontal, but you can pretend there is a line that runs from the side-seam/armscye points across the pieces. BTW if you would rather, you can figure all this out mathematically....
Once you know the length grade difference, you can then decide where you want that length growth to occur on your ungraded pattern pieces. In the examples below, you can have that length split between the two pieces or all of it in one piece or the other (shown in red).
The question you have to ask is:
This is where the beauty of computerized grading happens. I can play with the grade as much as I want - plugging in different numbers until the proportions look the way I want for each size. Hand grading would be a little more complex. The more complex the style, the more difficult the grade can become when doing it by hand. Handford's suggestion to tape the pieces together with long strips of tagboard can work in hand grading. The grader will have to determine if additional grade points should be added and how much movement should occur. This can be done by using Handford's red lines of distribution. Sophisticated manipulation at each grade point can only occur in CAD.
Still the principle works the same regardless of how complex the style or method.
1. Determine your total length/width grades.
2. Calculate the length/width difference between sizes at the grade points.
3. Decide where the growth should occur by comparing the total grade and the difference between each size at the needed grade points. What proportionally looks correct? How is my fit affected?
April 13, 2008
Grading Complex Styles pt. 1
Part 1 of this grading series will make more sense if you have a copy of Jack Handford's Professional Pattern Grading book. Unfortunately, the book is now out of print. Still, this entry may be helpful in grading complex styles, especially part 2...
An anonymous reader left this comment:
This is a good question and can be confusing. The first thing I had to do was go back and look at Handford's book to see those red lines. Sometimes when I read a technical book my eyes glaze over and I skim until I find the info I am looking for. To be honest, I have had to study Handford's book several times to grasp what he is saying. In any event, I couldn't recall those red lines....
The red lines are illustrated on page 1-2 of Handford's book. He uses the red lines to indicate where a pattern grows or shrinks. The rest of the book has more illustrations of basic pattern pieces that show this. The key is to read page 3:
In other words, a grader could draw those lines of distribution on each pattern piece and then cut the pattern apart to spread or overlap them for the next size. He is absolutely right that such a task would be extremely time consuming, error prone and tedious. This is the failure of the Price/Zamkoff book on grading because this is how they explain grading. It was the primary reason I was so confused about grading too. If you were to grade by hand, could you imagine making duplicate copies of your base pattern so you could cut it apart? You would then need to carefully align the pieces, tape them securely, redraw the pattern, and cut it out. Then you would have to start the whole process over again for the next size. Yikes!
I don't mean to be so hard on Price/Zamkoff because they explain the concept of grading correctly. The problem is that it is not practical, even in a CAD environment.
I am not sure why Handford places those red lines in his illustrations other than to illustrate where the growth is occurring as you grade using his method. In his method, you move a pattern piece a certain direction at each grade point. The grade points are related to those red lines but are actually located at a pattern edge, usually a corner or mid-point.
Anyway, the reason I didn't remember seeing those red lines is because I ignored them. As a CAD grader I simply select a point and enter in the amount of growth. In my head I know a piece is growing in the middle of the pattern even when I assign the growth to an outside corner or point.
Anyway, I have blathered too long.... The commenter is correct that with complex styles the growth/shrinkage must be placed properly. Handford illustrates a slightly more complex style of a bodice with midriff on pages 93-94. The pieces are taped together with strips of tagboard and graded at the same time. On page 89 Handford makes the suggestion of placing the style on a form to determine where growth/shrinkage should occur. While his suggestion is valid, it is difficult to make the conceptual leap from a 3D form with lines to a table top with flat pattern pieces.
I have never done this. Partly because I have only graded children's pattern pieces. There have only been a handful of styles that I would consider very complex. Since I did this on CAD I had the luxury of playing around with the grading until I felt it was correct. I came up with my own method that works for me. It is not much different from putting a jigsaw puzzle together and only involves a little bit of math.
CAD makes grading complex styles very easy. Unfortunately, the night is getting late and so a complete explanation will have to wait. For now, you must know your total width and length grades, say for a bodice pattern piece. If you have a bodice with a midriff and the total length grade is 1" (I don't know I am making this up...), divide the total length grade between the two pieces so that the growth looks proportionally correct.... Anyway, more later...
An anonymous reader left this comment:
I love your blog. Thank you so much for all the information. I've recently started grading patterns. I can grade simple styles by following Handford or other books' steps no problem. But when it comes to complex designs, such as clothing that has unusual shapes and consists of multiple panels, I have trouble placing the "distribution lines" (red lines in Handford's book) on the patterns. Handford suggests by putting the patterns on the mannequins and draw the red lines. But sometimes it isn't practical as I'm using a CAD program.
Any suggestions?
This is a good question and can be confusing. The first thing I had to do was go back and look at Handford's book to see those red lines. Sometimes when I read a technical book my eyes glaze over and I skim until I find the info I am looking for. To be honest, I have had to study Handford's book several times to grasp what he is saying. In any event, I couldn't recall those red lines....
The red lines are illustrated on page 1-2 of Handford's book. He uses the red lines to indicate where a pattern grows or shrinks. The rest of the book has more illustrations of basic pattern pieces that show this. The key is to read page 3:
Obviously the cutting and spreading or overlapping of each part of each pattern to grade it one size up or one size down would be far too time consuming and invite much chance for error to be practical.
In other words, a grader could draw those lines of distribution on each pattern piece and then cut the pattern apart to spread or overlap them for the next size. He is absolutely right that such a task would be extremely time consuming, error prone and tedious. This is the failure of the Price/Zamkoff book on grading because this is how they explain grading. It was the primary reason I was so confused about grading too. If you were to grade by hand, could you imagine making duplicate copies of your base pattern so you could cut it apart? You would then need to carefully align the pieces, tape them securely, redraw the pattern, and cut it out. Then you would have to start the whole process over again for the next size. Yikes!
I don't mean to be so hard on Price/Zamkoff because they explain the concept of grading correctly. The problem is that it is not practical, even in a CAD environment.
I am not sure why Handford places those red lines in his illustrations other than to illustrate where the growth is occurring as you grade using his method. In his method, you move a pattern piece a certain direction at each grade point. The grade points are related to those red lines but are actually located at a pattern edge, usually a corner or mid-point.
Anyway, the reason I didn't remember seeing those red lines is because I ignored them. As a CAD grader I simply select a point and enter in the amount of growth. In my head I know a piece is growing in the middle of the pattern even when I assign the growth to an outside corner or point.
Anyway, I have blathered too long.... The commenter is correct that with complex styles the growth/shrinkage must be placed properly. Handford illustrates a slightly more complex style of a bodice with midriff on pages 93-94. The pieces are taped together with strips of tagboard and graded at the same time. On page 89 Handford makes the suggestion of placing the style on a form to determine where growth/shrinkage should occur. While his suggestion is valid, it is difficult to make the conceptual leap from a 3D form with lines to a table top with flat pattern pieces.
I have never done this. Partly because I have only graded children's pattern pieces. There have only been a handful of styles that I would consider very complex. Since I did this on CAD I had the luxury of playing around with the grading until I felt it was correct. I came up with my own method that works for me. It is not much different from putting a jigsaw puzzle together and only involves a little bit of math.
CAD makes grading complex styles very easy. Unfortunately, the night is getting late and so a complete explanation will have to wait. For now, you must know your total width and length grades, say for a bodice pattern piece. If you have a bodice with a midriff and the total length grade is 1" (I don't know I am making this up...), divide the total length grade between the two pieces so that the growth looks proportionally correct.... Anyway, more later...
January 21, 2008
Grading Pants Notes pt. 3
The following is my final entry on grading infant-toddler pants. Having a copy of the Jack Handford grading manual will be helpful in understanding what these notes mean, especially for this last entry. Hopefully you have at least read the introduction and the instructions for grading a bodice. If you don't have a copy of the book, save these notes anyway - they may come in handy. Part 1 contains an explanation of direction arrows, Part 2 explains notation.
My infant-toddler pants are between knee and mid-calf length. I designed them to peek out just below the skirts of my dresses without distracting from the overall look of the dress. I wanted the trim of the pants barely visible below the skirt hem. So what should be the length grade of my pants?
At the top of the page for the pant grade (i.e., pg 218), Handford states that the grade for various lengths can be determined by studying the grading chart and diagram. The grading chart contains instructions for grading ankle length pants. I don't know why, but it wasn't obvious to me what grade steps to alter. I ended up doing the ankle length grade and decided it was grading to much. Did I mention that I ended up grading my toddler pants three times? Anyway, if you want to grade shorts, or any other length, these are the steps to alter:
Move #5 and #9 (up) is the knee length grade.
Move #6 and #8 is the ankle length grade.
If you want knee length shorts, skip moves #6 & #8. If you want mid-calf length, you could try splitting the difference between the knee length and ankle length grade. Any other lengths will be some variation on the above mentioned moves. If the length is closer to the ankle, follow the ankle grade and vice versa for shorter styles. In other words, these moves are flexible and depend on the style you are grading. It also depends on the personal preference of the individual grader. I graded my pants using the knee-length grade.
One reason I had a little bit of difficulty with determining the length grade has to do with my computerized grading experience. Moves 5 & 6, for example, can be combined in one grading point. The grading of children's patterns can be simplified because the shapes and growth is simpler in some ways. Since you can select an individual grading point and put in relative changes, the moves are interpreted a little bit differently. I am a self-taught grader and it takes me a bit more effort to determine my approach.
Any other question on grading pants? I hope these notes are helpful.
January 03, 2008
Grading Pants Notes pt. 1
The following are my notes on grading infant-toddler pants. Having a copy of the Jack Handford grading manual will be helpful in understanding what these notes mean. Hopefully you have at least read the introduction and the instructions for grading a bodice. If you don't have a copy of the book, save these notes anyway - they may come in handy.
These are the first of my notes on grading pants using the Jack Handford book. Part one of these notes is an explanation about directions and movements of the pattern pieces. Later I will talk specifically about grading pants, shorts, and what I think is a mistake in the children's chapter. Handford's book is a textbook and like most design text books he starts with grading women's styles. The book progresses from woman's bodices, pants, and skirts, to men's styles, and finally to children. When design/pattern making/grading book authors finally get to the children's info, the information becomes abbreviated and incomplete (if they include it at all). Handford's book is different because he does include infant and toddler information and it is more complete than any other grading manual out there. Still, he falls into the same trap. He assumes the student has worked through all of the previous chapters before arriving at the children's chapter. He assumes you have a strong grading background and understand his method completely. But what about those who have no interest in grading woman's clothing and skip ahead to the chapters with the most relevant information? This is what I did.
Now I do have a strong grading background - computer grading. Hand and computer grading are similar and Handford's method is how it is done in the industry. The direction of the grading is done in a similar fashion. The grade rules are similar. The grade steps are the same. But physically moving a hard, paper pattern around versus selecting points and entering relative coordinates is different. Despite that, I have a general sense of how a pattern should grow or shrink between sizes - and that helped me finally understand Handford's method better.
 To start out, you will need to compare the grade instructions for women's pants to children. If you turn to page 79 (grading of women's back pant), you will notice arrows with words around each pattern piece. The arrows look like this drawing. If you flip over to the toddler pant grade (page 225), you will see arrows, but no words. It is at this point that Handford assumes you will know what direction is In, Out, Up, or Down. Now study the drawings of the women's pant and the children's pant. Do you see any other differences? There is one major difference that threw me off - I'll explain later...
 The next thing to understand are directions. All patterns will move IN, OUT, UP, or DOWN. Handford shows how this works on page 6 in relation to a bodice. The children's chapter doesn't have these extra helps. So I drew arrows like on the right and below to help remind me of grading direction. I added the words to body center or to body side to remind me of how to move the pattern IN or OUT. As you can see, IN or OUT can change depending on whether you are grading a left or right piece (applies to front or back too). Directions may change again when grading darts. Be sure to study styles with darts to see the changes. Infant-Toddler styles do not have darts, so movements will occur like these drawings. Movements UP move toward the body head and DOWN toward the feet. UP and DOWN movements are always the same.
 I hope I haven't thoroughly confused anyone yet. I felt like this brief explanation of the notation and movements was necessary before getting into more detail.
If you have questions, please leave them in comments.
June 06, 2006
Making a dress form pt. 4 : padding the form with batting
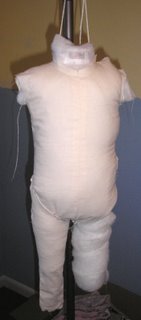
From the picture below, you can see I have made some progress. I have started to pad the papier mache form with batting. I used my original draft from my first form and modified a few seams. In this picture I am trying on the leg - it needed further adjustment, along with the front torso. I also took note on what areas needed a bit more padding. The form is suspended from the stand by a cotton yarn. I will be putting weights into the bottom of the legs to help give it more stability. Already, this version is much better than my previous one, but still not as good as the professionally made forms.

May 27, 2006
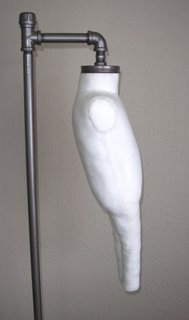
Making a dress form pt. 3 : Starting with a good base
I hit upon a bit of inspiration while searching the net for info on how to make a dress form. I kept running into the terms papier mache. The professional forms have a papier mache center. At Vintage Sewing (link no longer works) there is a demonstration on how to pad your own form.
Papier mache is a simple medium to work in, just messy. I bought an all vinyl doll to use as a base. It has smaller measurements than I need - which is perfect to later pad it out. I pulled the doll apart, sprayed it with oil and wrapped plastic wrap around the body. Next, layers of paper and glue. I then cut it off the body and slashed and spread it apart to get better proportions. More layers of glue and paper....
I have the body, done and I am now working on the legs. No pictures yet, but soon. Hopefully, I can start doing the padding next week!
May 18, 2006
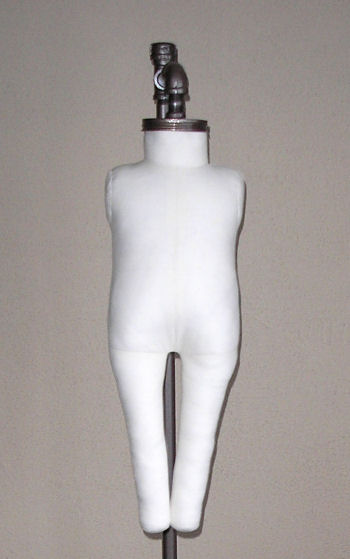
Making a dress form pt. 2 : How to suspend it and checking measurements
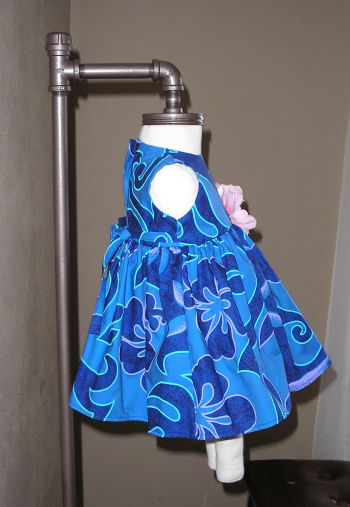
I made some more progress this week on my infant dress form (sized 3mo). I created a stand from bits and pieces from the hardware store and spray painted it to make it uniform. I love my stand! The form, on the other hand, has presented some problems - ones I am not quite sure how to work out.


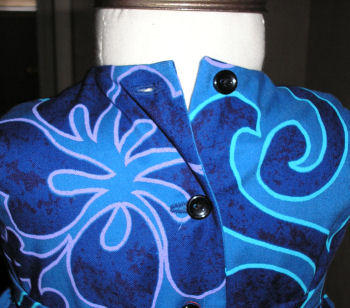
From the front, the form actually looks ok. The dress is one of my Hawaiian dresses, sized 3 mo. I know this dress fits because I have tried it on children. It may be hard to tell in these pictures, but my first problem is the neck size. I drafted my pattern from Aldrich's measurements. Her neck base is at least 1" larger in circumference than all of my other size charts. IMO, it is too big and I will be making it smaller in my next draft. The neck of my dress is on the small side, however, and I will be adjusting it in my next line, although not much. When I did my fittings, the moms actually commented on how the neck fit better than most RTW (which are usually too big!).

In these pictures, you can see how my form swings out from the bottom. The only adjustment I can think to make is to drop the back of the neckband at least 1/4", thus pulling the form into a straigher line. You can see how this may cause problems with checking the skirt.
You can see how large the neck size of my form is in comparison to my dress in this picture.
Another BIG problem is my measurements are all off. The girth measurements match a 12mo. The vertical trunk measurement matches a 6mo. I drafted my pattern in a 3mo with no ease. I can only assume that my measurements were thrown off from the fabric stretching while stuffing. This is probably why the professional forms use a heavy-weight linen fabric.
I think this project still has potential, but it is back to the drawing board. Plus, I need to try and find a medium/heavy-weight linen. I would appreciate any suggestions that you patternmakers may have out there?!
My other big project is designing my Fall/Holiday dresses. I am thinking about some red silk holiday dresses, just need to order some fabric and try not to fall too behind...

From the front, the form actually looks ok. The dress is one of my Hawaiian dresses, sized 3 mo. I know this dress fits because I have tried it on children. It may be hard to tell in these pictures, but my first problem is the neck size. I drafted my pattern from Aldrich's measurements. Her neck base is at least 1" larger in circumference than all of my other size charts. IMO, it is too big and I will be making it smaller in my next draft. The neck of my dress is on the small side, however, and I will be adjusting it in my next line, although not much. When I did my fittings, the moms actually commented on how the neck fit better than most RTW (which are usually too big!).

In these pictures, you can see how my form swings out from the bottom. The only adjustment I can think to make is to drop the back of the neckband at least 1/4", thus pulling the form into a straigher line. You can see how this may cause problems with checking the skirt.
You can see how large the neck size of my form is in comparison to my dress in this picture.

Another BIG problem is my measurements are all off. The girth measurements match a 12mo. The vertical trunk measurement matches a 6mo. I drafted my pattern in a 3mo with no ease. I can only assume that my measurements were thrown off from the fabric stretching while stuffing. This is probably why the professional forms use a heavy-weight linen fabric.
I think this project still has potential, but it is back to the drawing board. Plus, I need to try and find a medium/heavy-weight linen. I would appreciate any suggestions that you patternmakers may have out there?!
My other big project is designing my Fall/Holiday dresses. I am thinking about some red silk holiday dresses, just need to order some fabric and try not to fall too behind...
Subscribe to:
Posts (Atom)