July 25, 2007

When do you grade sewing patterns?

Amanda left a comment/question on a previous blog about grading. I thought the answer deserved its own blog entry.
I have what is probably a stupid question. Do you do the grading before or after you add the Seam Allowance to the sloper? Part of my brain says before because you are likely to get a better line, the other says after as it would be easier. I am loving your blog, thank you so very much.
Amanda, not a stupid question at all. The only stupid question is the one not asked. There is a lot of confusion about grading and the difference between a sloper and a block. Let's throw some definitions out and then I'll answer your question.

Sloper - a basic fitting pattern used by costumers and home sewing enthusiasts. The pattern does not have seam allowances, which are added later. People who use slopers do all of their pattern making without seam allowances.

Block - A pattern used by fashion designers and pattern makers which forms the basis of future styles. A block is a perfected pattern that has seam allowances. During the pattern making process the seam allowances remain on the pattern.

Many people believe that using blocks (vs. slopers) is an advanced pattern making technique. It's not really. The pattern making process is no different when using blocks, except for not having to add seam allowances. If anything, it saves time in production settings. It is important for the pattern maker to know what the seam allowances are - which are usually drawn onto the pattern anyway. The exception might be CAD patterns which may or may not have the seam allowances drawn. My CAD patterns do not show seam allowances even though they are there. I do all of my pattern making with the seam allowances already on the pattern. Occasionally, I will turn the seam allowances off to check measurements or to match up seam lines of complex pieces. CAD has greatly simplified the manipulation of seam allowances.

Now to answer the question.... Grading should only occur after the pattern has been perfected and the seam allowances have been added. If you add seam allowances after grading you just add more work to your project and you could introduce errors. This is especially true in a factory setting.

Now in theatrical settings, I know this would never occur. A cutter (aka pattern maker) does their pattern making in the size they need and then adds seam allowances during cutting. If they need two sizes of the same style, they will grade the "slopers". Finally, they trace the pattern onto fabric and add the seam allowances while cutting. This system works in the theater but is not precise enough for apparel production.

July 24, 2007

Boy's dress pants - an analysis


Here is a look at a pair of budget dress pants sized 24M. These were most likely sold by a big box retailer as part of a set that included a dress shirt and vest. They are 65% polyester, 35% rayon, made in Taiwan. Since these were likely sold as a set, it probably is not necessary for them to have all of the same details as an adult pair of pants. I call these pants budget because they would have sold for a low price point and were made from an inexpensive fabric. Still, there are some nice quality features.

Boys dress pantsThe pants have 4 pleats in the front. 1" cuffs on pant legs. There are no pockets or other trimming details. (Click on the images for bigger close-ups). The front waist band is flat.


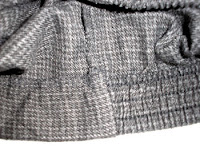
Boys pants waistbandThe back waistband has 1.25" stitch through elastic. Most infant/toddler pants or skirts have an elasticized back waist. This age group has a longer front waist than back waist. Combine this with a large seat (padded with a diaper) and it becomes necessary to take up the extra back width of the pant waist with elastic. The elastic is applied with a specialized machine that stretches the elastic while it is stitched on. Be sure to spec out the finished elastic measurement (the measurement of the elastic after it has been stitched). If you don't, the elastic will end up being too big or too small. A quality auditor (or you) should do in-line inspections during production. This is the one area that is the easiest to mess up.


Close up of waistband at side seam You can see the nice neat finish of the waist side seam. The front waist band is stitched onto the front pant. The back waist has the elastic applied, turned to the inside and top stitched down. Some manufacturers will have a separate back waistband piece, but I like the nice smooth back waistband of this pant. The side seam is stitched by folding the front waistband to the front over the back elastic waist band. When the front band is turned out, the back waist is enclosed. Lower quality pants do not enclose this seam. Even though these pants are budget, the topstitching of the front waist band runs even with the lowest line of stitching for the elastic.

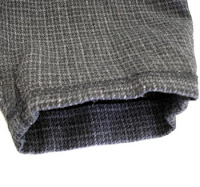
Pant leg hemThis is the only place where I could find the manufacturer truly skimped. The inside leg hem has a 1/2" hem which is topstitched down. This is a quicker finish than a blind hem and it can be hidden underneath the 1" cuff. To allow for future growth, you can add to the hem depth and do a blind hem instead. I wonder if there are many that would actually take the time to let the hem and cuff down, as simple as it is. Most parents would probably just buy another pair of pants.

July 03, 2007

A boy's shirt pattern fix for Butterick 6030 pt. 3

A boy's shirt pattern fix for Butterick 6030 pt. 1 is here
A boy's shirt pattern fix for Butterick 6030 pt. 2 is here
 
A continuation of my boy's shirt pattern fix....

4. Finish collar. Clip neck seam allowances near shoulder seams. Turn seam allowance of top collar under and push the remaining neck seam allowances into collar. Topstitch. Tack facing down along shoulder seams. Notice I included my care/content tag when I topstitched the collar closed.

Neckline finish for a shirt
5. Hem the sleeve. Attach sleeve to armhole flat. Close the side seam and sleeve. At this point I noticed the sleeve cap didn't match up to the armscye. So one more pattern fix to make - I made do for the sample.

Attach sleeve to shirt
At this point I decided not finish up the sample. Instead I put the shirt on the form to look at the overall proportions. The collar area looks nice and right on target.

Checking a shirt for fit
The overall proportion of the shirt still looks too big for a size 24 months. I didn't make any changes to the original pattern in body width or length and I should have. I will double check those measurements on my pattern and make adjustments. At this point, there is little of the original pattern left and I really should have just drafted my own pattern. The original Butterick 6030 pattern is heading to the trash. BTW, anyone like my two tone work room? I desperately need to repaint it.

Hawaiian boys shirt

June 28, 2007

A boy's shirt pattern fix for Butterick 6030 pt. 2

A boy's shirt pattern fix for Butterick 6030 pt.1 is here

Well I spent a few hours working on this pattern and sewed up a sample. I decided to go ahead and do a style similar to the original. My sample is a basic shirt with a convertible collar. Once the patterns are completely worked out, endless style variations can be developed. So far I have corrected:
  • Neckline smaller
  • Reduced and reshaped front self-facing
  • Reduced seam allowances. 1/4" s.a. for the neckline, 3/8" everywhere else.
  • Drafted a new collar - a one piece collar that folds in half.
I thought it might be useful for my readers to see how I construct a simple, casual shirt. This is not a finely tailored shirt, by any means - just the basics to test the pattern. These steps are production-style but allow for use of home sewing machines. At this point, I assume the pieces have been cut and markings and notches have been transferred. BTW, I reduced the number of notches and only used two drill holes (could use chalk) for the pocket placement. Also, you'll notice I did not use any interfacing. Interfacing is often eliminated in children's clothing from budget to high-end clothing. Firmly woven fabrics may not need any stiffening. During product development test and see if you really need it.

1. Prep work - edge finish the the pocket edges and long edges of facing. Fold collar in half and stitch collar ends (called "close" in the industry). Sew shoulder seams.
Edge finish a pocket before attaching to front
Sew collar ends
2. Details. Turn and press collar. Use a pocket template and press pocket. Stitch pocket hem. Topstitch pocket to left shirt front. Edgestitch collar. I think collars look best edgestitched 1/8" from edge. Further away can look homemade - but depends on style.

Edgestitch collar
3. Attach collar. This looks more complex than it is. This fabric is hard to see but there are three notches on the collar. Two match up with the shoulder seam and one for the center back neck match-up points. Sandwich the collar between the front facing and neck (notches on shirt front indicate center front neck where collar starts and and another for the fold back of facing). Clip the top collar at the shoulder seam point a little less than the seam allowance depth 1/4". Stitch the collar on using a 1/4" seam allowance, flip the seam allowance of the top collar out of the way. Notice there is no grading and clipping (my least favorite thing to do).

Attaching the collar to the neck edge
Tomorrow I'll show how to finish the collar, attach sleeves and give a review of the results.

June 13, 2007

Resizing Vintage Patterns versus Grading

Sewing pattern and notions

The same reader from the previous post also asked:
Also, I found some info on resizing vintage patterns http://www.sensibility.com/pattern/resizepattern.htm thought it might be of interest.
I checked out the link and I do like the website. However, Jenny's pattern resizing tutorial is mis-named. She actually is describing a grading process. It is not a very precise method, but perhaps it would work for a custom or one-time project. I would still encourage my readers to learn a better method, especially for preparing patterns for production.

The idea of re-sizing patterns implies there is an inherent sizing problem which should be solved. If you buy a commercial pattern and you need a longer waist, then you would resize the pattern by slashing and spreading it longer to the required measurement. Jenny does describe such a process at the end of her tutorial.

Jenny goes one step further and shows how to alter an adult pattern into a children's pattern. The method probably will work, but it will require too much fiddling. Why not take a basic block the size you need and draft the same style?

I don't think I am being too hard on Jenny. She does have a nice website. Just realize her perspective is geared more to costumers and others who don't want to be bothered with details.