Showing posts with label blouses. Show all posts

March 29, 2013

Blouses - yes, they need ironing

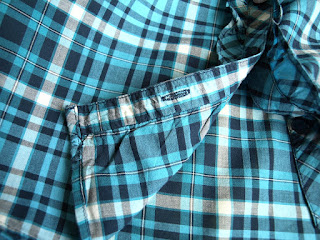
One of the consequences of my blouse buying spree is the sad fact that cotton blouses wrinkle when washed. The fabric will look worn and tired (see the picture below). This is true of just about any woven cotton fabric unless they are pre-treated with nasty chemicals. My blouses were getting little rotation in my wardrobe because they would hang, wrinkled, in the closet bypassed for easy wearing knits. In order for my blouses to get worn, I had to develop a new habit and like it. I've never been opposed to ironing, but standing at the ironing board for a long time is something I've never liked much.
Wrinkled blouse
So back in December, I pulled out all of my wrinkled clothes and and spent about 5 hours ironing. Adding DH's shirts to the mix would have been a bit over the top, I think. The goal was to catch up. Now, about once a week I pull out just the 3-4 wrinkled items and give them a good ironing. My blouses are back in rotation and not merely taking up space.

One thing that helps tremendously is that I pop in my earbuds and listen to my favorite audio podcasts. Time passes quickly and that chore is not a chore any longer.

I've also rediscovered starch. Cottons will look almost new with some light starching (photo above). I used to buy starch in aerosol cans. Not only was it more expensive, but who knows what nasty chemicals are released when you spray that starch. I invested in a concentrated 1/2 gallon of Sta-Flo starch. It has a few simple ingredients - water, cornstarch, borax, and a few unnamed ingredients. I suppose I could make my own, but I have not ventured down that path. The bottle contains directions of how to dilute it and it's a snap with spray bottles that have a dilution guide. This 1/2 gallon bottle will last a looong time.


Anyway, what say you about ironing? Any favorite tips, irons, starch recipes?

March 19, 2013

Blouse refashion : shortening sleeves

This was another lucky thrift store find. This is an Eddie Bauer blouse with a print and interesting yoke detail. The yoke has narrow tucks and a narrow double fold ruffle that measures about 3/8 inch. The button band extends below the yoke at the bottom. (click on the picture for a better view of the yoke details. The buttons are fabric covered. The attention to detail and the construction make this a high quality blouse. There are 6 separate pattern pieces resulting in 12 cut pieces just to make this yoke! I'm still not sure how the seam with the ruffle is not bulky considering it is a folded ruffle.
Eddie Bauer blouse with long sleeves
As much as I liked the blouse, the combination of the print and long sleeves made the blouse feel like I was wearing pajamas. So, I closed my eyes (not really) and chopped the sleeves off. The new shorter sleeves were a bit wide, so I added elastic to pull it in.
Shorter sleeves on an Eddie Bauer blouse
I like this version much better - a fun new top for Spring.

February 25, 2013

A blouse refashion and study

I seem to be a woman obsessed with blouses. Ever since I set out to create a basic blouse pattern for myself, I've kept my eyes open to study many RTW blouses. I've made many purchases from the thrift store with varying types of details and construction. I purchased this blouse a few months ago. As it usually goes, there were many things I liked about this blouse while I tried it on in the fitting room but I did note it was a little too big.

Plaid blouse with front ruffle detail
The refashion part of this post is probably the least interesting and so I don't have any before photos. I pulled out my basic blouse pattern and measured across the back at the base of the armholes. I compared that measurement with the blouse and did some math. The blouse needed to come in 1.5 inches on each side seam. Hmmm. The blouse was much bigger than I realized and made me recognize that our perceptions of body shape and size are definitely skewed when in a store fitting room. Anyway, the sleeves are set in flat so I just sewed up each side, taking it in the needed amount.

Detail of ruffle along shirt button band.
As I worked on the alterations, I took some construction notes. The front button band is a cut 2 (or 4, 2 for each side). A ruffle is gathered to the band that faces out on the long inner edge. The bands are sewn together on the outside edge and then stitched to the front bodice on the reverse side. The band is then turned to the front and topstitched down. I suspect the ruffle is not pressed down prior to topstitching. I think the operator used the ruffle to pull the band flat, turning the seam allowance to the inside. There is probably some interfacing on the band piece with the ruffle. The whole operation leads to a neat, clean finished button band. The operator who made this is probably very skilled, especially with dealing the bias area near the neck band. Still, this process is easier than it looks.
Inside view of front button band
The only problem with this style is the ruffle. Despite a good ironing with some starch, the ruffle wants to stand up and fall over the buttons. The blouse is still cute, but perhaps a narrower ruffle would solve that problem?
Shirt sleeve cuff with a band
While the sleeves were set in flat, the sleeve cuff was set in the round. The cuff was attached from the reverse side and turned out and topstitched down. I don't believe there was any pre-pressing because you can see the operator used a stripe of the fabric as a guide to turn the seam allowances in. If I were making this, I probably would pre-press just because I don't have the practice. The collar neckband was constructed in the same manner.

November 12, 2012

The blouse pattern revisited : recutting tagboard pieces

Bodice pattern pieces cut out of tag board
About a year ago I cut my blouse pattern out of tag board. I had cut the interior of the darts out because I thought it would be more convenient to just trace the dart onto the fabric. Sometimes this is done in the industry, but there is a better way. Anyway, this didn't work out very well.

Recutting blouse pattern pieces out of tagboard

So after I had made my most recent modifications, I recut the front and back blouse pattern pieces. This time I drew the darts in with the addition of drill holes. You can't really see them in the photo, but I used an awl to poke holes into the tag board. A pencil tip fits into the holes to mark the dart on the fabric. This should work better

Now I'm finally ready to buy some more fabric for blouses.

November 18, 2011

Transferring patterns to tag board : notches and guides

As part of finishing up my pattern blocks, I needed to add the armhole notches. Double notches for the back and single for the front. The front and back notches are a different distant from the side seam rather than symmetric. This helps ensure that the front sleeve matches the front armhole and vice-versa. The notches indicate nothing other than front and back.

This is my original sleeve from blouse 1.0 and 2.0. This sleeve can be used as the basis for any future variation. The original blouse has an elastic casing, so I noted the details related to that on the pattern piece.

I also finally got around to making the buttonhole guide. My awl from my book making helped make the holes in the tag board, but really any basic awl will work.

Further pattern making work:
1. Redo collar band shaping - again. [sigh]
2. Make a straight, short sleeve pattern in oak tag.
3. Buttonhole guide for collar band.
4. Long sleeve pattern with shirt sleeve placket and cuff.
5. Study/test block fusing of collar

November 09, 2011

Transferring patterns to tag board : an example of a blouse

Front and back bodice pieces in tagboard
 After sewing up Blouse 2.0, I felt confidant enough to transfer my pattern pieces to oak tag or tag board. Tag board is the same stiff paper product used in file folders but available in large sheets or rolls. Some pattern makers do all of their patternmaking on oak tag, which is a better practice. But, I usually do my initial patterns on tracing paper or medical exam paper. At some point I do transfer it oak tag for durability. These patterns aren't necessarily production ready. They are designed for the way I work at home. The darts are cut out so I can trace the dart shape on the fabric. In industry darts are marked with drill holes, just as an example.
Collar and collar band pieces in tagboard
I still need to create a buttonhole placement guide and place the armhole notches. I figured out about how much fabric I need to make a blouse and noted it on the main bodice piece. Fold lines and seam allowances that are different from the norm are indicated. I should have marked the interfacing piece in red ink - forgot to go retrieve the red pen from the office.
Paper pattern pieces ready to store away
Anyway, my paper pieces are stored in an envelope for future reference.