Showing posts with label Supplies. Show all posts

September 23, 2013

Repairing a leather sewing machine belt

If you own a sewing machine (industrial or otherwise) with a leather sewing machine belt, chances are that you will have to either replace or repair it at some point. Leather belts will stretch or shrink, and/or break. The climate of your workspace and other variables play into the life and condition of the belt. The area around the belt clip tends to get a lot of wear too. Leather belts are a little old school, but they do have a few advantages. They are customizable and relatively easy to fix.

You'll know you have a problem when the belt ends up in pieces or the machine is not operating properly. The leather belt on my Singer Hemstitcher 72w-19 machine stretched out over time and my machine was not going as fast as it should. It was time to shorten the belt.

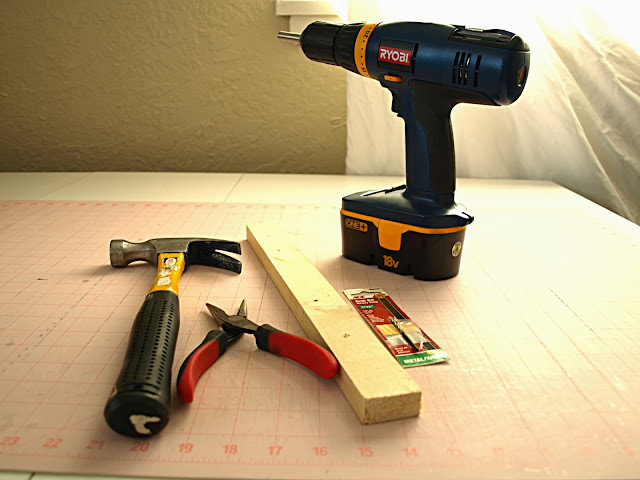
Tools needed to repair a leather sewing machine belt.
Any workshop should have a toolbox. For this job, you'll need these tools:

  1. Drill
  2. 3/32nd drill bit
  3. Scrap wood
  4. Pliers
  5. Hammer
  6. Utility knife (not pictured)
  7. Belt clips (not pictured)
I purchased a box of 500 belt clips from Southstar Supply. It sounds like overkill, but believe me, you will probably mess up the clip the first time you do it. Southstar also sells leather belting. You'll want extra length because you never know when you'll need it. Leather belting is not cheap, and there are other places on the net that will sell it in cut lengths. So it pays to repair a belt when you can.

One more note. There is a special tool designed to punch a hole in the leather belt for the belt clip. It's expensive. It doesn't work well (from what I'm told) and you don't need it. A drill with the right drill bit works really, really well.

Drilling a hole in a leather belt for a sewing machine

In my case, I first removed the belt from the machine by bending the existing belt clip apart with pliers. You won't be able to reuse it, so don't bother trying to save it (this is why you want a box of 500!).

Next, determine how much to shorten the belt. It won't be as much as you think. If you make the belt too short, the belt won't fit or the belt will exert too much tension on the machine causing the machine to work harder than it should. Using the utility knife, I only shortened the belt 1/4".

About 1/4" from the cut end, drill a hole through the center of the belt. Be sure to drill the hole on top of some scrap wood so you don't damage your work table! You do need your other hand to help steady the belt as you drill, but I was taking a demo picture by myself. All other safe tool handling rules apply.
Inserting a belt clip into a leather sewing machine belt

Place the belt clip through both holes to test, but don't mash the belt clip closed yet (Yes, I've done this!). Take the belt clip off one side and take the belt to the machine and thread it through the holes in the table. Attach the belt clip to the belt ends and place it over the handwheel and motor pulley to test the tension.

Leather sewing machine belt in place

How much tension is needed? It depends on your machine. You need just enough to turn the handwheel properly. In the photo below I'm testing the tension (or slack) on the belt. This is about how much I need to have the machine operate properly.

Testing the tension of a leather sewing machine belt

Finally, mash the belt clip closed with the pliers (sometimes you need a hammer) and you're good to go. It's amazing that a 1/4" shorter in length makes a big difference!

October 04, 2007

Tag Board for pattern making


I have needed to order tag board (manila folder paper for patterns) for a while. Up till now I haven't needed very much. My patterns are small and a large, heavy roll of the stuff seemed excessive. I think I have found a reasonable alternative until I need larger quantities.

I did a search for tag board among the big box office supply houses. Sure enough I found one that sold it in large pieces (24 x 36) in a box of 100 sheets. The pieces are big enough that I can cut out quite a few pieces at one time and still have left overs. I further economize by not cutting out square or rectangular pieces. Technically, every pattern piece should be cut out of tag board and if I were to send them to a contractor, I would. Square/Rectangular pieces are cut using cutting guides & charts. I have a cutting guide for sleeve cuffs and skirts indicating the dimensions for each size, for example.

January 23, 2007

A chair from the factory floor

This is the chair I sit on nearly every day and it has a story. It's not fancy, in fact it is rather ugly and uncomfortable. It has a few paint splatters from being used to repaint rooms in my house. The seat and paint is worn. What makes this chair so special?

This chair came from a local sewing factory as it was closing its manufacturing operations - the factory where I was first employed out of college. I don't know what possessed me to buy it other than it was cheap. It was after I brought it home that I noticed the date on the bottom of the chair. The same year I was born. A foreshadowing of destiny? More like life coming around full circle.

This particular factory produced little girls' dresses. My mother bought dresses from their factory outlet store - and yes I wore them. No one ever thought that I would be working in that same factory.

Sitting on this chair every day reminds me of where I came from, where I got my start. It is also give me tremendous sympathy for the poor women (literally) who sat on this chair and sewed little girls dresses day after day. Dresses that literally thousands have worn. All in an effort to earn meager wages. Even though the chair is uncomfortable, it keeps me from getting too cocky.

August 03, 2006

Sew What? Sewing a VW Convertible Bug Top Cover

VW Bug Convertible
This VW Convertible Bug looks better than the one I made!

I am sure many of you who sew have had this exact reaction to a sewing request. In this case, one woman named her company Sew What? Inc. Megan Duckett started a business sewing draperies. Her employment sewing for a theater company is how she decided on a company name. The complete story can be found at U.S. News and World Report, July 31, 2006 edition.

I am always impressed by women who start sewing related businesses. Megan even ran her company out of her garage for a time. What an inspiration! For more info about Megan, check out her website Sew What Inc.

My blog entry is not really about Megan's company, but about those Sew What?! moments. For Megan, she was asked to sew a lining into a coffin for a theatrical production. I have had many Sew What?! moments, but one stands out. I was asked to sew a vinyl car top cover for a convertible VW Bug.

Yes, I took this job. I knew I wouldn't make any money from the project, but it was the challenge that grabbed me. This was during college and I thought I could sew anything (I still think that, provided I have the right equipment). During college, a friend of mine bought a convertible bug. It had no cover. He welded a frame together and then asked me to sew a top together. I had an average home sewing machine and a lot of ambition.

With a budget of $60, I purchased some black vinyl, extra large snaps, and some clear vinyl (for a rear window). The only equipment purchase I made was some teflon coated needles in size 18 and a snap kit. This fabric was very thick. I have to say my initial pattern actually looked very good. The execution is where I had trouble.

This is one of those instances where a walking-foot machine would have come in handy. Instead, I sewed this thing together with my Singer 503A. For all of those Ebay sellers out there that claim this machine can sew through 4 layers of vinyl, well they are half right. It will do it, but it may not look very good. This is a tuff little machine and I really pushed it to the max sewing this together. The seams were overlapped on top of each other like a lapped seam, but the material slid and stretched as it went along. In any event, I finally finished it.

The top was attached to the car with the snaps. The snap kits available in the fabric stores are not really designed to go through heavy-weight vinyl or to be glued onto a car surface, but somehow we got them attached. Despite our efforts, this car was not really safe to drive with a home-made car top. I could just see it fly off at 25MPH. My friend ended up using the car top for rainy days while it was parked. He also bought a real vehicle that was safe to drive.