When I first started working with knits, it was rather difficult to find cute knit fabric but now with the increase in demand many online vendors carry a variety of knits, which makes shopping much more enjoyable. (see my list at the end for some of my favorites).
I have learned several things along the way when working with knits:
Quality is worth the wait, research, and/or price.
I seldom find good knits locally but do get lucky on occasion. Most of my purchases are online and some vendors send swatches for free. Price is not always a factor. I few years ago, a pattern/fabric designer launched a knit line and charged a pretty penny for it. I felt at the time it was more than I would spend especially since I didn't know what the quality was like. The prints were cute and a number of people I know bought them. Well, it had a horrible shrink factor of 10-12%. I believe this problem has been corrected by the manufacturer since I have noticed the online vendors no longer state the shrinkage rate. I have bought cheap and still do but there is the risk of the fabric becoming piley and looking worn out quicker.
Analyze stretch.
Stretch will impact the fit and choice of pattern. I will ask myself how much stretch does the fabric have and does it go back to the original shape and size afterwards. To find out stretch percentage, mark off 4 inches across (in the direction of the greatest stretch), then against a ruler hold down one side at the 0" mark while pulling until the fabric starts to resist, note how far it stretched. Let's say it stretched to 6", making it 2" longer. Now comes the math part (X/Y) x 100 = percentage of stretch. X = the number of inches stretched, here it is 2". Y = the base inches used, 4". 2 divide by 4 times 100 = 50%. If the fabric goes back to the original size/shape, great. If not I will make sure to use that fabric with a style that doesn't need retention, nothing close fitting.
Pick appropriate pattern for fabric
Pick an appropriate pattern for your fabric or know how to adjust to make it work. Last year, I made a dance costume which had a leotard under-structure. The leotard was made from a 4-way stretch miliskin and the attached over dress was made from a 2 way stretch metallic. The pattern for the overdress was based off of the leotard but had to be adjusted in both width and length. I highly recommend reading www.patternschool.com blog authored by Stuart Anderson, a stretch-wear pattern maker. He teaches the mechanics of stretch, fit and pattern making. And quite frankly, the best information I have found on working with knits.
Create your own design
 |
| Pointelle rib knit |
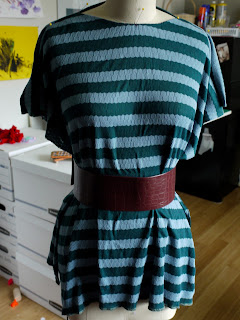
Besides making knitwear for my girls, I have been making t-shirts for myself. Lately, I am liking the looser blousier styles especially since I need to lose 20 lbs. of baby weight. My most recent shirt I made used a ribbed pointelle knit I found in the remnant section of the local chain fabric store. It was just under a yard and I probably paid less than $2.
 |
| Playing with the idea of a boatneck, batwing sleeve, and belt. |
The fabric is very soft and drapey. I looked through all my patterns and just couldn't find one I liked so I draped it and used an old shirt of mine as a pattern for the neckline. I used the actual fabric to drape in so, when it came time to take it off the mannequin I thread marked the seam allowances instead of using a marking pen.
Since I didn't make a true mock-up, I checked the pattern in fabric. I doubled checked the shoulder length and side seams. I also did a quick and dirty fitting on myself to make sure the neck line laid properly. I have small shoulders and small back width from armscye to armscye.
 |
| Stay tape on the back shoulder seam. |
I stabilized the shoulder line which is needed in knits because this is one area that can stretch out of shape. Instead of buying stay tape, I make my own using either lightweight fusible woven or fusible tricot/knit interfacing, cut at 3/8" wide. If using the knit fusible, I cut the length in the direction of least amount of stretch.
I usually sew my seams with a narrow zigzag and then serge together the edges to finish it. I got used to doing it this way because my serger is an industrial 5 stitch machine and has to be threaded in a three thread configuration for knits. So, I sew the seam first on the regular machine for strength and durability. My regular machine does have a stretch stitch but I don't care for it. It is hard to unpick if I make a mistake, so narrow zig zag it is. I have recently acquired a domestic four thread serger which I could use to seam and finish all at once, but I have it set up for roll hems and too lazy to change it back.
Hemming knits
For hemming, I use a twin needle for stretch on a standard sewing machine. I don't own a coverstitch machine and have felt the expense not necessary for the amount of knit sewing I do. That being said, the twin needle works really well for t-shirts and clothing that don't need 100% stretch to function (100% stretch as required by swim wear and some athletic wear or dance wear). Twin needle hems will pop if the hem is over stretched. I have only had to fix a few hems from this happening. Sometimes for more stretch, I will use the triple zigzag, lightening or serpentine stitch (same stitch I just have heard it called all these names). Hemming (as well as bindings used for necklines or sleeves, will post about this later) is one area of sewing with knits that may need to have a sample sewn first before preceding with the actual garment. Below is a picture of a hem done with a twin needle. The fabric stretched out on me. There are some different methods of approach to fix this.
 |
| Before pressing |
2. Use the serpentine stitch to hem
3. Stabilize the fabric by placing a tear away stabilizer between the feed dogs and fabric.
4. Starch, lots of it. (just don't stretch the fabric while applying)
5. The lazy method, press with lots of steam and see what happens after hem is in place. (This works if the wonkiness is minimal and is what I used for this shirt).
6. Often times, a combination of any of the above.
 |
| After pressing |
 |
| Neckline using same twin needle. |
 |
| Me in the finished shirt (sorry for the composition my 3.5 year old took the photo) |
Some online vendors I have bought knits from or just like to drool over:
Fabric.com
Print Knits Studio
Chez Ami
Girl Charlee
Gorgeous Fabric
Emma One Sock
Spandex World
Stretch House


