August 03, 2007

Are you a draper or a drafter?

In design school the teachers always told us that some students are natural drapers and some are natural drafters. Some students work better with a pencil and paper and others work better with a piece of fabric on a form. I leaned toward the pencil and paper because I prefer to work with numbers. Draping was was more difficult because it seemed less precise. My brain couldn't wrap itself around the concept of turning a drape into a pattern.

Over time draping has become less difficult, but still a challenge. I am getting a good draping exercise by making a slip cover for my old couch. Newer couches have the over-stuffed arms that curve. My couch doesn't have this and I couldn't find a slip cover to fit. A custom cover is $$$. Why not do it myself (with help from a library book on slipcovers)?

I am draping the cover with a "muslin" of green broadcloth and an old sheet.

Creating a pattern for a sofa slip cover
I just draped the arm and will be moving onto the deck next. This couch has the added difficulty of being a sleeper sofa. We would never have bought a sleeper sofa in a million years but it was given to us and so we use it.

Draping a couch arm for a slip coverThis is the fabric for the couch, a great buy from Wal-Mart. Wal-mart carries upholstery fabric and the price is usually great. BTW, that is our gold rocker. Isn't it lovely?! Unfortunately, the style is too difficult to slipcover and will have to be re-upholstered by a pro.

Upholstery fabric

July 26, 2007

Toddler Sweater Update


I started this sweater project over a year ago and it is still not finished. I finally blocked the pieces -- I doubt it was helpful when the sweater is made of synthetic yarn. One thing I noticed during the blocking process is how different the pieces looked from regular toddler patterns. There are several things I noticed that made me wonder...

Knitted sweater frontThe front piece has a t-shirt, boxy shape. The shoulder length looks too narrow and the front neck drop and width too big. I need to take measurements to see what toddler size this compares too.


Knitted sweater backThe back piece has no curve on the back neck. It is straight. I imagine a back neck curve is difficult to achieve in a knitted sweater. I wonder if this is typical in knitted garments? I don't knit enough sweaters to know. It could account for why the front neck is so big.


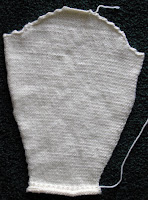
Knitted sleeve patternThe sleeve shaping seems fine, although they do bow out on the sides.


I have read books on knitwear design. One of these days I will draft my own basic knitwear design and try to knit up a sweater. In any event, all that's left on this sweater is to sew the pieces together and knit the neckband. I still haven't decided on the embellishment. Any ideas?

July 25, 2007

When do you grade sewing patterns?

Amanda left a comment/question on a previous blog about grading. I thought the answer deserved its own blog entry.
I have what is probably a stupid question. Do you do the grading before or after you add the Seam Allowance to the sloper? Part of my brain says before because you are likely to get a better line, the other says after as it would be easier. I am loving your blog, thank you so very much.
Amanda, not a stupid question at all. The only stupid question is the one not asked. There is a lot of confusion about grading and the difference between a sloper and a block. Let's throw some definitions out and then I'll answer your question.

Sloper - a basic fitting pattern used by costumers and home sewing enthusiasts. The pattern does not have seam allowances, which are added later. People who use slopers do all of their pattern making without seam allowances.

Block - A pattern used by fashion designers and pattern makers which forms the basis of future styles. A block is a perfected pattern that has seam allowances. During the pattern making process the seam allowances remain on the pattern.

Many people believe that using blocks (vs. slopers) is an advanced pattern making technique. It's not really. The pattern making process is no different when using blocks, except for not having to add seam allowances. If anything, it saves time in production settings. It is important for the pattern maker to know what the seam allowances are - which are usually drawn onto the pattern anyway. The exception might be CAD patterns which may or may not have the seam allowances drawn. My CAD patterns do not show seam allowances even though they are there. I do all of my pattern making with the seam allowances already on the pattern. Occasionally, I will turn the seam allowances off to check measurements or to match up seam lines of complex pieces. CAD has greatly simplified the manipulation of seam allowances.

Now to answer the question.... Grading should only occur after the pattern has been perfected and the seam allowances have been added. If you add seam allowances after grading you just add more work to your project and you could introduce errors. This is especially true in a factory setting.

Now in theatrical settings, I know this would never occur. A cutter (aka pattern maker) does their pattern making in the size they need and then adds seam allowances during cutting. If they need two sizes of the same style, they will grade the "slopers". Finally, they trace the pattern onto fabric and add the seam allowances while cutting. This system works in the theater but is not precise enough for apparel production.

July 24, 2007

Boy's dress pants - an analysis


Here is a look at a pair of budget dress pants sized 24M. These were most likely sold by a big box retailer as part of a set that included a dress shirt and vest. They are 65% polyester, 35% rayon, made in Taiwan. Since these were likely sold as a set, it probably is not necessary for them to have all of the same details as an adult pair of pants. I call these pants budget because they would have sold for a low price point and were made from an inexpensive fabric. Still, there are some nice quality features.

Boys dress pantsThe pants have 4 pleats in the front. 1" cuffs on pant legs. There are no pockets or other trimming details. (Click on the images for bigger close-ups). The front waist band is flat.


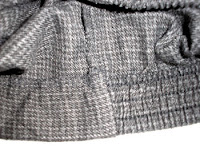
Boys pants waistbandThe back waistband has 1.25" stitch through elastic. Most infant/toddler pants or skirts have an elasticized back waist. This age group has a longer front waist than back waist. Combine this with a large seat (padded with a diaper) and it becomes necessary to take up the extra back width of the pant waist with elastic. The elastic is applied with a specialized machine that stretches the elastic while it is stitched on. Be sure to spec out the finished elastic measurement (the measurement of the elastic after it has been stitched). If you don't, the elastic will end up being too big or too small. A quality auditor (or you) should do in-line inspections during production. This is the one area that is the easiest to mess up.


Close up of waistband at side seam You can see the nice neat finish of the waist side seam. The front waist band is stitched onto the front pant. The back waist has the elastic applied, turned to the inside and top stitched down. Some manufacturers will have a separate back waistband piece, but I like the nice smooth back waistband of this pant. The side seam is stitched by folding the front waistband to the front over the back elastic waist band. When the front band is turned out, the back waist is enclosed. Lower quality pants do not enclose this seam. Even though these pants are budget, the topstitching of the front waist band runs even with the lowest line of stitching for the elastic.

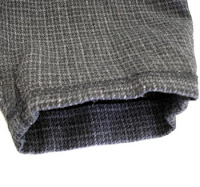
Pant leg hemThis is the only place where I could find the manufacturer truly skimped. The inside leg hem has a 1/2" hem which is topstitched down. This is a quicker finish than a blind hem and it can be hidden underneath the 1" cuff. To allow for future growth, you can add to the hem depth and do a blind hem instead. I wonder if there are many that would actually take the time to let the hem and cuff down, as simple as it is. Most parents would probably just buy another pair of pants.

July 03, 2007

A boy's shirt pattern fix for Butterick 6030 pt. 3

A boy's shirt pattern fix for Butterick 6030 pt. 1 is here
A boy's shirt pattern fix for Butterick 6030 pt. 2 is here
 
A continuation of my boy's shirt pattern fix....

4. Finish collar. Clip neck seam allowances near shoulder seams. Turn seam allowance of top collar under and push the remaining neck seam allowances into collar. Topstitch. Tack facing down along shoulder seams. Notice I included my care/content tag when I topstitched the collar closed.

Neckline finish for a shirt
5. Hem the sleeve. Attach sleeve to armhole flat. Close the side seam and sleeve. At this point I noticed the sleeve cap didn't match up to the armscye. So one more pattern fix to make - I made do for the sample.

Attach sleeve to shirt
At this point I decided not finish up the sample. Instead I put the shirt on the form to look at the overall proportions. The collar area looks nice and right on target.

Checking a shirt for fit
The overall proportion of the shirt still looks too big for a size 24 months. I didn't make any changes to the original pattern in body width or length and I should have. I will double check those measurements on my pattern and make adjustments. At this point, there is little of the original pattern left and I really should have just drafted my own pattern. The original Butterick 6030 pattern is heading to the trash. BTW, anyone like my two tone work room? I desperately need to repaint it.

Hawaiian boys shirt