October 01, 2007

The dangers of lead in children's products

Necklace with green gemstone

This will probably be a link heavy post. Lead is getting a lot of exposure of late because of its discovery in toys, but lead tainted products have been around for a long time - many common, everyday items. Lead can be found in:
  • Garden hoses (this is why children should not drink from them)
  • Ceramic glazes (The US blocks the importation of lead tainted ceramic dishes)
  • Lead Glass, including crystal dinnerware and swarovski crystals
  • Plumbing (pipes and solder)
  • Paint
  • Gasoline
  • Some candles
  • Roofing materials
  • Car batteries
  • Vinyl baby bibs
The danger from these items vary and depend on the amount of exposure. In the past the biggest concern has been focused on gasoline and paint. California has passed a law banning lead in jewelry, especially for children. Children have a tendency to put things in their mouth, so any lead containing products should be kept away. The CPSC has also issued guidelines about lead in children's products.

For years, Big Box retailers have required factories to submit any metal or painted metal products for lead testing. They may expand this to include plastic findings. So many trim details come from China, it is impossible to know if they are lead free unless they are tested. Later I will post some sources for testing labs.

The health effects of ingesting lead, especially by small children is well documented. Lead can affect adults too, especially reproductive, cardiovascular, and mental health.

September 13, 2007

Make a Design Storyboard

As I was designing Prairie Roses for Fall 2007, I created a digital design board. In school it was all about literally cutting and pasting paper onto illustration board. I like the digital version because it is much faster and more professional looking.

A design storyboard
I had a hard time identifying and explaining the look I wanted. When I started it was simply a feeling. I decided a story board was the best way for me to explain my line to myself. I have rarely done this in the past - it always seemed like busy work. This time, I have convinced myself of it's necessity. As I struggled to find pictures that explained the mood, everything else seemed to fall into place. The words A Country Sensibility came to me and it was perfect for so many reasons. It made me think of Sense and Sensibility and Jane Austen - how can I translate Jane Austen's "look" into little girl's dresses. It made me think about sensible country living. Being grateful for what you have. Not living too extravagantly - but comfortably.

Anyway, I headed out with my camera and took pictures of the flowers growing in my flower beds and nearby scenery. There was my mood. I already had purchased the fabrics and they meshed perfectly. The red ombre ribbon roses were the highlight and the key to the brand name.

Prairie Roses was a difficult brand name to nail down. Do you know how hard it is to find a brand name that is not already in use? One that fits the mood and explains the look without the customer ever seeing the clothing? This is complicated by trying to find an internet domain name that is available. It took weeks of research.

The work required to pull all of this together had other benefits. I emailed a graphic designer a copy of my design board and she was able to design my logo (which is shown on the right). I am fairly pleased with the results of the line, the logo, the brand. It all meshed together so perfectly. It feels good to be focused and I am excited about designing more for this line.

Next week is even better. I have been working on toddler patterns and I have a fitting/photo shoot scheduled. I am excited!

September 12, 2007

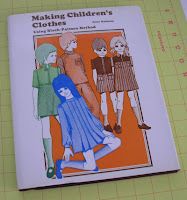
Making Children's Clothes by Joan Moloney

Making children's clothes using block-pattern method 1971I received my copy of Making Children's Clothes Using Block-Pattern Method (1971) by Joan Moloney today.

Just so you know, this book has no measurement charts, detailed drafting instructions, or sewing instructions. Think of it as looking on the back of a home sewing pattern envelope. The author shows the pattern pieces that make up a style next to an illustration or photograph of that style. The text is full of ideas but little how-to.

On the positive side, this is one of the few books I have seen that show all of the pattern pieces that make up a complete style. This may help designers who struggle with the complete design. Also, the book clearly illustrates the shapes of the pattern pieces. Sometimes that is all one needs to draft your own version. The illustrations are charming and I will add this book to my collection as a possible source of inspiration.

Homemade child's dressformThe author does describe how to make your own children's dress form, although briefly. Her version made me laugh for a second and then I wondered if I should be scared. It may give you an idea of how to make your own dress form. I did make my own, which I am using now. Children do not have the patience to be fit models for very long - so I do recommend obtaining dress forms at some point. Still, it is worth the time to try clothing on a child because you may notice differences in how the fabric drapes on a moving child.

This is not a must-have book to add to your reference collection. Used copies are available through Amazon for as little as $1 plus shipping so there is really no reason to not add it either.

August 31, 2007

Too Many Sizes pt. 2

In my previous blog entry on this subject I discussed combining sizes to reduce the overall number of sizes produced. As I have been developing patterns for my new line of dresses, Prairie Roses, I have attempted to practice what I preach.

I have been doing all of the pattern making and grading for my new dress line entirely by hand. I do use CAD, but only for my employer who actually owns the system. I try to keep everything separate so there are no ethical questions (My patterns have different shaping and grading anyway). Also, I want to experience what most new designers experience since so few DE's can afford a CAD system. It takes soooo much time to do it all by hand, especially the grading. I am getting faster on the grading, but it is very time consuming. I have been using Jack Handford's book on grading and my graded patterns have turned out really well. The grade rules are beautiful - there is no other way to describe it. They are nice and consistent and all of the pattern measurements fall into an acceptable range.

My patterns fall into the infant-toddler size range and I have chosen to combine the 24M and 2T. I also added a 9 mo size, which is considered a half size and not usually included. I decided to let customers tell me whether they want a 9 mo or not with sales. It isn't that big of a deal to split the grade between the 6 mo and 12 mo. If it doesn't sell, it is easy enough to drop it. Anyway, my sizes break down like this.

3 - 6 - 9 - 12 - 18
24M/2T - 3T - 4T

You will notice I combined the 24M with the toddler group. This means my 24M/2T patterns will be based on grading from the 3T. I decided a 24M child has shaping more closely related to toddlers than infants.

In my infant grouping, the sample/base size turns into the 9M. Since the 9M is something I may not keep around, it doesn't make sense to sample in that size. I prefer to use a 12M as a sample size. If you move the 24M back up to the infant grouping and drop the 9M, then the 12M is the right sample size. Also, it is easier to find a more willing 12M child model than younger.

Now here is a dirty little secret in the childrenswear industry. Many childrenswear companies actually sample in the smallest size, 3M. This is because they end up making A LOT of samples and the samples are made from actual production fabric, not muslin. Sampling in the smallest size saves fabric. The dress form I made is actually a 3M, so that is my sample size too. It causes problems with drafting first patterns and grading. As soon as I can afford it, I will be buying a 12M form and sampling in that size.

August 28, 2007

Fussy corners on a slip cover for a sofa


Here is a quick update on my couch slip cover. So far it has come together beautifully. I spent some time perfecting the pattern after pulling it off of the couch and added seam allowances. I managed to cut out all of the pieces and match important stripes (Striped fabric is probably not the best choice on a first attempt, btw).

A corner of a couch slip coverOne thing I learned is that couches are NOT symmetrical. I have a hard time with asymmetry when something is supposed to be symmetrical. Anyway, this back corner doesn't fit, but the opposite one does. This will be an easy fix though.

When I was perfecting the pattern, I should have pulled out my library book. The author has you add extra ease for the tuck in allowance in the corner where the deck and the inside back meet. I didn't allow extra ease and just drew a nice, easy to sew line. You can see the result in the second picture. Funny pulls. This will require a bit more work to fix. I ripped out that inner corner and I will have to add in a tuck-in gusset (which will never be seen).
Inner corner of a couch slip cover.
For the most part, I am fairly pleased with how it fits. The unfinished slipcover has been on my couch for the last few weeks and the most amazing thing is it doesn't move. You know how most store bought slipcovers shift and move the second you sit-down. It requires constant straightening. The extra effort to make a fitted slipcover is worth it!

After I fix those fussy corners, I will just need to do some finishing work and cover the cushions. The project will need to wait until the deep, dark days of winter. Harvest is around the corner and I have to get the garden beds ready.