Before I can move on to the grading question, I must make a couple of comments on my previous post. The best time to determine a sizing standard is at the very begining of your company. If you have been in business for 30 years, for example, it will be very difficult to change things around. So please, please do your homework.
Another thing, you can make your sizing standard anyway you want. Even though I am suggesting a simplified sizing standard, it may not be appropriate for you. If your intended customer is a big box retailer, it may be too simple. In fact, they may not like it. They are accustomed to choosing from a lot of different sizes. If you become part of a private label program, they will tell you what the sizing standard should be anyway. If you have something similar already set-up, there will be less stress for your patternmaker. Again, the sizing standard suggested in the previous post would be more appropriate for a company targeting specialty boutiques and small retailers.
Ok. Now the grading questiong...
"Can't we use the 3mo size for our base size and grade everything up from there?"
The motivation for this question is to save some work. In essence you make your pattern only one time and let the grading take care of all of the other sizes. While the idea is good, it presents some problems.
First, it is important to know how a child grows. A very good description and diagrams are shown in the book Patternmaking for Fashion Design by Armstrong. In my second edition of the book, it is on page 674. Up to about age 3 children are cylindrical in shape. There is little differentiation between chest, waist, and hips. At about age 4-5, girls start to develop a waist. At age 8, there is more definition and curves. Boys and girls are similar in shape up to about age 8.
Because there is a change in body shape at regular intervals, a patternmaker will break-up the sizes like this:
0-3M to 24M, 2T-4T, 4-6x, 7-16
By breaking up the patterns into these size ranges, a patternmaker would then make base size patterns in a 12M, 3T, 5, and an 8 (or whatever sizes are chosen). You could sample your initial style in any size you prefer - hopefully a middle size. When the design is approved and read to go into pre-production, the patternmaker will then make patterns for your style in each of the other base sizes. Those patterns are then graded for each range.
Some manufacturers will go to the trouble of sampling their style in each range. Retailers like to look at more than one size range because they have to "see" how to merchandise their floor areas. It is possible you will end up making a lot of sales rep's samples if you plan on selling the whole range. These extra samples are called sisters or brothers.
Even with our simplified sizing standard, you would still break up your sizes like this:
0-3M to 3, 4-6, and 7-16
Now some design entrepeneur's may still insist on having only one base size and grading everything off of that. What will happen is you will introduce errors into your patterns in the extreme ends of the range. The grading will be more complicated. The fit will be off in the transitional sizes between infant to toddler, young child to older child. For organization sake, your patternmaker/grader will greatly appreciate having things broken down into simpler groups.
Also, you will be bucking industry standards and not playing by the rules. Walk into any department store and look at how the children's clothes are arranged. You will notice that the clothes are arranged together in the size ranges we talked about above - infant, toddler, young child (4-6x), and older child (7-16). Your order form should have your styles broken down similarly.
By this point you are probably thinking that it is still a lot of work to make that many patterns for each base size. If you have a CAD system with nifty pattern drafting and grading capabilities, it isn't really that big of a deal. Even if you had to do it by hand, it should only take a day or so. Your patternmaker will be just repeating the same drafting process over and over again. If you make dozens of styles every season, you may seriously consider investing in a CAD system.

June 26, 2006
Too many sizes!
I am currently in the process of rewriting this article for another project. A lot of what I wrote in 2006 is a reflection of my thinking back then. I have since refined my thoughts which will be published later. So please consider this article a bit out-of-date.
One designer asked me two fundamental questions. At the time I wasn't sure how to answer them. The first is really a grading question and the second a sizing standard. Both are related. To keep things simple, I will start with the sizing standard question.
"Why are there so many sizes for children's clothing?"
Because children grow. Ok. That is the easy way out. The truth is that children grow and manufacturers try to have a range of sizes to choose from.
The other half of the question was, "Can we have fewer sizes?"
This is a much more complicated answer. Because children's clothing can cover such a wide range, it is possible to have a lot of sizes. One company I worked for produced clothing from Preemie to a size 16 - not including the plus sizes. When you break this down it looks like this:
Preemie, NB, 3M, 6M, 9M, 12M, 18M, 24M, 2T, 3T, 4T, 4, 5, 6, 6x, 7, 8, 10, 12, 14, 16.
This is a whopping 21 sizes! This complicates bookkeeping and sales information incredibly. If you create a style in one colorway, then each size will have its own SKU (stock keeping unit). If you add a colorway, then each size in this style can have two SKU's - one for each color. The company wanted to try and reduce the number of SKU's each season. This particular company produced a new line every 4 months which consisted of dozens of new styles. Thinking about it can give anyone a headache.
To reduce the number of sizes, you have to either combine some of the sizes into ranges and eliminate some duplication. The duplication is the easiest to see first. There is very little difference between a 24M and a 2T. A 24 month old child is essentially a 2 year old. The T simply means that ease is added to the pant area for a diaper.* Most 24 month old children and 2T children are still wearing diapers, so there should little to no difference in the patterns there.
*I'm not sure where the idea that the T in the size 2T implied the size included diaper ease. I repeated this idea because it was all I knew at the time. After a lot of research, I now believe this idea is a myth that has been perpetuated around the internet. I have found no size study information that supports this idea. Rather it has become a standard custom to refer to toddler sizing in this way. As a pattern maker I always included ease for a diaper in the toddler sizes because they wear diapers! The ease is not much more than what is needed for wearing pants anyway. Diapers do not add much bulk these days. Perhaps in years gone past in the age of cloth diapering, it was more of a concern.
The other likely duplication is the 4T and 4. Again these sizes overlap with only a slight difference in the pant area for a diaper. Most four year olds are potty-trained, although it is possible that some are not. In any event, if you manufacturer girl's dresses, this is another area where sizes could be combined. Some companies have started putting out a 5T, but it would be unusual to find a five year old wearing a diaper.
The next size duplication looks like the 6 and 6x. In this case, there is a fitting difference introduced. There should be little girth difference in the patterns, but there will be a length difference. A 6x is a taller size for a 6 year old. Some retailers combine the 6x with a 7. This is where it would be important to know your customers before eliminating or combining sizes.*
*(Please note that this paragraph has been modified. I made a big assumption that was just wrong stating that the size 6x is a plus size version of the size 6. This isn't true. It is a taller version of the size 6. In any event, the paragraph above has been edited with the correct information).
So now our sizing looks like this:
Preemie, NB, 3M, 6M, 9M, 12M, 18M, 24M/2T, 3T, 4T/4, 5, 6, 7, 8, 10, 12, 14, 16.
And this is where I have to interject. Retailers, and especially big box retailers, do differentiate the sizing of the patterns on the sizes we just combined. A 2T is just a little bit bigger than a 24M, even though it really shouldn't be. Consumers have become accustomed to this type of sizing system and so have the technical designers in the business. In other words, don't expect any big changes anytime soon. This proposal is a way to simplify things. You are more likely to find a simplified sizing standard in boutique or specialty stores.
Ok, back on track now. The next step is to create a range of sizes. This is simplest in the infant sizes and another grey area. Every major manufacturer has come up with their own size range break-down, and it really is all over the place.
I really like how JcPenney has broken down their infant size range:
Newborn, 0-3M, 6-9M, 12M, 18M, 24M/2T
The nice thing about this sizing standard is that there are no overlapping of sizes.
Some companies will create a range like this:
Newborn, 0-3M, 3-6M, 6-9M, 9-12M, 12-18M, 18-24M
As you can see, there is a lot of overlapping. This could cause confusion for a customer because it is difficult to pick just the right size range. Also, this doesn't reduce the number of sizes carried.
If we eliminate the newborn and preemie sizes and use the size range from JcPenney, we would get this:
0-3M, 6-9M, 12M, 18M, 2, 3, 4, 5, 6, 7, 8, 10, 12, 14, 16.
If you look carefully, you will see that I eliminated the 24M size and the T's on the 2, 3, and 4. This is where you have to decide how the size will appear on the care/content tag or hang tag. It would be best not to confuse customers - keep things simple and logical here.
You will also notice that there seems to be a size missing in the infant sizes. The size 6-9M is often combined because either the 6M or the 9M is considered a half size between the 3M and the 12M. This is obvious when you study measurement charts, so just take my word on it for now.
The other thing to consider when generating a size standard is the patternmaker/grader. The size 0-3M, for example can be created in one of two ways. The measurements of the Newborn and 3M could be averaged out or the patternmaker could just make the patterns a true 3M. In order to fit the most children, it is best to make the patterns fit the high-end of the range. In our example, the patterns would be made in a 3M. The clothing will fit loose on the small end of the range, but kids grow fast. The only exception might be sleepwear which needs to fit snug to the body in all of the size ranges. This is another place where you need to know your product and customer well.
By following this example, we have gone from a whopping 21 sizes to 15! While this still creates a lot of sizes, it is so much simpler and easier to understand.
0-3M, 6-9M, 12M, 18M, 2, 3, 4, 5, 6, 7, 8, 10, 12, 14, 16.
The next question to address is the grading question. And that will have to wait for tomorrow.
June 21, 2006
The end of Children's Business Magazine
This was one of the few magazines I knew of that covered specifics in the Children's Business. I am unsure when this occurred - certainly in the last year or so - but Children's Business has ceased publication. Children's Business was published by Fairchild, the same company that publishes Women's Wear Daily (WWD).
The decision is puzzling because children's boutiques have seen a recent upswing. Parents are interested in outfitting their kids in designer duds - forgoing the mass market apparel. I know that Children's Business gave away many free subscriptions. The manufacturers I worked for in the past received about 2-3 subscriptions - having never signed up in the first place. I am sure they lost a lot of potential income not to mention the competition from the net.
WWD now expects their former subscribers to catch children's related news in their regular magazine. WWD focuses too much on celebrities (actors, celeb designers and the like), gossip, and style info for women. I rarely check out their magazine, nor would I want to wade through most of it. With the easy access of news on the net, perhaps the best place on Children's Business news is James Girone - although it is full of slow-loading ads.
You CAN manufacture in the US!

So many companies have moved off-shore to manufacture in China. Those that moved to Mexico in the early 90's have even made the move to China. The word manufacture nearly equals China. With all of the talk about China and the near non-existance of apparel manufacturing in the US, you would think manufacturing will never return here. The few remaining factories in the United States, owned by small companies, produce little volume.
And then a suprise in the latest Newsweek magazine (6-26-06) about American Apparel. Here is a company located in Los Angeles that employs about 3,500 people and pays them $8-$18/hour! They produce about 90,000 units a day. On top of that their sales were $250,000,000 in 2005. Yes, you can manufacture in the US!
One thing is clear - you CAN manufacture in the US!
2019 note - American Apparel has had some financial struggles. Their financial woes have been in part dealing with lawsuits from the previous CEO's behavior toward his employees. There have been other issues because American Apparel not only manufactured but retailed their own product. Thus the company had to compete with cheaper imported products at the retail level. Regardless of their struggles, apparel manufacturing is returning to the United States. Many contractors are maxed out in capacity and are not able to take on more work even though there is a demand. There is high demand for qualified pattern makers, graders, technical designers, and sewing contractors.
June 18, 2006
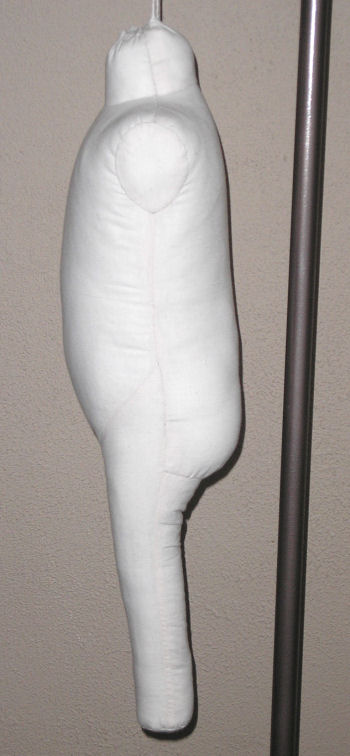
Making a dressform pt. 6 : More dressform pictures!
I realized I should have posted picts of what my form looks like under the dress. So here they are. At this stage I was still trying to figure out the top cap piece. All that is left is adding the tape to indicate the waistline and ankle. These pictures aren't great. In the top one, it looks like the shoulders are uneven. I think the form was still swinging when I snapped the shot. In the second, it looks like the form's legs are angled toward it's support. I think I was holding the camera at a funny angle. It does hang straight and even....


June 16, 2006
Saving Money at Outlet Stores

There is an article in the May 2006 Consumer Reports titled Outlet Stores - Where To Shop & How to Save Big Bucks. This is was an interesting article for many reasons. If you are a frequent shopper of outlet stores, you probably have suspected that some of the merchandise is not true factory seconds. More often than not, clothing is created and merchandised specifically for the outlet store. This article compares clothing from a regular store versus an outlet. You may be surprised at the quality available there (better than you might think). Even though this article does not specifically address children's clothing, an outlet store may be a great place to save money.
BTW, an outlet store is not necessarily the same as a discount store such as TJMaxx or Ross Dress for Less. Those stores are liquidators. They buy overstock, end of season, and customer returns. I suspect that those stores are selling merchandise they manufacture themselves, although I don't have proof. There are a few brands I have never seen anywhere else but those stores. In any event, you can find really great deals and good merchandise.
The general industry opinion is that placing your product into a TJMaxx may devalue the brand. I wonder how that is true when you can find high-end designer children's labels such as Ralph Lauren, Donna Karen, or Plum Pudding. I have rarely found obvious defects.
This is a very interesting article. A subscription is required to read this article on the web. They do have a free page that gives tips for outlet shopping. Check your local library for the full article.
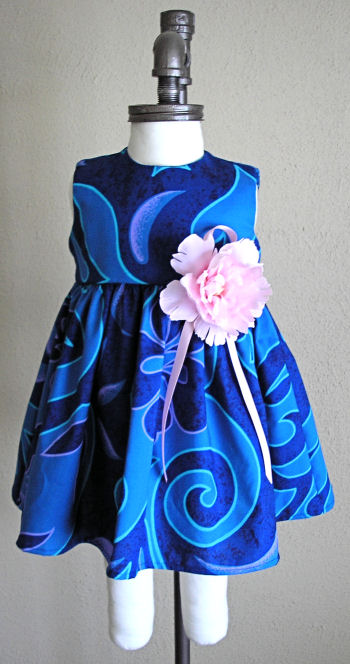
Making a dress form pt. 5 : Finished!
When I started this project, I assumed it would be rather simple. Draft a pattern with no ease and stuff it. Instead, I had to adjust my pattern many times. Plus I had to solve problem of creating an inner structure and stand. Wow, it was a lot of work!
I am generally pleased with how my form turned out. As in all experiments there are many lessons learned. The first, the form companies are charging a fair price. I saved money in materials, but it took me a lot of time and two attempts to get my form right. Second, my form may have a short life. Not all of the materials are the most durable. I imagine I will have to do repairs in the future. Just in case I decide to do this again, I am keeping my patterns!
Earlier I had posted about Aldrich's neck-base measurement being too big. I ended up not altering my form pattern - forgetfulness on my part. I still think her measurement is still a little too big, but as you can see my dress does fit. My earlier problems were from over-stuffing. I kept tight control of the stuffing of my final form.
Someday, I will purchase a real form. For now this one works well. It matches my measurement requirements fairly close. And it does fit my dress!
June 06, 2006
Making a dress form pt. 4 : padding the form with batting
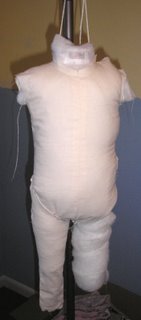
From the picture below, you can see I have made some progress. I have started to pad the papier mache form with batting. I used my original draft from my first form and modified a few seams. In this picture I am trying on the leg - it needed further adjustment, along with the front torso. I also took note on what areas needed a bit more padding. The form is suspended from the stand by a cotton yarn. I will be putting weights into the bottom of the legs to help give it more stability. Already, this version is much better than my previous one, but still not as good as the professionally made forms.

Subscribe to:
Posts (Atom)