Showing posts with label Patternmaking. Show all posts

July 02, 2009

Wedding Dress Alteration: The Whole Picture?

I don't think I posted pictures of the whole dress I recently altered. Here is the top with the alterations marked with pins. Recutting the armhole and adjusting the sleeves was probably the most difficult part of the alterations. The bride really needed a little bit taken in at the back, but that is one alteration I did not attempt. The zipper and lining would have to be ripped out and I had no time for that. The dress shop provided double sided tape to help keep things in place (maybe they knew how poor fitting this dress would be). I recommended the bride go ahead and use it for the gap-osis I would not be able to fix - though I did fix most of it.

Front bodice view of a wedding dress
Here is the skirt. Really, the simplest style of skirt to shorten if needed. Just make the tucks a bit deeper. I probably should have gone ahead and taken 1" off the bottom hem too, but I just advised the bride to buy some heels. The skirt is completely underlined with tulle to help give the skirt some shape and hold the draped tucks.

Wedding dress skirt with draped tucks
The wedding was this last week and the bride was absolutely radiant with joy. She looked lovely and no one was the wiser that a neophyte alterationist did the job. Maybe I will post a picture of the big day once I get the pictures off the camera.

June 16, 2009

Wedding Dress Alteration: The Underlining

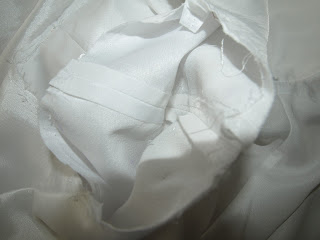
Inside view of the lining in a wedding dress
I expected to find boning in a size 18 wedding dress. I think I even put it in my dress, though the style didn't really need it. This dress doesn't have it at all. It does have the addition of padded bust cups - a feature I have not seen before (I would still recommend the bride wear a supportive bra anyway). The bodice and lining have been completely underlined with fusible. The outer fabric has a stiffer woven fusible and the lining has a softer knitted fusible. Click on the picture to get a better view of the inside of the dress. I am still debating on whether the dress should have boning or not. I think if the bride wears a body-shaping undergarment, it will help smooth out any bulges she doesn't want seen. Even so, it looks and fits pretty good in the waist area.

BTW, a common alteration in wedding dresses is to take it in some at the top of the princess line as it goes into the armhole. If this is indeed "common", it leads me to believe there is a grading or underlying pattern fit issue with wedding dress manufacturers. This alteration, plus taking it up in the shoulders, requires the alterationist to recut the armhole and sleeve (if a cap sleeve). A nasty set of alterations, IMO.

June 09, 2009

Correcting the fit of petal sleeves in a wedding dress pt. 1

I have been working on altering a wedding dress. It is, admittedly, a budget wedding dress available for less than $200 imported from China. I am by no means a wedding dress expert, so this little assignment is teaching me a lot about how wedding dresses are made today. There are some things about this dress that I found very interesting and innovative - things I have never seen before. And it is true, I haven't really looked at wedding dresses since my wedding many moons ago. In any event, dresses now have attached petticoats (I had to buy a separate one) and embedded, uh-hum, bust padding. On the other hand, there are some problems with this dress that clearly label it a budget dress, albeit a very pretty dress for the bride. And I should say the budget dresses available now are much prettier than they used to be. They have embroidery with beading, nicer fabrics, and that full, attached petticoat. Much fodder for future blog posts.

I'll show the nice features of the dress later. For now I will show show one of the problems. It is an annoying problem and one I was surprised to find. The dress has petal sleeves, which I have drafted before. I have even had this same problem show up. Can you spot the problem with the sleeves?


Petal sleeves on a wedding dressEven though this is on a hanger, the sleeves hang like this on the bride.

Petal sleeve side view on a wedding dressHere is the sleeve off the dress. I not only had to bring up the shoulders, but take the sleeves completely off to recut the armholes. The shoulders and armholes are part of a larger, but separate problem. This picture should give the problem away.

Petal sleeve ready for alteration

February 04, 2009

Who creates grade rules?

Tape measure

Some one asked me a grading question the other day. She wanted to know who creates grade rules?

A pattern maker, grader, or you could make the grade rules. If you choose to make the grade rules yourself, I have some guides available in The Organized Fashion Designer and The Simple Tech Pack. It's harder with children's clothing because there isn't as much standardization. An experienced grader should have some standard charts or be able to develop rules off of your measurement charts. I would personally start developing grade rules by referencing the Jack Handford book and make modifications as needed. I would only let a pattern maker or grader do it who has experience with it.

You can buy measurement charts from ASTM as a place to start. The ASTM measurement charts for children are probably the best resource for children's body measurements. Be cautious of using free charts found on the Internet. I have seen free measurement charts on the Internet riddled with inconsistencies that could lead to serious errors.

If you have time, you may want to sew up the smallest and largest sizes just to double check the grade and sizing. It doesn't have to be in your production fabric or anything. A fitting is the only way to know if your grade is correct. You won't need to do this on every style or very often. Kind of important when starting out though.

January 07, 2009

Accounting for shrinkage and/or stretch in sewing patterns

Leggings and pants

Just a few comments I made in the Fashion Incubator forum when making patterns to accommodate stretch (knits, stretch wovens) and/or shrinkage.

Have to be careful when scaling patterns in CAD. Shrinkage/stretch is not proportionally the same in both directions. Many pattern making books advise to add the same amount of change to the length as the width. Don't do this. The only way to know is to know the fabric. Things shrink more in length than width. I am so sick of washing pants and long sleeve shirts and having them end up too short. If anything, remove width ease and add length on knits. It sounds counter-intuitive but prevents high-waters. Not sure on stretch denims, so test, test, test.
In my Etsy shop I have a simple tech pack kit that includes a wash testing form. The wash testing form includes instructions and formulas to figure out shrinkage in both the length and width of a fabric. It is well worth the investment of time and money to test your fabrics for shrinkage, particularly knit fabrics. Once you know the approximate shrinkage of a knit fabric, I recommend adding the extra width and length needed to accommodate expected shrinkage.

Adding a shrinkage allowance to a pattern piece may cause the finished garment to look proportionally wrong. If you do not pre-wash the finished item before shipping to the retailer, the item may look wrong on the hanger and the customer may decline purchasing the item because it does not appear to fit. So there is a limit to the amount of shrinkage you can include in a pattern before proportions, fit, and hanger appeal are impacted. Generally, you can include about 3-5% shrinkage in a pattern without too much of an impact. If your wash testing results return a shrinkage greater than 5%, then you either need to reject the fabric or pre-shrink the fabric before cutting and sewing.

Knits in particular add an added layer to product development because they are more likely to shrink. There are various types of knit fabrics with different types of finishing. Some knits are pre-shrunk at the factory and some are not depending on whether the fabric will be printed or dyed at a later date. When sourcing knits it is important to ask about shrinkage.

Accounting for stretch in knit fabrics is also another added layer. Stretch influences fit. Should the item fit close to the body? If so, the pattern needs to be reduced in width and length. This is another area where the amount to reduce will be different for the length and width. As an item is stretched in one direction, the other direction also changes. You may notice this when you stretch a knit t-shirt in the width direction - the length of the t-shirt will shorten. This is a complex topic and the answers depend entirely on the style and chosen fabric.

December 10, 2008

A Free Christmas Stocking Sewing Pattern

Chistmas stocking ornament
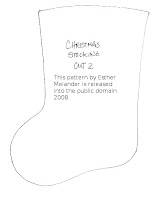
This is a mini-Christmas stocking that I was selling in my store. Now that the store is closed, I am making the pattern available to every one as a thank you to my blog readers. The pattern is being released into the public domain. You can make stockings and sell them, or whatever you want, just make something pretty and give it to someone.

I am releasing the pattern only - no sewing instructions. The pattern has 1/4" seam allowances on all edges, but you can ignore them if you want. This is so you can use your own imagination in whatever you create. Have fun with it! Click on the image below to enlarge it and print it from your browser window.

Free Christmas stocking ornament sewing pattern

September 02, 2008

Comparing pattern shaping and children's sizes

As many children's wear designers know, children's clothing has a lot of sizes. It can become quite the dilemma when trying to decide which sizes to offer. Some DE's offer their styles in as many as 21 sizes. Way back in 2006 I suggested a theory to reduce the number of sizes by combining or eliminating some of them. You may want to go back and review the entry Too Many Sizes and other related entries to see how I have arrived at today.

Anyway, I have tried to put the theory into practice and I have made some progress. I only offer my styles in sizes 3M to 6x. I am still working on the grades for the 4-6x styles, so I am nearly there. My sizes break down like this:

3M, 6M, 9M*, 12M, 18M

24M/2T, 3T, 4T/4

5, 6, 6x

I don't really consider the 9M as a true size. It is a half size between the 6M and 12M and is graded by splitting the grade between the 6M and 12M. The 24M and 2T are essentially the same as are the 4T and 4 - those sizes have been combined for grading purposes. My website still delineates the combined sizes as separate sizes.

This blog entry is not a discussion on the why and wherefores of children's sizing - a surprisingly complex and controversial topic. Instead, I wanted to show a possible grading/pattern problem that shows up now and then. I have been grading and comparing my basic bodice blocks. You should do this too because someone will eventually see the problem and it will be more difficult to fix.

I have drafted my basic bodice block three times, in each of my sample sizes for each of my size ranges - 12M, 3T, 5. (BTW, you can't use the same pattern piece and grade it in all the sizes. Believe me, that is one large headache). The next step is to grade each range separately. Keep in mind that each sample size will have slightly different shaping, but the general shape and proportion should be related.

Before getting too far, the outer fringes of each size range should be compared. For example, the size 18M should be smaller than the 24M/2T and the size 4T/4 should be smaller than the 5. Originally, I had graded the size 4T and 4 separately. In other words the 4T was based off the 3T sample and the 4 was based off the 5. The reason I combined the 4T and 4 was because the shape and overall size was so similar it was a duplication in effort, and I also ran into the problem where the 4T was actually larger than the 4. If you do separate out the sizes than the 4T must be smaller than the 4. If you don't check your grades, someone will bring two dresses to you and say the patterns are wrong, size labels are switched or some other problem.

In the photos below you can see the problem more clearly. In the top picture, the size 4 is laying on top of the 4T. You can see the 4 is smaller than the 4T. In the bottom picture the 4T is on top of the 4 and it is clearly longer with a larger armhole.
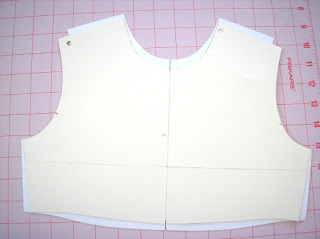
Comparing pattern shaping and sizing of a bodice frontComparing pattern shaping and sizing of a bodice back
To solve this problem, I have been reworking my toddler patterns. I started by combining sizes 4T and 4 so I have one less size to grade. Next my toddler bodices were redrafted to have a shape similar to the 5 (less boxy, smaller armhole). Finally, I regraded the toddler patterns. This is still a work in progress, but the results are much better - each size is progressively larger.

I had the same problem with my size 18M and 24M/2T. In this case it wasn't a grading problem. Instead my infant patterns were proportionally too long compared to the toddler. I fixed this by shortening the bodice slightly.

Anyway, the point is that you should make sure and check the sizes on the outer fringes of each size range and make adjustments so that each size is progressively larger. You can adjust the grade rules (much easier in CAD, btw) or change the shape of the patterns.

(I am ignoring the idea that in the real world an 18M child could be larger than a 24M child. If that is the case, a parent would buy a larger size than 18M and just complain about the craziness of US sizing standards. When I did private label programs for the big box retailers their grade/POM charts progressively got larger with each size. Logically it makes sense even if reality is very different. Anyway, you can allow your sizes to overlap if you want, you'll just need to have an explanation as to why when a sewing contractor becomes confused.).

April 18, 2008

Grading Complex Styles pt. 2

Part 2 of this series continues the discussion of how to grade complex styles. It is not necessary to have the Handford book to understand the concept, but some experience with grading would be helpful.

This part of the series was going to contain a lot of explanation with lots of examples. There are two reasons that I held off on that. The first is I am considering writing a book on the subject. I am sure it will be a best seller and I will be able to retire early [eye-roll]. The second is that it would be impossible to discuss every possible scenario. It would be best to explain the principle and let you work out your specific grading problem on your own. You will benefit with having to struggle with the material and learn lots in the process.

Just a side note, these pieces have been simplified, no darts or extra gathers. I am also ignoring the seam allowances. The grading is done the same way regardless. This demonstration only shows how to figure out a length grade. The same principle works for widths.

Anyway, let's move on to the examples....

Graded nest of a bodice pattern piece

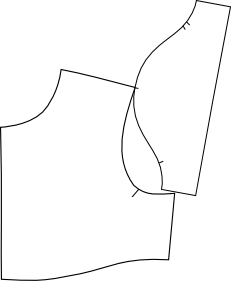
Bodice pattern split for a midriff

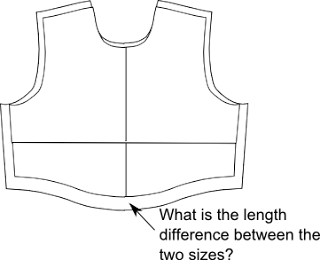
In order to grade a complex style, you need to have basic blocks that are already graded. On top I have a basic block that is already graded. Below that is my ungraded pattern pieces for a bodice with a mid-riff.

Measuring the difference in length between sizes

There are many ways to determine the total length grade. In this case, I just want to know what the length difference is between the graded basic block and the ungraded pieces. I want to grade my pieces up to the next larger size. To do this, I just lay the ungraded pattern pieces on top of the next size and align the pieces along the horizontal and vertical axis. My drawings are missing the horizontal, but you can pretend there is a line that runs from the side-seam/armscye points across the pieces. BTW if you would rather, you can figure all this out mathematically....

Once you know the length grade difference, you can then decide where you want that length growth to occur on your ungraded pattern pieces. In the examples below, you can have that length split between the two pieces or all of it in one piece or the other (shown in red).
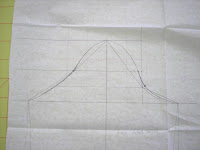
Growth split between the top and bottom pieces

Growth occurring only with the top pattern piece

Growth occurring only with the bottom pattern piece

The question you have to ask is:

How much should a seam move to maintain proportions?


This is where the beauty of computerized grading happens. I can play with the grade as much as I want - plugging in different numbers until the proportions look the way I want for each size. Hand grading would be a little more complex. The more complex the style, the more difficult the grade can become when doing it by hand. Handford's suggestion to tape the pieces together with long strips of tagboard can work in hand grading. The grader will have to determine if additional grade points should be added and how much movement should occur. This can be done by using Handford's red lines of distribution. Sophisticated manipulation at each grade point can only occur in CAD.

Still the principle works the same regardless of how complex the style or method.

1. Determine your total length/width grades.
2. Calculate the length/width difference between sizes at the grade points.
3. Decide where the growth should occur by comparing the total grade and the difference between each size at the needed grade points. What proportionally looks correct? How is my fit affected?

April 13, 2008

Grading Complex Styles pt. 1

Part 1 of this grading series will make more sense if you have a copy of Jack Handford's Professional Pattern Grading book. Unfortunately, the book is now out of print. Still, this entry may be helpful in grading complex styles, especially part 2...

An anonymous reader left this comment:

I love your blog. Thank you so much for all the information. I've recently started grading patterns. I can grade simple styles by following Handford or other books' steps no problem. But when it comes to complex designs, such as clothing that has unusual shapes and consists of multiple panels, I have trouble placing the "distribution lines" (red lines in Handford's book) on the patterns. Handford suggests by putting the patterns on the mannequins and draw the red lines. But sometimes it isn't practical as I'm using a CAD program.
Any suggestions?

This is a good question and can be confusing. The first thing I had to do was go back and look at Handford's book to see those red lines. Sometimes when I read a technical book my eyes glaze over and I skim until I find the info I am looking for. To be honest, I have had to study Handford's book several times to grasp what he is saying. In any event, I couldn't recall those red lines....

The red lines are illustrated on page 1-2 of Handford's book. He uses the red lines to indicate where a pattern grows or shrinks. The rest of the book has more illustrations of basic pattern pieces that show this. The key is to read page 3:

Obviously the cutting and spreading or overlapping of each part of each pattern to grade it one size up or one size down would be far too time consuming and invite much chance for error to be practical.

In other words, a grader could draw those lines of distribution on each pattern piece and then cut the pattern apart to spread or overlap them for the next size. He is absolutely right that such a task would be extremely time consuming, error prone and tedious. This is the failure of the Price/Zamkoff book on grading because this is how they explain grading. It was the primary reason I was so confused about grading too. If you were to grade by hand, could you imagine making duplicate copies of your base pattern so you could cut it apart? You would then need to carefully align the pieces, tape them securely, redraw the pattern, and cut it out. Then you would have to start the whole process over again for the next size. Yikes!

I don't mean to be so hard on Price/Zamkoff because they explain the concept of grading correctly. The problem is that it is not practical, even in a CAD environment.

I am not sure why Handford places those red lines in his illustrations other than to illustrate where the growth is occurring as you grade using his method. In his method, you move a pattern piece a certain direction at each grade point. The grade points are related to those red lines but are actually located at a pattern edge, usually a corner or mid-point.

Anyway, the reason I didn't remember seeing those red lines is because I ignored them. As a CAD grader I simply select a point and enter in the amount of growth. In my head I know a piece is growing in the middle of the pattern even when I assign the growth to an outside corner or point.

Anyway, I have blathered too long.... The commenter is correct that with complex styles the growth/shrinkage must be placed properly. Handford illustrates a slightly more complex style of a bodice with midriff on pages 93-94. The pieces are taped together with strips of tagboard and graded at the same time. On page 89 Handford makes the suggestion of placing the style on a form to determine where growth/shrinkage should occur. While his suggestion is valid, it is difficult to make the conceptual leap from a 3D form with lines to a table top with flat pattern pieces.

I have never done this. Partly because I have only graded children's pattern pieces. There have only been a handful of styles that I would consider very complex. Since I did this on CAD I had the luxury of playing around with the grading until I felt it was correct. I came up with my own method that works for me. It is not much different from putting a jigsaw puzzle together and only involves a little bit of math.

CAD makes grading complex styles very easy. Unfortunately, the night is getting late and so a complete explanation will have to wait. For now, you must know your total width and length grades, say for a bodice pattern piece. If you have a bodice with a midriff and the total length grade is 1" (I don't know I am making this up...), divide the total length grade between the two pieces so that the growth looks proportionally correct.... Anyway, more later...

March 27, 2008

Peasant Blouse Pattern Conquered


There are a few styles that have always perplexed me. The peasant top with an elastic neck and elastic sleeve cuff has always driven me crazy. When I relied on pattern making books to develop the pattern, I would start off with a kimono style. Bad move because it will create a neckline on the bias. On most styles, this will happen by default. But try tunneling elastic into a neckline casing that is on the bias? It doesn't happen. At least not well. Funny thing is, I have a RTW sample with tunneled elastic on a curved neckline. I am fairly certain the factory that sewed it had a set-up with a 1/4" rolled ball hemmer with an elastic feed. Anyhoo. I don't have one of those nifty set-ups.

The secret is that the neckline should be on the straight grain. I received a helpful tip from the blog Just Tutes with her peasant blouse tutorial. I didn't copy her method exactly. I had to study why it works and where her measurements came from. I drafted a peasant blouse off of my basic blocks and my measurements to get the same basic shape as hers. Amazingly, it worked well enough and I just need to grade my pattern for other sizes.

March 06, 2008

Tutorial: Reduce/Remove Sleeve Cap Ease

I have written an additional entry on sleeve cap ease. After reading this entry be sure to check out Reduce/Remove sleeve cap ease pt. 2.

Melissa wrote some comments on my blog entry A Problem with Cap Sleeves:

I was really excited when I found your blog on the children's sleeve draft from Armstrong's book. I have been working on a project for weeks now and I'm having a lot of trouble with the sleeve. Starting with the Basic Sleeve Draft, I found there was too much ease and took 2cm off the bicep measurement when I read that you take the ease out. But my worry is the shaping of the sleeve cap, it just doesn't look right to me. Even before I took out the ease, it looked like the under arm shaping was really short. When I compare it to bought patterns and the pictures in the book, it just looks like the notches are really low, and there is a very small amount left to go under the arms. I have tried a zillion things and it's been driving me crazy and I hope you might be able to shed some light on my sleeve shaping problem. Thanks so much!
I responded:

One thing that is probably causing you trouble is the placement of your notches. The notches should match up with the notches on your bodice. They don't necessarily imply that is where you should start easing. Home sewing patterns use those notches to indicate the start and end of easing and thus some of the confusion.

And just as an aside, There is more than one way to remove ease. You can lower the sleeve cap, fold out extra (like a tuck), or shorten the bicep at the underarm seam. I'm sure I did some combination of the above.
This is my promised tutorial. Even though I prefer the Armstrong shaping for cap sleeves, it still leaves too much ease. If you draft the sleeve exactly as outlined in her book, you will have to correct your draft by reducing or removing that ease. On page 68 (second edition) she explains that a sleeve should measure 2 inches bigger than the bicep and have an average of 1.5 inches of sleeve cap ease. On pages 69-70 she illustrates how to reduce/add ease to your sleeve. As I have stated before 1.5 inches of ease is simply too much. Some fabrics require 0.25 to 0.5 inches of ease, but not much more. Armstrong does use the notches to indicate easing. If your sleeve has no ease then the notches are just match points.

Just a few more words before you get to the drawings. This is just my method - Armstrong's is similar. My hope is to just illustrate the principle and not hard fast rules. You can have ease, if you choose, thus the tutorial is on how to reduce or remove the ease. You can use this same method to fix the patterns from the Big 4 - which notoriously have too much sleeve cap ease.

First step in walking a pattern to match corresponding edgesBefore you can remove/reduce sleeve cap ease, you need to know how much ease the sleeve already has. To do this you need to "walk" the sleeve cap along the armscye - without seam allowances. This is one of the few times I actually remove seam allowances when pattern making because they actually might get in the way. Align the center sleeve notch with the shoulder seam and walk the pattern along until you get to the underarm seam. Armstrong does this procedure just the opposite by starting at the underarm seam and moving toward the shoulder. Either way will work and her method is probably better. I usually do this in a CAD environment and my brain says start at the shoulder. It doesn't really matter so do what you think is right.


Continue to walk the sleeve cap along the armscye More walking.


Matching the notches while walking the sleeve along the armscye Still walking. You can see at this point that my underarm notches meet up. This won't be true in the real world - this is just how my drawing ended up. When I am done altering the sleeve, I move the notches where I need them to be. Right now my goal is to get the sleeve cap and armscye to be the same distance. This is where the Armstrong method might work better for you as the underarm notches don't move.


Measure any difference in length Finally done walking. Now measure any of the sleeve cap that is left over. This is how much ease you have on the front. Yes, sleeves have a front and a back and I only walked my sleeve along the front armscye. You will need to repeat the procedure since most of you will have assymetric sleeves. My sleeves tend to be symmetric for children so I only have to walk the pattern on one side. Make sense? Now that you know how much ease you have, you can decide how much to remove.

Two options to reduce sleeve cap easeThis is where things can get a little fiddly... There are a few different ways to remove sleeve cap ease. I usually use a combination of these methods because I want to maintain a nice sleeve cap shape. Not too flat and not too round. My eyes have been trained to recognize a good sleeve cap shaping and it is not something I can pass along to you. You will have to experiment a little bit to see what works best. Try to keep the convex and concave curves balanced (again, how to explain that?). In this drawing I show two places to reduce ease. The first is to shorten the bicep line by moving in the underarm seam. Armstrong's extra 2 inches is too much for children. It may be too much for adults too. It all depends on your desired fit. The next place to remove ease is to lower the sleeve cap height. With my cap sleeve, I lowered the sleeve cap height at least 1/2 inch and re-drew the cap. Again it depends on your fit and the shape of your sleeve to begin with.

Remove sleeve cap ease by splitting the pattern and overlapping Another way to reduce sleeve cap ease is to split the pattern and overlap it - similar to these drawings (remember I am only working on the front side so don't forget to do the back). Redraw the sleeve cap. This method reduces the bicep but may help preserve the cap shaping.

Remove sleeve cap ease by splitting the pattern and overlapping As I stated before, I probably did a combination of these three methods so that I didn't do anything too drastic. It will take subtle changes to distribute the ease reductions to retain a nice sleeve cap shaping. Finally, check your notch placement on the sleeve and move it to where it should be.

Any questions?

January 21, 2008

Grading Pants Notes pt. 3

The following is my final entry on grading infant-toddler pants. Having a copy of the Jack Handford grading manual will be helpful in understanding what these notes mean, especially for this last entry. Hopefully you have at least read the introduction and the instructions for grading a bodice. If you don't have a copy of the book, save these notes anyway - they may come in handy. Part 1 contains an explanation of direction arrows, Part 2 explains notation.

My infant-toddler pants are between knee and mid-calf length. I designed them to peek out just below the skirts of my dresses without distracting from the overall look of the dress. I wanted the trim of the pants barely visible below the skirt hem. So what should be the length grade of my pants?

At the top of the page for the pant grade (i.e., pg 218), Handford states that the grade for various lengths can be determined by studying the grading chart and diagram. The grading chart contains instructions for grading ankle length pants. I don't know why, but it wasn't obvious to me what grade steps to alter. I ended up doing the ankle length grade and decided it was grading to much. Did I mention that I ended up grading my toddler pants three times? Anyway, if you want to grade shorts, or any other length, these are the steps to alter:

Move #5 and #9 (up) is the knee length grade.

Move #6 and #8 is the ankle length grade.

If you want knee length shorts, skip moves #6 & #8. If you want mid-calf length, you could try splitting the difference between the knee length and ankle length grade. Any other lengths will be some variation on the above mentioned moves. If the length is closer to the ankle, follow the ankle grade and vice versa for shorter styles. In other words, these moves are flexible and depend on the style you are grading. It also depends on the personal preference of the individual grader. I graded my pants using the knee-length grade.

One reason I had a little bit of difficulty with determining the length grade has to do with my computerized grading experience. Moves 5 & 6, for example, can be combined in one grading point. The grading of children's patterns can be simplified because the shapes and growth is simpler in some ways. Since you can select an individual grading point and put in relative changes, the moves are interpreted a little bit differently. I am a self-taught grader and it takes me a bit more effort to determine my approach.

Any other question on grading pants? I hope these notes are helpful.

January 09, 2008

Grading Pants Notes pt. 2

The following are my notes on grading infant-toddler pants. Having a copy of the Jack Handford grading manual will be helpful in understanding what these notes mean. Hopefully you have at least read the introduction and the instructions for grading a bodice. If you don't have a copy of the book, save these notes anyway - they may come in handy. This is part 2 of the series. Part 1 contains an explanation of direction arrows.

This will be a short entry and only partially about grading pants. Mostly it is about Handford's notation and what caused me confusion.

Overlaying directional arrows on a pattern that is to be gradedIn this drawing I superimposed the direction arrows onto a bodice pattern. There is a similar drawing in Handford's book, page 6 and in Kathleen Fasanella's book, pg 174. All movements start from your point of origin which I have indicated in my drawing. Depending on how you set-up your grading, it will be helpful to draw direction arrows on your patterns.

Now notice the little black triangle under the point of origin. Handford uses this triangle in many drawings. I interpreted those triangles to mean the "point of origin" and that is where I messed up.

Compare the drawings for pants of women (pg 77), men (188-189), and children (219). You'll notice that Handford adds or drops those black triangles almost randomly. Some drawings have them, some don't.

The black triangles don't indicate "point of origin". Instead, I think Handford is borrowing the notation from geometry where it means "right angle". Your direction arrows should be perpendicular - at 90 degrees. If you look at the pants drafts (sorry no more drawings for today), you can see his direction arrows are drawn down the center of the pant legs with two black triangles - meaning the lines should all be perpendicular. In my head, I was seeing "point of origin" or (0,0) on an X-Y coordinate plane. Interpreting things this way caused me to move my pattern pieces incorrectly (my own dumb fault for trying to over analyze things).

Anyway, by nesting my pieces I found my error and realized Handford's direction arrows do not always show the point of origin on all of his drawings. They just show direction.

Clear as mud?

January 03, 2008

Grading Pants Notes pt. 1

The following are my notes on grading infant-toddler pants. Having a copy of the Jack Handford grading manual will be helpful in understanding what these notes mean. Hopefully you have at least read the introduction and the instructions for grading a bodice. If you don't have a copy of the book, save these notes anyway - they may come in handy.

These are the first of my notes on grading pants using the Jack Handford book. Part one of these notes is an explanation about directions and movements of the pattern pieces. Later I will talk specifically about grading pants, shorts, and what I think is a mistake in the children's chapter. Handford's book is a textbook and like most design text books he starts with grading women's styles. The book progresses from woman's bodices, pants, and skirts, to men's styles, and finally to children. When design/pattern making/grading book authors finally get to the children's info, the information becomes abbreviated and incomplete (if they include it at all). Handford's book is different because he does include infant and toddler information and it is more complete than any other grading manual out there. Still, he falls into the same trap. He assumes the student has worked through all of the previous chapters before arriving at the children's chapter. He assumes you have a strong grading background and understand his method completely. But what about those who have no interest in grading woman's clothing and skip ahead to the chapters with the most relevant information? This is what I did.

Now I do have a strong grading background - computer grading. Hand and computer grading are similar and Handford's method is how it is done in the industry. The direction of the grading is done in a similar fashion. The grade rules are similar. The grade steps are the same. But physically moving a hard, paper pattern around versus selecting points and entering relative coordinates is different. Despite that, I have a general sense of how a pattern should grow or shrink between sizes - and that helped me finally understand Handford's method better.

Directional movement in grading in and outTo start out, you will need to compare the grade instructions for women's pants to children. If you turn to page 79 (grading of women's back pant), you will notice arrows with words around each pattern piece. The arrows look like this drawing. If you flip over to the toddler pant grade (page 225), you will see arrows, but no words. It is at this point that Handford assumes you will know what direction is In, Out, Up, or Down. Now study the drawings of the women's pant and the children's pant. Do you see any other differences? There is one major difference that threw me off - I'll explain later...

Directions in pattern grading, in, out, up, downThe next thing to understand are directions. All patterns will move IN, OUT, UP, or DOWN. Handford shows how this works on page 6 in relation to a bodice. The children's chapter doesn't have these extra helps. So I drew arrows like on the right and below to help remind me of grading direction. I added the words to body center or to body side to remind me of how to move the pattern IN or OUT. As you can see, IN or OUT can change depending on whether you are grading a left or right piece (applies to front or back too). Directions may change again when grading darts. Be sure to study styles with darts to see the changes. Infant-Toddler styles do not have darts, so movements will occur like these drawings. Movements UP move toward the body head and DOWN toward the feet. UP and DOWN movements are always the same.

I hope I haven't thoroughly confused anyone yet. I felt like this brief explanation of the notation and movements was necessary before getting into more detail.

If you have questions, please leave them in comments.

November 29, 2007

Aldrich vs. Armstrong pattern drafting books


The two most useful (IMO) books for children's pattern making are by Winifred Aldrichand Helen Armstrong. There are others, but I rarely consider them because they lack essential information, and/or are outdated. Some of you may ask about Childrenswear Design by Hilda Jaffe and Rosa Rosa. IMO, Childrenswear Design offers a decent overview of the biz but lacks a lot of detail in the pattern making chapter. Both Aldrich and Armstrong are good references, though I have a stronger preference for one over the other. Tiki has left some interesting comments on another blog entry about her comparison of Aldrich vs. Armstrong. I thought it might be useful to reprint them in a separate blog entry. I'll follow up with my own opinions about the strengths and weaknesses of each book.

From Tiki:
I've been doing the same, pouring over measuring charts and re-working patterns. My 4 y.o. is my fit model, though, so I do have the luxury (ha!) of dressing her up when I need a fit, but it's by no means easier than having a dress form that won't want to dance around the room while I'm trying to check the fit.

Thank you so much for your explanation below about the flat patterns. I meant to respond earlier, but then got caught up in the holiday madness. Anyway, after much pondering conceptually over the "right" pattern method, I was encouraged by your explanation, especially that it's the fit that matters, not so much the method for getting there. I know that probably sounds simple and obvious, but since I have no formal patternmaking training, everything is a learning experience and I sometimes get stymied because I want to do everything "right." So I finally put pencil to paper to draft Aldrich's and Armstrong's patterns and compare them to mine. My patterns are a more like Aldrich's classic, although my armhole shape isn't quite as cut out (so my armhole is somewhat in between her flat and classic). I think the shoulder width on her flat block is too wide, but I guess that's part of what creates a boxier fit versus the slimmer fit of her classic block.

I did notice that Aldrich seems to modify the front armhole and lowers the front shoulder slope even in her "flat" blocks for wovens (on the infant woven on p. 25 and on the body/shirt block on p. 39), although it's not as pronounced as in her classic block (on p. 89). And when I cut out my front and back patterns for the classic block and woven flat block, the shape and contrast between the front and back of each are not that different. In other words, the difference in the armhole shape between the front of the classic and the back of the classic is very similar to the difference in the armhole shape between the front woven flat block and the back woven flat block (I laid the fronts over the backs and compared). Of course, the armhole shaping between the front classic block and the front woven flat block are significantly different, as are the back classic and back woven flat. I'm not sure exactly what that means, really, except that she seems to apply the "true" flat (meaning identical front and back except for the neckline) as you suggested to casual knit boxy styles like t-shirts (which she drafts also for older children on p. 45).

One more thing about Aldrich's book that I find confusing. I do prefer her drafting method to Armstrong's (for children, I haven't done anything with either of their adult patterns)--it seems simpler because it uses fewer complicated measurements (I suppose because she makes certain educated assumptions about the slope of the shoulder, etc rather than using actual measurements).

However, her book seems a bit schizophrenic, like several people drafted different patterns and she compiled them into one book. For example, the points (0,1,2,3, etc) are not in the same places in her various patterns--sometimes point 0 is center front and sometimes it is a point just above center front that lines up with the inner shoulder. Then her patternmaking steps are not consistent throughout. Sometimes she measures the width from this point 0 and then squares down and sometimes she measures the width from the center chest and then squares from there. Her patterns all end up with the same basic shape and I found following her drafting instructions for each pattern very straightforward. But I think comparing one pattern to another is difficult because in one pattern point 3 is at center chest and on another pattern point 7 is at center chest and point 3 is somewhere else. Maybe it's just my inexperience, but I found it more difficult when trying to compare, say, the chest width ease from one pattern to another, than if she followed the same drafting steps for each bodice.

I do love both books as they are great at explaining how/where to modify patterns for different styles. And I like having two resources to compare--they are both a wealth of knowledge.
If you draft your own versions from each method, I would be interested in hearing your comments. I agree with a lot of what Tiki has said about the ease of drafting Aldrich over Armstrong. Though I prefer Armstrong for some things. I am fairly certain that Aldrich created all of the drafts in her book. I think the points of reference are unique to each draft and can't be used for comparison between drafts. It may make things simpler if they were consistent. Also some of the differences may come down to European vs. American fit and expectations. Europeans tend to fit closer to the body - Americans have a boxier fit.

Anyway, here is a brief run down of the highlights (positive & negative) of each book:

Aldrich (third edition)
  • Backs up measurement charts with her own measurement studies
  • Simpler drafting, though some instructions may be difficult to follow
  • Includes Infant sizing and basic infant drafts
  • Draft instructions for flat and classic blocks
  • The only book that comes close to how things are done in the industry
  • The only nitpick I had was the shaping of some of her basic blocks. I agree with Tiki on the shoulder slope, shoulder width and the neckline circumference. These are easy things to adjust once you have a draft to work with. I also did not like her cap sleeve shaping - another thing that was easy to fix.
Armstrong (second edition)
  • Design variations are laid out on separate pages and not squished together like Aldrich.
  • Step by step draft instructions
  • Easy to read measurement chart, though her chart starts at size 3
  • Chapter on knitwear
  • Ignores infants
  • Sleeve drafts have too much ease

November 09, 2007

Standard Pattern Blocks- Flat vs. Classic

Tiki left some questions in comments and I thought I would address them in a separate blog entry.
I am reworking some of my patterns and have both Aldrich's and Armstrong's books as well. As you mentioned, I have noticed that my own kids' clothes from various manufacturers are drafted "flat" as Aldrich describes it, with the front and back patterns basically identical except for the neckline, but was wondering if you could explain more why that is the standard.
Here is a picture of what Tiki is talking about. Aldrich is the only other person I know of that addresses this topic. It is true that most childrenswear manufacturers work off of flat blocks, especially for infants. Aldrich only presents it for infant casual clothing. But I have seen variations of the idea spanning all children's sizes.

An example of a modified classic pattern block
My basic blocks are a variation of the flat method. The armholes and shoulders of the front and backs pieces are identical. The body widths match (the long vertical line indicates the center back/front). The flat fit is a little more boxy and loose. My fit is not too boxy, but it does allow for some growth. You can see the fit of this bodice on one of my dresses. The patterns are not too boxy because the side seams do taper inward and my front waist has some curve. Aldrich's patterns have a straight side seam and waistline. BTW, I am not done refining the shape of this pattern - I am considering narrowing the shoulders and reducing the armhole. You have to start somewhere with your patterns, and they will evolve as you refine your fit.
I have read the discussion of armhole and sleeve shaping from Kathleen's blog and book and was wondering if the standard in the children's wear industry is due to simplicity in drafting, etc (perhaps because there is more ease built into the design of the garment itself) or if there is a specific anatomical/physical reason that makes drafting the asymmetrical sleeve/armhole unnecessary in children's wear. I guess, in other words, is that only the standard in loose children's garments or would drafting a more fitted children's garment with the same symmetrical sleeve still be correct/standard?
I can't say for sure why this is the standard. It is definitely not something I learned in school, but rather on the job. Tiki's instincts are probably right. There is a simplicity in the drafting of flat pattern blocks, and it does save some time. There is a physical limitation too. The smaller the size, the less practical it becomes to draft a classic block. A flat block gives some wearing ease and allows for growth. Children, after all, grow and a little extra ease allows the clothing to be worn longer. And yes, you can draft a more fitted bodice block with symmetrical armholes/sleeves. That is what I did with my patterns because it is what looked right to me. Here are some pictures of a classic, fitted block with asymmetric armholes (click on images for a better view).

Pattern draft of a classic fit bodice blockThis is a set of classic bodices sized three month. You can see the small armhole - there is little room to draw a nice curve. The back armhole is nearly a straight line. These drafts are based off of Aldrich's book. A classic block would be more appropriate for larger sizes.


Pattern draft of a sleeve with an asymmetric capThis is a corresponding sleeve with an asymmetric sleeve cap. The sleeve cap seems really high and the curves are abrupt, IMO. These blocks could certainly work, but they require more refining. I opted to modify my blocks so they were semi-fitted and flat. The curves are easier and sewing is easier.

There is a relationship with children's body shapes and the flat method. Young children are simple round cylindrical shapes until about the age of 5 and it makes sense to keep the patterns simple.
I'm having difficulty understanding from Aldrich's book what makes the "flat" block or "classic" block more appropriate for a particular style, so I wondered what was standard practice here in the industry. I hope this makes sense.
I look at it this way. Flat blocks are good for casual styles, like t-shirts. Classic blocks are good for more formal looks. Flat blocks are good for infant sizes, classic for older. Your fit and look defines your design and you can opt for either method. Usually I see a modified classic block for fit, but with symmetrical armholes and shoulders (perhaps more of a convention rather than a standard). I have seen some designers use only classic blocks and others only flat. Really, the decision is up to you.

This is a topic I am still researching and trying to understand. I hate to label flat blocks as a standard because there are several possible methods that may be considered "right" or the "standard". Pattern making is considered a technical, rigid system, but don't be afraid to do things your way. I learn things from those who do not have formal training and are not afraid to do things a little different. Sure there are certain accepted standards for labeling patterns or placing notches. Acceptable shaping and fit is open to interpretation.

November 01, 2007

A Problem With Cap Sleeves

Over the last couple of months I have struggled with drafting a toddler cap sleeve. For whatever reason, my infant cap sleeve came off without a hitch. I tried some quick and dirty pattern making by grading the infant sleeve up to 24M and using it as my toddler base. The shaping just didn't work and I had to actually draft a 3T sleeve. I used the opportunity to compare draft instruction between Aldrich and Armstrong and these are my results.

The actual draft instructions for either cap sleeve are fairly simple and easy to draft. Even so, I didn't like the shaping and resultant styles of either sleeve. I'll try to explain the differences of each. I had a stronger preference for the Armstrong version, but I still modified hers considerably.Sewing pattern of different sleeve cap shapes
The top sleeve is the Aldrich version, the bottom my modified Armstrong sleeve. The Aldrich sleeve is very straight - such a sleeve results in a large sleeve cuff opening. Her sleeve is not a fitted cap sleeve. The instructions were easy to follow, I just had a styling disagreement.

I much prefer a fitted cap sleeve. The basis of the sleeve draft must start with a regular sleeve block. Just draw in a style line similar to what you see in the photo for the shaping at the hem. There are some minor refinements detailed in the Armstrong book. The problem with the Armstrong draft is that the sleeve cap height was too high for a toddler. I decreased the cap height by about a good 1/2". Walk the sleeve cap along the armscye and adjust any length differences. Armstrong states there should be 1-1 1/2" of ease in the sleeve cap, which is simply too much. My sleeves have virtually no ease because I removed it. Sometimes the fabric calls for 1/4-1/2" of ease, but not anymore. A sewing operator will return a bundle with too much sleeve cap ease. It is just too difficult to sew in an industrial sewing. And in IMO, it doesn't do anything for fit or wearing ease. Armstrong's draft instructions are easy to follow and you can make any adjustments you prefer after you have the shape you want.

If you look closely, you will notice that my sleeves are symmetrical. This is because my bodice armhole shapes are identical for the front and back. This is typical in the industry for infant and toddler styles. In older children, this is not true and Aldrich's basic sleeve drafts illustrate the differences very well. Kathleen Fasanella has blogged much on the proper shaping of sleeve caps.

A sewn sample with two sleeve that have different sleeve cap shapesHere is a sewn sample. On the right is the Aldrich cap sleeve and my modified Armstrong sleeve is on the left. Can you see the difference in the sleeve shaping and cuff openings? The sleeve on the right is good for t-shirts and casual styles. The sleeve on the left is better for more formal, fitted styles. I have a few minor refinements to make and at least one more sew test and I will have my toddler cap sleeve done! (I am debating on adding 1/4" back to the sleeve cap height, overall I like it).

Either book will get you a basic cap sleeve. My eyes prefer the fitted style. Any questions? Anyone need draft instructions?

October 30, 2007

Stewart Girl's Dress pt. 4

This may be my last or second-to-last post on this subject. I may post some sketches of design ideas that I may want to try this design element - that is if I can work out the construction. Here are some sewn samples from my pattern that may illustrate more clearly my difficulties...

Sew testing a skirt dartIn this first picture you can see how the sample sews up. I am unsure if the dimple at the end of the dart is from my poor sewing or if the dart needs more shaping. I used a poly-cotton broadcloth. The gathers were made by pulling up the bobbin thread.


Skirt pattern piece with a dart and added fullnessHere is the pattern with the seam allowances added.


A closer look at a dart with added fullnessIt didn't occur to me until after I sewed up the sample that the skirt below the dart would now have a bias grain and the area above straight. I think a softer fabric, like a rayon, would gather up beautifully. But sewing the bias of the front skirt to the straight grain of the back skirt would cause all kinds of difficulties. I suppose some of the difficulty could be overcome by putting the entire style on the bias - which would fit the style period of the 1910's. The style requires a skilled pattern maker familiar with working on the bias.

As I said before, I would like to meet the original designer to see how she put this dress together.