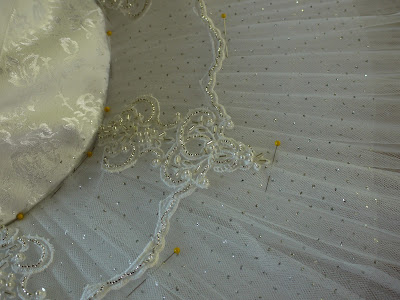
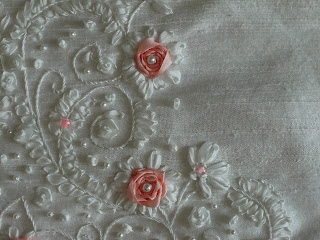
Showing posts with label Sewing Techniques. Show all posts

November 13, 2013

Recovering Shoes - a step by step how to guide

Now that Halloween is over I can breathe for just a moment. My girls were Tinker Bell and Periwinkle based from Disney's movie Secret of the Wings. I was super excited for the request and the chance to make wings again, cause let's be honest, little fairies are just cute.  The movie takes place in winter fairyland which is a bonus for staying warm while trick or treating. As part of their designs, I needed shoes that matched their outfits and is the focus of my post today. Tinker Bell wears boots and Periwinkle wears slip-on style slippers. I pulled shoes from the girls' closet according to overall shape and ones that would be easy to sew through, so no leather.


I learned to recover shoes in grad school and was taught to actual separate the sole from the main part of the shoe, not completely but enough to stuff about 1/2" or so of fabric into, and gluing everything back together with Barge cement. This method is a permanent change and I wanted to undo what I was doing.

                                                              This is the shoe before:

Girls red shoe


Recovering a shoe starting with the toe
The fabric used for this project was stretch velour. I placed it on the shoe with the greatest stretch running from side to side. (If you are using a woven fabric then you will need to use the fabric on the bias).


Anchor the fabric to the shoe with pins

I used a lot of pins and stabbed them straight in the shoe, right above the rubber sole.


Trim excess fabric

After the fabric was draped and pinned in place, I trimmed off excess fabric leaving about 3/8" to turn under.


Turn under the seam allowances and pin


Here, I turned the seam allowance and repinned.


Recovered shoe ready to sew


Ready to sew.


Sewing new shoe cover with a straight needle


A curved needle would have been nice at this point but I made it work.


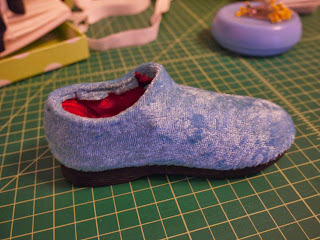
Finished shoe cover


All finished except the puff ball.

 I added puff balls and fur trim. 

Fairy costumes with custom covered shoes
The fairies exploring the outdoors.

July 09, 2013

The Tutu Series : design details

I will be doing a series of tutu construction posts. This post is primarily some background and what I have been doing up to date.

A few years ago, I took a tutu making workshop from the ballet costumer at the local university. I met her during the years I taught costume design for the theatre department. I actually encouraged her to teach the class because I really wanted to learn. I had done some study and taken a short poster seminar at USITT but really wanted a hands-on experience. In the workshop, each student made a complete tutu. I made a black one which I learned is not the easiest color for a first timer, but of course I learned a lot from the experience. Following this, I studied up more on tutu construction. There are many ways to make a tutu, it is just finding what works for you. I bought some books and did some more studying. I made a romantic tutu for a neighbor's daughter and then two for my own daughters' halloween costumes.

About a year ago, I was able to go back to the university and help teach two more workshops. I also started on a white tutu. Well, I finally just finished it. It was one of those projects that had no deadline and took the back burner on many occasions.


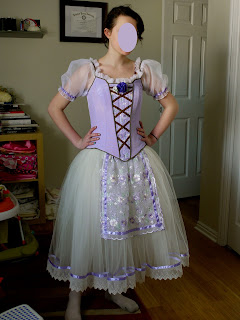
Giselle Tutu
Giselle for YAGP Feb 2012
The Giselle tutu is a 4 layer tulle skirt on a self net inner basque. The bodice is a 12 piece long line made from cotton/rayon bengaline and flatlined with coutille. For closures, I used hook and eye tape dyed to match fashion fabric. I used the tape instead of individual hooks and eyes for construction time reasons and since she was not partnering in this costume knew that this would be ok. I did a double row of eyes for future adjustment since she was 13 or 14 years old. The director was pleased with the costume but at final dress rehearsal requested the sleeves to be off the shoulders.


Halloween fairies with custom tutus
Halloween 2012
I made these Halloween costumes from an old Simplicity pattern but constructed them using traditional tutu methods.

White Tutu 

Double hand pleating on a tutu skirt
Double hand pleating of top two layers
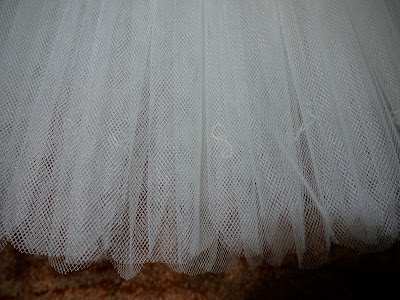
Scalloped edge on tulle tutu skirt
Scalloped edges and hand tacking

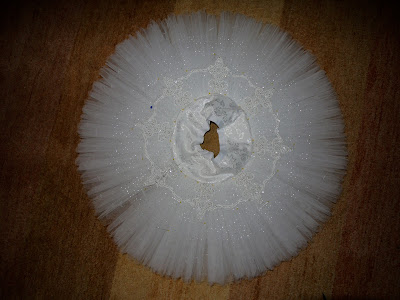
Decorated top plate on a tutu
Decorated top plate pinned on

Close-up of beading on a tutu
Close-up of hand beading

A complete tutu for a ballerina
Finished tutu

May 21, 2013

I Love Knits! : A guide to buying knit fabrics online

If you were to walk into my sewing studio, you will notice two things. One, I must have kids because it looks like a 2 year old has been in the vicinity and secondly, I have a large stash of knit fabric. I love knits. It is the main fabric of choice I have been buying lately. Back in 2009, I started making clothes for my first daughter and was introduced to Ottobre sewing magazines in my quest to find good children's sewing patterns. (Some other patterns I have used are Studio Tantrum and Roos - out of print). Many of the patterns in Ottobre are for knits.

When I first started working with knits, it was rather difficult to find cute knit fabric but now with the increase in demand many online vendors carry a variety of knits, which makes shopping much more enjoyable. (see my list at the end for some of my favorites).

I have learned several things along the way when working with knits:

Quality is worth the wait, research, and/or price. 


I seldom find good knits locally but do get lucky on occasion. Most of my purchases are online and some vendors send swatches for free. Price is not always a factor. I few years ago, a pattern/fabric designer launched a knit line and charged a pretty penny for it. I felt at the time it was more than I would spend especially since I didn't know what the quality was like. The prints were cute and a number of people I know bought them. Well, it had a horrible shrink factor of 10-12%. I believe this problem has been corrected by the manufacturer since I have noticed the online vendors no longer state the shrinkage rate.  I have bought cheap and still do but there is the risk of the fabric becoming piley and looking worn out quicker.

Analyze stretch. 


Stretch will impact the fit and choice of pattern. I will ask myself how much stretch does the fabric have and does it go back to the original shape and size afterwards. To find out stretch percentage, mark off 4 inches across (in the direction of the greatest stretch), then against a ruler hold down one side at the 0" mark while pulling until the fabric starts to resist, note how far it stretched. Let's say it stretched to 6", making it 2" longer. Now comes the math part (X/Y) x 100 = percentage of stretch. X = the number of inches stretched, here it is 2". Y = the base inches used, 4". 2 divide by 4 times 100 = 50%. If the fabric goes back to the original size/shape, great. If not I will make sure to use that fabric with a style that doesn't need retention, nothing close fitting.

Pick appropriate pattern for fabric


Pick an appropriate pattern for your fabric or know how to adjust to make it work. Last year, I made a dance costume which had a leotard under-structure. The leotard was made from a 4-way stretch miliskin and the attached over dress was made from a 2 way stretch metallic. The pattern for the overdress was based off of the leotard but had to be adjusted in both width and length. I highly recommend reading www.patternschool.com blog authored by Stuart Anderson, a stretch-wear pattern maker. He teaches the mechanics of stretch, fit and pattern making. And quite frankly, the best information I have found on working with knits.

Create your own design


Pointelle rib knit
Pointelle rib knit

Besides making knitwear for my girls, I have been making t-shirts for myself. Lately, I am liking the looser blousier styles especially since I need to lose 20 lbs. of baby weight. My most recent shirt I made used a ribbed pointelle knit I found in the remnant section of the local chain fabric store. It was just under a yard and I probably paid less than $2.
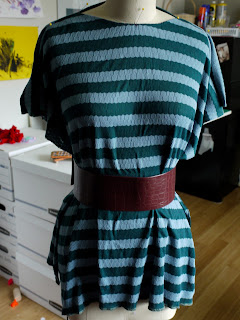

Draping a knit fabric to design a t-shirt
Playing with the idea of a boatneck, batwing sleeve, and belt.


The fabric is very soft and drapey. I looked through all my patterns and just couldn't find one I liked so I draped it and used an old shirt of mine as a pattern for the neckline. I used the actual fabric to drape in so, when it came time to take it off the mannequin I thread marked the seam allowances instead of using a marking pen.


Since I didn't make a true mock-up, I checked the pattern in fabric. I doubled checked the shoulder length and side seams. I also did a quick and dirty fitting on myself to make sure the neck line laid properly. I have small shoulders and small back width from armscye to armscye. 

Stay tape on the back shoulder seam.

I stabilized the shoulder line which is needed in knits because this is one area that can stretch out of shape. Instead of buying stay tape, I make my own using either lightweight fusible woven or fusible tricot/knit interfacing, cut at 3/8" wide. If using the knit fusible, I cut the length in the direction of least amount of stretch.


I usually sew my seams with a narrow zigzag and then serge together the edges to finish it. I got used to doing it this way because my serger is an industrial 5 stitch machine and has to be threaded in a three thread configuration for knits. So, I sew the seam first on the regular machine for strength and durability. My regular machine does have a stretch stitch but I don't care for it. It is hard to unpick if I make a mistake, so narrow zig zag it is. I have recently acquired a domestic four thread serger which I could use to seam and finish all at once, but I have it set up for roll hems and too lazy to change it back.

Hemming knits


For hemming, I use a twin needle for stretch on a standard sewing machine. I don't own a coverstitch machine and have felt the expense not necessary for the amount of knit sewing I do. That being said, the twin needle works really well for t-shirts and clothing that don't need 100% stretch to function (100% stretch as required by swim wear and some athletic wear or dance wear). Twin needle hems will pop if the hem is over stretched. I have only had to fix a few hems from this happening. Sometimes for more stretch, I will use the triple zigzag, lightening or serpentine stitch (same stitch I just have heard it called all these names). Hemming (as well as bindings used for necklines or sleeves, will post about this later) is one area of sewing with knits that may need to have a sample sewn first before preceding with the actual garment. Below is a picture of a hem done with a twin needle. The fabric stretched out on me. There are some different methods of approach to fix this.

A knit hem sewn on a regular sewing machine
Before pressing
1. Hem using a coverstitch machine, though it can still stretch out.
2. Use the serpentine stitch to hem
3. Stabilize the fabric by placing a tear away stabilizer between the feed dogs and fabric.
4. Starch, lots of it. (just don't stretch the fabric while applying)
5. The lazy method, press with lots of steam and see what happens after hem is in place. (This works if the wonkiness is minimal and is what I used for this shirt).
6. Often times, a combination of any of the above.

A knit hem after pressing
After pressing
Neckline finish in a knit sewn with a twin needle
Neckline using same twin needle.


A simple t-shirt design created by draping
Me in the finished shirt (sorry for the composition my 3.5 year old took the photo)
Oh and lastly, I love working with knits because sewing projects work up really fast. T-shirts typically have 4-6 seams, not counting hems and the fabric is very forgiving.

Some online vendors I have bought knits from or just like to drool over:

Fabric.com
Print Knits Studio
Chez Ami
Girl Charlee
Gorgeous Fabric
Emma One Sock
Spandex World
Stretch House


May 07, 2013

Stuffed Toy Floor Bag

My kids stuff toy collection is getting out of control, mostly due to grandparents but we are just as guilty. And since they are young, I have all their toys in the family room so I can watch them from the kitchen and the pile was becoming unsightly, overflowing their corner. One evening while on Pinterest, I came across an idea to use a bean bag as storage for soft toys. I also found a company that makes a bag but charges more than I wanted to spend. I mean it is just a giant bag.

My version is a giant floor bag, large enough for 2-3 little ones to sit on.

Stuffed toy bag storage solution - the kids love it
The girls love it.


Diameter of top and bottom circle pieces is 36". Side panel (in grey) measures 15"x 120".

Stuffed toy bag storage solution
Fabric is a double sided fur fleece.

I cut a 24" diameter inner circle in the top to create a mesh fabric window and zipper opening. The mesh fabric is an old laundry bag but you can buy mesh fabric like this from Seattle Fabrics. I used the small inner circle as a pattern for the mesh window adding 1" more for seam allowance. 
A 1/2" binding strip of sheer tricot was applied to the cut edge of the mesh so one side of the zipper could be sewn on to it. The fur fleece was overlapped to finish the other side of the zipper.


March 29, 2013

Blouses - yes, they need ironing

One of the consequences of my blouse buying spree is the sad fact that cotton blouses wrinkle when washed. The fabric will look worn and tired (see the picture below). This is true of just about any woven cotton fabric unless they are pre-treated with nasty chemicals. My blouses were getting little rotation in my wardrobe because they would hang, wrinkled, in the closet bypassed for easy wearing knits. In order for my blouses to get worn, I had to develop a new habit and like it. I've never been opposed to ironing, but standing at the ironing board for a long time is something I've never liked much.
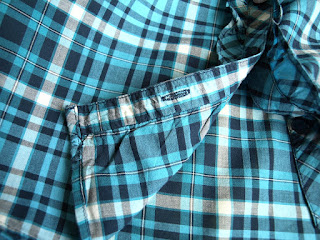
Wrinkled blouse
So back in December, I pulled out all of my wrinkled clothes and and spent about 5 hours ironing. Adding DH's shirts to the mix would have been a bit over the top, I think. The goal was to catch up. Now, about once a week I pull out just the 3-4 wrinkled items and give them a good ironing. My blouses are back in rotation and not merely taking up space.

One thing that helps tremendously is that I pop in my earbuds and listen to my favorite audio podcasts. Time passes quickly and that chore is not a chore any longer.

I've also rediscovered starch. Cottons will look almost new with some light starching (photo above). I used to buy starch in aerosol cans. Not only was it more expensive, but who knows what nasty chemicals are released when you spray that starch. I invested in a concentrated 1/2 gallon of Sta-Flo starch. It has a few simple ingredients - water, cornstarch, borax, and a few unnamed ingredients. I suppose I could make my own, but I have not ventured down that path. The bottle contains directions of how to dilute it and it's a snap with spray bottles that have a dilution guide. This 1/2 gallon bottle will last a looong time.


Anyway, what say you about ironing? Any favorite tips, irons, starch recipes?

March 19, 2013

Blouse refashion : shortening sleeves

This was another lucky thrift store find. This is an Eddie Bauer blouse with a print and interesting yoke detail. The yoke has narrow tucks and a narrow double fold ruffle that measures about 3/8 inch. The button band extends below the yoke at the bottom. (click on the picture for a better view of the yoke details. The buttons are fabric covered. The attention to detail and the construction make this a high quality blouse. There are 6 separate pattern pieces resulting in 12 cut pieces just to make this yoke! I'm still not sure how the seam with the ruffle is not bulky considering it is a folded ruffle.
Eddie Bauer blouse with long sleeves
As much as I liked the blouse, the combination of the print and long sleeves made the blouse feel like I was wearing pajamas. So, I closed my eyes (not really) and chopped the sleeves off. The new shorter sleeves were a bit wide, so I added elastic to pull it in.
Shorter sleeves on an Eddie Bauer blouse
I like this version much better - a fun new top for Spring.

March 08, 2013

Natalie Christening Gown pt. 2 : Heirloom sewing details

I finished the gown a few weeks ago but have been busy with other projects; Chinese New Year, Valentine and DD2 second birthday. The gown came out very well for being my first heirloom project and would recommend this pattern (Natalie in Sew Beautiful issue 135 March/April 2011) to anyone else looking for a beginner project.

There was no lace insertion but strips of lace were sewn together to create a wide lace border at the bottom of the skirt. I used this website for tips and hints on how to do this.

Heirloom lace on Christening gown skirt


I didn't have an edger foot for my machine and so I tried my blindstitch foot. It worked ok but in the end found I had better or more control with my regular foot. Decreasing upper thread tension is a must otherwise the lace will become puckery. The hardest row was the last one which was sewing a gathered lace edge to entredeux. I gathered the lace by pulling one of top header threads in the lace. I had to sew really slow and adjust the gathers as I went with a straight pin. The presser foot wanted to keep pulling out the gathers but it worked out in the end just lots of patience.

One change I made to the construction was finishing the edge of the dupioni skirt before adding the lace band. According to heirloom sewing, the lace would be attached using a narrow zigzag roll described here as flat lace to flat fabric technique. This method rolls the fabric very narrowly while attaching the lace. I have worked with dupioni and feared the unraveling would cause some problems with this, at least to my inexperience heirloom sewing skills. I instead opted to serge the bottom edge first and then overlap the top lace edge over the serger stitching with a narrow zigzag. I don't think anyone will notice.

Here is the end result, enjoy.

Christening gown with lace and embroidery

Update: Baby was blessed this last Sunday, June 2, 2013

Baby in silk christening gown
Maria in her dress

February 25, 2013

A blouse refashion and study

I seem to be a woman obsessed with blouses. Ever since I set out to create a basic blouse pattern for myself, I've kept my eyes open to study many RTW blouses. I've made many purchases from the thrift store with varying types of details and construction. I purchased this blouse a few months ago. As it usually goes, there were many things I liked about this blouse while I tried it on in the fitting room but I did note it was a little too big.

Plaid blouse with front ruffle detail
The refashion part of this post is probably the least interesting and so I don't have any before photos. I pulled out my basic blouse pattern and measured across the back at the base of the armholes. I compared that measurement with the blouse and did some math. The blouse needed to come in 1.5 inches on each side seam. Hmmm. The blouse was much bigger than I realized and made me recognize that our perceptions of body shape and size are definitely skewed when in a store fitting room. Anyway, the sleeves are set in flat so I just sewed up each side, taking it in the needed amount.

Detail of ruffle along shirt button band.
As I worked on the alterations, I took some construction notes. The front button band is a cut 2 (or 4, 2 for each side). A ruffle is gathered to the band that faces out on the long inner edge. The bands are sewn together on the outside edge and then stitched to the front bodice on the reverse side. The band is then turned to the front and topstitched down. I suspect the ruffle is not pressed down prior to topstitching. I think the operator used the ruffle to pull the band flat, turning the seam allowance to the inside. There is probably some interfacing on the band piece with the ruffle. The whole operation leads to a neat, clean finished button band. The operator who made this is probably very skilled, especially with dealing the bias area near the neck band. Still, this process is easier than it looks.

Inside view of front button band
The only problem with this style is the ruffle. Despite a good ironing with some starch, the ruffle wants to stand up and fall over the buttons. The blouse is still cute, but perhaps a narrower ruffle would solve that problem?
Shirt sleeve cuff with a band
While the sleeves were set in flat, the sleeve cuff was set in the round. The cuff was attached from the reverse side and turned out and topstitched down. I don't believe there was any pre-pressing because you can see the operator used a stripe of the fabric as a guide to turn the seam allowances in. If I were making this, I probably would pre-press just because I don't have the practice. The collar neckband was constructed in the same manner.

January 24, 2013

Review of Simple Modern Sewing pt. 2 : Sewing up a sample

I have to admit that I put off the rest of this review. It's hard to be so down on a book that I had so enjoyed perusing. You can read the gushing in part 1 of my review. First the positive:

The photography and layout of Simple Modern Sewing is great. The instructions are adequate for experienced sewists. The patterns are printed on sturdy white paper.

And then when you pull out the pattern sheet, this is what you get:

Pattern sheet from Simple Modern Sewing


As you can see, nearly all the pattern pieces and sizes use the same exact black line. It would have helped to at least denote the different sizes with different line types and colors for different styles in the same way that Burda does. You have to really look carefully for notches, because they are easy to miss despite extra notations on the pieces. And in just this one snapshot of one part of the pattern sheet, there are 5 pattern pieces that overlap.

The issues with the pattern sheet are relatively minor though, especially if you are comfortable with Burda patterns. I did manage to trace everything off for the wrap blouse and dress. I had to select the large size since that matched up with my measurements best. There did seem to be some discrepancy between the measurement chart, printed finish measurements in the pattern instructions, and the actual pattern pieces. I didn't take the time the track it down and it could be just differences in how one measures. For me, it resulted in a bit more room (which was actually needed) than I expected. One good thing is that the shape of the armhole and sleeve was along the lines of what Kathleen recommends.

A bigger issue did present itself once I started checking the pattern. There is a grading error on the shoulder seam of the bodice pieces of the wrap blouse for the medium and large sizes. In order to fix the large size, you will need to pull the shoulder point of the back shoulder seam in about 3/8 inch. The other smaller sizes match up just fine. I debated whether this was indeed a grading problem because sometimes the back shoulder is eased instead of having a dart. On boxy, loose fitting styles there is no easing or dart, which is what this style is supposed to be. Since the smaller sizes matched, there could be no other explanation. No other bloggers have mentioned the same problem, so I'm not sure if it is just an anomaly on my copy.

After correcting the pattern and adding seam allowances, I proceeded to cut and sew and got this:

DH said it looked like a medical scrub, except it didn't even fit that well. The dart points in the wrong direction, which means I probably should have done a FBA or something else. The skirt part of the blouse has an extremely small gather ratio, less than 1:1.25, which makes the gathers look like a mistake. The result of all of this is that it looked terrible on.


I probably could spend the time to fix the pattern and try again.


But it would take too many iterations.


This project caused me to loose my sewing mojo. Who else hates spending time on something with such disappointing results? I think I can now understand beginning sewists frustrations.


Having said all that, I can recommend this book only for its design and styling inspiration. Go elsewhere for patterns which are similar.


I cannot recommend this book to beginning sewists at all. If you have more experience altering patterns and don't mind endless fiddling, then maybe this book is for you.

January 20, 2013

Natalie Christening Gown pt. 1 : Prep work

I am very excited to be able to join Esther's blog. As she mentioned, I am costume designer by trade but  currently have taken some time off to raise my girls. Before children, I worked as a university professor teaching costume design, theatre technology, and special effects makeup. I have recently started to dabble in tutu making and have done some freelance work in that area. Hopefully, my posts will be of interest.

So right now I am working on a Christening/blessing gown for baby #3. I decided to go the heirloom route. The pattern is from Sew Beautiful issue 135 March/April 2011, the Natalie Christening Gown. I have never done anything heirloom before except for making some 19th century women's blouses for various theatrical productions. Materials I am using are silk dupioni, French cotton laces, silk ribbon and glass beads. I haven't bought all the lace yet but will need to soon. The cost of this project is a bit on the expensive side. I think the cost of the laces will end up being the most expensive items. I goal is to have this finished by the end of the month.

Below are some pics of what I have done so far (Hopefully, you can make out the details, photographing white is tricky).


Marking the pattern on silk
 Center Front panel traced onto fabric using pencil (This is marking cutting lines so no worries of it showing through once sewn). Center front is marked using a disappearing ink pen.


Marking the embroidery pattern on silk
I chose to pencil mark the embroidery pattern.


Silk ribbon embroidery
Detail of finished ribbon embroidery. Still debating on adding more but will look at it when the dress is sewn together. 


January 04, 2013

Review: Simple Modern Sewing pt. 1


Simple Modern Sewing one of the new how-to sew books at my library. I was excited to review this because Japanese sewing books have a reputation for precision and design that elevate the average sewing book. The Pattern Magicand Drape Drape series of books are two notable series that pattern making enthusiasts rave about. I knew that our local patrons would not respond well to Pattern Magic or Drape Drape, but they would probably respond to Simple Modern Sewing.

This book is written by Shufu To Seikatsu Sha. The photography and styling of the designs really grabbed my attention. I personally found the designs very appealing and in this case something that I would actually make and wear. In comparison, I did not find any of the designs in the books I reviewed previously inspiring enough to put in the work necessary to make them up. The book consists of 8 simple patterns that can be used to create 25 garments. Each grouping of patterns can be mixed and matched interchangeably to create the different styles.

The book is divided up into three general sections. The first is the photography/inspiration section that shows each of the style variations. The second is general pattern and sewing instruction. The third contains detailed cutting and sewing instruction for each style variation. This includes a pattern layout, diagrams, and a list of sewing instructions.

The styles in the book are sized for the average Japanese woman. The average American woman may find some of the styles a bit on the small side. Some of the styles are intended to have a lot of wearing ease, so the largest size may fit some American women anyway. There is a size chart and finished measurements for each style, which helped me determine the correct size to trace.

Overall I really like the styles in this book. I selected the wrap blouse, shown on the front cover to sew up as a test for the dress. The biggest downfall of the book is the pattern sheet. It is nice to see the patterns are printed on sturdy white paper rather than tissue paper. But the pattern sheet is a dizzying array of overlapping pattern pieces in multiple sizes in solid black lines. All the patterns and all the sizes are solid black lines. Burda patterns are similar, but they are much easier to sort out. Each style is a different color and the sizes are differentiated by different line types.

To finish up part 1 of the review, the book is inspiring and lovely to look at. The general sewing information and detailed sewing information appear to be adequate for sewists who have some experience. The cutting diagrams and pattern prep require a bit of work. Because of the difficult pattern sheets, I don't know that I can recommend the book for beginning sewists. The styles are simple enough that one could find similar patterns from the Big 4 without the hassle of interpreting the pattern sheet.

Anyway, I've traced off the blouse and dress pieces and begun the pattern checking process. So far I've spent maybe 4 hours just in prep work. Updates as I work my through it.

October 10, 2012

Book Reviews : Dressmaking, Collette Sewing Handbook, and Burdastyle

Our library recently acquired three new how-to-sew books. Sewing is picking up in popularity and the numbers of books coming out about sewing reflect that. I took some time to flip through them and here are my thoughts. All of these books give the impression of being exhaustive in their subject. They are also project based meaning the how to sections are emphasized by the included projects.

Dressmaking


Published by DK, Dressmaking has the fantastic photography one comes to expect from DK. The book is written by Allison Smith who previously penned The Sewing Book: An Encyclopedic Resource of Step-by-Step Techniques also put out by DK. The layout and organization of Dressmaking is above average. The how-to photography is clear and easy to understand.

The projects are in the back of the book with additional instructions to complete each project. This means the how to section is designed to support the projects. So, you will have to flip back and forth to get a complete how-to. It also means that the how-to section is not comprehensive. You will likely need a more comprehensive how-to sew book such as the Reader's Digest Guide to Sewing to supplement what is missing. What is missing is the info to complete some other project not included in the book. Much of the information can be applied to other styles. But you may want to do a project with some design feature that requires a different technique, which is not included in this book. Thus the need for some other sewing manual. For advanced sewists, this is not a big deal, but then again an advanced sewist probably wouldn't need the how-to section anyway.

The styles are pretty basic. The graded patterns are printed on grids at the back of the book. This means you would have to enlarge them yourself. Since I didn't make up any of the styles, I can't tell you how accurately the patterns are drafted. I also can't comment on fit. You will almost certainly have to spend time testing the pattern in muslin. The process would be time consuming.

The biggest problem with this book is the binding. It is a large book and while the binding is sewn, it is cheap. Many DK books of this size fall apart with semi-regular use. In the library, we have replaced one very popular DK book several times, which begins to fall apart after only two circulations.

The Collette Sewing Handbook

Written by Sarai Mitnick, the book was written to support Mitnick's indie sewing pattern company Collette Patterns. The book is spiral bound, so it will lay flat when open. The layout and photography is also pretty good.

Mitnick spends time explaining her five basic principles: a thoughtful plan, a precise pattern, a fantastic fit, a beautiful fabric, and a fine finish. I only spent a few minutes reviewing the sections on fit and sewing. The information presented is pretty basic and you will need supplemental resources if you do not have the fit issues described. The sewing information is also basic but will at least help you sew the projects in the book. The patterns are apparently drafted for a C-cup, which means that if that is not you, expect alterations. The patterns are printed on tissue and included in the back of the book. I didn't take the time to check the patterns or sew them up as the styles didn't appeal to me.

Burdastyle

This sewing manual is written by Nora Abousteit, a Hurbert Burda employee and Alison Kelly, a Project Runway alum. The book is designed to support the Burdastyle website and Burda sewing patterns. The book is spiral bound so that it will lay flat when open with the patterns included in the back.

I have an admitted preference for Burda patterns because I have used some of them from the magazine. They are usually drafted pretty well, though the instructions are very anemic, which is a challenge for beginners. This book explains how to use the Burda patterns from the magazine. It explains the pattern notations, how to trace off the patterns, and how to add seam allowances. Burda patterns are based off a European sizing system. It is important to measure yourself to find the appropriate size on the Burda size chart. Unfortunately, the how to measure instructions are pretty pathetic with simple, flat line drawings. The sewing instructions are pretty basic.

There is one thing that I really liked about this book. The book encourages the reader to experiment and redesign the styles. There are only four projects in the book, but the reader is shown several variations. There are instructions for a project with no alterations and then there are instructions for a variation. Additional variations are show in a photograph with no additional instructions in the hope the reader can figure them out on their own. The variation with instructions demonstrates how to alter the patterns to achieve the desired effect. I like how the authors encourage their readers to experiment and play because I feel that is the best way to learn. I think this may be a challenge for beginning or brand new sewists.

I think most of the projects are pretty achievable. I didn't sew any of them up because the styles didn't appeal to me. The jacket would be the most challenging project, especially the variation.

A few final thoughts

All of these books will help either a beginning or intermediate sewist with lots of hand holding for the included projects. Though, I expect there will be some frustration with the patterns and some of the instructions. Additional support material is definitely required for more complete coverage of the subject. The Reader's Digest book is still a gold standard due to it's comprehensive nature. Older how-to sewing books are also better. There really isn't anything new presented with the exception of the included patterns.

There is one popular book that I have not reviewed and that is Gertie's New Book for Better Sewing. The primary reason is that I don't have access to a copy and a full review would be unfair. But, I am admittedly biased against the book already. The content is just an updated version of previously available information. Gertie got her start by working her way through a Vogue sewing manual, and that is the primary source for her book. Some of her tutorials found on her blog have been lifted off of at least one other website. Also, from what I have heard, Gertie is the fit model for the included patterns, which are then graded up and down. If you aren't Gertie, then expect needing to make adjustments.