December 11, 2013

Adapting a block pattern into something else pt. 7 : Pattern modifications

Testing a neckband construction

Have you ever had a project bug you? I had my first sample hanging in the Design Loft almost taunting me. Originally I wanted a neckband on my cardigan. Then during construction, I changed to a rolled fabric edge along the neckline. The longer I stared at it, the less I liked it. Still unsure how a folded neckband would look, I whipped up a small sample, and what do you know? It worked just fine. It could be improved with a bit of interfacing, but not too bad.

So I pulled out the seam ripper and set to work. In addition, I removed some of the extra ease I had previously added for a closer fit.
Testing the fitting sample
You'll notice there are still a few minor adjustments that need to be made. The sleeves are too long. Yep, I over compensated there. The shoulder needs to be brought back up. And the back neckline needs to be raised. Despite all that, I am fairly pleased with the results. This is the style of cardigan that I really like. It looks sloppy in the photo because I used a rayon/poly jersey knit that is just too lightweight and drapey for the style. The next version will be even better. And yes I do plan to wear this, even in public. It is very, very comfortable.


November 21, 2013

Adapting a block pattern into something else pt. 6 : Sewing a fitting sample

Test fitting sample for a new cardigan design
You can easily spend a lot of time creating a pattern on paper but at some point, it needs to be sewn up. It is while sewing that you'll see your design take shape and lead you to make modifications as needed. I changed the design a bit by eliminating the folded neckband. The neckband is instead a single layer that is allowed to roll. I made this change because the fabric is pretty light and it would need some kind of stabilizer, which I didn't have. The cardigan is very comfortable and fits pretty well. Even so, I added just a bit too much wearing ease. So I need to reduce some of the body width. The upper back is a tad long and the sleeves need shortened.

It's pretty hard to get everything just right on the first attempt. I've done enough girls dress patterns that I don't usually have to do many iterations. Adult clothing takes a bit more tries because I lack experience with it. Industry pattern makers and sample makers will sometimes make many iterations of a design before they get it just right. This is a slightly different approach than home sewists might take. But once the pattern is nailed down, I won't have to worry about it anymore. It will be much easier to create variations on this style too.

Paper sewing pattern
Before I could tackle the pattern adjustments, I needed to stop and get organized. I assigned a style number, created a style and cutting spec sheet, and assigned pattern numbers. I explain how to do this along with providing printable blank forms to fill out in my book. If you prefer keeping a digital record, you can use the examples in the book to create your own spreadsheets. In many ways I still prefer paper and pencil. It forces your brain to think differently - perhaps more analytically. I have used both paper and pencil and spreadsheets. There are advantages to both.

November 13, 2013

Recovering Shoes - a step by step how to guide

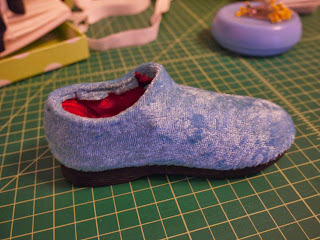
Now that Halloween is over I can breathe for just a moment. My girls were Tinker Bell and Periwinkle based from Disney's movie Secret of the Wings. I was super excited for the request and the chance to make wings again, cause let's be honest, little fairies are just cute.  The movie takes place in winter fairyland which is a bonus for staying warm while trick or treating. As part of their designs, I needed shoes that matched their outfits and is the focus of my post today. Tinker Bell wears boots and Periwinkle wears slip-on style slippers. I pulled shoes from the girls' closet according to overall shape and ones that would be easy to sew through, so no leather.


I learned to recover shoes in grad school and was taught to actual separate the sole from the main part of the shoe, not completely but enough to stuff about 1/2" or so of fabric into, and gluing everything back together with Barge cement. This method is a permanent change and I wanted to undo what I was doing.

                                                              This is the shoe before:

Girls red shoe


Recovering a shoe starting with the toe
The fabric used for this project was stretch velour. I placed it on the shoe with the greatest stretch running from side to side. (If you are using a woven fabric then you will need to use the fabric on the bias).


Anchor the fabric to the shoe with pins

I used a lot of pins and stabbed them straight in the shoe, right above the rubber sole.


Trim excess fabric

After the fabric was draped and pinned in place, I trimmed off excess fabric leaving about 3/8" to turn under.


Turn under the seam allowances and pin


Here, I turned the seam allowance and repinned.


Recovered shoe ready to sew


Ready to sew.


Sewing new shoe cover with a straight needle


A curved needle would have been nice at this point but I made it work.


Finished shoe cover


All finished except the puff ball.

 I added puff balls and fur trim. 

Fairy costumes with custom covered shoes
The fairies exploring the outdoors.

November 12, 2013

Adapting a block pattern into something else pt. 5 : Making the pocket pattern

Sewn sample of the new cardigan style

Here's a sneak peak of the first sample of my cardigan pattern. I'm fairly pleased with the results, though there are a couple of minor pattern modifications to make. So more about all that later.

For now, we need to finish up the pattern. The last two pieces to deal with are the pockets (shown above) and the elastic casing. I referenced my sweater to determine the pocket dimensions and placement, which is basically a rectangle. Pockets come in all sorts of shapes and sizes with varying amounts of functionality. Pockets should be proportional to the overall garment. They can be graded for larger or smaller sizes to maintain proper proportions. Pockets can be applied in various ways and include seam and hem allowances.

I wanted a very casual look to my pocket so I used a narrow 3-thread serger hem around all four sides and topstitched it on. This allowed the fabric at the top of the pocket to roll. This detail mimics the detail on my sweater. I didn't have a lot of confidence in producing a neat topstiched pocket in which the raw edges are turned under. This is partly due to the fabric and my machine. For a more structured pocket this fabric would need a fusible to help stabilize it.

Pocket placement is noted on the pattern piece by a drill hole. In a factory, an actual hole is drilled into the fabric. I have seen knits marked with a drill that also contained a marking medium such as a washable marker. In that case, the drill bit was like a needle. My pattern at home will contain a hole large enough for a chalk marking pencil to fit. Even though there are lines on the pattern pieces indicating placement, they are not transferred to the actual fabric. They are just there for clarity.

Drill holes for pocket placement

The elastic casing is just another rectangle large enough to cover the elastic. I think mine is about 1/2" x 8".

October 30, 2013

Adapting a block pattern into something else pt. 4 : how to create the neckband pattern piece

T-shirt into cardigan
For review read part 1, 2, and 3 of this series.

All of the major pattern pieces are now done. Next up is to do the neckband, the elastic casing for the back waist, and pocket. These three pieces are just rectangles. In a CAD pattern making environment, I will make pattern pieces for all rectangles and squares. Pattern makers, graders, marker makers and cutters all handle these kinds of pieces a little bit different, so ask if you are not sure.

For me, working on a personal pattern in my own workspace I handle rectangle and square pieces one way. I figure out the dimensions and note them on my style sheet. You can do this for patterns* that will be used in a factory setting too, but you will need to create a cutting guide for any rectangular pieces which might be graded. For now noting the cut dimensions is sufficient.

Up to this point I haven't really needed to consider how the cardigan is to be constructed. The majority of the cardigan has rather simple construction that mimics the construction of the t-shirt. But the neckband can be constructed and attached in a number of different ways. I also have to consider the stretch factor along the back neck. Do I want a 3-piece neckband with seams at the shoulders or a 2-piece neckband with a seam at center back? How do I finish the neckband at the hemline? How wide? All these things have an influence on the dimensions of the cut piece.

I like to keep things simple so I opted for a 2-piece neckband with a seam at center back. A 3-piece band might be necessary if the fabric width is too narrow. A 1-piece neckband might be possible if the cardigan was smaller. Begin by measuring the front and back neckline of the cardigan patterns.

Measure the neckline for the neckband

Now it is a matter of math. There really isn't a formula for this. It's just adding and subtracting.**

Neckband width = (front neck+back neck) - (front and back shoulder seam allowances + hem allowance) + seam allowance for center back + seam allowance at hemline - some stretch factor for the back neck.

Neckband length = 2 * (Desired finished width + seam allowance)

The neckband will be cut across the width of the goods like this:

Cutting guide for the neckband

Dimensions should be written as Length x Width. In this case the Length is the shorter measurement. My neckband pattern piece will then be something like:

5 x 30 inches

A CAD version or hard pattern will look something like this with a pattern number assigned instead of the words neckband:


You'll notice that I have two notches. The notch along the length (the narrow end) instructs the sewing machine operator to stitch the neckband pieces together at that end. The other notch along the width (long direction) is the match point between the neckband and the shoulder seam of the cardigan. This notch is necessary because I reduced the back neck to account for a stretch factor. This will help the back neck fit better rather than stand straight up.

Since I am just making one size and working at home I will draw a picture indicating the notch placement with a measurement along with the cut dimensions for the neckband.


*Managing rectangular and square pattern pieces is the subject for at least two additional blog posts! Yep, it's hard to believe but there is a lot to say on the subject....

**I do all this adding and subtracting right at the calculator.