Showing posts with label Sewing Techniques. Show all posts

March 29, 2012

Book Review : Sew Serendipity


There seems to be a trend in new sewing books for the home sewing market. Some are written by fabric or textile surface designers as a way to expand their personal brand, others are written by indie pattern makers. Usually, they include basic how-to sew information and patterns. My local library received two of the Sew Serendipity sewing books written by Kay Whitt, an indie pattern maker (though she does sell to McCall's). The first book I brought home was the book featuring skirts and coats.

The book is organized with basic sewing how-to first followed by common instructions on how to sew the designs featured in the book. Finally, the designs are featured with beautiful photography. I have to admit I skimmed most of the how-to sewing instruction as I am probably a bit more advanced. There are some photo step-by-step instructions and each design has additional illustrated step-by-step instructions. A beginning sewist would have to flip back and forth several times to get complete instructions.

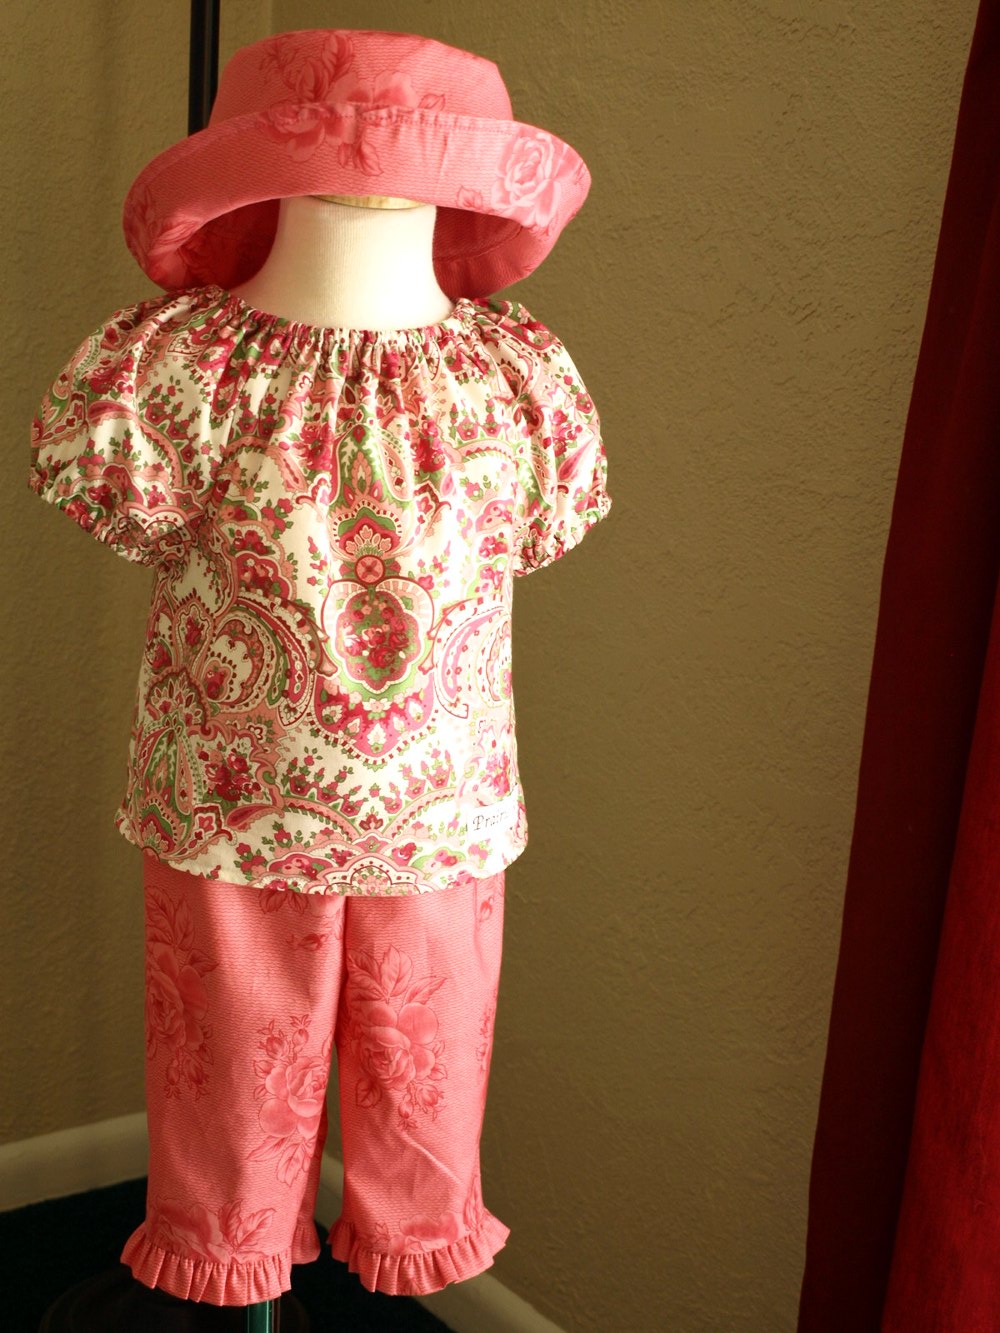
There are three basic designs, a skirt, a tunic/dress, and two jackets. Variations are presented for each design with changes in embellishment, design details, and fabric prints while the basic pattern pieces do not change. I do like the basic shapes of the styles presented, though some of the design details are just not my taste. The patterns are sized XXS to XXL and her measurement chart seems to follow a regular grade, which is nice.

As a pattern maker, I was very pleased when looking at the actual pattern pieces. The line width used on the pattern pieces is very fine, which is so much better than the Big 4. Also, the notches were not the traditional outward V notches but rather slit style notches. I did trace off the tunic pattern and walked some of the pattern pieces and they matched up really well. It is important to read the pattern sheet carefully because there are not a lot of markings other than notches and the piece name. Seam allowances are 1/2 inch unless otherwise noted. In addition, you have to read the instructions for the selected design and the basic how-to for the section. As an example, there is no sleeve cuff pattern piece because it is just a rectangle, but the dimensions are given in the basic how-to section.

A few of the seams needed a bit of refinement, but should not bother most home sewists. One area that will probably cause difficulty is the coat facing. I recommend redrawing the outer facing edge just to make it easier to sew. I think the facing has a sharp inward corner to make it easier when topstitching the facing down, so the facing shape is probably intentional. As an option you can use some other guide while topstitching and still smooth out that shape to make it easier to edge finish. Just my personal preference.


Overall, the book has a nice presentation and the designs are generally appealing. As I mentioned, I did trace off the tunic blouse to sew up but I have to put it off until I get a zipper. So the review is a bit incomplete but I think a beginning sewist will enjoy it.

January 09, 2012

T-shirt pattern quest pt. 4 : Analysis of fit and construction

T-shirt test samples for construction and fit

Here are the results of my first and second pattern test. I had enough fabric to make two shirts. Each shirt revealed problems with my construction and fit. I had added about 1" of extra wearing ease to shirt 1 and that was reduced to 1/2" of extra ease in shirt 2. The pattern was designed with 3/8" seam allowances. This allowed for an 1/8" cut off on the seam edges so that the seams finish at 1/4". I had difficulty in shirt 1 maintaining that cut off allowance, improving on the second.

One thing I did not notice is that this fabric is directional. With napped fabrics, the fabric can look darker or lighter depending on which direction the fabric lays. This interlock is not napped but it definitely looks different in different directions. I had switched the direction of the sleeves on shirt 2 and so there is a color variation. It is subtle and hardly noticeable except in certain light.

Finally, there is an issue with the fit of the armhole, which is just a bit too tight. This creates unsightly wrinkles in the underarm area. I guess I never noticed on the original shirt, but the problem exists there too. So, a bit of adjustment has to happen. I need to lower the armhole a bit and scoop out the front. This means the sleeve will need a bit of adjustment as well. The armholes will no longer be symmetrical front to back, which is how it should be. Anyway, more on that as progress is made.

The shirts are fine and comfortable enough to wear, but a modeled shot may or may not appear on the blog

January 03, 2012

T-shirt pattern quest pt. 3 : Sewing up the first sample


The next step in recreating my favorite t-shirt pattern is to test out some different construction options by sewing up a sample. This sample will also be used to double check fit. I began by testing some binding options on some scraps. I eventually discovered the best method for my machines that gave the best looking results.

Testing binding options for knits

Before stitching the neckbinding to the t-shirt, I stitched one shoulder and overedged one edge of the neck binding.
Sewing a should seam on a t-shirt
In the picture below I am stitching the binding strip to the neck. The binding strip is on top so that I can stretch it as it goes through the machine. The shirt is supported by the table. Don't let it hang down in front of the machine or gravity will do more stretching of the shirt than you intend. I did edge finish one edge of the binding strip by serging. I didn't have enough green thread, so some of it is in black.
Stitching a neck binding to a t-shirt
Next, I followed the same steps in stitching the binding to the sleeve hem edge. These sleeves show about how much I stretch the binding as it went through the machine.

Attaching the sleeve binding

I then stitched the remaining shoulder seam closed through the neckbinding. This means there is a visible seam at the shoulder. This type of shoulder - neckline construction is also visible on the original t-shirt.
Neck and shoulder seam construction
After closing up the second shoulder, attach the sleeves and sew up the side seams. This is the shirt just prior to topstitching. Just fold the binding strip to the inside and topstitch carefully from the right. You can see an example in the first picture of how it turned out, but I'll post a picture of the finished shirt later. I used a regular straight stitch for topstitching. I don't need the neck to stretch to pull it over my head, so it actually turned out fine. My Babylock Evolve does have a chain stitch option, and that is how it should be done. BUT, it takes a good amount of time to switch it over and because of the overly large presser foot, you can't easily see where you are stitching - too much bother. Industrial chain stitch machines look a lot like regular machines. I believe some vintage domestic Singers also have the ability to do a chain stitch, so if you have that option, than use that.

A few last words on the binding. The original shirt had a double fold binding, which is difficult to reproduce at home without the proper folders and adjustments to your machines. The binding I did is less bulky and easier to execute with home sewing equipment and it turned out just fine.

December 05, 2011

Product Review : Cash wallet sewing pattern

Finally it is done. I started this thing clear back in May and it has taken me this long to locate all of the supplies and get it finished.


The wallet is designed with a fabric cover stiffened by interfacing and held closed by an elastic band. The interior envelopes are closed with magnets, with one zippered pocket for change. The inside of the wallet has slots for cards, though I doubt I will ever use it because I would be afraid of them falling out. It's hard to see the slots in the picture below, but there are three in front and back.


Pros: The pattern is rather clever. There were some things that I didn't expect and I initially liked the approach. I like the removable envelopes so that I don't have to carry the whole wallet if I don't need it. And the wallet does fit into my purse (barely) whereas my cheap plastic coupon file from Walmart did not. I like the zippered coin envelope because I always had change flying about when I was using paper envelopes. I expect the fabric envelopes will last far longer than the paper.

Cons: Let me first start with the supplies list. The hardest thing for me to find were the magnets. My local hardware store did not carry magnets with the right width. You really do need to have magnets that are 1/32 inch in width. You can have a larger diameter, but the thinner the magnet, the thinner your wallet. I ended buying some from babemagnet for a reasonable price. The magnet search delayed the project the longest.

I used a hair elastic for the closure, but I think 1/8" elastic would have been a bit better. The hair elastic is already stretching out of shape.

The pattern is clever, but could use some refinements. This is just my inner pattern making voice. My construction of the zippered envelope ended up being very sloppy, partly my fault, but partly not. I think some of the pieces could have been adjusted to incorporate the turn of cloth concept to accommodate the bulky seams.

There are some time consuming processes such as fusing the interfacing to the envelopes which drove me batty. In any event, the same Etsy seller that sells the patterns also sells finished wallets and envelopes. Considering the cost and time involved, save yourself the trouble and buy one already finished. I can't remember the price on the finished wallets but they should retail for more than she is selling them, considering the labor involved. Her Etsy shop is currently on vacation, so sign up for an email notification when she reopens.

DH still won't use the cash wallet or envelopes. I should have picked something more manly for the fabric. He'll probably still pullout the cash he needs and stuff it in his wallet or pocket.

Cost:  The cost ended up being more than I anticipated. The pattern is a bit expensive to buy ($10), and then add in all the supplies and it ended up costing almost $50. Sure, I can customize the wallet with whatever fabric I choose, but I'm not sure it is worth making yourself.

My Fail: I used an iron-on transfer to label my envelopes. I didn't trim close enough around the transfer (fail) and so I ended up with awful looking labels. And the labels are on dark fabric. Doh! Let's not talk about the zipper pocket.

Would I make this again? No. The cost and time consuming construction just doesn't make it worth it to me. I am not sure that I am entirely satisfied with the results, nor am I sure that I want to buy this style again. There are other Etsy sellers selling cash wallet systems and I may explore those. I will use this wallet until it wears out before replacing it with something else.

July 02, 2009

Wedding Dress Alteration: The Whole Picture?

I don't think I posted pictures of the whole dress I recently altered. Here is the top with the alterations marked with pins. Recutting the armhole and adjusting the sleeves was probably the most difficult part of the alterations. The bride really needed a little bit taken in at the back, but that is one alteration I did not attempt. The zipper and lining would have to be ripped out and I had no time for that. The dress shop provided double sided tape to help keep things in place (maybe they knew how poor fitting this dress would be). I recommended the bride go ahead and use it for the gap-osis I would not be able to fix - though I did fix most of it.

Front bodice view of a wedding dress
Here is the skirt. Really, the simplest style of skirt to shorten if needed. Just make the tucks a bit deeper. I probably should have gone ahead and taken 1" off the bottom hem too, but I just advised the bride to buy some heels. The skirt is completely underlined with tulle to help give the skirt some shape and hold the draped tucks.

Wedding dress skirt with draped tucks
The wedding was this last week and the bride was absolutely radiant with joy. She looked lovely and no one was the wiser that a neophyte alterationist did the job. Maybe I will post a picture of the big day once I get the pictures off the camera.

June 16, 2009

Wedding Dress Alteration: The Underlining

Inside view of the lining in a wedding dress
I expected to find boning in a size 18 wedding dress. I think I even put it in my dress, though the style didn't really need it. This dress doesn't have it at all. It does have the addition of padded bust cups - a feature I have not seen before (I would still recommend the bride wear a supportive bra anyway). The bodice and lining have been completely underlined with fusible. The outer fabric has a stiffer woven fusible and the lining has a softer knitted fusible. Click on the picture to get a better view of the inside of the dress. I am still debating on whether the dress should have boning or not. I think if the bride wears a body-shaping undergarment, it will help smooth out any bulges she doesn't want seen. Even so, it looks and fits pretty good in the waist area.

BTW, a common alteration in wedding dresses is to take it in some at the top of the princess line as it goes into the armhole. If this is indeed "common", it leads me to believe there is a grading or underlying pattern fit issue with wedding dress manufacturers. This alteration, plus taking it up in the shoulders, requires the alterationist to recut the armhole and sleeve (if a cap sleeve). A nasty set of alterations, IMO.

July 21, 2008

Product Review: Jacket and Pants set for a child pt. 2

Up next are the pants. I didn't take a picture of the whole pants. Oh well. Here is a closeup of the waistband. The pants have a set-on waist band with elastic only going partway around the waist. The front has a faux fly - typical of this size range. The elastic appears not to be centered correctly - I'll have to look at it again. In any event, this would be a difficult application. The elastic ends are topstitched through the front waistband. I am sure the waist was done this way so that the faux fly would lay flat.

Detail of pant waistband
An inside view of the faux fly. The center front seam is sewn in one operation. No separate pieces here.

Detail of a faux fly on child's pant front
Each pant leg has a patch pocket with velcro closures. Notice that each outseam is also topstitched.
Detail of patch pocket on pant leg
Another close-up of the waist. The elastic is encased in the waist band and not stitched to the top pant edge like the corduroy pants. Because of the fly front, this is probably how the elastic waist has to be done. Still, I don't like the loose edge on the inside.
Detail of construction of elastic waist in child's pant
Guesses about the size can be left in comments here too. Any guesses on the retail price point?

July 17, 2008

Product Review: Jacket and Pants set for a child pt. 1

Do you like these product reviews? Maybe I should call it product analysis? I like to look at how other people are making their products. Children's products, in particular, require a little bit different construction because they are so small.

Up next is part 1 of a 2 part series on a 2 piece set consisting of a yellow jacket and casual pants. It is picture intensive and I didn't want to post it all in one super long post. I won't tell you the size yet. Maybe you can guess in comments? The fabric is what I call a "popcorn" knit. I think the correct classification is pointelle, but I am not sure. Anyway, it is a textured knit and there are some surprising details that I wouldn't expect in a bulkier knit or in this size.

First up is the jacket. Raglan sleeves, pocket with welts, lined hood, separating zipper, and a screen printed image. I wonder how the screen printed image will hold up in the wash? It is probably tricky to get it to "stick" on a textured knit. All of the sleeve seams and hems have a decorative stitch from a coverstitch machine.

An infant jacket with welt pockets, screen printing, and decorative stitching
Here is a close-up of the pocket. I am not entirely sure how to do this in this knit fabric and have it come out so nice. There is no interfacing or reinforcement stitching that I can see. There is the top-stitching around it though.
A close up of welt pockets in a knit jacket
BTW, the pocket is functional.
A functional welt pocket in an infant jacket
The inside of the jacket with the back of the pocket. You can see the pocket extends into the hem but comes just short of where the zipper is located. You can see the zipper is covered with a facing too.
Inside view of welt pocket in infant jacket
The back neck has a facing in a striped knit fabric. Look at that nice curve on the bottom edge of the facing. Hard to do in a knit. BTW, the facing is not necessary. It is purely for hanger appeal. The neck is finished with a "bias" finish out of the striped knit. The hood is nicely lined too.
Neckline finish of infant jacket for hanger appeal
The sleeves are set in flat. The sleeves would have been hemmed first, set into the body and closed under the arm. This is typical in this size range and price point.
Sleeve construction in infant jacket
The seam end of the underarm is tacked down with a straight stitch machine. This is also typical. It prevents the seam from opening back up during wash and wear. You can backstitch with the overlock seam and eliminate this step, but tacking the seam down provides another benefit. It reduces a point of irritation.
Seam allowance tacked down along hem
Next time I will show the pants. If you have a guess on the size, submit it into comments. I think I left enough clues, so it shouldn't be too hard. I welcome any other questions or comments about the review....

July 10, 2008

Product Review: Corduroy Pants for a toddler


I haven't done a product review in a long time. This is an item randomly pulled from my stash, a pair of elastic waist corduroy pants in size 18 months.

There was a time when this heavy-weight corduroy was popular. Is it still popular for boys? Even though this is a heavy weight corduroy, I don't know that this would be very durable. 18 month old kids spend a lot of time on their knees and bums crawling and scooting around. Most are probably walking, but not all the time. Anyway, you can see it has a pieced front leg with a bias piece over the knee. The waist has tunneled elastic.

Corduroy pants for a toddler
Here is a close-up of the knee. Stitching this fabric can pose challenges because it is a thick fabric. BTW, the fabric is cut nap up (smooth toward the waist). Doing this gives a richer, more luxurious look, but also turns the clothing into a giant lint trap.

Extra padding on a pair of toddler corduroy pants
Here is the inside view of the front leg. One thing you could do to add extra value is to line, possibly interface, the knee piece. It would add some extra durability. But maybe people don't care about that when the pants are $5.


This last picture shows the elastic. I imagine the pattern maker and sample sewer spent a lot of time figuring out the correct cut elastic measurement. The fabric weight and tunnel stitching can cause the elastic to stretch out and not recover properly unless you compensate. The elastic is attached to the waist with an overlock stitch, turned to the inside and topstitched. I don't think there is any other way to do an elastic waist in this fabric. Too bulky otherwise.

March 27, 2008

Peasant Blouse Pattern Conquered


There are a few styles that have always perplexed me. The peasant top with an elastic neck and elastic sleeve cuff has always driven me crazy. When I relied on pattern making books to develop the pattern, I would start off with a kimono style. Bad move because it will create a neckline on the bias. On most styles, this will happen by default. But try tunneling elastic into a neckline casing that is on the bias? It doesn't happen. At least not well. Funny thing is, I have a RTW sample with tunneled elastic on a curved neckline. I am fairly certain the factory that sewed it had a set-up with a 1/4" rolled ball hemmer with an elastic feed. Anyhoo. I don't have one of those nifty set-ups.

The secret is that the neckline should be on the straight grain. I received a helpful tip from the blog Just Tutes with her peasant blouse tutorial. I didn't copy her method exactly. I had to study why it works and where her measurements came from. I drafted a peasant blouse off of my basic blocks and my measurements to get the same basic shape as hers. Amazingly, it worked well enough and I just need to grade my pattern for other sizes.

November 05, 2007

Sewing Tutorial - Set-in sleeves

This is my first sewing tutorial for sewing set-in sleeves flat - please forgive the photo intensive entry and anything that is not too clear. Here, I am testing some refinements to my cap sleeve pattern. I am doing the sewing with my domestic Singer 503 (a fabulous machine, btw). The technique is essentially the same on a 4-5 spool serger or industrial straight stitch machine. Some of this is my personal opinion, some fairly standard fabric handling techniques. Please note, my sleeve pattern has no ease.

Start sewing a sleeve with a sleeve cap against the feed dogsPlace the sleeve against the feed dogs, the body on top. Notice that I am using no pins, no basting, and no ease stitching. There is a single notch at the center of the sleeve cap. My sleeve is symmetrical front to back so there are no extra notches to indicate the back or front of the sleeve. Adult clothing would have extra notches, so make sure to match up fronts or backs or you will have a funny looking sleeve.


Hand position for sewing a sleeve without pins Do you see the placement of my hands? My left hand is holding the body and my right hand is controlling the sleeve. This is one of the major differences of industrial vs. home sewing. Home sewists like to pin the two layers together and have everything move together in lock step. With this method I can control the two layers as they move under the foot by ever so subtly pulling or pushing. It takes time, practice, and confidence in your pattern to develop this skill but it is absolutely essential.

Matching notches when sewing a sleeveThis picture just shows that the shoulder seam and the sleeve notch meet up. Another industrial technique is that the operators will tap the foot pedal. Home sewers press down on the foot pedal like they are at the races. But during certain operations, the operator can gain more control by tapping the foot pedal. This can help while going around a curve.


A set-in sleeve sewn flatThis picture tries to illustrate why the sleeve should be next to the feed dogs. If there is any ease (and it should be minimal) the feed dogs will do the work of easing for you. My sleeve has no ease so this picture isn't accurate. If there were ease, it would look something like this on the inside.


View of the sleeve capThis is a view of the top of the sleeve cap. There seems to be a few puckers, but that is a combination of poor lighting and the fabric - a poly-cotton broadcloth. The sleeve cap is actually nice and smooth.


Sew a side seam from waist to sleeve hemStitch the side seam from the waist to the sleeve hem making sure the armscye/sleeve cap seam allowances are turned toward the sleeve. The seam allowances, when turned in the right direction, will fill the sleeve cap and help give it a nice rounded shape from the outside. Some operators will allow the seams to lay in opposite directions (for bulk, they may go in opposite directions, but otherwise they shouldn't).


Finished sewn sleeveThe finished sleeve.

Super Easy Pincushion

Handmade pincushionI was inspired by the Sew, Mama, Sew Blog and The Domestic Diva (an inspiring Blog!) with their 30 Days of Gifts for a handmade holiday. So I jumped in on day 5 - although I am very behind and out of order. I know I will not be able to keep up or do every project. Still, this year will be a handmade holiday and there are some great ideas. All of my projects will be made from that never ending fabric scrap pile. Check out the Sew, Mama, Sew blog for the list and The Domestic Diva for more great inspiration.

My first project was a pincushion. I actually made two. I was in desperate need of a new one. My 15 year old pincushion was just not doing a good job anymore. BTW when I sacrificed my old pincushion to File 13, I found about 50 hand sewing needles inside. I knew I had a lot of hand sewing needles somewhere!

This pincushion comes from Martha Stewart, but there is really nothing to it. Cut out a round circle, run a gathering stitch around the outer edge and stuff. Mine doesn't have the tomato leaves, but rather a button. The Domestic Diva has links to lots of other fun pin cushion patterns and ideas.

October 30, 2007

Stewart Girl's Dress pt. 4

This may be my last or second-to-last post on this subject. I may post some sketches of design ideas that I may want to try this design element - that is if I can work out the construction. Here are some sewn samples from my pattern that may illustrate more clearly my difficulties...

Sew testing a skirt dartIn this first picture you can see how the sample sews up. I am unsure if the dimple at the end of the dart is from my poor sewing or if the dart needs more shaping. I used a poly-cotton broadcloth. The gathers were made by pulling up the bobbin thread.


Skirt pattern piece with a dart and added fullnessHere is the pattern with the seam allowances added.


A closer look at a dart with added fullnessIt didn't occur to me until after I sewed up the sample that the skirt below the dart would now have a bias grain and the area above straight. I think a softer fabric, like a rayon, would gather up beautifully. But sewing the bias of the front skirt to the straight grain of the back skirt would cause all kinds of difficulties. I suppose some of the difficulty could be overcome by putting the entire style on the bias - which would fit the style period of the 1910's. The style requires a skilled pattern maker familiar with working on the bias.

As I said before, I would like to meet the original designer to see how she put this dress together.

October 25, 2007

Stewart Girl's Dress pt. 3

I have made some progress with the pattern. I still believe the greater challenge is coming up with a mass construction technique. No matter how I twist my brain around the style, it still requires hand manipulation of the gathers. So per Kathleen's suggestion, here is what the pattern would look like. I realized after I took the pictures that I had left off the seam allowances for the dart - must add that before sewing up the samples. This is a quick and dirty pattern, and I know it is not production ready. The style is going to work for girl sizes 8-16 and older. Younger sizes do not have (or need) darts in the skirt, although they can be added for a style detail.

Skirt sewing pattern with dart detailsThis is a basic skirt block for a girl's size 10. A style line is drawn on the pattern where the gather detail is to be placed.


Adding fullness to a dart on a skirt patternLines are drawn from the dart point and the style line until they intersect. The skirt is slashed along those lines to the point of intersection. The dart is partially rotated closed. The original style had some fullness in the waist. The dart equivalent fullness only adds about a 1/2" to the waist front. I suspect the original style had more. The original style was probably for an older teenager rather than a young girl. Anyway, slash lines are drawn from the lower dart leg to the hip line (On a full length skirt, the slash lines would go to the hem. For ease, I am only working to the hip line).

Added fullness to a side dart on a skirtSlash the skirt along the new slash lines to the hip and spread to the desired fullness. In this case, I spread for a 2:1 gather ratio. The finished pattern would look something like the one to the left. Like I said, I forget to add seam allowances to the dart opening. If you try this yourself, don't forget to add them.

Fabric samples will have to wait until later - too many pressing projects.

October 19, 2007

Stewart Girl's Dress pt. 2 : Testing the idea

As a continuation from my first entry on this topic, I made up some samples to illustrate the sewing problem. (Click on the images for a better view).

This is how the pattern might look. I suspect the slit would be similar to a dart. The top of the slit is angled upward. I left the bottom of the slit on grain, but it probably should angle down too, making it a true dart, and not a slit.


Sewing a partial seam in skirt with a gather detailThis is how the sample looks sewn. The yellow arrows indicate the direction of sewing each dart if sewn with a 4/5 spool industrial serger with a shirring arm (my sample is not, so this is an approximation). At the end of each dart is a flat spot because of the physical limitation of the foot and shirring arm getting in the way. Even with my straight stitch machine you can see similar problems. On the left, a pretty little tuck and dimple show up. On the right, the flat spot is more pronounced because the gathers can not start at the end of the dart opening. I also ended up with an open seam where I failed to catch one side. I could easily see these sewing errors occur in an industrial setting.

I suspect there may be more to the pattern than I am thinking.

October 18, 2007

Stewart Girl's Dress Patent of 1922

From the USPTO comes a patent filing for a girl's dress in 1922. The claim made by Gladys Matson Stewart is for the ornamental design of the dress, which I found rather difficult to see. Perhaps the ribbon belt? I guess the claim depends on the definition of ornamental design and I find her claim rather dubious. Perhaps if she filed the claim on the basis of how the dress is constructed, then perhaps her claim may be more legitimate. The design of the dress is structural and also very intriguing. I would like to sit down with designer and see how she constructed it. The gather details on the upper skirt sides would be especially difficult to sew in an industrial setting. I have tried in the past to come up with an easy way to do it, but haven't yet. The pattern itself is rather easy to create, its the construction that is the challenge.

The difficulty would be in getting the gathers to start right at the end of the slit and have them evenly distributed across the length of it. The next difficulty is overcasting or serging the seam so there are no raw edges while avoiding unsightly tucks. There is a physical/space limitation in inserting the skirt piece under a gather foot on a sewing machine. The detail would almost certainly require some kind of hand manipulation and would be too expensive for modern manufacturing.

The gather detail on the skirt would not be very attractive on an adult woman unless done in a certain way. It would add weight and attention to an area that most women choose not to emphasize. But a girl's dress could certainly get away with it. As a design idea, the detail could show up in lots of different ways and locations on a piece of clothing. The only road block is coming up with an easy mass construction technique.

Dress from 1922 with a US patent

August 28, 2007

Fussy corners on a slip cover for a sofa


Here is a quick update on my couch slip cover. So far it has come together beautifully. I spent some time perfecting the pattern after pulling it off of the couch and added seam allowances. I managed to cut out all of the pieces and match important stripes (Striped fabric is probably not the best choice on a first attempt, btw).

A corner of a couch slip coverOne thing I learned is that couches are NOT symmetrical. I have a hard time with asymmetry when something is supposed to be symmetrical. Anyway, this back corner doesn't fit, but the opposite one does. This will be an easy fix though.

When I was perfecting the pattern, I should have pulled out my library book. The author has you add extra ease for the tuck in allowance in the corner where the deck and the inside back meet. I didn't allow extra ease and just drew a nice, easy to sew line. You can see the result in the second picture. Funny pulls. This will require a bit more work to fix. I ripped out that inner corner and I will have to add in a tuck-in gusset (which will never be seen).
Inner corner of a couch slip cover.
For the most part, I am fairly pleased with how it fits. The unfinished slipcover has been on my couch for the last few weeks and the most amazing thing is it doesn't move. You know how most store bought slipcovers shift and move the second you sit-down. It requires constant straightening. The extra effort to make a fitted slipcover is worth it!

After I fix those fussy corners, I will just need to do some finishing work and cover the cushions. The project will need to wait until the deep, dark days of winter. Harvest is around the corner and I have to get the garden beds ready.