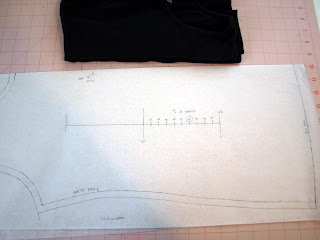
My favorite t-shirt company went out of business and I really loved the fit of their t-shirts. The best solution I could come up with was to recreate the pattern by doing a rub-off of one of the t-shirts. This pattern is for my own personal use, but you will find many pattern makers who do rub-offs of existing styles as a starting point. This is one way to study how another pattern maker developed their pattern. I have done this in the industry too, but the resulting style was not an exact copy and bore no resemblance to the initial style. Copying a style in this way for the sake of reproducing an identical product to sell is another thing entirely.
You can see the resulting shape of the pattern that I rubbed-off or traced. The armhole is symmetrical for the front and back bodices, which is fairly typical for t-shirts. Technically, the armhole should be different front to back and if you have fit issues, this would be one place to adjust. For now, I'm leaving it alone.
The original pattern also had binding on the neck and sleeves. I wasn't sure how to accomplish that and have it look neat on a home sewing machine. I think there may be a way that I'll play with later. At this point, I added seam allowances for a narrow neck ribbing.
Patterns for knits are designed with the amount of stretch AND recovery. The original t-shirt had some spandex, which means it stretches and recovers a bit better than a 100% cotton jersey. The original t-shirt is pretty slim fitting because of the spandex and because it is meant as a layering t-shirt to wear under other tops. I wanted to have a pattern I could use with 100% cotton jerseys, so I plan on adding a bit of extra wearing ease.
I noted the amount of stretch for the original knit fabric on the pattern. The stretch ruler is found in the Armstrong pattern drafting book. I'll target my knit fabric shopping for between 50-60% stretch - just have to remember to take a copy of the stretch ruler. I do have some stash knits but it has taken me over a week to find it. More on that later...
Showing posts with label Product Review. Show all posts
Showing posts with label Product Review. Show all posts
December 12, 2011
December 05, 2011
Product Review : Cash wallet sewing pattern
Finally it is done. I started this thing clear back in May and it has taken me this long to locate all of the supplies and get it finished.
The wallet is designed with a fabric cover stiffened by interfacing and held closed by an elastic band. The interior envelopes are closed with magnets, with one zippered pocket for change. The inside of the wallet has slots for cards, though I doubt I will ever use it because I would be afraid of them falling out. It's hard to see the slots in the picture below, but there are three in front and back.
Pros: The pattern is rather clever. There were some things that I didn't expect and I initially liked the approach. I like the removable envelopes so that I don't have to carry the whole wallet if I don't need it. And the wallet does fit into my purse (barely) whereas my cheap plastic coupon file from Walmart did not. I like the zippered coin envelope because I always had change flying about when I was using paper envelopes. I expect the fabric envelopes will last far longer than the paper.
Cons: Let me first start with the supplies list. The hardest thing for me to find were the magnets. My local hardware store did not carry magnets with the right width. You really do need to have magnets that are 1/32 inch in width. You can have a larger diameter, but the thinner the magnet, the thinner your wallet. I ended buying some from babemagnet for a reasonable price. The magnet search delayed the project the longest.
I used a hair elastic for the closure, but I think 1/8" elastic would have been a bit better. The hair elastic is already stretching out of shape.
The pattern is clever, but could use some refinements. This is just my inner pattern making voice. My construction of the zippered envelope ended up being very sloppy, partly my fault, but partly not. I think some of the pieces could have been adjusted to incorporate the turn of cloth concept to accommodate the bulky seams.
There are some time consuming processes such as fusing the interfacing to the envelopes which drove me batty. In any event, the same Etsy seller that sells the patterns also sells finished wallets and envelopes. Considering the cost and time involved, save yourself the trouble and buy one already finished. I can't remember the price on the finished wallets but they should retail for more than she is selling them, considering the labor involved. Her Etsy shop is currently on vacation, so sign up for an email notification when she reopens.
DH still won't use the cash wallet or envelopes. I should have picked something more manly for the fabric. He'll probably still pullout the cash he needs and stuff it in his wallet or pocket.
Cost: The cost ended up being more than I anticipated. The pattern is a bit expensive to buy ($10), and then add in all the supplies and it ended up costing almost $50. Sure, I can customize the wallet with whatever fabric I choose, but I'm not sure it is worth making yourself.
My Fail: I used an iron-on transfer to label my envelopes. I didn't trim close enough around the transfer (fail) and so I ended up with awful looking labels. And the labels are on dark fabric. Doh! Let's not talk about the zipper pocket.
Would I make this again? No. The cost and time consuming construction just doesn't make it worth it to me. I am not sure that I am entirely satisfied with the results, nor am I sure that I want to buy this style again. There are other Etsy sellers selling cash wallet systems and I may explore those. I will use this wallet until it wears out before replacing it with something else.
March 16, 2010
Dress Design by Hillhouse and Mansfield

I have been looking for Dress Design by Hillhouse and Mansfield (1948) for years. It was a hot item on Ebay at one time and sold for much, much more than it was probably worth. This book has become highly collectible because it contains detailed pattern draping and drafting instructions for 1940's women's clothing design. I found a very nice copy of this book for a mere $2 at a thrift store. I knew if I kept my eyes open at the thrift store, it would eventually show up and I checked the used books every time I was there. Yep, I was quite excited to finally find this!
This book came to my attention in design school. There was an advanced pattern making/theater class that utilized this book as a textbook. The book was, of course, long out of print and the college gained special permission to print special spiral bound copies. Word spread among the design students about this book and copies of the book would sell out before some of the students of that class could even buy their copies. I was never able to grab a copy when I was in school.
You can see from these two pages that the designs are iconic and also complex. It's these two characteristics that makes the books so highly desireable and collectible to people who wish to reproduce a 1940's vintage style. Many of these styles would be difficult, if not impossible, to replicate in a modern factory. The labor charges would be enormous. Regardless, this pattern drafting manual would be a great resource to study and learn from. I have not yet attempted any of the drafting instructions, so I can't comment on the difficulty. For me the book is for inspiration.
December 15, 2009
Metric pattern cutting for children's wear and babywear - 4th Edition

Winifred Aldrich has released an updated edition of her pattern making book. Besides having a much nicer cover design, it reportedly contains a revised organization and emphasis on flat pattern making. I find this change interesting because more and more design entrepreneurs are utilizing flat pattern making today and this confirms my personal experiences in the industry.
From the abstract at Amazon:
Today’s popularity of easy-fitting styles and knitted fabrics means that basic ‘flat’ pattern cutting is used to construct the majority of children’s wear and babywear and this type of cutting is therefore emphasized in this new edition. Shaped blocks and garments, cut to fit the body form, are still included, and are placed in chapters covering some school uniform garments or more expensive fashion or formal clothes.
One primary difference between flat versus fitted pattern making is that the patterns have the same shape for the front and back pieces. For example, the armhole shaping is symmetrical. Creating patterns in this way results in a looser, more casual fit and it is appropriate for a lot of children's clothing. Even so, I see more of a modified flat method in actual use. Patterns are modified so that they aren't quite so boxy and more fitted. Yet, they retain some symmetry between front and back pieces.
June 16, 2009
Wedding Dress Alteration: The Underlining
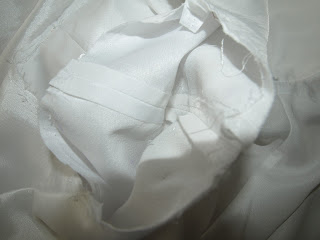
I expected to find boning in a size 18 wedding dress. I think I even put it in my dress, though the style didn't really need it. This dress doesn't have it at all. It does have the addition of padded bust cups - a feature I have not seen before (I would still recommend the bride wear a supportive bra anyway). The bodice and lining have been completely underlined with fusible. The outer fabric has a stiffer woven fusible and the lining has a softer knitted fusible. Click on the picture to get a better view of the inside of the dress. I am still debating on whether the dress should have boning or not. I think if the bride wears a body-shaping undergarment, it will help smooth out any bulges she doesn't want seen. Even so, it looks and fits pretty good in the waist area.
BTW, a common alteration in wedding dresses is to take it in some at the top of the princess line as it goes into the armhole. If this is indeed "common", it leads me to believe there is a grading or underlying pattern fit issue with wedding dress manufacturers. This alteration, plus taking it up in the shoulders, requires the alterationist to recut the armhole and sleeve (if a cap sleeve). A nasty set of alterations, IMO.
June 09, 2009
Correcting the fit of petal sleeves in a wedding dress pt. 1
I have been working on altering a wedding dress. It is, admittedly, a budget wedding dress available for less than $200 imported from China. I am by no means a wedding dress expert, so this little assignment is teaching me a lot about how wedding dresses are made today. There are some things about this dress that I found very interesting and innovative - things I have never seen before. And it is true, I haven't really looked at wedding dresses since my wedding many moons ago. In any event, dresses now have attached petticoats (I had to buy a separate one) and embedded, uh-hum, bust padding. On the other hand, there are some problems with this dress that clearly label it a budget dress, albeit a very pretty dress for the bride. And I should say the budget dresses available now are much prettier than they used to be. They have embroidery with beading, nicer fabrics, and that full, attached petticoat. Much fodder for future blog posts.
I'll show the nice features of the dress later. For now I will show show one of the problems. It is an annoying problem and one I was surprised to find. The dress has petal sleeves, which I have drafted before. I have even had this same problem show up. Can you spot the problem with the sleeves?
 Even though this is on a hanger, the sleeves hang like this on the bride.
 Here is the sleeve off the dress. I not only had to bring up the shoulders, but take the sleeves completely off to recut the armholes. The shoulders and armholes are part of a larger, but separate problem. This picture should give the problem away.

I'll show the nice features of the dress later. For now I will show show one of the problems. It is an annoying problem and one I was surprised to find. The dress has petal sleeves, which I have drafted before. I have even had this same problem show up. Can you spot the problem with the sleeves?
 Even though this is on a hanger, the sleeves hang like this on the bride.
 Here is the sleeve off the dress. I not only had to bring up the shoulders, but take the sleeves completely off to recut the armholes. The shoulders and armholes are part of a larger, but separate problem. This picture should give the problem away.
July 25, 2008
Product Review: Jacket and Pants set for a child pt. 3
Only one person ventured a guess on the size and price point of the hooded yellow jacket and pants I reviewed last week. Jennifer ventured a guess that it would be about $25-30 (AUS) and the Aussie size range of 0000 to 2.
Firstly, it's awesome that an Australian reads my blog! Very cool, this internet blogging thing. Secondly, I acquired this set from a thrift store so I don't know the exact price for which it originally sold. I think this set is private label for JcPenney, but I am not 100% sure. I used to do private label for JcPenney and some other big box stores so the brand looks very familiar.
You would have to look closely to see on the brand tag (partly smeared) was the word layette. Layette sizes normally run 3M-6M-9M or some variation of that (not sure how that translate into Aussie sizes, but probably similar). The set I showed is a size 3M.
Jennifer is probably right with the price point. JcPenney layette price points run about $15-$30 (USD), sometimes a little more. This set was made in China and there is a huge price savings because of cheap labor. A similar layette is available at JcPenney's online store for $20.
The only reason I made a big deal about the price point is because of the amount of detail included in a size 3M. What 3M old child really needs functional welt pockets on a jacket? Such detailing appeals to adults because it appears to add value. But does it really? We like to dress our babies up in clothing similar to ours with all of the same details. BabyGap sells 5 pocket denim jeans for infants too. Not really necessary and perhaps not as comfortable for a newborn, but it sells. Anyway something to think about.
BTW, it would be difficult, if not impossible, to manufacture this item in the US for this price point.
July 21, 2008
Product Review: Jacket and Pants set for a child pt. 2
Up next are the pants. I didn't take a picture of the whole pants. Oh well. Here is a closeup of the waistband. The pants have a set-on waist band with elastic only going partway around the waist. The front has a faux fly - typical of this size range. The elastic appears not to be centered correctly - I'll have to look at it again. In any event, this would be a difficult application. The elastic ends are topstitched through the front waistband. I am sure the waist was done this way so that the faux fly would lay flat.

An inside view of the faux fly. The center front seam is sewn in one operation. No separate pieces here.

Each pant leg has a patch pocket with velcro closures. Notice that each outseam is also topstitched.
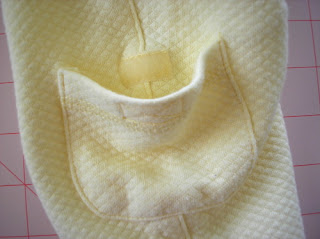
Another close-up of the waist. The elastic is encased in the waist band and not stitched to the top pant edge like the corduroy pants. Because of the fly front, this is probably how the elastic waist has to be done. Still, I don't like the loose edge on the inside.

Guesses about the size can be left in comments here too. Any guesses on the retail price point?

An inside view of the faux fly. The center front seam is sewn in one operation. No separate pieces here.

Each pant leg has a patch pocket with velcro closures. Notice that each outseam is also topstitched.

Another close-up of the waist. The elastic is encased in the waist band and not stitched to the top pant edge like the corduroy pants. Because of the fly front, this is probably how the elastic waist has to be done. Still, I don't like the loose edge on the inside.

Guesses about the size can be left in comments here too. Any guesses on the retail price point?
July 17, 2008
Product Review: Jacket and Pants set for a child pt. 1
Do you like these product reviews? Maybe I should call it product analysis? I like to look at how other people are making their products. Children's products, in particular, require a little bit different construction because they are so small.
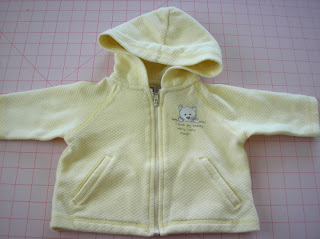
Up next is part 1 of a 2 part series on a 2 piece set consisting of a yellow jacket and casual pants. It is picture intensive and I didn't want to post it all in one super long post. I won't tell you the size yet. Maybe you can guess in comments? The fabric is what I call a "popcorn" knit. I think the correct classification is pointelle, but I am not sure. Anyway, it is a textured knit and there are some surprising details that I wouldn't expect in a bulkier knit or in this size.
First up is the jacket. Raglan sleeves, pocket with welts, lined hood, separating zipper, and a screen printed image. I wonder how the screen printed image will hold up in the wash? It is probably tricky to get it to "stick" on a textured knit. All of the sleeve seams and hems have a decorative stitch from a coverstitch machine.
Here is a close-up of the pocket. I am not entirely sure how to do this in this knit fabric and have it come out so nice. There is no interfacing or reinforcement stitching that I can see. There is the top-stitching around it though.

BTW, the pocket is functional.
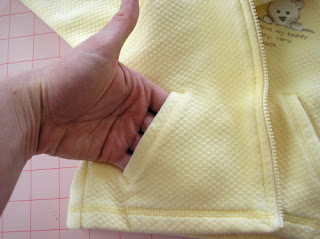
The inside of the jacket with the back of the pocket. You can see the pocket extends into the hem but comes just short of where the zipper is located. You can see the zipper is covered with a facing too.

The back neck has a facing in a striped knit fabric. Look at that nice curve on the bottom edge of the facing. Hard to do in a knit. BTW, the facing is not necessary. It is purely for hanger appeal. The neck is finished with a "bias" finish out of the striped knit. The hood is nicely lined too.

The sleeves are set in flat. The sleeves would have been hemmed first, set into the body and closed under the arm. This is typical in this size range and price point.

The seam end of the underarm is tacked down with a straight stitch machine. This is also typical. It prevents the seam from opening back up during wash and wear. You can backstitch with the overlock seam and eliminate this step, but tacking the seam down provides another benefit. It reduces a point of irritation.

Next time I will show the pants. If you have a guess on the size, submit it into comments. I think I left enough clues, so it shouldn't be too hard. I welcome any other questions or comments about the review....
Up next is part 1 of a 2 part series on a 2 piece set consisting of a yellow jacket and casual pants. It is picture intensive and I didn't want to post it all in one super long post. I won't tell you the size yet. Maybe you can guess in comments? The fabric is what I call a "popcorn" knit. I think the correct classification is pointelle, but I am not sure. Anyway, it is a textured knit and there are some surprising details that I wouldn't expect in a bulkier knit or in this size.
First up is the jacket. Raglan sleeves, pocket with welts, lined hood, separating zipper, and a screen printed image. I wonder how the screen printed image will hold up in the wash? It is probably tricky to get it to "stick" on a textured knit. All of the sleeve seams and hems have a decorative stitch from a coverstitch machine.

Here is a close-up of the pocket. I am not entirely sure how to do this in this knit fabric and have it come out so nice. There is no interfacing or reinforcement stitching that I can see. There is the top-stitching around it though.

BTW, the pocket is functional.

The inside of the jacket with the back of the pocket. You can see the pocket extends into the hem but comes just short of where the zipper is located. You can see the zipper is covered with a facing too.

The back neck has a facing in a striped knit fabric. Look at that nice curve on the bottom edge of the facing. Hard to do in a knit. BTW, the facing is not necessary. It is purely for hanger appeal. The neck is finished with a "bias" finish out of the striped knit. The hood is nicely lined too.

The sleeves are set in flat. The sleeves would have been hemmed first, set into the body and closed under the arm. This is typical in this size range and price point.

The seam end of the underarm is tacked down with a straight stitch machine. This is also typical. It prevents the seam from opening back up during wash and wear. You can backstitch with the overlock seam and eliminate this step, but tacking the seam down provides another benefit. It reduces a point of irritation.

Next time I will show the pants. If you have a guess on the size, submit it into comments. I think I left enough clues, so it shouldn't be too hard. I welcome any other questions or comments about the review....
July 10, 2008
Product Review: Corduroy Pants for a toddler
I haven't done a product review in a long time. This is an item randomly pulled from my stash, a pair of elastic waist corduroy pants in size 18 months.
There was a time when this heavy-weight corduroy was popular. Is it still popular for boys? Even though this is a heavy weight corduroy, I don't know that this would be very durable. 18 month old kids spend a lot of time on their knees and bums crawling and scooting around. Most are probably walking, but not all the time. Anyway, you can see it has a pieced front leg with a bias piece over the knee. The waist has tunneled elastic.

Here is a close-up of the knee. Stitching this fabric can pose challenges because it is a thick fabric. BTW, the fabric is cut nap up (smooth toward the waist). Doing this gives a richer, more luxurious look, but also turns the clothing into a giant lint trap.
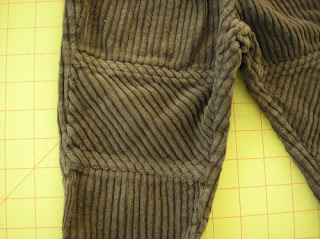
Here is the inside view of the front leg. One thing you could do to add extra value is to line, possibly interface, the knee piece. It would add some extra durability. But maybe people don't care about that when the pants are $5.

This last picture shows the elastic. I imagine the pattern maker and sample sewer spent a lot of time figuring out the correct cut elastic measurement. The fabric weight and tunnel stitching can cause the elastic to stretch out and not recover properly unless you compensate. The elastic is attached to the waist with an overlock stitch, turned to the inside and topstitched. I don't think there is any other way to do an elastic waist in this fabric. Too bulky otherwise.

November 29, 2007
Aldrich vs. Armstrong pattern drafting books


The two most useful (IMO) books for children's pattern making are by Winifred Aldrich
From Tiki:
I've been doing the same, pouring over measuring charts and re-working patterns. My 4 y.o. is my fit model, though, so I do have the luxury (ha!) of dressing her up when I need a fit, but it's by no means easier than having a dress form that won't want to dance around the room while I'm trying to check the fit.If you draft your own versions from each method, I would be interested in hearing your comments. I agree with a lot of what Tiki has said about the ease of drafting Aldrich over Armstrong. Though I prefer Armstrong for some things. I am fairly certain that Aldrich created all of the drafts in her book. I think the points of reference are unique to each draft and can't be used for comparison between drafts. It may make things simpler if they were consistent. Also some of the differences may come down to European vs. American fit and expectations. Europeans tend to fit closer to the body - Americans have a boxier fit.
Thank you so much for your explanation below about the flat patterns. I meant to respond earlier, but then got caught up in the holiday madness. Anyway, after much pondering conceptually over the "right" pattern method, I was encouraged by your explanation, especially that it's the fit that matters, not so much the method for getting there. I know that probably sounds simple and obvious, but since I have no formal patternmaking training, everything is a learning experience and I sometimes get stymied because I want to do everything "right." So I finally put pencil to paper to draft Aldrich's and Armstrong's patterns and compare them to mine. My patterns are a more like Aldrich's classic, although my armhole shape isn't quite as cut out (so my armhole is somewhat in between her flat and classic). I think the shoulder width on her flat block is too wide, but I guess that's part of what creates a boxier fit versus the slimmer fit of her classic block.
I did notice that Aldrich seems to modify the front armhole and lowers the front shoulder slope even in her "flat" blocks for wovens (on the infant woven on p. 25 and on the body/shirt block on p. 39), although it's not as pronounced as in her classic block (on p. 89). And when I cut out my front and back patterns for the classic block and woven flat block, the shape and contrast between the front and back of each are not that different. In other words, the difference in the armhole shape between the front of the classic and the back of the classic is very similar to the difference in the armhole shape between the front woven flat block and the back woven flat block (I laid the fronts over the backs and compared). Of course, the armhole shaping between the front classic block and the front woven flat block are significantly different, as are the back classic and back woven flat. I'm not sure exactly what that means, really, except that she seems to apply the "true" flat (meaning identical front and back except for the neckline) as you suggested to casual knit boxy styles like t-shirts (which she drafts also for older children on p. 45).
One more thing about Aldrich's book that I find confusing. I do prefer her drafting method to Armstrong's (for children, I haven't done anything with either of their adult patterns)--it seems simpler because it uses fewer complicated measurements (I suppose because she makes certain educated assumptions about the slope of the shoulder, etc rather than using actual measurements).
However, her book seems a bit schizophrenic, like several people drafted different patterns and she compiled them into one book. For example, the points (0,1,2,3, etc) are not in the same places in her various patterns--sometimes point 0 is center front and sometimes it is a point just above center front that lines up with the inner shoulder. Then her patternmaking steps are not consistent throughout. Sometimes she measures the width from this point 0 and then squares down and sometimes she measures the width from the center chest and then squares from there. Her patterns all end up with the same basic shape and I found following her drafting instructions for each pattern very straightforward. But I think comparing one pattern to another is difficult because in one pattern point 3 is at center chest and on another pattern point 7 is at center chest and point 3 is somewhere else. Maybe it's just my inexperience, but I found it more difficult when trying to compare, say, the chest width ease from one pattern to another, than if she followed the same drafting steps for each bodice.
I do love both books as they are great at explaining how/where to modify patterns for different styles. And I like having two resources to compare--they are both a wealth of knowledge.
Anyway, here is a brief run down of the highlights (positive & negative) of each book:
Aldrich (third edition)
- Backs up measurement charts with her own measurement studies
- Simpler drafting, though some instructions may be difficult to follow
- Includes Infant sizing and basic infant drafts
- Draft instructions for flat and classic blocks
- The only book that comes close to how things are done in the industry
- The only nitpick I had was the shaping of some of her basic blocks. I agree with Tiki on the shoulder slope, shoulder width and the neckline circumference. These are easy things to adjust once you have a draft to work with. I also did not like her cap sleeve shaping - another thing that was easy to fix.
- Design variations are laid out on separate pages and not squished together like Aldrich.
- Step by step draft instructions
- Easy to read measurement chart, though her chart starts at size 3
- Chapter on knitwear
- Ignores infants
- Sleeve drafts have too much ease
September 12, 2007
Making Children's Clothes by Joan Moloney
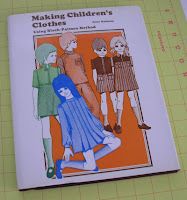 I received my copy of Making Children's Clothes Using Block-Pattern Method (1971) by Joan Moloney
Just so you know, this book has no measurement charts, detailed drafting instructions, or sewing instructions. Think of it as looking on the back of a home sewing pattern envelope. The author shows the pattern pieces that make up a style next to an illustration or photograph of that style. The text is full of ideas but little how-to.
On the positive side, this is one of the few books I have seen that show all of the pattern pieces that make up a complete style. This may help designers who struggle with the complete design. Also, the book clearly illustrates the shapes of the pattern pieces. Sometimes that is all one needs to draft your own version. The illustrations are charming and I will add this book to my collection as a possible source of inspiration.
 The author does describe how to make your own children's dress form, although briefly. Her version made me laugh for a second and then I wondered if I should be scared. It may give you an idea of how to make your own dress form. I did make my own, which I am using now. Children do not have the patience to be fit models for very long - so I do recommend obtaining dress forms at some point. Still, it is worth the time to try clothing on a child because you may notice differences in how the fabric drapes on a moving child.
This is not a must-have book to add to your reference collection. Used copies are available through Amazon for as little as $1 plus shipping so there is really no reason to not add it either.
Labels:
Books,
Design,
Inspiration,
Patternmaking,
Product Review,
Style
July 24, 2007
Boy's dress pants - an analysis
Here is a look at a pair of budget dress pants sized 24M. These were most likely sold by a big box retailer as part of a set that included a dress shirt and vest. They are 65% polyester, 35% rayon, made in Taiwan. Since these were likely sold as a set, it probably is not necessary for them to have all of the same details as an adult pair of pants. I call these pants budget because they would have sold for a low price point and were made from an inexpensive fabric. Still, there are some nice quality features.
 The pants have 4 pleats in the front. 1" cuffs on pant legs. There are no pockets or other trimming details. (Click on the images for bigger close-ups). The front waist band is flat.
 The back waistband has 1.25" stitch through elastic. Most infant/toddler pants or skirts have an elasticized back waist. This age group has a longer front waist than back waist. Combine this with a large seat (padded with a diaper) and it becomes necessary to take up the extra back width of the pant waist with elastic. The elastic is applied with a specialized machine that stretches the elastic while it is stitched on. Be sure to spec out the finished elastic measurement (the measurement of the elastic after it has been stitched). If you don't, the elastic will end up being too big or too small. A quality auditor (or you) should do in-line inspections during production. This is the one area that is the easiest to mess up.
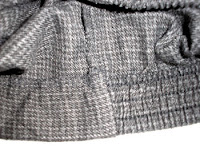 You can see the nice neat finish of the waist side seam. The front waist band is stitched onto the front pant. The back waist has the elastic applied, turned to the inside and top stitched down. Some manufacturers will have a separate back waistband piece, but I like the nice smooth back waistband of this pant. The side seam is stitched by folding the front waistband to the front over the back elastic waist band. When the front band is turned out, the back waist is enclosed. Lower quality pants do not enclose this seam. Even though these pants are budget, the topstitching of the front waist band runs even with the lowest line of stitching for the elastic.
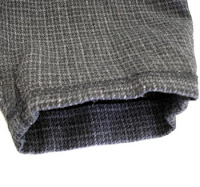 This is the only place where I could find the manufacturer truly skimped. The inside leg hem has a 1/2" hem which is topstitched down. This is a quicker finish than a blind hem and it can be hidden underneath the 1" cuff. To allow for future growth, you can add to the hem depth and do a blind hem instead. I wonder if there are many that would actually take the time to let the hem and cuff down, as simple as it is. Most parents would probably just buy another pair of pants.
May 22, 2007
Clothing for Children: Chapter 3, part 3
Essentials in the Layette
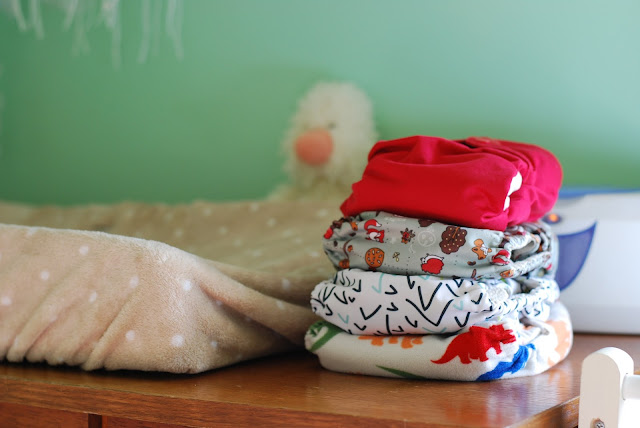
This section discusses what is needed in an infant layette. Diapers are considered one of the most important layette items to have, especially cloth diapers. Disposable diapers were available in 1949 but they were bulky and used mostly during travel. Disposable diapers have certainly improved since 1949 and many people use them. However, do we want to trade convenience for landfills brimming with diapers that don't decompose? It's past time to return to cloth diapers.
I will be the first to admit that I haven't paid much attention to cloth diapers. I have designed special occasion dresses for several years. When I think of cloth diapers, I think of diaper flannel. It's soft and absorbent. But there are many more choices today, not only in fabric but print and design. Suzanne from The Good Mama gave me a rundown of fabrics used in her diapers. Bamboo velour and organic cottons are both renewable resources, and soft, comfortable fabrics. The prints are adorable too.
In 1949 the typical diaper was a large rectangle of flannel fabric that was folded a certain way and pinned on with diaper pins. The diaper was then covered with rubber pants, wool soakers, or water-repellent batiste pants. The authors encouraged limited use of diaper covers because they did not breathe, especially the rubber pants. Wool soakers were preferred because they kept the baby dry and breathed. The wool soakers were made from a knit fabric.
The cloth diapers of today are engineered much better. They have closures like snaps and velcro - no need for diaper pins. They are absorbent and rarely leak, so no need for plastic diaper covers. They are constructed to withstand lots of washing. The fabrics are soft and more durable. The price may be a little higher, initially, than disposables but they will last a long time.
The rest of the chapter discusses all the rest of layette essentials, which is pretty common knowledge.
Labels:
Clothing for Children,
Comfort,
Diapers,
Fashion,
Product Review,
Style,
Trends
May 08, 2007
Clothing for Children - a book review

I just received a book I requested through inter-library loan called Clothing For Children by Henrietta Mary Thompson and Lucille E. Rea. I had seen used copies of this book on Amazon, but I wanted to peruse a copy before deciding to buy. The book is a college level textbook written from the perspective of Home Economists. It was published in 1949, and contains many attitudes and philosophies from the time.
There are many interesting things in the book, which I hope to share with you. One curious chapter (about 75 pages) is devoted entirely to planning the child's clothing budget. It compares what clothing to buy for each age level, gender, and income level. While the numbers are amusing, it is not really of much interest. Does it matter that an urban family with a yearly income of $500 spent $26 a year on clothing for the WHOLE family? Maybe it does. Some of the numbers are surprising, and perhaps low (comparing a Gen X'er to a Baby Boomer). It certainly demonstrates a completely different attitude toward money and a clothing budget. (BTW, I have no idea how to adjust 1949 dollars for inflation and time, so it would be difficult to have a meaningful discussion anyway). It is safe to say that the modern consumer thinks of clothing as a disposable item. How many modern parents buy clothes allowing for growth? Do we really have hand-me-downs anymore? How many of us throw away clothes with treatable stains or repairable tears? As land fills over flow and raw materials become more expensive, perhaps we need to return to this type of thinking.
Here is a breakdown of the chapters:
1. Clothing and the child - psychological theories mixed with lots of opinions.
2. Planning the child's clothing in relation to the family budget
3. The infant - Standards for infants' clothing, safety & health, and other interesting things.
4. The Creeping Age - Design ideas for toddlers
5. Clothing the preschool child (2-6 years) - interesting section on "made-overs" or using adult clothes to make new clothing for children.
6-7. Clothing for the grade school girl and boy
8. Texture and Design
9. Trimmings and decorative stitches
10. Care and storage
Appendix - Factory methods in home sewing, sewing equipment, and some shortcuts.
I will probably cover chapters 3-5 and the appendix. If there is anything else that looks interesting, or perhaps you would like to know more about, be sure to leave a comment.
April 18, 2007
I like Jack Handford's book Professional Pattern Grading!

You know you might be a little strange when you do a happy dance after receiving a new book in the mail on pattern grading. That was certainly me yesterday when I received Professional Pattern Grading
This is the BEST book on pattern grading. If you own the Price/Zamkoff book, just stuff it in a corner and get this one instead. The explanations are very clear and complete. And yes, this is how it is done in the industry. It was so gratifying to see that what I have learned on the job, some of it on my own, IS how it is done. The other book is too complex and ignores men's and children's styles completely. Jack Handford covers all three categories very well. And it is so nice to see that children have not been ignored. He covers infant, toddlers, boys, girls, and juniors.
This book describes manual grading with a paper and pencil. Still the concepts can be applied to computerized grading. Most of my grading is done on the computer and I will be using this book as a reference.
In fact, this book is so good, that I will not be doing my last installment on my grading series (a pictoral demo). Handford demonstrates the process well enough, there is no reason for me to duplicate it. Can I say buy the book? I will probably blog more about grading in the future, so no worries there.
I will be going back over my infant pattern/body measurement charts to see how they compare with Handford's grading. I probably will be making some adjustments. I am not too far along on developing my own infant/toddler patterns, so this is a great time to go back over them.
Labels:
Books,
Grading,
Patternmaking,
Product Review,
References
Subscribe to:
Posts (Atom)


