Showing posts with label Personal Projects. Show all posts

November 07, 2007

Americana Apron from a 1950's sewing pattern

Ok, this is day 7 of the Sew, Mama, Sew challenge of 30 gifts in 30 days. Here is my entry that was supposed to be for day 1. Of course, I made two, because I was in desperate need of a new one. DH used our only apron to carve some elk - let's just say it's not too pretty anymore. From here on out, I am only doing one of each item on the list that I can manage to accomplish.

1950's apronI chose a pattern I had made as a teenager - it came from an old high school Home Ec manual of the 1950s. I loved this pattern as a teenager, but what I failed to realize is that I (ahem) am not a teenager anymore. The original pattern has a cute bib with ties. I am thinking my younger, shorter sister, aka Twiggy, should be able to wear this with no problem. She recently has expressed an interest in cooking, so I will tuck a couple of my favorite go-to recipes in the pocket.

I know that I said most of my gifts would be made from scraps. Well, I purchased this fabric from the thrift store for about $2 and it has been collecting dust in my stash for at least 5 years. I think it counts - plus, this fabric may show up in other scrappy projects.

1950's apron without the bibI left the bib off of my apron, which works just fine. DH says it makes me look like a 1950s housewife. Not sure what to say about that..... Anyhoo, both aprons are trimmed with some left over ribbon along the hem and pocket. And yes, I am wearing socks with my shoes because the mountains are chilly this time of year.....


Homemaking for teenagersHere is the book that I acquired as a teenager. I still love it. I wish modern Home Ec books were so practical about making a home as this one.

Up next on the list for Nov 8th is "Whimsy". I have no idea what I will come up with. I may browse some books at the library for ideas. Whimsical is something I am not so this may be a good design exercise.

November 05, 2007

Super Easy Pincushion

Handmade pincushionI was inspired by the Sew, Mama, Sew Blog and The Domestic Diva (an inspiring Blog!) with their 30 Days of Gifts for a handmade holiday. So I jumped in on day 5 - although I am very behind and out of order. I know I will not be able to keep up or do every project. Still, this year will be a handmade holiday and there are some great ideas. All of my projects will be made from that never ending fabric scrap pile. Check out the Sew, Mama, Sew blog for the list and The Domestic Diva for more great inspiration.

My first project was a pincushion. I actually made two. I was in desperate need of a new one. My 15 year old pincushion was just not doing a good job anymore. BTW when I sacrificed my old pincushion to File 13, I found about 50 hand sewing needles inside. I knew I had a lot of hand sewing needles somewhere!

This pincushion comes from Martha Stewart, but there is really nothing to it. Cut out a round circle, run a gathering stitch around the outer edge and stuff. Mine doesn't have the tomato leaves, but rather a button. The Domestic Diva has links to lots of other fun pin cushion patterns and ideas.

August 28, 2007

Fussy corners on a slip cover for a sofa


Here is a quick update on my couch slip cover. So far it has come together beautifully. I spent some time perfecting the pattern after pulling it off of the couch and added seam allowances. I managed to cut out all of the pieces and match important stripes (Striped fabric is probably not the best choice on a first attempt, btw).

A corner of a couch slip coverOne thing I learned is that couches are NOT symmetrical. I have a hard time with asymmetry when something is supposed to be symmetrical. Anyway, this back corner doesn't fit, but the opposite one does. This will be an easy fix though.

When I was perfecting the pattern, I should have pulled out my library book. The author has you add extra ease for the tuck in allowance in the corner where the deck and the inside back meet. I didn't allow extra ease and just drew a nice, easy to sew line. You can see the result in the second picture. Funny pulls. This will require a bit more work to fix. I ripped out that inner corner and I will have to add in a tuck-in gusset (which will never be seen).
Inner corner of a couch slip cover.
For the most part, I am fairly pleased with how it fits. The unfinished slipcover has been on my couch for the last few weeks and the most amazing thing is it doesn't move. You know how most store bought slipcovers shift and move the second you sit-down. It requires constant straightening. The extra effort to make a fitted slipcover is worth it!

After I fix those fussy corners, I will just need to do some finishing work and cover the cushions. The project will need to wait until the deep, dark days of winter. Harvest is around the corner and I have to get the garden beds ready.

August 03, 2007

Are you a draper or a drafter?

In design school the teachers always told us that some students are natural drapers and some are natural drafters. Some students work better with a pencil and paper and others work better with a piece of fabric on a form. I leaned toward the pencil and paper because I prefer to work with numbers. Draping was was more difficult because it seemed less precise. My brain couldn't wrap itself around the concept of turning a drape into a pattern.

Over time draping has become less difficult, but still a challenge. I am getting a good draping exercise by making a slip cover for my old couch. Newer couches have the over-stuffed arms that curve. My couch doesn't have this and I couldn't find a slip cover to fit. A custom cover is $$$. Why not do it myself (with help from a library book on slipcovers)?

I am draping the cover with a "muslin" of green broadcloth and an old sheet.

Creating a pattern for a sofa slip cover
I just draped the arm and will be moving onto the deck next. This couch has the added difficulty of being a sleeper sofa. We would never have bought a sleeper sofa in a million years but it was given to us and so we use it.

Draping a couch arm for a slip coverThis is the fabric for the couch, a great buy from Wal-Mart. Wal-mart carries upholstery fabric and the price is usually great. BTW, that is our gold rocker. Isn't it lovely?! Unfortunately, the style is too difficult to slipcover and will have to be re-upholstered by a pro.

Upholstery fabric

July 26, 2007

Toddler Sweater Update


I started this sweater project over a year ago and it is still not finished. I finally blocked the pieces -- I doubt it was helpful when the sweater is made of synthetic yarn. One thing I noticed during the blocking process is how different the pieces looked from regular toddler patterns. There are several things I noticed that made me wonder...

Knitted sweater frontThe front piece has a t-shirt, boxy shape. The shoulder length looks too narrow and the front neck drop and width too big. I need to take measurements to see what toddler size this compares too.


Knitted sweater backThe back piece has no curve on the back neck. It is straight. I imagine a back neck curve is difficult to achieve in a knitted sweater. I wonder if this is typical in knitted garments? I don't knit enough sweaters to know. It could account for why the front neck is so big.


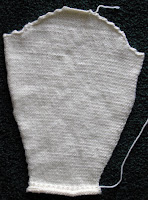
Knitted sleeve patternThe sleeve shaping seems fine, although they do bow out on the sides.


I have read books on knitwear design. One of these days I will draft my own basic knitwear design and try to knit up a sweater. In any event, all that's left on this sweater is to sew the pieces together and knit the neckband. I still haven't decided on the embellishment. Any ideas?

January 18, 2007

CAD 101 published at Fashion Incubator

I am being a lazy cross-poster today. Part One of my co-written articles on CAD can be found at Fashion-Incubator (part two should be published January 19th). My co-writer is Angela from Eve and Ellie. Check out Angela's website - it is beautiful! Kathleen did a great job pairing us up. Not only was Angela great to work with, but we both work with girl's special occasion clothing. My current special occasion work can be seen at One Small Child. Most of my work is technical design, but you can see some of my designs in the mix.

If there is interest, I can expand on some of my CAD drafting, grading techniques, pattern naming, organization, etc. In the mean time I am working on the back-end of my store, which is taking a lot of my time. I have been reading up on CSS, PHP web design and database management (for coding geeks only!). I decided that to truly get the website I want, I need to switch my store manager to something new. This is all behind the scenes and is in the building and testing stages. My current store continues to work and is secure. The new store will be 100% more powerful!

So my grading projects and boys' shirt pattern revision is still in the works, just slowed down. I have my base pattern graded up to my needed size 24M. And guess what! The neck measures a little over 12"! Now it is only a matter of applying that neck to the shirt pattern.

In other news, the consumer product safety commission has issued recalls on more children's jewelry, rattles, teethers, and magnetic toys. Be sure to read this page!

December 04, 2006

Knitting a toddler sweater and a book review


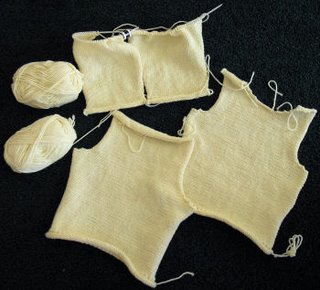
My current personal project is this toddler sweater. I obtained the yarn from a local thrift store. It is a soft, creamy yellow synthetic yarn and surprisingly very soft. There is enough yarn to make not only a sweater, but also a hat and mittens. I am currently working on the sleeves. I like to knit both sleeves at the same time so they both turn out exactly the same. Shouldn't be much longer and I will have this finished up.

Knitted sweater pieces for a toddler sweater

The pattern came from the book The Knitter's Handy Book of Patterns by Ann Budd. I love this book! You just choose your yarn, needles and knit a gauge swatch. Once you know your gauge, you use her charts to knit up a sweater. The sweater is rather plain and I would like to add some embroidery to dress it up - just not sure what yet.

I don't have an intended recipient for this sweater - it will probably go to charity.

August 03, 2006

Sew What? Sewing a VW Convertible Bug Top Cover

VW Bug Convertible
This VW Convertible Bug looks better than the one I made!

I am sure many of you who sew have had this exact reaction to a sewing request. In this case, one woman named her company Sew What? Inc. Megan Duckett started a business sewing draperies. Her employment sewing for a theater company is how she decided on a company name. The complete story can be found at U.S. News and World Report, July 31, 2006 edition.

I am always impressed by women who start sewing related businesses. Megan even ran her company out of her garage for a time. What an inspiration! For more info about Megan, check out her website Sew What Inc.

My blog entry is not really about Megan's company, but about those Sew What?! moments. For Megan, she was asked to sew a lining into a coffin for a theatrical production. I have had many Sew What?! moments, but one stands out. I was asked to sew a vinyl car top cover for a convertible VW Bug.

Yes, I took this job. I knew I wouldn't make any money from the project, but it was the challenge that grabbed me. This was during college and I thought I could sew anything (I still think that, provided I have the right equipment). During college, a friend of mine bought a convertible bug. It had no cover. He welded a frame together and then asked me to sew a top together. I had an average home sewing machine and a lot of ambition.

With a budget of $60, I purchased some black vinyl, extra large snaps, and some clear vinyl (for a rear window). The only equipment purchase I made was some teflon coated needles in size 18 and a snap kit. This fabric was very thick. I have to say my initial pattern actually looked very good. The execution is where I had trouble.

This is one of those instances where a walking-foot machine would have come in handy. Instead, I sewed this thing together with my Singer 503A. For all of those Ebay sellers out there that claim this machine can sew through 4 layers of vinyl, well they are half right. It will do it, but it may not look very good. This is a tuff little machine and I really pushed it to the max sewing this together. The seams were overlapped on top of each other like a lapped seam, but the material slid and stretched as it went along. In any event, I finally finished it.

The top was attached to the car with the snaps. The snap kits available in the fabric stores are not really designed to go through heavy-weight vinyl or to be glued onto a car surface, but somehow we got them attached. Despite our efforts, this car was not really safe to drive with a home-made car top. I could just see it fly off at 25MPH. My friend ended up using the car top for rainy days while it was parked. He also bought a real vehicle that was safe to drive.

June 18, 2006

Making a dressform pt. 6 : More dressform pictures!

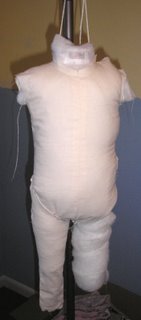
I realized I should have posted picts of what my form looks like under the dress. So here they are. At this stage I was still trying to figure out the top cap piece. All that is left is adding the tape to indicate the waistline and ankle. These pictures aren't great. In the top one, it looks like the shoulders are uneven. I think the form was still swinging when I snapped the shot. In the second, it looks like the form's legs are angled toward it's support. I think I was holding the camera at a funny angle. It does hang straight and even....

June 16, 2006

Making a dress form pt. 5 : Finished!


When I started this project, I assumed it would be rather simple. Draft a pattern with no ease and stuff it. Instead, I had to adjust my pattern many times. Plus I had to solve problem of creating an inner structure and stand. Wow, it was a lot of work!

I am generally pleased with how my form turned out. As in all experiments there are many lessons learned. The first, the form companies are charging a fair price. I saved money in materials, but it took me a lot of time and two attempts to get my form right. Second, my form may have a short life. Not all of the materials are the most durable. I imagine I will have to do repairs in the future. Just in case I decide to do this again, I am keeping my patterns!

Earlier I had posted about Aldrich's neck-base measurement being too big. I ended up not altering my form pattern - forgetfulness on my part. I still think her measurement is still a little too big, but as you can see my dress does fit. My earlier problems were from over-stuffing. I kept tight control of the stuffing of my final form.

Someday, I will purchase a real form. For now this one works well. It matches my measurement requirements fairly close. And it does fit my dress!

June 06, 2006

Making a dress form pt. 4 : padding the form with batting

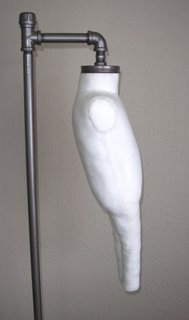
From the picture below, you can see I have made some progress. I have started to pad the papier mache form with batting. I used my original draft from my first form and modified a few seams. In this picture I am trying on the leg - it needed further adjustment, along with the front torso. I also took note on what areas needed a bit more padding. The form is suspended from the stand by a cotton yarn. I will be putting weights into the bottom of the legs to help give it more stability. Already, this version is much better than my previous one, but still not as good as the professionally made forms.

May 27, 2006

Making a dress form pt. 3 : Starting with a good base

I hit upon a bit of inspiration while searching the net for info on how to make a dress form. I kept running into the terms papier mache. The professional forms have a papier mache center. At Vintage Sewing (link no longer works) there is a demonstration on how to pad your own form.

Papier mache is a simple medium to work in, just messy. I bought an all vinyl doll to use as a base. It has smaller measurements than I need - which is perfect to later pad it out. I pulled the doll apart, sprayed it with oil and wrapped plastic wrap around the body. Next, layers of paper and glue. I then cut it off the body and slashed and spread it apart to get better proportions. More layers of glue and paper....

I have the body, done and I am now working on the legs. No pictures yet, but soon. Hopefully, I can start doing the padding next week!

May 18, 2006

Making a dress form pt. 2 : How to suspend it and checking measurements

I made some more progress this week on my infant dress form (sized 3mo). I created a stand from bits and pieces from the hardware store and spray painted it to make it uniform. I love my stand! The form, on the other hand, has presented some problems - ones I am not quite sure how to work out.


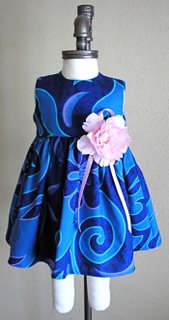
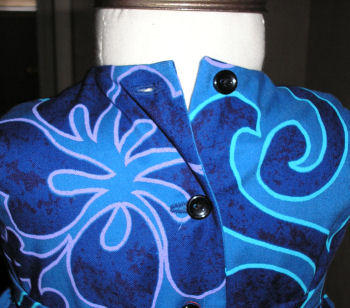
From the front, the form actually looks ok. The dress is one of my Hawaiian dresses, sized 3 mo. I know this dress fits because I have tried it on children. It may be hard to tell in these pictures, but my first problem is the neck size. I drafted my pattern from Aldrich's measurements. Her neck base is at least 1" larger in circumference than all of my other size charts. IMO, it is too big and I will be making it smaller in my next draft. The neck of my dress is on the small side, however, and I will be adjusting it in my next line, although not much. When I did my fittings, the moms actually commented on how the neck fit better than most RTW (which are usually too big!).


In these pictures, you can see how my form swings out from the bottom. The only adjustment I can think to make is to drop the back of the neckband at least 1/4", thus pulling the form into a straigher line. You can see how this may cause problems with checking the skirt.

You can see how large the neck size of my form is in comparison to my dress in this picture.


Another BIG problem is my measurements are all off. The girth measurements match a 12mo. The vertical trunk measurement matches a 6mo. I drafted my pattern in a 3mo with no ease. I can only assume that my measurements were thrown off from the fabric stretching while stuffing. This is probably why the professional forms use a heavy-weight linen fabric.

I think this project still has potential, but it is back to the drawing board. Plus, I need to try and find a medium/heavy-weight linen. I would appreciate any suggestions that you patternmakers may have out there?!

My other big project is designing my Fall/Holiday dresses. I am thinking about some red silk holiday dresses, just need to order some fabric and try not to fall too behind...

May 10, 2006

Making a dress form pt. 1 : Start by drafting a pattern

Dress forms are expensive - at least the ones used in the industry. You can purchase retail display forms but they will not hold up in the work room. The average professional form averages $1,000. Not many of us have that much cash laying around and I certainly do not. I began to think about making my own dress form. This is an idea that I have seen floated around in vintage sewing books. One of my previous employers also did the same thing and it made me wonder if  I could really do it.

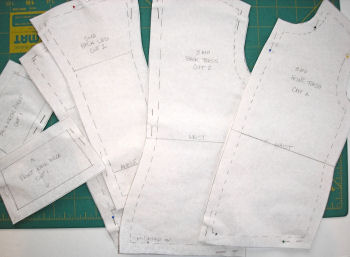
Well I plunged in and drafted Aldrich's classic bodice using metric measurements without ease (size 3mo). I then drafted her sleep-suit block without ease. I had fairly good pictures of a child's full body dress form, so I used that picture to create a more anatomical form. I added shaping for a tummy and rear end. I added 1/2" seam allowances. Here are some of my pieces:


I have already sewn most of it together and stuffed it. I have already discovered some further pattern adjustments for the future. Especially the seam between the front leg and front torso. You can see the wrinkles in the picture below. I think I will angle this line more. The second thing I learned is that to get a truly smooth, surface, you need to create a cardboard body to put inside. I managed to find a piece of lightweight cardboard to put into the torso. I wrapped the cardboard in some pieces of batting and it made a huge difference. Next time, I will add some cardboard tubes to the legs and use a heavier weight of linen, like the professional forms. In this test form, I used muslin. So far, I am fairly pleased.


I have to finish sewing on the armhole pieces and finish up the neck. And then I have to figure out how to suspend this form. I will likely have to create my own stand...